Symptoms of a problem
Although the input shaft support bearing is an inexpensive part, replacing it is a labor-intensive process. And this is connected not so much with the difficulty of dismantling the rolling unit itself, but with the need to remove other parts and assemblies of the engine. To avoid wasting hard work, bearing failure must be correctly diagnosed. Signs indicating this type of malfunction:
- Noise coming from a running engine when the clutch is depressed. A similar rustling or rustling noise also appears when the release bearing fails. And if the noise from the latter is detected even with slight pressure on the petals of the spring diaphragm of the clutch basket, then the gearbox support bearing will make extraneous sounds only when the clutch is completely disengaged.
- Wear or jamming of the bearing due to lack of lubrication leads to the fact that the input shaft of the gearbox is subject to the action of torque even while the driven disk is completely removed from the flywheel. In fact, this manifests itself with the same symptoms as with a clutch that “drives” - it is difficult to engage first gear when starting from a stop, jerks appear when changing gears while moving, etc.
- An irregular knock that appears from the gearbox indicates destruction of the bearing cage. In this case, the balls can spill out or clump together, causing an unpleasant sound and causing an imbalance in the crank and gearbox input shaft.
The latter happens rarely and indicates that the driver did not pay attention to noise and other signs of malfunction for a long time.
Troubleshooting
The average bearing life of a VAZ 2107 axle shaft is 100–150 thousand kilometers. However, this does not mean that it cannot last longer or will not fail much faster, especially if the car is driven on roads with poor surfaces.
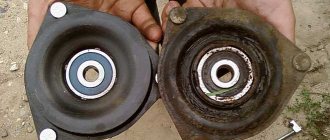
A bearing is considered faulty if it is worn out or has mechanical damage. It is impossible to accurately diagnose this without dismantling the axle shaft. Typically, the consequence of bearing failure is:
- hum and grinding noise when the wheel rotates;
- heating the central part of the drum;
- the appearance of play on the wheel.
If, when driving on a flat road, a hum is heard from the rear wheel, the frequency of which changes as the vehicle speed changes, the bearing is faulty. The appearance of a hum is not a critical sign and indicates the initial stage of bearing wear. In this case, you can go on your own to a garage or car service center, where you can replace it.
Heating the central part of the drum
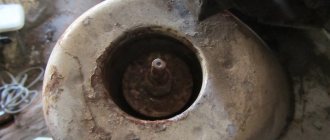
Failure of the axle bearing can be determined by the temperature of the drum. You need to drive a few kilometers and then touch its central part with your hand. If the bearing is faulty, the surface will be warm or hot. As a result of wear of the part, the friction force increases, the axle shaft and its flange heat up and transfer heat to the drum.
Grinding
The appearance of a grinding noise from the wheel side may be a consequence of wear of the brake pads and drum, destruction of the parking brake mechanism, etc. However, if it was preceded by a hum and heating of the drum, then the axle bearing is very likely to fail or even completely collapse. In this case, the movement should not be continued, and the bearing should be replaced.
Wheel play
The appearance of play in the wheel can be evidence of a bearing failure. To identify the problem, the wheel is suspended using a jack, and attempts are made to loosen it by hand. If the disk is properly secured and the bearing is in good condition, the wheel should not wobble. If play is detected along its horizontal axis, the bearing is faulty and needs to be replaced.
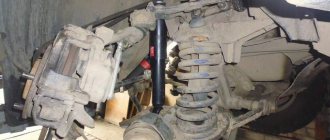
Important points
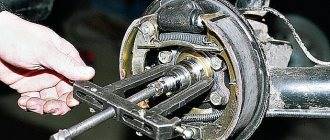
You need to be very careful when cutting off the old bearing with a grinder so as not to touch the axle shaft itself. It is best to cut off only the outer ring of the bearing and the cage with a grinder
Only a few small cuts (not through) should be made on the inner ring. Then you can insert a chisel into these cuts and, with a few careful and precise blows, split the inner ring of the bearing without touching the axle shaft.
The new bearing cannot be placed on the axle shaft without effort. In fact, it will have to be stuffed onto the axle. But in no case should you use only a hammer for this, since there is a high risk of distortion and damage. The best way is to take a piece of pipe whose diameter is slightly larger than the diameter of the axle shaft, and use it to seat the part in place. Some car enthusiasts heat the bearings and place them hot on the axle shaft. This really makes it easier to fit the new part because all the metals expand when heated. But it is strictly forbidden to install bearings in this way, since when this part is heated and subsequently cooled in air, it may anneal (that is, heat treatment, which consists of heating the steel to temperatures below critical, followed by slow cooling). Annealing will reduce the hardness of the bearing several times and increase its ductility, as a result, its service life will be reduced significantly.
Replacing a bearing is a difficult task, but it can be done. The main thing here is to avoid damage to the axle shaft when cutting off the bearing and distortions when installing a new part
In addition, you should take into account the fragility of the bearing rings and use the hammer with extreme caution. Otherwise, the procedure is quite within the capabilities of even a novice car enthusiast, who, by doing it with his own hands, can save a significant amount
↑ How to remove the front suspension wheel bearings
Unscrew the hub nut and remove the washer and inner race of the outer bearing.
If necessary, if the outer bearing cage is damaged along the way, we do not press out the outer ring of the bearing, but replace only its inner part. However, at the first opportunity we install a completely new bearing.
Carefully, trying not to damage the cuff, remove the hub together with the brake disc from the steering knuckle axis.
Using a 12mm wrench, unscrew the two guide pins and remove the brake disc and spacer ring from the hub.
We clean the inner cavity of the hub from old lubricant, wash all parts with kerosene and add fresh lubricant.
To remove the outer race of the outer bearing, secure the hub in a vice.
Using a beard, trying not to damage the hub, we hit the perimeter of the outer ring of the bearing and knock it out of the hub.
We take out the hub cuff by prying it off with a screwdriver.
A spacer bushing is installed under the cuff.
We remove the inner bearing from the hub in the same way as the outer one.
When is it necessary to replace the VAZ 2107 axle bearing?
Constant loads and driving on uneven roads contribute to rapid wear of the device. In this mode, the rear axle bearing of the VAZ 2107 can fail at any time.
In this case, the signs of its malfunction are as follows:
- Extraneous noise appears while driving a car. It is very difficult not to notice unnecessary sounds - they tend to intensify during acceleration;
- the product jams and stops rotating;
- the bearing is damaged (deformed) and several balls fall out of it.
In the cases mentioned above, it may be necessary to replace the bearing of the VAZ 2107 axle shaft, and sometimes the axle shaft assembly itself.
How to remove the rear axle axle shaft of a VAZ 2106
Repair work to replace the axle shaft on a VAZ 2106 should be carried out in cases where, when driving a car, there is increased noise from the rear wheels, which will be felt not only when the car moves in a straight line, but also when turning, as a rule, when increased noise occurs, the backlashes increase accordingly , both axial and radial.
To replace the rear axle axle shaft of a VAZ car, you will need a wheel wrench to remove the wheel and a socket with an extension to “17”. If everything is there, you can start repairing, and for this:
- After unscrewing the four fastening bolts, remove the wheel from the car, then remove the brake drum.
- Now you need to turn the flange to such an extent that the large holes on it coincide with the two nuts securing the brake flap, unscrew the nuts and then turn the flange to the next two nuts and unscrew them in the same way. Unscrew the nuts and remove the spring washers.
- Take the brake drum in your hands and secure its outer end to the flange with two bolts, tighten the bolts by hand.
- Hold the brake drum firmly and with a sharp movement pull out the axle shaft not completely, unscrew the two bolts and disconnect the brake drum from the flange.
At this point, the removal of the rear axle axle shaft of the VAZ 2106 is completed, replace the old axle shaft with a new one complete with bearing and install it in place in the reverse order of removal.
remladavaz.ru
Procedure for bearing replacement
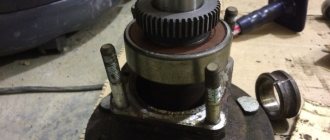
To get to the faulty unit, you will have to remove the gearbox, clutch and flywheel. Carry out similar work on a lift, pit or overpass, using a special crankshaft bearing puller (a device for pressing out of blind holes).
Crankshaft bearing puller
The replacement procedure is as follows:
1.First, disassemble the crankshaft bearing removal tool into its component parts, otherwise you will damage the thread when installing it. After this, lubricate the conical protrusion on the puller bushing with engine oil or grease - this will protect its surface from damage.
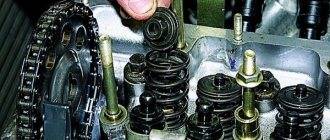
2.Install the press-out spacer sleeve into the inner race of the bearing and drive the device in until it stops.
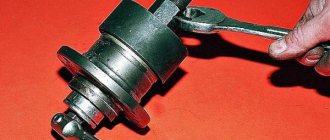
3.To remove the bearing from the crankshaft, do the following. First tighten the puller screw by hand. Then, holding the press-out sleeve from turning with a 14-point open-end wrench, tighten the screw with a 17-point socket. Resting against the blank wall of the hole in the crankshaft flange, the shank of the device moves out of the coupling, pushing it along with the bearing out of the socket.
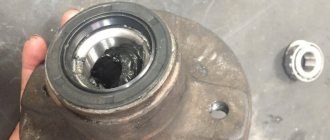
4. Having removed the damaged part, wipe the seat in the crankshaft from dust and lubricate it with engine oil. Don’t forget to check and, if necessary, replenish the amount of lubricant in the new bearing - manufacturers often sin with excessive efficiency.
5. When installing the new VAZ 2107 crankshaft bearing in place, make sure that it does not warp. The final pressing is carried out with a hammer and a suitable mandrel. If one is not found, then use the dismantled unit or hammer the bearing with a hard rubber mallet.
6.Installation is complete when the top plane of the bearing is flush with the flange.
If you are unable to find a press-out, do not despair. Every experienced auto mechanic knows how to remove a bearing from a crankshaft without a tool. In this case, you will need: a drift with a diameter of 15 mm (you can use a suitable bolt) and plastic material - lithol, plasticine or bread crumb mixed with sawdust. It is placed through the opening in the inner race in such a way as to fill the space under the bearing. Then a drift is inserted into the hole and hit with a hammer. Expanding to the sides, the soft mixture squeezes the bearing out. This way you can replace the faulty unit and avoid troubles in the future.
Something else useful for you:
- How to replace the rear crankshaft oil seal of a VAZ with your own hands?
- How to replace the front crankshaft oil seal of a VAZ yourself?
- What are the types of engine knocks, causes, diagnostics?
Removing and replacing the axle shaft on a VAZ-2107, VAZ-2106 and any classic
Dear friends, today we will tell you how to remove and replace the axle shaft on a classic on your own. This procedure may be necessary if the bearing on the axle shaft has failed, or, even worse, its seat has worn out (in the first case, you can limit yourself to replacing the bearing and retaining ring), if you have a leaking axle shaft seal, or the axle shaft itself has become octagonal, such happens too. Remember about safety precautions, insure the car, do not rely only on the jack, also protect the car from arbitrary rolling with a shoe. To begin with, we recommend loosening the tension on the handbrake cable; this will make the work easier later; we will have time to tighten it after assembly. So, we hang up the required wheel with a jack, remove the wheel itself and proceed to dismantling the brake drum. You need to unscrew two guide pins, these:
There are times when it is problematic to remove it, it has become sour or stuck; we read about problems with removing the brake drum on a classic here . For convenience, we hung the rear axle “stocking” itself on the jack, like this:
The drum is removed, we remove the pads themselves, first we disconnect the springs from the pads like this, prying them with something like a strong screwdriver
then we clamp the locking pins holding the block and turn the cup to disengage them from each other
We remove the handbrake cable from them, which we previously loosened, and put the pads aside:
Now we need to unscrew the four nuts that secure the axle shaft directly, in the seat itself on the axle shaft there are two holes for this, unscrew the nuts one by one. If the head does not fit into the hole, remove it from the key and first place the head on the nut and only then insert the key itself through the hole and secure it with the head.
Then we carefully pull the axle shaft out of its seat and see the following picture:
If we also need to change the axle shaft seal itself, we pull it out from there with this tool:
then we take a new oil seal, lubricate the working edges with lithol and hammer it into place with a suitable mandrel or head:
Then we pick up a new or restored axle shaft
and put everything back together in reverse order:
We put our drum in place, having previously lubricated the surface of the ring with graphite, with which it comes into contact and is centered with the axle shaft.
That's all, so we learned how to remove and change the rear axle shafts on our VAZ classic ourselves. If you have any questions, ask them in our VAZ classic club on the forum .
Adjusting the VAZ rear axle gearbox
If the main pair in the gearbox is worn out, it must be replaced. But you can’t just put the gears back in place; the gaps in them must be adjusted. In total, two types of basic adjustments are made:
- The thickness of the adjusting sleeve (washer) is selected for the shank (drive gear). The washer can have a thickness from 2.6 mm to 3.5 mm;
- The gap between the gears of the main pair is adjusted using two adjusting nuts of the differential housing.
The washer for the shank is selected in such a way that the shaft with the drive bevel gear rotates in the gearbox housing without backlash with a force by hand (0.3-0.4 kg). In this case, the shank nut should be tightened with a force of 12 to 26 kg, usually 18-19 kg are tightened.
After installing the shank, the differential housing with the planetary gear attached to it is put in place. The housing is secured with two covers (4 bolts, a knob with a 17mm head). The adjusting nuts are tightened from the sides of the bearings, the differential is installed so that there is play between the gears of the main pair, and the planetary gear should not be clamped. By moving the adjusting nuts to the right and left, the shank gear is brought to the planetary gear. By adjusting, you select the moment when the gap between the gears practically disappears.
The last stage is to adjust the preload of the differential bearings; the adjusting nuts are tightened from the sides. This work must be done with an indicator; the device should show from 0.14 to 0.18 mm, the gap between the gears should be within 0.08-0.13 mm. After the operation, the adjusting nuts are fixed with plates so that they do not turn.
It should be noted that adjusting the VAZ rear axle gearbox is a very difficult matter, and it is better to trust it to professionals.
↑ Description of the rear axle design
↑ Rear axle beam
The rear axle of the car is made in the form of a hollow beam, to the ends of which flanges with seats for axle shaft bearings and holes for attaching brake shields are welded.
In the middle, a main gear reducer with a differential is bolted to the beam, and on the flange side, two axle shafts are inserted into the beam, transmitting torque from the gearbox to the rear wheels.
The rear axle of all “classic” VAZ cars (except all-wheel drive models) is unified and, depending on the model, can be equipped with a gearbox with a gear ratio of 3.9 or 4.1.
↑ Rear axle gearbox
The drive and driven gears of the gearbox are selected in pairs and if at least one of them is damaged, they are replaced as a set.
The drive gear is mounted on two tapered roller bearings, and an elastic spacer sleeve is inserted between their inner rings. When the nut on the pinion shank is tightened, this bushing is deformed, providing preload to the bearings.
Location of gear ratio marking on the driven gear of the rear axle
An adjusting ring is installed between the drive gear and its bearing, which determines the axial position of the drive gear.
↑ Differential
The final drive gear is bolted to the differential housing, which is mounted on two tapered roller bearings. The preload in these bearings, as well as the amount of clearance between the teeth of the drive and driven gears, are adjusted by ring nuts screwed into split bearing beds.
What bearings to put
When a wheel bearing requires replacement, the question immediately arises of which part to install. Many people advise using original components. However, today the quality of parts leaves much to be desired and the issue of choice remains quite relevant.
Table: type, installation location, and size of bearings
| Installation location | Bearing type | Size, mm | Quantity |
| Front wheel hub (outer support) | Roller, conical, single row | 19,5*45,3*15,5 | 2 |
| Front wheel hub (inner support) | Roller, conical, single row | 26*57,2*17,5 | 2 |
| Rear axle shaft | Ball, radial, single row | 30*72*19 | 2 |
Manufacturer's choice
When choosing a manufacturer of a wheel bearing for a VAZ “Seven”, we can recommend SKF, SNR, FAG, NTN, Koyo, INA, NSK. The companies listed have many locations around the world. These products are of high quality and meet the most stringent requirements.
The choice of bearing manufacturer should be given special attention, since the service life of the product depends on this
Among the domestic manufacturers that supply bearings for cars of the Togliatti plant, we can highlight:
- CJSC "LADA Image" - manufactures and sells original Lada wheel bearings through secondary markets;
- Saratov plant - produces parts under the SPZ brand;
- Volzhsky Plant - uses the Volzhsky Standard brand;
- Vologda plant - sells products under the VBF brand;
- Samara plant SPZ-9.
Front wheel bearing "six"
The main purpose of wheel bearings is to ensure uniform rotation of the wheels. Each hub uses two single-row roller bearings.
Table: parameters of VAZ 2106 wheel bearings
| Wheel bearing | Options | ||
| internal diameter, mm | outer diameter, mm | width, mm | |
| outer | 19.06 | 45.25 | 15.49 |
| interior | 26 | 57.15 | 17.46 |
The hub bearings last about 40–50 thousand km. When installing new parts, they are lubricated for their entire service life.
Malfunctions
A broken wheel bearing can cause an accident. Therefore, their condition must be periodically monitored and any extraneous sounds or unusual behavior of the machine must be responded to in a timely manner. If play is detected, the elements need adjustment or replacement. The main symptoms indicating problems with the wheel bearings are:
- Crunch. Due to the destruction of the separator, the rollers inside the device roll unevenly, which leads to the appearance of a metallic crunch. The part must be replaced.
- Vibration. If the bearing wears too much, vibrations are transmitted to both the body and the steering wheel. Excessive wear and tear may cause the product to jam.
- Pulling the car to the side. The malfunction is somewhat similar to incorrect wheel alignment adjustment, which is caused by the bearing getting wedged.
How to check a bearing
If you suspect that the wheel bearing on one side of your car is faulty, you should follow these steps to check its functionality:
- Raise the front wheel.
- We place a stop, for example, a stump, under the lower arm, and then lower the jack.
- We grab the wheel with both hands at the top and bottom and try to tilt it towards and away from us. If the part is working properly, then there should be no knocking or play.
Video: checking the wheel bearing on the “six”
How to adjust
If increased clearances are found in the bearings, they need to be adjusted. Tools you will need:
- jack;
- chisel;
- torque wrench;
- head at 27;
- hammer.
The sequence of adjustment actions is as follows:
- Raise the front of the car and remove the wheel.
- Using a hammer and chisel, knock the decorative cap off the hub.
It is recommended to replace the hub nut with a new one when adjusting the bearing, since the fasteners may end up in the same place and it will be impossible to lock it from turning.
Bearing replacement
During the operation of the bearings, the cage, rollers and the races themselves wear out, so the part must only be replaced. To do this, you will need the same list of tools as when adjusting the clearance in the bearings, plus you also need to prepare:
- key for 12 and 27;
- beard;
- head at 17;
- knob;
- flat screwdriver;
- Litol-24 lubricant.
We carry out the work as follows:
- Raise the front of the car and remove the wheel.
- We remove the brake pads and caliper. We fix the latter in the wheel well to prevent tension on the brake hoses.
Video: replacing the wheel bearing
Which to choose
Owners of classic Zhiguli cars, sooner or later, have to deal with replacing wheel bearings and the issue of choosing a manufacturer. Today there are many companies that produce products of this type. But it is better to give preference to the following brands:
The products of these manufacturers are characterized by high quality and meet the most stringent requirements.
If we consider domestic manufacturers of bearings, then they also exist. Bearings are supplied to AvtoVAZ by:
- CJSC "LADA Image" is a supplier of original Lada wheel bearings on the secondary market;
- SPZ (Saratov Bearing Plant);
- Volzhsky Standard (Volzhsky Plant);
- VBF (Vologda Bearing Plant);
- SPZ-9 (Samara plant).
Removing and installing the bearing
If there is not enough money to replace the complete unit, and the bearing is badly worn, you can try to replace only the part that has become unusable. True, the bearing will have to be replaced along with the locking ring. To carry out this operation, you need to buy the necessary parts and prepare the following tools:
- hammer;
- installation;
- hand-held electric circular saw for cutting metal (grinder, grinder);
- gasoline or gas burner;
- blacksmith's pliers or pliers.
In addition, to press parts onto the drive shaft, you need to have a special mandrel. To do this, you need to find a metal pipe with an internal diameter of 32 mm and cut off an even piece of at least 80 cm in length from it. After this, you can proceed with the replacement. The work must be performed in this sequence.
First you need to cut the locking ring crosswise on two opposite sides, being careful not to damage the axle shaft. Then knock the 2 parts of the ring off the shaft using a pry bar and a hammer. After this, you need to use the same tools to knock the bearing off the axle shaft in the direction opposite to the flange. Next, you should clean the seat from dirt and, putting a new bearing on the axle shaft from the spline side, carefully press it into place using a prepared mandrel and a hammer. Then you need to heat the locking ring with a burner to such an extent that it becomes ash-gray in color (it is important not to let it turn red) and, picking it up with pliers, put it on the drive shaft with the reduced side facing the flange. Next, you need to very quickly and carefully hammer the locking ring, using a mandrel and a hammer, into its proper place. The ring should sit close to the bearing.. https://www.youtube.com/embed/STvRuG3gT4M
Preparing and disassembling the unit
The front rolling bearings are roller, cone type, consisting of two parts: external and internal. Good quality products are sold complete with the required amount of lubricant and two clamping nuts. The nuts differ in their thread, on one it is left-handed, on the other - right-handed, the first will fit the axis of the right axle, the second - to the left.
The manufacturer does not know which wheel will be replaced, so he completes the product with both nuts. Additionally, you need to purchase an oil seal, which is located at the rear of the hub and does not allow grease to leak out. You can carry out the work on a level surface, securing the car with the hand brake so that it does not roll away.
Before lifting the car with a jack, you need to pull out the metal boot covering the hub nut and loosen the latter with a 27 mm wrench. Then the wheel bolts are loosened, the car is jacked up and the wheel is removed. The next step is to remove the brake caliper, which is attached to the axle with 2 bolts; they need to be unscrewed, the part removed and moved to the side.
It is recommended to first remove the brake pads from the caliper, then it will be easier to put it back.
Now you can completely unscrew the nut, pull out the washer and remove the hub from the axle axle by hand. After this, you need to remove the old grease from all parts; it contains metal shavings.
Bridge VAZ 2101
The rear axle is one of the main elements of the VAZ 2101 transmission. It is designed to transmit torque from the driveshaft to the axle shafts of the vehicle, as well as to evenly distribute the load on the wheels while driving.
Specifications
The drive axles of VAZ cars of the 2101–2107 series are unified. Their design and characteristics are completely identical, with the exception of the gear ratio. For a “kopeck” it is 4.3. VAZ station wagon models (2102, 2104) were equipped with gearboxes with a gear ratio of 4.44.
The rear axle is used to transmit torque from the driveshaft to the wheels of the car
Table: main characteristics of the rear axle of the VAZ 2101
| Name | Index |
| Factory catalog number | 21010–240101001 |
| Length, mm | 1400 |
| Crankcase diameter, mm | 220 |
| Stocking diameter, mm | 100 |
| Weight without wheels and oil, kg | 52 |
| Type of transmission | Hypoid |
| Gear ratio value | 4,3 |
| Required volume of lubricant in the crankcase, cm3 | 1,3–1,5 |
Photo report on the removal and installation of the rear axle shaft on a VAZ 2106
So, the first thing you need to do is remove the rear wheel mounting bolts, jack up the car and finally unscrew the bolts and remove the wheel. After this, it is necessary to remove the brake drum, since it is under it that all the axle shaft mounting nuts are located. As a result, we get the following picture:
Next, you need to align the holes in the axle flange with the fastening nuts. Since there are two such holes, you need to do this twice, of course, then turn the axle shaft so that the third and fourth fastening nuts are accessible in the holes.
It is advisable to first apply a penetrating lubricant and then rip it off with a wrench:
When the force is already small, you can use a ratchet handle for greater convenience:
When all 4 are completely unscrewed, you can then begin to remove the axle shaft. To do this, take the wheel, turn it over and screw it onto two bolts, just tighten it so that there is a slight spread across the bolts. This is clearly shown in the photo below:
And with sharp jerks using both hands we try to pull the axle shaft off the splines. This usually happens after the first jerk, since it does not require much effort:
Next, you can unscrew these bolts and remove the wheel, and finally remove the axle by hand:
After this, you can replace either the axle shaft itself or its bearing if necessary (I’ll write about this in future articles). Installation takes place in reverse order and does not take much time. The only thing worth noting is that when installing it is necessary to ensure that it matches the slots and hit it with a small blow. But I think that everything is clear from the video clip. As for the price of a new axle shaft for a VAZ 2106, it can range from 100 to 1300 rubles.
The main sign of wear on the VAZ 2106 axle bearing is increased noise from the rear wheel when the car is moving. Replacing the VAZ 2106 axle bearing is required if strong noise in the area of one or another rear wheel occurs both when the vehicle is moving in a straight line and when turning.
The cost of a bearing is from 100 rubles for a Chinese one and up to 250 rubles for an original one. The assembled axle shaft costs several times more. However, it should be taken into account that for craftsmen the cost of performing work on replacing the VAZ 2106 drive shaft assembly is much lower. In this case, you can save money by doing the repairs yourself.
Replacing the axle shaft and its seal VAZ 2106
To replace the axle shaft seal on a VAZ 2106, you need to remove the axle shaft from the rear axle housing; to do this, lift the car onto a lift, remove the wheels and brake drums
Using a 17mm socket, unscrew the four nuts through the holes in the axle shaft flange.
Remove the elastic washers with tweezers
We attach an impact puller to the axle shaft flange and knock the axle shaft out of the beam. Instead of this device, you can use the removed wheel. We install it with the reverse side on two bolts and with a sharp movement pull out the axle shaft
The axle shaft is removed along with the oil seal, mounting plate, bearing and locking ring
A rubber O-ring is installed between the beam flange and the brake shield.
Using sliding pliers, remove the axle shaft seal from its socket in the rear axle beam
With light blows of a hammer on the socket head, we press the new oil seal into the stocking of the rear axle of the VAZ 2106. If the axle shaft is deformed, there are large radial and axial clearances in the bearing, the locking ring is displaced, or the splines are worn, the axle shaft must be replaced with a new assembly. Independent replacement of the VAZ 2106 axle bearing and locking ring is not recommended. Installation of the axle shaft on a VAZ 2106 is performed in the reverse order of removal. Before installation, lubricate the working surfaces of the oil seal with Litol-24 lubricant.
Repair work to replace the axle shaft on a VAZ 2106 should be carried out in cases where, when driving a car, there is increased noise from the rear wheels, which will be felt not only when the car moves in a straight line, but also when turning, as a rule, when increased noise occurs, the backlashes increase accordingly , both axial and radial.
Front hub VAZ 2106
One of the important elements of the VAZ 2106 chassis is the hub. This part allows the wheel to rotate. To do this, a wheel disk is screwed onto the hub, and the rotation itself is carried out thanks to a pair of wheel bearings. The main functions assigned to the hub are:
- connection of the wheel disk with the steering knuckle;
- ensuring a high-quality stopping of the car, since the brake disc is fixed to the hub.
To know how hub malfunctions manifest themselves, as well as how to make repairs, you need to familiarize yourself with the structure of this element. Despite the fact that the part is designed to perform complex functions, it is structurally quite simple. The main parts of the hub are the housing and bearings. The body of the part is cast, made of durable alloy and processed on turning equipment. The hub fails quite rarely. The main malfunction of the product is the wear and tear of the outer bearing races at the installation sites.
The hub secures and rotates the front wheel
Adjusting the wheel bearing on a VAZ 2107.
The hub nut must be tightened so that the wheel does not dangle and rotates freely. Those. We rotate the wheel and, by tightening or loosening the nut, look for a position in which the wheel will not dangle and will rotate freely.
Article rating:
Replacing the front wheel bearing of a VAZ 2106 Link to main publication
Related publications
- How to change the CV joint on a VAZ 2115
Replacing the front wheel bearing
Work on replacing a wheel bearing begins with the preparation of tools and materials. You will need:
- set of socket wrenches;
- screwdriver;
- chisel;
- hammer;
- pliers;
- extension for knocking out the bearing race;
- new bearing, seal and lubricant;
- rags;
- kerosene.
How to remove
To dismantle the part, lift the front wheel using a jack. In a service station, work is carried out on a lift. When replacing a bearing, the following sequence of actions must be performed:
- Unscrew the fasteners and remove the wheel.
- Unscrew the fastening and dismantle the caliper.
- Using a screwdriver, pry up the protective cap of the hub and remove it.
- Align the side of the hub nut.
- Unscrew the nut and remove it along with the washer.
- Dismantle the hub.
- Remove the outer bearing cage.
- Using a tool and a hammer, knock out the outer part cage from the hub.
- Pull out the ring that separates both wheel bearings and the oil seal.
- Knock out the inner race.
- Using kerosene and rags, clean the seat from dirt.
How to put
After dismantling the wheel bearings and cleaning the hub itself, you can begin installing new parts. The work is performed in the following order:
- Press in the races of both bearings.
- Apply lubricant to the separator and insert it inside the hub.
- The space between the bearings is filled with lubricant.
- Insert the spacer ring.
- Install a new seal.
- Install the hub onto the steering knuckle axis.
- Apply lubricant to the outer cage and place it in the bearing race.
- Place the washer in place and tighten the hub nut until it stops.
- After replacing the wheel bearings, adjustments are made by smoothly unscrewing the nut and ensuring that the hub rotates freely, but there is no play.
- Strike the side of the nut with a chisel, which will prevent it from unscrewing arbitrarily.
- Place the caliper in place and tighten the fasteners.
- Install the protective cap and wheel and tighten the bolts.
- They lower the car.
Video: how to replace the front wheel bearings of a VAZ 2107
What to lubricate
Litol-24 is used to lubricate wheel bearing separators. It is also used to apply a new oil seal to the working edge during installation.
Bearing nut tightening torque
The need to tighten the hub nut arises after replacing the bearings or during their adjustment. The nut is tightened using a torque wrench to a torque of 9.6 Nm, while the hub is turned several times to install the bearings in place. Then loosen the nut and tighten it again, but with a torque of 6.8 Nm, after which it is locked in this position.
The hub nut is tightened with a torque wrench
Replacing the Wheel Bearing VAZ 2106 Video
Description of replacing the VAZ 2106 hub
Replacing a VAZ 2106 with a hub is rare, because this part lasts at least 150,000 km. The main reason for the replacement operation is wear of the bearing seats, which leads to rotation of the latter cells. The fault can only be determined by removing the hub and removing the bearing. If they scroll in place, then after removing the oil there will be clear marks on the inner surface.
Sign of wear on the wheel bearings and vibration from one of the front wheels. To accurately determine the origin of a loud sound, the car is raised and the wheel is manually rotated in different directions. If there is a lot of noise, the bearing needs to be replaced. The service life of these spare parts is on average 40-50 thousand km. Disassembling this assembly on a VAZ 2106 car, removing old parts and installing new ones. a simple task for every motorist.
Preparing and disassembling the assembly
Front roller bearings are tapered type, consisting of two parts: outer and inner. Good quality products come complete with the required amount of oil and two clamping nuts. The nuts differ in their threads, on one it is left-handed, on the second. on the right, the first approaches the axis of the right torso, the second. left.
The manufacturer does not know which of the wheels will be replaced , so he supplements the product with both nuts. Additionally, you need to buy a seal that is located at the rear of the hub and prevents grease from leaking out. You can do the job on a level surface by using the handbrake to secure the vehicle to prevent it from rolling.
Before jacking up the car, remove the metal cover covering the hub nut and loosen the last 27mm nut. The wheel bolts are then loosened, the vehicle stops and the wheel is removed. The next step is to remove the brake caliper, which is attached to the axle with 2 bolts; they need to be unscrewed, the part removed and moved to the side.
Replacement of VAZ wheel bearings. (All details)
ADJUSTMENT Wheel bearings
HERE: DIAGNOSTICS
Wheel bearings
HERE:.
replacement front bearings nails VAZ 2107
Replacing bearings
front
Hobby VAZ
2107, repair kit
front
bearings hubby
.
It is recommended to first remove it from the caliper. brake pads, then it will be easier to put it back.
Now you can completely unscrew the nut, remove the washer and remove the hub from the axle with the axle shaft with your own hands. Then you need to remove the old grease from all parts, it has metal shavings.
Installation and configuration of new parts
The inside of the outer bearing is removed and the old grease is removed from the bore. To get inside the second part, you will need to remove the seal, securing it with a fastening blade or a strong flathead screwdriver. It is recommended to wash the inner surface of the hub with remaining clamps, gasoline or diesel fuel. Sequence of further work.
- With the hub on 2 pieces of wood, attach a punch or other metal rod with a pointed end to the holder from the inside. Hit the part with a hammer. During this strike you need to move it so that the clip comes out evenly. Turn the hub over and do the same operation on the other side.
- Now it is necessary to study the condition of the surface of the hub seats. If you notice signs of the clamps turning, you should consider replacing it. It is possible to slightly extend the “life” of the hub; for this, the old grandfather’s method is used. Small cuts should be made on the surface of the seats using a core or chisel. Once the clamps are installed, they will fit snugly against these burrs and will not slip for a while.
1. Outer ring with rollers and inner ring 2. Outer outer ring 3. hub 4. Inner cup 5. Inner bearing cage with rollers and inner ring 6. Oil seal
- Coat the new clamps with a thin layer of thick lubricant, and then insert one of them into the hole without distortion. Point the old piece of the same size on top and press the clamp evenly into the seat using light hammer blows. Repeat the operation on the other side of the hub.
- After the rollers are thoroughly lubricated, insert the bearing into the pressed cage. Start from the inside of the hub. Then install the seal in the same way as described in step 3. Lubricate thoroughly and leave the bearing . Lubricate both parts with grease. Wipe off oil from both working surfaces of the brake disc and install the hub onto the axle shaft. Tighten the lock nut and lightly tighten it with a wrench.
Further assembly is carried out in the reverse order; after completion, the front hub of the VAZ 2106 tightens the nut without much effort. You can check that the adjustment is correct by pulling on the top and bottom of the suspension wheel with your hands.
In this case you should feel a slight play and the bearing should not be tight. After tightening the nut, you need to tilt the point of the hammer, placing it on the nut flange opposite the groove on the axle shaft. By hitting it with a second hammer, a depression is made that prevents the nut from rotating on its own.
When replacing bearings or the entire hub, all internal surfaces must be filled with the grease that is included in the kit and must be used completely.
How to change a bearing?
Repair and replacement work can be done in the garage or outside. The main thing is to choose a relatively flat surface to work on, so that the car stands more stable during repairs.
To begin, stock up on the necessary tools, prepare a socket wrench (or an open-end wrench) for “ten”, a socket wrench for “seventeen” (if you have a head of this diameter, then this is only a plus), prepare a jack.
Please note that a regular “17” key is not very convenient to use, so it is better to optimize the tool - weld the head to the collar in the shape of the letter “T”.
It is better to buy spare parts after you have taken everything apart, since there are times when after dismantling you will have to buy a new axle shaft.
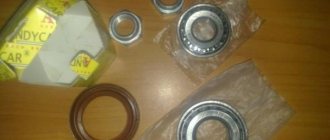
So, you will need:
Brand new bearing
axle shaft seal,
locking sleeve.
The sequence of actions for changing the bearing on a VAZ 2107 axle shaft:
1. Place the machine on a flat surface, install the locking shoes on the rear wheel and the front wheel on the other side.
2. Slightly unscrew the screws on the rear wheel and jack up the car.
3. Install a special support that will protect one of the sides of the car from accidentally falling. Alternatively, you can use an empty metal canister.
4. Unscrew the bolts completely and remove the wheel.
5. Using a ten-point socket wrench, screw in the guides and carefully “squeeze out” the brake drum (the easiest way is to knock it down using a wooden block and a hammer).
If these methods do not help, then try another method. Make sure that the car is well secured, depress the clutch, put the gearshift knob in the second gear position, start the engine, release the clutch, spin the silent drum (do not accelerate too much). After this, press the brake pedal sharply. As a rule, after just a few attempts the drum can be easily removed.
Note! When removing the drum in this way, you need to act extremely carefully; no one should be near the machine, as the drum may fly off.
6. Using a “seventeen” wrench, through the special holes in the flange, unscrew the fastening bolts that secure the axle shaft.
7. Remove the axle shaft. If this cannot be done, place the wheel on two bolts and, tugging it (the movements should be as sharp as possible), remove the product. If it does not give in, then proceed by rocking.
Next, proceed to replace the bearing. Please note that if you do not have a special puller at hand, this operation will take you much longer.
Replacing a VAZ 2107 axle shaft
An axle shaft is a part of a rear-wheel drive car that transmits rotation from the rear axle gearbox to the wheels. The rear part cannot be repaired, therefore, when worn out, they are replaced with new ones. Along with the axle shaft, the rear axle shaft bearing and its seal must also be replaced. These parts are also consumables and cannot be repaired under any circumstances.
The VAZ 2107 axle shaft must be replaced in the following cases:>
- The axle shaft is deformed (bent). At the same time, it makes noise in the form of a knock in the rear of the car when moving.
- The locking sleeve no longer fulfills its role
- Bearing seat bored
- The threads for mounting the wheels on the flange are heavily worn
- The axle splines are also worn
Replacement of the axle shaft can be carried out both in the garage and in an open area, provided there is a flat and clean area.
When purchasing an axle shaft, purchase a new bearing, axle shaft seal and a new locking sleeve in advance.
Procedure:
- We carry out preparatory activities. Why: put the car on a flat horizontal surface, engage first gear and place wheel chocks under the front wheels. Also, loosen the wheel bolts on the side from which we are going to replace the axle shaft. Loosening the bolts should be done using the “criss-cross” method.
- We lift the wheel with a jack, place bricks or stumps under the car as support, completely unscrew the wheel bolts and remove the wheel.
- Unscrew the drum guides and remove the drum. If the drum is stuck, take a rubber hammer and gently hit it around the entire circumference to knock it off the brake pads. Note: If the drum does not come off after being hit with hammers, you can dismantle it in another way. To do this, lift the second wheel, place a support under it and start the engine. Engage second gear and accelerate the engine to 1500 rpm. After this procedure, the ram usually “comes to life” and removing it is no longer difficult. Attention! Do not perform this operation if one of the wheels is on the ground. Thus, the car may fall from the support and damage the part of the bridge that is being repaired. Also, such a violation can lead to premature wear of the clutch disc.
- Take a 17mm socket wrench and unscrew the bolts that secure the axle shaft. They should be unscrewed using the “crosswise” method. Then you need to pull the axle shaft out of the bridge with your hands. Note: in cases where it is difficult to pull out the axle shaft by hand, you can use a wheel. To do this, bolt the wheel with the back side to the axle shaft and pull out the axle shaft, holding the wheel with your hands.
- Now press the bearing onto the new axle shaft. This is done using a special press. If there is none, then you can contact the nearest car service center that has the appropriate equipment.
- Replace the oil seal on the axle shaft and install the axle shaft in the bridge (Replacing the axle shaft oil seal for a VAZ 2107).
- Tighten the axle shaft mounting bolts and install the drum in place. Tighten the drum guides. The guides should be screwed in carefully, without tearing off any sharp edges. Because, in the future, removing the drum can become a very problematic task and will require a lot of effort and time.
- Install the wheel and hand tighten the wheel bolts as far as possible. Then lower the car and tighten the wheel bolts further.
The new axle shaft is checked while driving. To do this you need to listen to the sounds. If the sounds that arose before the repair disappeared, then replacing the axle shaft on a VAZ 2107 was successful.
Good luck on the roads!
Increased wheel turnout
Sometimes drivers want to increase the handling of their car. The standard turning angle of the VAZ “classic” has always raised many questions among car enthusiasts. So drivers increase this angle themselves with a few simple operations. Fans of the so-called drift do this especially often: increased wheel turn allows the car to more easily enter a controlled drift, and this can be done at maximum speed.
- The machine is installed on the pit. One of the wheels is jacked up and removed. After this, the steering bipods, which are located behind the hub, are unscrewed from the suspension. There are two of these bipods.
- One of the bipods is sawed in half using a grinder. The sawn-off upper part is discarded. The remaining part is welded to the second bipod. The result is shown in the photo below.
- The welded bipods are installed in place.
- In addition, there are small limiting projections on the lower suspension arms. They are carefully cut off with a hacksaw. After performing all the above operations, the inversion of the wheels of the “seven” becomes about a third more than the standard one.
It should also be noted that some car owners prefer not to do their own welding and installation of bipods. Instead, they buy ready-made tuning kits for VAZ “classics”, which allow them to increase the wheel alignment without unnecessary labor costs. Unfortunately, finding such a set on sale is not so easy. Therefore, the above technology for increasing wheel inversion will be popular among “Seven” owners for a very long time.
Where is the crankshaft bearing installed and what is it used for?
The bearing installed in the crankshaft flange is not part of the engine, but of the transmission. The main purpose of this assembly is to center and support the transmission input shaft - it serves as a front rotating support. Anyone who has ever installed a gearbox on a car is familiar with the crankshaft bearing - it is so difficult to get into its inner race with the shank of the input shaft. As for the high service life of the part, it can be explained simply. The fact is that the rolling unit only works when the clutch is depressed. The rest of the time, the crankshaft and gearbox input shaft rotate at the same frequency. Despite the low load, it is recommended to replenish the lubricant supply in the bearing when replacing the crankshaft rear oil seal, repairing the clutch, etc. This way you will delay the need for repairs for a long time.
5.2.4 Replacing rear wheel hub bearings
| You will need | |
| |
Before starting work
Remove the brake drum ( see subsection 7.2.1. ).
The hub has two single-row roller bearings. During operation, it is necessary to adjust the clearances and replace the grease in the bearings.
If, when rocking a suspended wheel, you feel play that cannot be eliminated by adjustment, or noise appears while driving, there is a possibility that the hub bearings have failed.
One of the hub bearings may fail. The bearings should rotate freely, without jamming. Rollers and bearing rings must not have holes, chipping or signs of wear. Replace the defective bearing.
| EXECUTION ORDER |