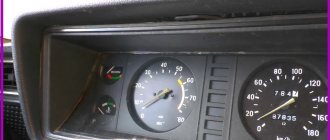
Xenon for the VAZ 2107 can be purchased for low and high beam. Xenon VAZ 2107 is selected according to the lamp base. If the high beam and low beam are in one lamp, it is bi-xenon. To install xenon, you do not need to change the headlights. Xenon can be installed in any VAZ 2107 headlights. If the on-board computer queries the performance of standard lamps, xenon must be purchased and installed only with decoys.
Xenon can be installed both in lenses, if they are already installed, and in simple reflectors. From us you can buy and install lenses and xenon in the headlights of a VAZ 2107. Lenses in the headlights are selected according to the diameter and distance to the headlight glass. Lenses are available for low beam and high beam. You can also buy and install bi-xenon lenses with angel eyes. If such lenses are placed on the low beam, then the high beam can either be dimmed, or it will work in parallel with the high beam from the lens.
If a standard xenon is installed on a VAZ 2107, we can select an analogue of the standard xenon units, or replace the standard xenon with any other one. You can also buy standard used xenon units from us.
Cost of xenon and bi-xenon VAZ 2107:
| Xenon options | Xenon price |
| Xenon VAZ 2107, low beam | from 3,500 rub. |
| Xenon VAZ 2107, high beam | from 3,500 rub. |
| Xenon VAZ 2107, in PTF | from 4,500 rub. |
| Xenon CAN VAZ 2107, with blende | from 3,500 rub. |
| Bixenon VAZ 2107 | from 5,000 rub. |
| Bi-xenon CAN VAZ 2107 with blende | from 6,000 rub. |
| Xenon lamp VAZ 2107 | from 1,000 rub. |
| Bi-xenon lamp VAZ 2107 | from 1,200 rub. |
| Xenon ignition unit VAZ 2107 | from 1,000 rub. |
| Xenon lenses VAZ 2107, with and without eyes | from 4,500 rub. |
Sign up for installation of xenon VAZ 2107
8 (812)
701-02-01
The cost of xenon depends on whether it is new or used, the manufacturer, as well as on availability in our warehouse or delivery time to our store.
You can buy and install xenon in the PTF of a VAZ 2107. Xenon in fog lights is selected according to the base and the distance to the PTF glass. When installing xenon in a PTF, be sure to take a xenon kit with waterproof ignition units. Because they will be installed below, dirt, salt, and reagents fly there. If the ignition unit is ordinary, it will quickly fail.
VAZ 2107 xenon rating based on owner reviews:
1. Zumato (Japan) 2. Hella (Germany) 3. Philips (Germany) 4. Sho-Me (Taiwan) 5. Klunger (China)
When you need to buy xenon for a VAZ 2107:
– the standard xenon ignition unit has failed; – dim light from halogen lamps; – the old non-standard xenon has failed.
Addresses in St. Petersburg: Service station on Bolshevikov: st. Voroshilova, house 7, from 10 to 18, t. 8 (812) 701-02-01, Sat, Sun – closed. Service station on Grazhdansky: st. Uchitelskaya, building 23, from 9.30 to 21.00, t. 8 (812) 603-55-05, seven days a week. Service station on Kupchino: st. Dimitrova, building 1, from 10 to 20.00, t. 8 (812) 245-34-84, seven days a week.
The VAZ 2107, unlike its predecessors, has advanced front optics that provide better visibility on unlit roads. Headlights on the VAZ 2107 are one of the main areas of tuning. In addition, the functionality of the headlights ensures the safety of night driving. Therefore, knowledge of the structure and methods of repairing and replacing headlights will not be superfluous.
The device of block headlights VAZ 2107
The headlights on the VAZ 2107 are plastic boxes with a front side made of glass or durable transparent plastic.
Glass headlights are scratch-resistant and provide better, more focused light output. But glass breaks easily when hit by stones and physical impact. Plastic has less focusing properties and is scratched. But it has greater fracture strength and small stones are unable to damage it. This is why many car owners prefer plastic headlights.
Inside the headlight unit there is a 12-volt lighting lamp with two filaments for low and high beam, a side (parking) lamp and a turn signal lamp. The latter is also intended for emergency signaling.
The lamps are inserted into sockets, and behind them there is a reflector that focuses the light and directs the beam onto the road surface.
The VAZ 2107 headlight has an important detail - a hydraulic corrector. When heavily loaded, the front of the car, and with it the headlight beam, lifts up. The hydraulic corrector changes the vertical angle of the headlight, which allows you to adjust the angle of the light flux and direct it down onto the canvas.
The back side of the headlamp has a cover, which is used to replace burnt out lamps.
Standards or is it possible to install xenon on a car in Russia
Xenon light appeared in Russia relatively recently, but has already won millions of fans. This is not surprising, because xenon gas lamps consume less energy and shine much brighter than halogen lamps, which has a positive effect on driving at night. If xenon is installed in the headlights from the factory, then there are no problems or claims from the law, but in cases where owners install lamps with bright light on their own, there are some restrictions. You need to immediately find out about them before starting to implement your idea.
Since the advent of xenon lamps, the number of cars with such light has increased exponentially. Moreover, many owners began to install this xenon in their cars themselves, which caused emergency situations due to incorrect installation or blinding oncoming drivers. Xenon lamps emit very bright light, which is comparable to a welding arc, so its incorrect use leads to emergency situations.
Based on these consequences, Russia adopted a ban on the independent installation of xenon in headlights that are not intended for gas-discharge lamps. Since then, the number of cars with bright lights has decreased, but some are still not afraid of fines, since high-quality lighting of the roadway seems more important to them. In Russia, installing xenon in the standard optics of a car for which it is not intended is prohibited and punishable by law. If the driver is stopped by a traffic police officer, then with a high probability for such an alteration he will not only have to pay a fine, but also return to the previous light.
Xenon and bi-xenon - what are the differences?
Having decided to install xenon on a VAZ 2107, the question arises: what is better xenon or bi-xenon and how do they differ? Bi-xenon is exactly what xenon is, only additionally equipped with a mechanism for switching high and low beams. Unlike halogen lamps, where switching between high and low beam is realized by switching 2 spirals located inside one lamp, a xenon lamp has one chamber with gas, which creates bright radiation. To switch between low and high beams, the bulb is located in a special shell with a movable shutter. This curtain, depending on whether the low or high beam is turned on, moves in one direction or the other.
On the VAZ 2107 you can install not only xenon lamps, but also bi-xenon, but for this you will need a set of bilenses. The role of the switch between low and high beam is played by bi-xenon lenses that have a built-in curtain through which switching occurs. If you are going to install gas-discharge lamps instead of halogen ones, then it is better to choose xenon with lenses. The lenses are not only designed to switch the light, but also to focus the light on the road surface. The light with the lenses is correct and does not scatter throughout the headlight, blinding oncoming cars. It is xenon with lenses that is recommended for installation in the standard optics of the VAZ 2107.
We install xenon on the seven with our own hands
Installing lenses on a VAZ 2107 is an order of magnitude more difficult than replacing a halogen lamp with a bi-xenon one, but it is recommended to choose this option for implementation. Although this method is more difficult to implement and requires dismantling the headlight unit from the car, it still provides the correct beam of light. After all, the likelihood of blinding oncoming drivers with lenses is much less than when installing xenon lamps instead of standard ones.
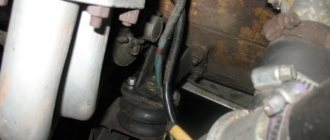
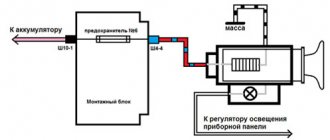
How to secure the ignition unit
When installing xenon or bi-xenon, you will need to install an ignition unit. This is a small box through which the voltage increases from 12V to several thousand volts. This voltage is needed to create a spark, thereby igniting the gas in the flask. The ignition unit is mounted in the engine compartment near the headlight location. One ignition unit is used for each lamp.
Replacing headlights VAZ 2107
In some cases (if the glass is damaged or you want to tune the car), you have to replace the headlight assembly. To replace, you need a Phillips screwdriver and an 8mm wrench.
The removal procedure is as follows:
- disconnect the ground wire;
- disconnect the lamp power terminals;
- remove the hydraulic corrector by pressing the lock;
- Unscrew the three fastening screws with a Phillips screwdriver (one of the screws is secured with a nut, which must be held in place with a key);
- remove the headlight by pulling it towards you.
To install the headlight, you need to do the operations in reverse order.
Do-it-yourself LED tuning of VAZ 2107 headlights
For the “Seven” you can easily find, buy and install non-standard headlights or individual lighting elements. The cheapest solution is to install LEDs instead of standard lamps or in addition to them. This allows you to transform the appearance of your car at a minimum cost.
Tuning the rear lights of a VAZ 2107 is also often done by changing lamp lighting to LED.
For tuning with LEDs you will need:
- resistors;
- panel or box for mounting lighting elements (LEDs);
- drill;
- drill;
- sealant;
- wires;
- LEDs.
The box or panel must be adjusted to the size of the headlight and installation holes for the LEDs must be drilled. Depending on the number and parameters of the LEDs used, resistors are connected in series to provide the required circuit resistance. The resistor values are selected individually. The sealant is used to secure the LEDs in the holes.
Important: when connecting LEDs, polarity must be taken into account.
In addition to the original appearance, tuning with LEDs has other advantages:
- low power and, as a result, low load on the on-board network;
- durability and reliability;
- diffused light that does not blind other road users.
If your budget allows, you can tune VAZ 2107 headlights by replacing standard units with ready-made tuning products. The advantage of this solution: beautiful design and excellent quality with minimal time investment.
Headlights for VAZ 2107
The VAZ-2107 is a luxury version of the simpler VAZ-2105 car, but everything also belongs to the general family of “classics” of the Volzhsky Automobile Plant. This brand of car was produced in Russia until 2012, so on the roads you can see both new examples of cars and honorary old men of thirty years of age.
This model differs from other classic VAZ cars in a large number of modifications associated with different engine sizes. The “sevens” were equipped with engines with a volume of 1.3 liters, 1.5 liters, 1.6 liters, 1.7 liters. On special models produced for the Ministry of Internal Affairs and the KGB, which were later decommissioned and fell into private hands, even rotary piston engines with a volume of 1.3 liters and a power of 140 hp were installed.
Such a variety of engine systems has led to the fact that the VAZ-2107 model has a fairly large range of spare parts, which are constantly in demand during repairs and periodic maintenance of these vehicles. Also, recently, a trend has developed towards deep tuning of this model, which consists in installing a more powerful engine and reinforced suspension, for the participation of modified cars in unrecognized, but quite popular street racing among young people.
www.avtoall.ru
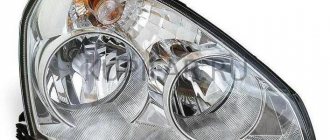
Installation of xenon headlights on a VAZ 2107
Xenon headlights are characterized by a particularly powerful luminous flux, which requires additional focusing using lenses. Full-fledged xenon headlights are expensive and include, in addition to the power supply and lamps, an automatic beam height adjustment system and a headlight glass washer. Each of the elements is extremely important for safety:
- correct focusing and adjustment of the light flux is necessary so that oncoming drivers are not blinded by bright light;
- Without a washer, dirty headlight glass overheats and may burst.
If you do not have the funds to install xenon headlights of appropriate quality, it is better not to install fakes, endangering yourself and other road users, so we do not recommend installing this type of lighting and did not describe the connection
Xenon headlights for VAZ 2106
Xenon headlights on the VAZ 2106 - that’s what became my goal for the near future. I once saw such headlights on a foreign car and literally fell in love with them. The light they emit is very attractive and beautiful. You can’t say the same about standard VAZ headlights, nothing designer, everything is simple. So, simple light will not satisfy me, I decided and got down to business.
What added to my confidence in the success of the project was that a good friend of mine was involved in such matters and had considerable experience, and he also owed me a little, so I immediately went to him, drove the car into the garage and outlined the situation. He understood everything and reassured me that my problem was completely solvable, the investment was minimal, and the work was high-quality. We started with the low beam, we stuck bi-xenon headlights 4300 , of course it’s not that cheap, but similar brands weren’t worth attention, this one was the best, so I bought it. Moreover, it does not blind the driver who is driving towards him, the rays are directed strictly straight, the beams of light do not scatter. In order to manage all this goodness, I borrowed a corrector from a Niva car, I don’t know how it ended up in my garage, I don’t remember it at all, but the fact is that it was very useful to me. Plus, I found a headlight washer, it was from a Toyota car. Naturally, it will not be able to remove heavily dried dirt, but it will quickly cope with fresh splashes or pieces of dirt. It also prevents xenon from overheating. They installed 4300 xenon bulbs on the high beams, I didn’t install any adjustments, much less a washer, not because I’m such a greedy redneck, I just had them in a single copy, and I didn’t want to spend money on buying new ones. Maybe someone will say that he will blind. So excuse me, that’s why it’s high beam, to be bright and blinding, you just need to switch to low beam headlights in advance.
But I had to suffer with the fog lights. I got a very well-known high-quality model, but fixing it in place turned out to be very difficult. However, it was worth the trouble, because the place intended for him did not go against the rules of the road, so the traffic cops could not say a word. Another important factor is that it is fixed quite well and does not spin while driving, that is, the settings are saved, and this is very helpful when driving through unfamiliar terrain, and even in poor visibility conditions. Installed high above the ground, nothing can knock them down or disable them, at least it shouldn’t. Model 4300 xenon bulbs are installed there; they are bright enough to penetrate thick fog without blinding oncoming traffic. The installation took half a day, along with the fact that I was looking for material, purchasing light bulbs, etc. I think we managed it in a very short time; I would have taken much longer on my own. because there are a lot of electrical circuits that require knowledge of circuits, I’m not very strong in this. My friend showed his class and I was once again convinced of his skill.
Photos were taken from the site Drive2.ru
- Author: admin
Rate this article: Share with friends!
Related posts:
replacing headlights on a VAZ 2106 car
Xenon headlights: pros and cons
Fog lights, xenon lamps in Lada Priora
Tinting of headlights and taillights of VAZ 2107
Another common do-it-yourself tuning of VAZ 2107 headlights is tinting. It is used when upgrading both taillights and headlights. It is necessary to carefully choose the method of dimming the headlights - the quality of road lighting is a determining criterion for safety when driving at night.
Important: before tinting your headlights, you should take into account that tinted headlights may be grounds for imposing an administrative fine. You also need to understand that any tint reduces the brightness of the headlights, making night driving more dangerous.
In order for tinting to have a minimal effect on the quality of the car's headlights, it is worth tinting the glass surface only partially. This solution is safe and quite effective: narrowed headlights make the appearance more stylish. Partial tinting can also help avoid a fine - not the entire headlight is shaded, but a small sector.
To tint headlights, you must use only high-quality film. The order of work is as follows:
- remove the VAZ 2107 headlights;
- take out the glass;
- wash and degrease the surface;
- stick the film.
You can partially tint the headlights without removing and disassembling them - just wash the glass and stick on a strip of film. But this method does not provide adequate quality, and it is almost impossible to perfectly accurately cut and paste the film without removing the headlight unit.
When tinting the taillights, you should install brighter lamps in them so that the brake lights and side lights are clearly visible to other road users. To apply the film, it is also better to remove the rear lights from the car first.
Headlights for VAZ 2107.Tuning, tinting headlights and taillights Video
The VAZ 2107, unlike its predecessors, has advanced front optics that provide better visibility on unlit roads. Headlights on the VAZ 2107 are one of the main areas of tuning. In addition, the functionality of the headlights ensures the safety of night driving. Therefore, knowledge of the structure and methods of repairing and replacing headlights will not be superfluous.
The device of block headlights VAZ 2107
The headlights on the VAZ 2107 are plastic boxes with a front side made of glass or durable transparent plastic.
Glass headlights are scratch-resistant and provide better, more focused light output. But glass breaks easily when hit by stones and physical impact. Plastic has less focusing properties and is scratched. But it has greater fracture strength and small stones are unable to damage it. This is why many car owners prefer plastic headlights.
Inside the headlight unit there is a 12-volt lighting lamp with two filaments for low and high beam, a side (parking) lamp and a turn signal lamp. The latter is also intended for emergency signaling.
The lamps are inserted into sockets, and behind them there is a reflector that focuses the light and directs the beam onto the road surface.
The VAZ 2107 headlight has an important detail - a hydraulic corrector. When heavily loaded, the front of the car, and with it the headlight beam, lifts up. The hydraulic corrector changes the vertical angle of the headlight, which allows you to adjust the angle of the light flux and direct it down onto the canvas.
The back side of the headlamp has a cover, which is used to replace burnt out lamps.
Replacing headlight bulbs
No tools are required to replace burnt out lamps. Removal and installation of lamps is done manually. To do this, you need to open the headlight cover by turning it 10 degrees to the left. To prevent a short circuit, the ground wire should be disconnected from the battery before replacing lamps. The procedure for replacing a low/high beam lamp is as follows:
- disconnect the terminal block;
- unscrew the plastic boot;
- release the locking spring;
- get an old lamp;
- snap the spring;
- connect the terminal.
Important: when replacing halogen or xenon lamps, do not allow the lamp shell to come into contact with your fingers. Grease marks on the glass will shorten the life of the lamp.
The lamps responsible for the side lights and turn signals/hazard warning lights are changed in the same way as the headlight lamps. The only difference is that they do not have a fixation spring and are not afraid of finger touches.
Replacing headlights VAZ 2107
In some cases (if the glass is damaged or you want to tune the car), you have to replace the headlight assembly. To replace, you need a Phillips screwdriver and an 8mm wrench.
The removal procedure is as follows:
- disconnect the ground wire;
- disconnect the lamp power terminals;
- remove the hydraulic corrector by pressing the lock;
- Unscrew the three fastening screws with a Phillips screwdriver (one of the screws is secured with a nut, which must be held in place with a key);
- remove the headlight by pulling it towards you.
To install the headlight, you need to do the operations in reverse order.
Tuning headlights VAZ 2107
It is quite possible to do headlight tuning yourself. For the query “headlights for VAZ 2107 tuning photo”, Yandex and Google find many links with instructions, tips and ready-made proposals. Various solutions are used here:
- ready-made and homemade headlights;
- LEDs and LED blocks;
- xenon headlights with lenses;
- headlight tinting
Do-it-yourself LED tuning of VAZ 2107 headlights
For the “Seven” you can easily find, buy and install non-standard headlights or individual lighting elements. The cheapest solution is to install LEDs instead of standard lamps or in addition to them. This allows you to transform the appearance of your car at a minimum cost.
Tuning the rear lights of a VAZ 2107 is also often done by changing lamp lighting to LED.
For tuning with LEDs you will need:
- resistors;
- panel or box for mounting lighting elements (LEDs);
- drill;
- drill;
- sealant;
- wires;
- LEDs.
The box or panel must be adjusted to the size of the headlight and installation holes for the LEDs must be drilled. Depending on the number and parameters of the LEDs used, resistors are connected in series to provide the required circuit resistance. The resistor values are selected individually. The sealant is used to secure the LEDs in the holes.
Important: when connecting LEDs, polarity must be taken into account.
In addition to the original appearance, tuning with LEDs has other advantages:
- low power and, as a result, low load on the on-board network;
- durability and reliability;
- diffused light that does not blind other road users.
If your budget allows, you can tune the VAZ 2107 headlights by replacing the standard units with ready-made tuning products. The advantage of this solution: beautiful design and excellent quality with minimal time investment.
Installation of xenon headlights on a VAZ 2107
Xenon headlights are characterized by a particularly powerful luminous flux, which requires additional focusing using lenses. Full-fledged xenon headlights are expensive and include, in addition to the power supply and lamps, an automatic beam height adjustment system and a headlight glass washer. Each of the elements is extremely important for safety:
- correct focusing and adjustment of the light flux is necessary so that oncoming drivers are not blinded by bright light;
- Without a washer, dirty headlight glass overheats and may burst.
If you do not have the funds to install xenon headlights of appropriate quality, it is better not to install fakes, endangering yourself and other road users, so we do not recommend installing this type of lighting and did not describe the connection
Tinting of headlights and taillights of VAZ 2107
Another common do-it-yourself tuning of VAZ 2107 headlights is tinting. It is used when upgrading both taillights and headlights. It is necessary to carefully choose the method of dimming the headlights - the quality of road lighting is a determining criterion for safety when driving at night.
Important: before tinting your headlights, you should take into account that tinted headlights may be grounds for imposing an administrative fine. You also need to understand that any tint reduces the brightness of the headlights, making night driving more dangerous.
In order for tinting to have a minimal effect on the quality of the car's headlights, it is worth tinting the glass surface only partially. This solution is safe and quite effective: narrowed headlights make the appearance more stylish. Partial tinting can also help avoid a fine - not the entire headlight is shaded, but a small sector.
To tint headlights, you must use only high-quality film. The order of work is as follows:
- remove the VAZ 2107 headlights;
- take out the glass;
- wash and degrease the surface;
- stick the film.
You can partially tint the headlights without removing and disassembling them - just wash the glass and stick on a strip of film. But this method does not provide adequate quality, and it is almost impossible to perfectly accurately cut and paste the film without removing the headlight unit.
When tinting the taillights, you should install brighter lamps in them so that the brake lights and side lights are clearly visible to other road users. To apply the film, it is also better to remove the rear lights from the car first.
This video shows a different car, but the principle of tinting is the same
semerkavaz.ru
How to choose a good kit
Today, there are a huge variety of xenon lamps on the automotive market. This variety makes the choice a little more complicated, and we will try to figure out which xenon is best for a particular car.
Most xenon kits consist of:
- xenon lamps;
- ignition blocks;
- wiring and fastening parts.
Xenon lamps have special markings - 6000K, 5000K, etc. It denotes color temperature - the brightness and color of the light that the lamp shines. Xenon marked 4300K shines white with a slight yellow tint .
They are often installed in fog lights and in the main headlights of a car. They are best suited for driving on wet asphalt. lamps emit a shade that is closest to white . Their light output power is the highest, and the light is normally perceived by the human eye. The light of a 6000K lamp has a slightly bluish tint , and is inferior in power to the two previous types, since it has the lowest light output. However, in the Russian and Ukrainian markets this type is the most popular.
The ignition unit is a device that supplies the required voltage to the xenon lamps necessary to ignite them. The more complex and “smarter” this block is designed, the more processes it controls. A high-quality ignition unit will ensure long-term and high-quality operation of the lamps , since during their ignition and glow the lamp parameters are within acceptable limits.
It will be useful for every driver to know what the fine is for driving without insurance or with a expired MTPL policy.
Airbrushing is an original way to decorate your car. We have prepared an article for those who want to make their car stand out from the gray mass.
Which xenon is better
Firstly, you should understand that the most expensive xenon will not necessarily work the best . The cost of well-advertised products includes the cost of advertising, so there is no point in overpaying.
Also, in order not to overpay, you should select an ignition unit that matches the functions of your car. For example, if the car does not have a module installed that controls the voltage of the lamps, then there is no point in buying xenon with so-called “false lights”. This will save money and not lose quality.
There is also no point in buying thin “slim” ignition units if you have enough space under the hood to install a standard unit. Good slim blocks are more expensive, and very cheap ones often have low quality materials and workmanship.
The most popular manufacturers of xenon lamps:
Xenon installation diagram
The installation process itself is quite simple and every car enthusiast can handle it.
Briefly, the xenon connection diagram can be described as follows: we install light bulbs, ignition units and connect them using the wires that come in the kit. What we need for installation:
- xenon kit - (lamps, ignition units, wires and fastenings);
- scissors;
- Phillips screwdriver;
- double-sided tape or clamps.
You may need a drill and a 25mm cutter, as well as some wrenches.
We install xenon with our own hands
Do not neglect safety precautions when installing xenon, as you can not only damage the equipment, but also seriously injure yourself. So make sure your hands are dry and oil-free.
It is also forbidden to touch the xenon lamp bulb with your hands. In case of contact with it, it is necessary to degrease the surface with alcohol.
Once you are convinced that the process is safe, you can proceed directly to the installation. First of all, we will remove the old halogen lamps and replace them with xenon lamps. To do this, you need to remove the protective cover from the headlights.
Disconnect the contact wires from the lamp and take it out.
In order to safely remove the light bulb in some cars, you need to release the spring that secures it.
We carefully remove the new xenon lamp from the protective bulb and insert it into the hole. Remember not to touch the flask with your hands . If you had a spring that fixed the halogen lamp, then you need to crush it. The fact is that the wires from the xenon lamps will need to be pulled through it and then brought out through a plug into the engine compartment.
From the battery side, this will be a little more difficult to do, since it will partially block access to the headlight. Therefore it is better to remove it. After installing the bulbs, connect the terminals from the ignition unit to them.
The next step is to make holes in the headlight plugs to run the wires through. There are two types of plugs - rubber and metal. We cut out a hole in rubber ones with scissors; in metal ones we will have to drill.
It is better to use a milling cutter for drilling. The optimal hole diameter is approximately 25 mm.
The stage of installing the light bulbs was the most difficult and time-consuming. Next, you need to select a location to install the ignition unit. It should be located in close proximity to the headlights so that the wires do not pass under tension.
It is better to choose a place that is protected from moisture, dirt and heat. In general, high-quality ignition units should be sealed, but some manufacturers take little care of this. If you still cannot find a protected place, then simply wrap the block with electrical tape or tape. This will increase his safety, albeit partially. The ignition unit itself can be secured using clamps, double-sided tape, or attached with screws.
Next, we connect the wires from the ignition unit and from the xenon lamps. Here, each wire has its own color, so it will be difficult to mix it up. also need to connect the ignition unit to the standard electronic system . To do this, we draw another wire from the ignition unit to the connector where the halogen light bulb was connected.
We repeat the procedure with the second headlight, the process is similar - we install xenon lamps, an ignition unit and connect the wires. We secure all the wiring with clamps so that it does not dangle. We twist the excess wire into a ring.
How to remove a headlight on a VAZ 2107
Replacing and gluing glass on a VAZ- 2107 , 2105 and 2104
Hello everyone! Today we will tell you how to change the glass on a VAZ- 2107 , VAZ-2105 or VAZ-2104 headlight yourself. This may be needed if the glass on your headlight is cracked, you break it, or the headlight starts to sweat. Yes, it’s sweating - headlights sweat when they are not sealed. And depressurization of the headlight is possible only if there is a crack in the housing (worst option), you forgot or did not close the back cover on the headlight tightly when replacing the lamps (best option), or you have problems with the glass (poorly glued, broken, cracked). So we will tell you how to independently glue glass into the headlight of a VAZ and similar “square” VAZs.
We remove the headlight from the car, to do this we remove two pads from the back (turning and light):
. and unscrew the headlight, three screws in front, one on top in the middle and two on the bottom on the sides, unscrew them and the headlight unit falls right into our hands. We take her and take her home. We unscrew the two headlight wiper stops, they will interfere:
Now, in any case, we will first need to get rid of the remnants of the old glass, or, if we are simply re-gluing the glass, then carefully remove it without breaking it. To do this we will need a sharp knife, something like this:
Replacing headlights on a VAZ 2105
Non-standard lamps led to overheating and cracking of the headlight
head light. The video shows the installation.
I broke the headlight / How to glue the headlight glass on a VAZ 2107
Today, I’ll tell you how you can literally glue in a new VAZ 2107 headlight
. Pay attention.
Carefully use it along the contour to cut the factory sealant (if the headlight has never been repaired) or silicone or other sealant, depending on the imagination of the person who glued the glass there before you. I have seen headlights with glass that was firmly glued in, that is, essentially unrepairable. And after that we carefully squeeze it out by prying the glass towards ourselves with something. If you cut it well it will come out quickly. Don't overdo it so it doesn't burst. Then we thoroughly clean everything from the old sealant so that only plastic remains:
We prepare the glass for the headlight and try it on. The glass must be “native” to your headlight; Kirzhach and OSVAR are different from each other.
You can buy a special sealant for headlights on the market, but we used regular silicone:
It’s just that black sealant will look a little prettier, but we neglected this. We carefully apply it around the perimeter of the body of our headlight, something like this:
We insert the glass and apply sealant or silicone around the perimeter; if there is not enough and there are gaps left, do not overdo it. We remove the excess and wrap the headlight with masking tape so that the sealant hardens properly and the glass does not move. Let it dry, ideally overnight:
After the sealant has hardened, remove the masking tape (painting tape simply does not leave marks like regular tape) and install the headlight back on the car, plug it in and enjoy. Do not touch the reflector while working, it is very easily damaged and try not to stain it with anything. That's all, you have learned how to independently replace and glue glass into the headlights of VAZ-2107, 2105 and 2104, but if you still have questions, we will be glad to see you in our club of VAZ-2107 lovers .
Bi-xenon installation
Bi-xenon is the same lamp filled with an inert gas, only equipped with a special electromagnet. It controls the focus of the lamp, which allows you to create “low” and “high” light. A conventional xenon lamp constantly shines at full power, and the power of bi-xenon lenses is regulated using a solenoid (electromagnet).
The principle of installing bi-xenon with your own hands is approximately the same. It differs only in the presence of a voltage controller, which is connected to the lamp, battery and ignition unit . Its main function is to control and stabilize the voltage in the wiring.
We wrote above how to install xenon yourself. Now let’s just look at the connection diagram for bi-xenon lenses and look at some of the nuances.
- The high-voltage wires from the bi-xenon lamps are connected to the corresponding wires from the ignition unit.
- The controller is connected to the power connector of the ignition unit.
- The third wire on the lamp is the electromagnet connector, which controls the intensity of the light. It also connects to the controller.
- The connector from the controller is connected to the standard lamp power connector. It has 3 contacts.
- We connect the controller to the battery power, “+” and “-” respectively.
After installation , do not forget to adjust the headlights so as not to dazzle oncoming drivers. Remember that well-adjusted headlights will ensure the safety of all road users.
Statistically, heavily tinted cars are more likely to be involved in accidents. You can find out what standards for tinting the front glass according to GOST on our website.
A good battery will last much longer. Useful tips on choosing a battery for beginners and experts.
Today, there are many different radar detectors available on the automotive gadget market. On this page you can find out /tuning/elektronika/radar-detektor-kak-vybrat.html what parameters you should pay attention to when choosing a radar detector.
Tuning rear and front headlights on a VAZ 2107
It's no secret that classic domestic cars like the VAZ 2107, along with their simplicity and reliability, are not distinguished by sophistication and perfection of design. For this reason, their owners initially learn to do car tuning with their own hands.
First of all, this concerns such simple things as body tuning, body kits, and exterior lighting. Today, the auto parts market provides a lot of ready-made options for improving lighting devices. Depending on the goal and budget of the project, options are available for both complete replacement of headlights and certain elements.
The cheapest and easiest tuning that you can do yourself is installing LED lighting elements in the headlights and rear lights instead of standard lamps. Thus, at minimal cost you can significantly transform the appearance of the VAZ 2107.
To do this work yourself you will need:
- LEDs;
- Resistances (resistors);
- A panel or small box for the front and rear headlights (lights), for mounting LEDs;
- A drill with a drill whose diameter corresponds to the size of the LEDs;
- Connecting conductors;
- Sealant.
First of all, we adjust the panel or box to the size of the headlight with our own hands. Next, we drill holes for the LEDs, at the same distance from each other. Using the method of several samples, you can select the optimal number and order of their arrangement. Having installed the LEDs, we connect their contacts to each other - separately positive and negative.
For every 3-4 LEDs, a resistance (resistor) is installed to ensure appropriate resistance for the entire circuit. The resistor resistance is selected individually, depending on the characteristics of the LEDs used. The assembled circuits are connected to the headlight power supply blocks.
The main advantages of LEDs installed in the front and rear lights are:
- Low power, which allows reducing the load on the on-board network of the VAZ 2107;
- Smooth diffused light, thanks to which, despite the high efficiency of the front and rear headlights, they do not blind drivers of other vehicles;
- High durability;
- Great looks.
If the project budget is unlimited, you can perform tuning of VAZ 2107 headlights without extra labor and time. To do this, it is enough to purchase ready-made tuning headlights and rear lights, with built-in LEDs, and replace standard lighting fixtures with them. In addition, you can install LEDs in the turn signals and front (rear) fog lights with your own hands.
Nowadays, LEDs are increasingly used for lighting, both in everyday life and in cars, mainly due to their efficiency and long service life. Therefore, you should not neglect the opportunity to do your own tuning of VAZ 2107 headlights with high quality, efficiency and without large material costs.
In addition to LED lights, car enthusiasts often use xenon headlights with original lens and glass shapes. Xenon has a more powerful luminous flux than halogen and LED lamps, but at the same time it has a bad effect on visibility for oncoming drivers. Before the advent of LED lighting technologies, xenon was the most common way to make high-quality tuning of car optics.
Along with tuning of external lighting fixtures, interior lighting lamps and lamps in the dashboard are modernized. Thanks to the breadth of choice on the modern market, with a high-quality approach you can achieve excellent results, making the design of your VAZ 2107 unique and inimitable, no worse than that of expensive foreign cars.