A note about what kind of lighting lamps are installed in the Largus headlights; which of them are low/high beam, and which are responsible for the side lights. How to change lamps yourself. How much do originals and analogues cost in Yaroslavl?
Good day, future and aspiring gentlemen Largusovod!
On Largus, the low/high beam and headlight lamps often burn out. At least for 70 thousand I have already changed it five times on each side.
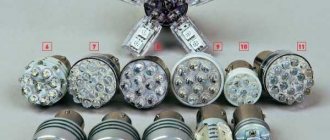
The following light bulbs were installed on my car:
1. Low/high beam: halogen, Osram H4 12v 60/55w. (art. 64193). Price from 109 rub.
There are many analogues. Here are some of them:
370 rub. General Electric (34454)
117 rub. Valeo (032007)
2. Front dimensions: halogen baseless 12V Osram (art. 2825). Price from 17 rub.
26 rub. Lynx (L12805)
9 rub. Fortluft (2825)
3. Rear dimensions: two-pin with filament, base BAY15D. Beacon 12V P21/5W.
from 56 rub. Fortluft (7528)
They burn out less often. I changed it only once in the right lamp. This is what she looks like:
How to replace headlight bulbs
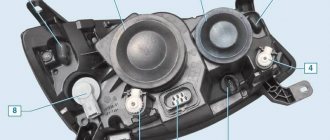
1. First, remove the protective cover. It turns a little, then a small latch is released.
2. The block with wires is removed.
3. Remove the rubber protective sleeve.
4. The lamp is pressed U -shaped clamp. It needs to be pulled to the side and back.
5. Take out the lamp. Remember its orientation. Two teeth at the bottom, one at the top. And if you look at it from the side of the headlight, the inscription (marking) will be on top.
6. Install a new lamp. You should not take it with your bare hands, as greasy marks from the pores will remain on the bulb and the lamp will fail faster. This applies to all halogen lamps. It is better to hold it by the plinth or use a microfiber cloth.
7. Assembly is carried out in reverse order. First the clamping clamp, then the rubber bushing and finally the top cover.
How to replace front markers
There isn't much action here. The main thing is to get to the cartridge and turn it 90 degrees. The most inconvenient thing to change is the battery side. Not enough space. If your hand is large, it is better to remove it.
Thus, the procedure is as follows:
- Found a cartridge
- They turned it over and took it out
- Removed the lamp
- It is better to wear gloves when installing a new lamp into the socket.
- Then we insert the cartridge back into the headlight and rotate it 90 degrees.
How to replace rear lights
Changing lamps is a pleasure. All you need to do is remove the headlight unit. It is secured with two wings from the interior: one at the top under the plastic upholstery, the other at the bottom. We unscrew them, move the headlight to the side and disconnect the block with the wires.
Next you need to remove the protective cover. It is held on by three latches. There are three lamps underneath it. We find the size lamp and change it. The steps are simple: insert into the cartridge and turn.
Car headlights are designed to provide a full view of the road at night. The proper condition of all lighting sources on the car is a necessary condition for safety while driving. Traffic regulations set very strict requirements for the serviceability of headlights. A driver who does not comply with them is subject to a fine.
To avoid troubles with the car inspection, the car owner is obliged to regularly inspect the lights on his car and, if defects or breakdowns are detected, promptly take measures to eliminate them.
Headlights on Lada Largus may have the following types of problems:
- burnt out lamps;
- broken lamps;
- cracks on the surface of the optics;
- dimming of lights;
- incorrect formation of the light beam, etc.
The reasons for these problems may vary. Clouding of the optics is caused by the matting effect of dust particles in the oncoming air flow; cracks and broken lamps are usually the result of a collision with an obstacle while driving. Scratches on the surface of the optics can be the result of driving on roads with bushes and trees with spreading branches growing on the sides.
Changing lamps
First, let's look at how to replace the low beam bulb and replace the high beam bulb on the Lada Largus. Headlights on Lada Largus use one H4 lamp with a voltage of 12 V and a power of 60/55 W for low and high beam. Therefore, replacing the low beam bulb on a Lada Largus will automatically mean replacing the high beam bulb.
While working, follow the following algorithm:
- To access the left light, you will need to remove the battery.
- Turn the lantern cover counterclockwise.
- Release the holder and remove the cover.
- Release another holder to remove the cable block.
- Hook the rubber cap on the edge and open it.
- Move the light bulb holder aside and remove it.
- Install the new product and follow the procedure in reverse order.
- As in other cars, in Lada Largus lamps are replaced on both sides, even if one fails. This is explained by the need for complete symmetry in road lighting. Therefore, do the same procedure on the right side.
Remember that you must hold the light bulb by the base - touching the bulb with your hands is strictly prohibited. Otherwise, the fat from your fingers will remain on the glass and will begin to evaporate during operation at high temperatures - its deposition on the optics will lead to clouding and poor visibility.
The change in dimensions looks like this:
- We unscrew the screws securing the fender liner and remove it;
- We unscrew the socket with the light bulb, turning it counterclockwise on the right, and clockwise on the left;
- We unscrew the burnt out product and screw in a new one;
- Then we proceed in reverse order.
We proceed in the same way with turning lights:
- Unscrew the screws and remove the fender liner;
- We turn out the cartridge;
- We change the light bulb and screw the socket back;
- We return the fender liner to its place.
The situation with fog lights is similar:
- Remove the fender liner;
- We snap off the holder and disconnect the block;
- Turn the lamp 1/3 turn counterclockwise and remove it;
- Installing a new one;
- Then we proceed in the reverse order.
Some drivers manage to gain access to the headlights through the engine compartment without removing the fender liners and battery - this requires dexterity and some experience.
Standard replacement procedure
- Replacing the low beam lamp, as well as the high beam, begins by disconnecting the on-board power supply. This precedes all electrical repair work. In this case, a special switch is turned or the negative terminal is disconnected from the battery, which avoids accidental short circuits or erroneous connections during installation.
- The place where the Largus lamp will be replaced is determined. There, the rubber plugs covering the electrical components are removed, and two metal antennae are opened in front of the car owner, fixing them in the reflector. They are separated so that the used parts can come out of their seat without damaging the housing.
- Next, you need to disconnect the plugs from the wiring that was previously disconnected. Here it is worth paying attention to the order of arrangement, otherwise, during the installation of new parts, everything can be mixed up and they will have to be changed again.
- After connecting the plug with wiring to the new parts, they are mounted in place and secured with antennae. You should try not to touch the flasks with your hands, as this can lead to their rapid failure.
- If the light is dim during lighting, and the headlights flash when you turn on the headlights, then it is imperative to restore the contacts of the wires with the vehicle body. This is especially true for a marker lamp, because the fat that gets there begins to evaporate when heated and can cause ignition.
- At the end of this procedure, you need to put on the rubber plugs and secure all the parts in their places. After this, the car will be ready for use and the driver does not have to worry about malfunctions of the Lada Largus lighting fixtures.
As practice shows, in modern domestic cars, one of which is the Lada Largus, lamps with directional luminous flux are most often used. The essence of such lighting is a reliable view in front of and behind the car. At the same time, inconvenience to other traffic participants heading towards the driver or driving behind is excluded.
Replacing the headlight
Now let's see how to remove the headlight on a Lada Largus if you need to replace or repair it:
- First, remove the wheel from the side where you are going to change the light.
- Unscrew the fastening screws and remove the fender liner.
- Disconnect the wires.
- Remove the block.
- While turning, remove the marker and turn signal cartridges.
- Open the hood, remove the lamp cover and remove the block.
- Disconnect and remove the hydraulic correction cable.
- Remove the front bumper to gain access to the light mounts.
- Unscrew the three bolts - use a ten-point socket to do this.
- Remove the headlight and install a new one in its place.
- Reassemble in reverse order.
How to choose a lighting element
The range of lamps for installation in car headlights is very extensive. However, there are two factors that significantly limit your choice:
- the design of the headlamp block does not allow the use of any options you like;
- code requirements that expressly prohibit the installation of any elements other than those originally used by the manufacturer.
In the Lada Largus car, the functions of low and high beam are performed by one double-filament halogen lamp. This is convenient as it allows you to save space under the hood and reduce the size of the headlight unit. One tungsten filament produces a beam of light of greater brightness, directed primarily horizontally (high beam), and the second creates a beam with an opening angle of 30°, of which 10° are directed above the horizontal, and the remaining 20° below it.
The ability to reduce the size of the headlight unit results in the need to change the light bulb when any filament fails, even if the second one works quite reliably. In addition, you always have to change both lamps, left and right, since for high-quality lighting you need a set of two lamps selected according to their characteristics.
Lada Largus lamp base
High and low beam are realized using one light bulb with h4 socket. In addition, the following types of base are used for different positions:
In addition, there is a C3W baseless bulb that illuminates the stove control.
Table of lamps used in Lada Largus
Let's consider what lamps are installed for light signaling on Largus. Front lamps:
| Front lamps | Type | Power, W |
| Low/high beam | H4 | 60/55 |
| Front turn | PY21W | 21 |
| Dimensions | W5W | 5 |
| Fog lights | H11 | 55 |
| Side dimensions | WY5W | 5 |
| Rear lamps | Type | Power, W |
| Direction indicators | PY21W | 21 |
| Dimensions and brake signal | P21/5W | 21/5 |
| Fog light | P21W | 21 |
| Reverse | P21W | 21 |
| Additional brake light | P21W | 21 |
| License plate lamp | W5W | 5 |
| Trunk lighting | W5W | 5 |
Interior lighting and service lighting:
| Purpose of the lamp | Type | Power, W |
| Interior lighting | W5W | 5 |
| Individual lighting | W5W | 5 |
| Glove compartment lamp | W5W | 5 |
| Cigarette lighter illumination | W1.2W | 1,2 |
| Illumination of the ventilation, air conditioning and heating unit | W1.2W | 1,2 |
| Hazard switch illumination | W1.2W | 1,2 |
Important! This is a complete list of lamps used on the Lada Largus. It must be taken into account that new models, for technological or other reasons, can be equipped with other types of lamps.
The best n4 lamps for Largus
To install the high/low beam of the Lada Largus, H4 halogen lamps are required, provided by the optics of the headlights. The most popular models:
- Philips X-treme Vision. Bright lamps giving cool white light. This is convenient in good weather, but in fog or snow the lighting efficiency is sharply reduced;
- Philips LongLife EcoVision. Inexpensive models with extended operating time;
- Osram Original Line. All-weather design with extended coverage area;
- Bosch Pure Light. They have bright light and extended service life.
Read more: Car battery sizes table
According to users, the best option is Bosch Pure Light, the cheapest and brightest designs. Philips X-treme Vision is too expensive and often fails quickly, in addition, vision 130 models are too often counterfeited by unscrupulous manufacturers from Southeast Asian countries. Osram products represent an average option in terms of characteristics and service life, but when purchasing you need to carefully monitor the supply voltage - many models are designed for 24 V.
Dimensions
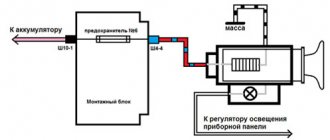
To replace the side light bulb in Largus, the socket of the old part is turned counterclockwise. The black and yellow wires connect it to the battery, so it turns off from them. A new part is installed in this place, and assembly is carried out in the reverse order.
You need to make it a rule to regularly change not only the lamps, but also monitor other lighting elements. After all, the process of reducing their brightness occurs slowly and the driver simply does not notice the deterioration in road lighting.
Car headlights are designed to provide a full view of the road at night. The proper condition of all lighting sources on the car is a necessary condition for safety while driving. Traffic regulations set very strict requirements for the serviceability of headlights. A driver who does not comply with them is subject to a fine.
To avoid troubles with the car inspection, the car owner is obliged to regularly inspect the lights on his car and, if defects or breakdowns are detected, promptly take measures to eliminate them.
Headlights on Lada Largus may have the following types of problems:
- burnt out lamps;
- broken lamps;
- cracks on the surface of the optics;
- dimming of lights;
- incorrect formation of the light beam, etc.
The reasons for these problems may vary. Clouding of the optics is caused by the matting effect of dust particles in the oncoming air flow; cracks and broken lamps are usually the result of a collision with an obstacle while driving. Scratches on the surface of the optics can be the result of driving on roads with bushes and trees with spreading branches growing on the sides.
Driving with headlights that have any of the above factors is unacceptable. To carry out repairs, you can contact a service station, where qualified technicians will provide you with the required assistance. But car service costs money - not all vehicle owners are ready to incur financial expenses.
Which low beam lamp is suitable for Largus?
60/55 H4 lamps are installed at the factory:
- 60/55 is the power of low beam (55) and high beam (60) in watts,
- H4 - base type.
Please note that the same bulb is used for low and high beam.
Quick comparison
| Model | Peculiarities | Rating | Link |
| Philips X-treme Vision | the brightest, give white light | ★★★★★ | Buy |
| Philips LongLife EcoVision | inexpensive, extended service life | ★★★★✩ | Buy |
| Bosch Pure Light | extended service life | ★★★★✩ | Buy |
| Osram Original Line | good lighting area | ★★★★✩ | Buy |
Philips X-treme Vision - the brightest light bulbs
Features declared by the manufacturer:
- bright white light,
- increase the lighting area in front of the car by 45 m,
- high quality quartz glass.
One of the highest brightness levels and incredible comfort in the dark.
The package contains two lamps.
Country of origin: Poland.
What we like most: White bright light, increased illumination area.
Test results
Good ADAC score, results:
- very good road lighting,
- short service life,
- relatively expensive (but each lamp is tested at the factory).
Auto Express test winner. According to the measurement results, the border of the bright light spot is 75 meters from the car.
Philips LongLife EcoVision - long-lasting lamps on Largus
- high strength quartz glass,
- resistant to temperature changes and vibration,
- high internal pressure - powerful light.
There are two pieces in the package.
Country of origin: Poland, Germany.
What we like most: they are close in color to standard lamps, they should last longer than regular lamps.
Bosch Pure Light
Features declared by the manufacturer:
- up to 90% more light,
- exclusive design with silver plating and blue sector.
Read more: Chevy Niva 2 news official website
There is one piece in the package.
Country of origin: Poland, Germany.
What we like most: Inexpensive, well-known manufacturer.
Osram Original Line
- quality of the original spare part (OEM),
- improved visibility up to 130%.
The package contains one lamp.
Country of origin: Germany.
What we like most: inexpensive, good service life, country of origin.
Driving safety largely depends on the condition of the head optics. Failure of any element impairs the driver's visibility of the roadway at night, increasing the risk of an emergency. The maximum load is experienced by the low beam lamp, which is the first to fail. Replacing a lamp requires skills, knowledge of the procedure and the availability of a spare light bulb that is suitable for all parameters. Let's look at the selection and installation procedure using the Lada Largus car as an example.
Changing lamps
First, let's look at how to replace the low beam bulb and replace the high beam bulb on the Lada Largus. Headlights on Lada Largus use one H4 lamp with a voltage of 12 V and a power of 60/55 W for low and high beam. Therefore, replacing the low beam bulb on a Lada Largus will automatically mean replacing the high beam bulb.
While working, follow the following algorithm:
- To access the left light, you will need to remove the battery.
- Turn the lantern cover counterclockwise.
- Release the holder and remove the cover.
- Release another holder to remove the cable block.
- Hook the rubber cap on the edge and open it.
- Move the light bulb holder aside and remove it.
Replacing a low beam lamp on a Lada Largus
- Install the new product and follow the procedure in reverse order.
- As in other cars, in Lada Largus lamps are replaced on both sides, even if one fails. This is explained by the need for complete symmetry in road lighting. Therefore, do the same procedure on the right side.
Remember that you must hold the light bulb by the base - touching the bulb with your hands is strictly prohibited. Otherwise, the fat from your fingers will remain on the glass and will begin to evaporate during operation at high temperatures - its deposition on the optics will lead to clouding and poor visibility.
The change in dimensions looks like this:
- We unscrew the screws securing the fender liner and remove it;
- We unscrew the socket with the light bulb, turning it counterclockwise on the right, and clockwise on the left;
- We unscrew the burnt out product and screw in a new one;
- Then we proceed in reverse order.
We proceed in the same way with turning lights:
- Unscrew the screws and remove the fender liner;
- We turn out the cartridge;
- We change the light bulb and screw the socket back;
- We return the fender liner to its place.
Replacing a turn signal bulb on a Lada Largus
The situation with fog lights is similar:
- Remove the fender liner;
- We snap off the holder and disconnect the block;
- Turn the lamp 1/3 turn counterclockwise and remove it;
- Installing a new one;
- Then we proceed in the reverse order.
Some drivers manage to gain access to the headlights through the engine compartment without removing the fender liners and battery - this requires dexterity and some experience.
Replacing a fog lamp on Largus
Replacing lamps in headlights of Lada Largus
During operation of the vehicle, the headlight bulbs may burn out. If you decide to replace them not at the dealer, but yourself, we recommend that you first study the instructions. The fact is that on the Lada Largus the lamps in the headlights change with some features, which we will discuss later.
- Low and high beam lamp - H4, power 12V, 60/55W;
- Bulb dimensions - W5W, power 5W;
- Front turn signal lamp - PY21W;
- Fog lamps - H11, power 12V, 55W.
Low and high beam lamp - H4, power 12V, 60/55W
Bulb dimensions - W5W, power 5W
Front turn signal lamp mdash; PY21W
Fog lamps - H11, power 12V, 55W
One lamp is responsible for low and high beam. Its resource is 2000-4000 hours. To gain access to the left headlight unit, you must remove the battery.
- Turn the lid counterclockwise;
- Remove the cover by releasing the latch.
replacing low and high beam lamps Lada Largus
replacing low and high beam lamps Lada Largus
- Remove the block with wires by unclipping the lock;
- Remove the rubber cover by prying it off by the edge.
replacing low and high beam lamps Lada Largus
replacing low and high beam lamps Lada Largus
- Unscrew the lamp clamp to the side;
- Remove the headlight bulb.
replacing low and high beam lamps Lada Largus
replacing low and high beam lamps Lada Largus
Installing a new lamp in the Largus headlight is carried out in the reverse order. You need to hold the lamp by the base; it is not recommended to touch the bulb with your fingers. If necessary, wipe the flask with a microfiber cloth that does not leave lint. The process of replacing the H4 lamp is also shown in the video:
There is no access to the lamp from the engine compartment, so replacement is made from below.
- Remove the fender liner by removing the screws;
- Remove the lamp socket by turning it clockwise (for the right one - counterclockwise);
- Remove the baseless lamp from the socket.
remove the fender liner Lada Largus
replacing the side light bulb on Lada Largus
replacing the side light bulb on Lada Largus
Install the new lamp in the reverse order.
There is no access to the lamp from the engine compartment, so replacement is made from below.
- Remove the fender liner by removing the screws;
- Remove the lamp socket by turning it counterclockwise;
- Remove the lamp by pressing and then turning it counterclockwise.
Removing the fender liner Lada Largus
replacing turn signal lamp Lada Largus
replacing turn signal lamp Lada Largus
Install the new lamp in the reverse order.
There is no access to the lamp from the engine compartment, so replacement is made from below.
- Remove the fender liner by removing the screws;
- Disconnect the block from the lamp by pressing the lock;
- Remove the lamp by turning it a third of a turn counterclockwise.
Removing fender liners Lada Largus
replacing lamps in PTF Lada Largus
replacing lamps in PTF Lada Largus
Install the lamp in the reverse order.
Attention! In practice, replacing lamps in a Largus headlight is much easier. In other words, it is not at all necessary to remove the battery and fender liners (lockers). If you get the hang of it, you can access all the headlight bulbs from the engine compartment.
Let us remind you that other operating and repair instructions for Lada Largus are in this category. It is convenient to find the answer to your question based on the content.
Source: https://calypsocompany.ru/avto/zamena-lamp-v-farax-lada-largus
Replacing the headlight
Now let's see how to remove the headlight on a Lada Largus if you need to replace or repair it:
- First, remove the wheel from the side where you are going to change the light.
- Unscrew the fastening screws and remove the fender liner.
- Disconnect the wires.
- Remove the block.
- While turning, remove the marker and turn signal cartridges.
- Open the hood, remove the lamp cover and remove the block.
- Disconnect and remove the hydraulic correction cable.
Removing the hydraulic corrector unit on the Lada Granta headlight
- Remove the front bumper to gain access to the light mounts.
- Unscrew the three bolts - use a ten-point socket to do this.
- Remove the headlight and install a new one in its place.
- Reassemble in reverse order.
Installing a new headlight on Largus
Replacing the low beam bulb on a Lada Largus — RenoStar
Constant use of the car will one day lead to the need to replace light bulbs on the Lada Largus. This is easy to do at a specialized service station, but you can do all the necessary work yourself.
To achieve the desired result, you need to carefully study the instructions. This is due to some nuances that should be taken into account when replacing light bulbs on a Lada Largus.
Let’s talk about all these subtleties of work in more detail.
What kind of lamps are in the headlights of Lada Largus?
All lamps that are used for outdoor lighting in Lada Largus can be divided into 3 categories:
- halogen;
- xenon;
- LED
You also need to understand what kind of light bulbs are needed to replace in a Lada Largus car:
For low beam, use an H-4 bulb with a power of 12V, 60/55W;
For dimensions, you need to take a W5W lamp with a power of 5W;
For the front turn signal, use a PY21W bulb;
The fog lights have H-11 lamps with a power of 12V, 55W.
Replacing low and high beam bulbs on a Lada Largus
Any replacement of light bulbs must begin with turning off the power. These actions are required for working with electrical equipment of a car. The power is disconnected by turning a special lever or removing the terminals from the battery.
This way you will completely eliminate short circuits caused by improper connection of wires. You need to understand that one bulb is used for the low beam of Largus , and the second for the high beam. The average lamp operating life ranges from 2-4 thousand hours.
You can gain access to the left light by removing the battery.
- Turn the lid counterclockwise;
- We remove it by releasing the latches.
- We remove the block with all the wires, also not forgetting to release the latches;
- Remove the rubber cover by slightly prying it off.
- Move the lamp clamp to the side;
- We remove the burnt out light bulb from the socket.
Installing the working light bulb in the Largus lantern is carried out in the reverse order. Remember that you should only hold the lamp by the base, and it is advisable not to touch the bulb. As a last resort, you can wipe the light bulb with a lint-free microfiber cloth. You can watch the correct process of replacing a low beam light bulb in the video:
Replacing side light bulbs on Largus
If it is necessary to replace this lamp, the entire lamp must be removed. This is the only way to ensure access to the side lights of Largus. After dismantling, we disconnect all power wires with extreme care and attention.
After disconnecting the power from the battery, you need to remove the front bumper, which serves as additional protection for the dimensions. Ideally, work is carried out with sterile gloves.
If the device was accidentally touched, it must be treated with a lint-free microfiber cloth.
- We remove the fender liner by removing the fasteners;
- We remove the socket with the light bulb by turning it in the direction of the clock, and for the right side you need to turn it in the opposite direction;
- Remove the burnt out lamp from the base.
To replace the backlight on Largus, turn the socket counterclockwise. Then carefully connect the 2 wires to the battery. And now all that remains is to install the working lamp and carry out the assembly. Installing all components in place is carried out in the reverse order and does not take much time.
Replacing turn signal bulbs on Lada Largus
It is impossible to get to this lamp from the engine side, so we will replace it from below the car.
- We remove the fender liner by removing the fasteners;
- We unscrew the socket with the burnt out lamp counterclockwise;
- Remove the lamp by carefully pressing it and at the same time turning it counterclockwise.
Reinstalling all parts is carried out in reverse order.
Replacing bulbs in fog lights
As in the previous case, the replacement is carried out from below the car.
- We unscrew the fasteners and dismantle the fender liner;
- Unlock the latch and disconnect the block from the lamp;
- Carefully turn the light bulb counterclockwise and remove it from the socket.
Installing the work lamp is carried out in the reverse order.
Let's sum it up
It is imperative to monitor all lighting elements and change them on time. Reduced efficiency of light bulbs can easily lead to dangerous situations while driving!
Source:
Replacing lamps in headlights of Lada Largus
January 18, 2020 LadaOnline 46,963
During operation of the vehicle, the headlight bulbs may burn out. If you decide to replace them not at the dealer, but yourself, we recommend that you first study the instructions. The fact is that on the Lada Largus the lamps in the headlights change with some features, which we will discuss later.
What kind of bulbs are in the headlights?
- Low and high beam lamp - H4, power 12V, 60/55W;
- Bulb dimensions - W5W, power 5W;
- Front turn signal lamp - PY21W;
- Fog lamps - H11, power 12V, 55W.
Low and high beam lamp - H4, power 12V, 60/55W Sidelight bulb - W5W, power 5W Front turn signal lamp - PY21W Fog lamps - H11, power 12V, 55W
Low and high beam
One lamp is responsible for low and high beam. Its resource is 2000-4000 hours. To gain access to the left headlight unit, you must remove the battery.
- Turn the lid counterclockwise;
- Remove the cover by releasing the latch.
replacement of low and high beam lamps Lada Largusreplacement of low and high beam lamps Lada Largus
- Remove the block with wires by unclipping the lock;
- Remove the rubber cover by prying it off by the edge.
replacement of low and high beam lamps Lada Largusreplacement of low and high beam lamps Lada Largus
- Unscrew the lamp clamp to the side;
- Remove the headlight bulb.
replacement of low and high beam lamps Lada Largusreplacement of low and high beam lamps Lada Largus
Installing a new lamp in the Largus headlight is carried out in the reverse order. You need to hold the lamp by the base; it is not recommended to touch the bulb with your fingers. If necessary, wipe the flask with a microfiber cloth that does not leave lint. The process of replacing the H4 lamp is also shown in the video:
Side light bulb
There is no access to the lamp from the engine compartment, so replacement is made from below.
- Remove the fender liner by removing the screws;
- Remove the lamp socket by turning it clockwise (for the right one - counterclockwise);
- Remove the baseless lamp from the socket.
remove the fender liner Lada Largusreplacing the side light bulb Lada Largusreplacing the side light bulb Lada Largus
Install the new lamp in the reverse order.
Turn signal lamp
There is no access to the lamp from the engine compartment, so replacement is made from below.
- Remove the fender liner by removing the screws;
- Remove the lamp socket by turning it counterclockwise;
- Remove the lamp by pressing and then turning it counterclockwise.
Removing the fender liner Lada LargusReplacing the turn signal lamp Lada LargusReplacing the turn signal lamp Lada Largus
Install the new lamp in the reverse order.
PTF lamp (fog lamp)
There is no access to the lamp from the engine compartment, so replacement is made from below.
- Remove the fender liner by removing the screws;
- Disconnect the block from the lamp by pressing the lock;
- Remove the lamp by turning it a third of a turn counterclockwise.
Removing fender liners Lada LargusReplacing lamps in PTF Lada LargusReplacing lamps in PTF Lada Largus
Install the lamp in the reverse order.
Attention! In practice, replacing lamps in a Largus headlight is much easier. In other words, it is not at all necessary to remove the battery and fender liners (lockers). If you get the hang of it, you can access all the headlight bulbs from the engine compartment.
Source: https://dol-avto.ru/dvigatel/zamena-lampochki-blizhnego-sveta-lada-largus.html
