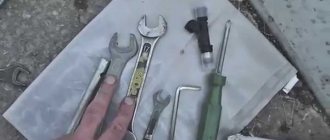
REMINDER FOR INSTALLING HEATING ELEMENTS ON REAR VIEW MIRRORS
1. Disassemble the rear view mirror in accordance with the manufacturer's recommendations and remove the mirror element. To remove the mirror element (or separate it from the adhesive base), it may be necessary to heat the housing to a temperature of 70-90°C, which can be achieved using a hair dryer. It is necessary to take into account that the plastic from which the case is made has low thermal conductivity, and heating (as well as cooling) occurs slowly. It is recommended to carry out work in a heated room.
2. Place the heating element over the gluing area. To do this, place it against the mirror (“back to back”) and trace it along the contour with a marker, so that the current-carrying strips do not fall into the cutting area. Trim off excess.
3. Degrease and wipe dry the gluing surface.
4. If the heating element is on a self-adhesive base, peel off the protective film and apply the heating element to the back of the mirror in accordance with the markings. It is recommended to glue along the long side and, moving towards the opposite end, press the heating element to prevent the formation of air bubbles. If a bubble does appear, remove it by piercing it with a needle and pressing.
5. If the heating element does not have a self-adhesive base, glue it with BF 88 glue in accordance with the instructions.
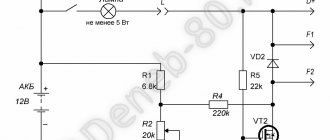
6. Install the electrical circuit. When installing an electrical circuit, the circuits must be protected by a fuse. The heating element must be connected via a separate switch and relay after the ignition switch. Connection to the rear window heating circuit is not allowed! The connection points of the wires must be crimped with a sleeve or soldered and insulated with insulating tape or heat-shrinkable tubing.
7. Check for correct assembly by performing a test run. In this case, heating of the mirror element should be observed.
8. Install the mirror element into the housing, following the same rules as during disassembly (preliminary uniform heating of the housing).
How to make heated side mirrors with your own hands?
This process is somewhat more complex than installing ready-made components. But still, even a beginner can carry out such work and the made reflector will serve perfectly.
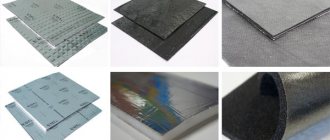
We will talk about installation using the example of one of the options mentioned above, a film heater. It is effective and simple to make heated mirrors in your car.
- A film heater can be purchased at the car market. You will need to stick it with double sided tape to the back of the reflector. Pre-degrease. Cut off the protruding parts of the film, bend the edges so that they do not protrude beyond the edges of the mirror. The mirror reflector and the heater contacts must not touch, otherwise the former will burn out.
- If the case has stiffening ribs on the inside, they will need to be carefully cut off and a hole made for the wiring. The film usually comes with outgoing wires that need to be connected to the car's wiring.
- The wires are routed through standard passages in the doors to the salon, to the place where the control relay will be. It must also be connected to the battery. In this case, install a fuse on the wire connecting to the battery.
- The wire for controlling the relay is connected to the ignition switch. A power button is installed in the gap of this wire, otherwise the heating will go on constantly when the car is turned on.
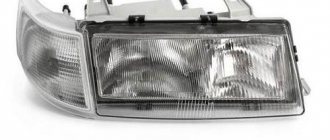
Exterior mirrors
Model selection
News
- [17.01.2019]
ATTENTION! From January 1, 2020, due to an increase in the VAT rate, prices for products of NPK Polytech have been changed. - [10.01.2019]
Sale of interior and additional mirrors produced by 3R! - [05.06.2017]
Since May 2020, NPK Polytech products have been labeled with EAN-13 barcodes.
Instructions for installing mirrors: Here you can download the passport and instructions for installing mirrors of NPK "Polytech".
Installation of heated mirrors.
Here are general recommendations for installing heated mirrors that apply to all car models. Detailed installation information is contained in the operating instructions for each specific mirror (see above).
First, you need to turn off the voltage of the vehicle's on-board network (remove the battery terminals). Then, remove the existing mirrors and install heated ones instead, after passing the heating wires inside the door. For ease of operation, you should first remove the inner door trim. Next, the wires are led out of the door under the dashboard of the car. It’s good if the car already has electrical wires entering the door - the heating wires can be routed through it. If there is no input, then you will have to drill two holes: in the body pillar and at the end of the door and lay the wires through them.
To avoid accidental damage to the wires when closing the door, it is useful to install protective rubber bushings from the VAZ-2106 or Oka into the holes. Any other dense rubber bushing will do, as long as it can be securely fastened to the body pillar.
One of the wires is connected to the ground of the car in any convenient place. It is not recommended to connect to ground inside the door, since electrical contact in door hinges and other moving connections is not always reliable. The other wire connects to the power supply. It can be connected in parallel to the heated rear window or through a separate switch. The first method is the simplest. The connection is made by connecting the heated mirror wire to the output wire of the rear window heated relay.
Special clamps that have recently appeared on the market allow you to connect wires without preliminary stripping and subsequent insulation. As a result, the entire connection operation takes a few seconds. However, not all domestic cars are equipped with a heated rear window. In addition, in some cases, for example, when driving in fog, the mirrors may fog up, although the rear window remains clear. Therefore, connecting via a switch is more convenient and versatile. Standard switches from any car model will do. Just make sure that the current limit value through the switch (usually indicated on its body) is greater than the current consumed by the heating system. If the passport for heated mirrors only indicates the power of the heating system, then the amount of current consumed can be easily determined by dividing the power by the voltage of the on-board network. Connecting the heated mirror system with electric drive is carried out in the same way.
The bathroom belongs to the category of wet rooms. High humidity causes some discomfort, not to mention the formation of fungus. When planning renovation work in the bathroom, it is necessary to consider the following points:
1. Ventilation (natural or forced) 2. Room heating (warm floor; heated towel rail; radiator)
An indispensable attribute of the bathroom is a mirror, the surface of which is susceptible to fogging.
There are several ways to solve the problem of mirror fogging.
1. Wipe the surface of the mirror with your hand 2. Before taking a bath or shower, rub various gels (liquid soap, shampoo, special spray) into the surface of the mirror 3. You can install a car wiper on the mirror 4. You can install a fan with a humidity sensor 5. You can organize heating of the mirror using a special heating film.
Methods for connecting the heating film:
1. Combine with turning on the lighting above the mirror. 2. Install a separate switch for heating the mirror. 3. You can organize automatic activation of the mirror heating when the humidity in the room exceeds a preset value. For this, a signal from a fan with a humidity sensor is used (the fan circuitry requires modification)
A unique video course on apartment renovation:
My name is Alexander Smolin and for more than 17 years I have been renovating premises of any complexity. My channel on YouTube: https://www.youtube.com/user/remontkvpro is entirely devoted to such topics as high-quality do-it-yourself apartment renovation and high-quality do-it-yourself home renovation. With the help of my videos, you can quickly make repairs in your apartment with your own hands and without expensive professional tools, even if you are completely new to this matter.
At the moment, I have done QUALITY renovations in more than 50 apartments. Here are some of my works:
prev next On my channel you will find video lessons on topics such as planning an apartment renovation, electrical, plumbing, rough and fine finishing of walls and ceilings, bathroom renovation, toilet renovation, hallway renovation, living room renovation, kitchen renovation, working with different electrical tools, installation of ceilings and work with drywall.
In addition, on my channel there is a separate playlist, one might even say a whole video course, dedicated to interior and entrance doors. From the video in this playlist you will learn how to choose a door, how to install a door with your own hands, how to install extensions with your own hands (2 ways are discussed in the video), how to install platbands, how to simply and quickly install a lock and a lock mate without expensive tools, how to install door limiter and finally, you will learn about the features of interior and entrance doors.
In my master classes you will find answers to questions: how NOT to lay tiles, how NOT to flood your neighbors, how to make holes in tiles, how to make an arch from plasterboard with your own hands, how to properly hang wallpaper, how to save on materials, how to choose paint and wallpaper, how to seal cracks and cracks.
You will learn how to make LED lighting with your own hands, find out what to do when the hot water is turned off, how to clean the seams between the tiles, how to choose a kitchen hood, how to repair faulty wiring, how to turn the lights on and off remotely, how to install a window sill with your own hands, and much more , much more. Don't forget to subscribe to my channel so you don't miss new videos:
Keywords: diamond discs, disc review, how to choose a disc, diamond wheel, grinder disc, cutting disc, sharpening discs, grinder wheel, tile disc, tile cutting, discs for concrete, grinding diamond slides, flexible diamond slides, disc for concrete, apartment renovation, do-it-yourself, diamond tools
Tube heater
Self-production of lamp-heated mirrors
We will look at heating made from improvised materials. One of the simplest types of heating is the use of ordinary 12-volt incandescent lamps. When such a lamp burns, enough heat will be released to warm the mirror. At the same time, to create a heater you will not need so many materials:
- two automobile incandescent lamps;
- cartridges for them;
- wires;
- foil;
- insulation (varnished fabric, paronite, textolite);
To install the heating, you need to remove the mirror along with the housing from the car, and then disassemble it so that you can install the bulbs inside. Insulation is needed in order to reduce heat loss from the housing. It needs to be glued from the inside to the body. Then foil is glued to the insulation, which will act as a reflector, providing heat flow towards the mirror.
Next, the light bulb socket is installed inside the housing and secured. This can be done in different ways, but it is important that the installed light bulb does not touch the mirror and reflector, so the light bulb also needs to be selected in the optimal size.
If there is not enough space in the case, you can simply solder wires to the lamp and insulate the base. The lamp itself can be secured in the housing using a heat-resistant clamp and glue. Then the mirror is assembled and installed on the car.
The wiring from the light bulb can be pulled through the mirror mounting post into the interior. One of the wires is connected to ground, and the second is stretched to the button for turning on the heated rear window and connected to it.
This type of heating is good because it can be tweaked and improved. For example, install a two-pin lamp, making dual-mode heating, display a separate key, etc.