VAZ starter connection diagram
VAZ cars use starters, which are a DC electric motor with an electromagnetic two-winding traction relay and a roller freewheel clutch (overrunning clutch). Starters are used to provide the minimum crankshaft speed required to start the engine. The starter is powered in starting mode from the battery.
The starter relay is connected to the power circuit, thereby closing and opening the circuit, depending on how fast the crankshaft rotates. The starter design on all cars is the same, with only minor design differences. If you understand how the starter works in one car, you can easily figure it out in another.
To prevent a starter failure from taking you by surprise, let’s look at how to replace it yourself. But first, read the theory and study all the options for starter connection diagrams for different models of VAZ cars, collected by the editors of 2 Schemes.ru from familiar auto electricians.
Starter connection diagram 29.3708 for VAZ 2108, 2109, 21099 cars: 3 comments
In this article, we will be much more interested in the second relay, which is responsible for the operation of the starter, namely the retractor. Also look at how much charge the battery has. And now he saves 35 rubles a year on gasoline! Replace the core. Register on site 2. We conducted a little investigation and came to the following conclusions, yes, from the factory on VAZ cars, a starter relay was installed. If the starter does not turn off, then the relay is missing. Most often, such a start indicates wear of the teeth on the Bendix gear or the teeth of the engine flywheel.
To understand why a starter solenoid relay is needed, let’s look at the engine’s operation schematically. Other possible schemes are no different from the one described. We conducted a little investigation and came to the following conclusions, yes, from the factory on VAZ cars, a starter relay was installed. The problem is not constant, this can happen once a week, maybe every other day. VAZ starter relay wiring diagram. SOLVING THE PROBLEM WITH THE IGNITION SWITCH VAZ 2110 2111 2112
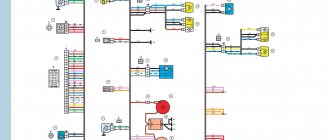
VAZ 2101 starter connection diagram
- starter;
- holding winding of traction relay;
- ignition switch;
- generator VAZ 2101;
- fuse box;
- pull-in winding of the traction relay;
- accumulator battery.
Under normal loads, the current generated by the starter is 150 A. When heavy loads occur, for example in winter, the resulting current can reach 500 A. This is a serious test for this electrical unit, so it is not recommended to keep the key on the start for more than 10 seconds, and repeated starting attempts must be made with a break of at least a minute.
Starter diagram VAZ 2108, 2109, 21099
Electric current enters the starter circuit from terminal “30” of the generator. Next, through block Ш8 (Х8) of the mounting block (pins 5,6), block Ш1 (Х1) - pink wire, to the ignition switch. The driver turns the key in the ignition to turn on the starter (position 2) and closes the contacts (50, 30). After which the ignition switch, through the red wire, current flows to block Ш1 (X1) of the mounting block (pin 8), then block Ш5 (Х5) (pin 4), starter switch relay (pin 85). The relay is activated. From terminal “30” of the start relay, current flows to terminal “50” of the starter traction relay, energizing its winding. The traction relay is activated, activating the starter.
The starter electrical circuit uses a switching relay 111.3747-10.
- Screw securing the protective cap.
- Protective cap.
- Retaining half ring.
- Rear cover fastening nut.
- Back cover.
- Brush springs.
- Brush guides (outer part).
- Brushes.
- Stator.
- Anchor.
- Drive lever.
- Drive unit.
- Restriction ring.
- Retaining ring.
- Drive lever axis.
- Screws for securing the traction relay.
- Front cover.
- Plastic sealing ring for the lid.
- Tie rods.
- Rubber plug.
- Traction relay core.
- Return spring.
- O-ring for traction relay.
- Traction relay.
- Sealing washer.
- Adjusting washers.
Additional VR starter
On modern cars, an additional VR starter is a priori provided. On older cars, the relay is installed and connected independently.
Article on the topic: Engine life of Nissan Qashqai 1.2, 1.6, 2.0
The advantages of installing an additional VR are obvious:
- Protects the starter device from burnout of contacts in the lock, which occurs for various reasons (long start-up, banal wear, etc.);
- It has a positive effect on the loading of contacts of the same ignition switch, as a result of which the contacts remain operational longer;
- Protection of the starter from a situation where, due to a “glitch” of the key in the ignition switch (the engine has started, but the starter continues to spin).
How to connect the additional starter relay
You can check whether the additional VR is installed on the car like this:
- Look in the “black box” (fuse box);
- Turn on the starter device in the engine purging mode - if the additional relay is on, then the starter must turn off on its own after a few seconds.
Starter circuit for VAZ 2110, 2111, 2112
Starters of type 57.3708 were installed on VAZ-2110 cars and had the following technical characteristics:
- Rated power 1.55 kW
- Current consumption at maximum power no more than 375 Amperes
- Current consumption in the inhibited state is no more than 700 Amperes
- Current consumption in idle mode no more than 80 Amperes
The connection diagram for the starter for the ten is shown above, here is its explanation:
- battery
- generator
- the starter itself
- egnition lock
Starter solenoid relay
The starter relay is called a pull-in relay. This is due to the principle of its operation - it performs the function of connecting the starting device to the electrical circuit and connecting its armature to the crankshaft. It happens like this: when no current is supplied to the windings of the device, its armature, under the action of the return spring, remains in the forward position. The same spring, through a special fork, holds the Bendix gear, preventing it from engaging with the crankshaft flywheel ring.
By turning the key in the ignition, we supply current to the winding of the device. Under the influence of an electromagnetic field, the armature is fed back (pulled into the housing), closing the starter power contacts. The Bendix gear also moves, engaging with the flywheel. At the same moment, the retracting winding is turned off, and the holding winding comes into play. The force from the starter shaft is transmitted through the gear to the flywheel, causing the crankshaft to rotate until we no longer hold the ignition key in the start position.
What functions does the solenoid relay perform:
- Protects the starter from shorting contacts in the ignition.
- In order to turn off the power to the starter in a situation where the engine is running and the key shows the “starter” mode.
- Provides relief of contacts in the ignition switch.
When the engine starts, voltage from the generator goes to the relay coil. Then the gears of the drive system begin to work, due to which a magnetic field is created. The flywheel of the propulsion system is working. The gear begins its work thanks to the holding winding, while the bolts are closed. When the key is returned to the ignition switch, the winding is de-energized, thus disconnecting the gear and flywheel. This scheme applies to modern cars, including VAZ models.
How to install an additional starter relay on a VAZ 2110? Assembly diagram
Until the year 2003, the ignition system of VAZ cars was one of the weakest points in the on-board electrical network. This is due to the generation of high voltage and the inability to unload the starter unit. To solve the problem of a weak starter, vehicle designers and developers adopted the VAZ 2110 auxiliary starter relay.
What exactly does installing an additional relay do?
- Relieves the contact group in the ignition switch
- Prevents sintering of starter contacts due to prolonged ignition
- Opens the electrical circuit when the engine has already started and the ignition key is in the “starter” position
Of course, the additional starter relay for the VAZ 2110 (diagram in the photo) is not a panacea for all the ills of on-board electronics. Experienced experts recommend modernizing the electrical network comprehensively. The list of work may include installation of capacitors, installation of an auxiliary battery, replacement of mass, and other, other work.
To this we can add that not even all the latest modifications of this car have a wiring diagram for the VAZ 2110 starter. If the on-board electrical circuit is well balanced and designed, then an additional relay is not needed at all.
How to check for the presence of an additional relay in the starter?
If you depress the gas pedal and turn the key to the “starter” position, after 12 seconds the starter will automatically turn off. This activates the cylinder purging mode. That is, fuel is not supplied to the working chamber.
If the starter does not turn off, then the relay is missing. In this case, it is advisable to install an additional VAZ 2110 starter relay (the connection diagram is noted in the instructions for this review).
What is needed to install an additional relay?
- Relay with 4 contacts with current strength from 30 to 40 (A). The most commonly used is the 30 amp relay.
- Reinforcement with a cross-section around 1.5 (mm2)
- Flat female connectors (5 pcs)
- Flat male connector (1 pc)
- Ring connectors for 6 and 8 (mm)
When the materials are prepared, let's look at how to connect the starter relay. By the way, there is an intelligible video on this topic:
Please note that car dealerships sell ready-to-install additional relay kits. This set contains both good wire and high-quality ring connectors. All elements are marked and made in the same style. It is easy and pleasant to work with such materials yourself.
Connecting wires to the starter
Connecting a starter to a VAZ - instructions. Attach the relay in a convenient place (for example, a washer reservoir). Connect the wires to the starter. Then remove the red wire located on the flat terminal of the relay, and you need to make a connection with the connector of the male wire and the wire from the new relay.
Place the wire with a ring terminal for 8 mm on the positive side of the starter and tighten it with a nut. Place the wire of the new “female” type relay onto the contact that was released at the traction relay. This wire will transmit the positive to the coil. Using a clamp, tighten the new wire and the stock one together. Screw a small length of wire from the coil. Now you can turn on the new relay.
How to close the starter
A car whose engine cannot be started ceases to be a means of transportation, turning into a heap of expensive scrap metal. If this happens in cold weather, then you can deal with the problem by “revitalizing” the battery or starting the engine using the towing method. But in cases where the starter does not respond to turning the ignition key in a car with a working battery in warm weather, the fastest way to start the engine is to directly close the starter. The driver who knows how to do this can also use this method to diagnose the starting system.
Causes of starter malfunction
If, when you try to turn on, the starter still shows signs of life, for example, you can hear its armature spinning idle or an unpleasant sound is heard when the Bendix overrunning clutch slips, then the failure of the unit is mechanical in nature. That is, there is a failure of the fork, overrunning clutch or planetary gearbox (if any). In this case, you will not be able to start the car if the starter does not work. It will have to be removed and repaired, and the launch will be carried out “from the pusher”.
Car starter circuit
If the flywheel turns too slowly, it is a sign that the armature is touching the stator. As motorists say - “shoes”. This happens due to wear of the armature sliding bearings - bushings. Moreover, if you operate the starter for a long time with worn bushings, then the armature winding plates, constantly “clinging” to the stator, will begin to shift, damage the winding wires and a short circuit will occur. In order to narrow the scope of troubleshooting when it is associated with a power supply failure, car repair shops often use this method to start the starter, such as shorting the terminals of the “positive” wires connected to the solenoid relay. If the attempt is unsuccessful, then the fault should be looked for inside the starter. Its cause may be:
- Worn or stuck brushes.
- Broken wiring in the solenoid relay.
- Broken stator or armature windings.
- Burnt contacts of the solenoid relay.
The starter working as a result of such a “direct connection” will be a clear indication that the electrical circuit is broken outside the unit, that is, the following options are possible:
- Broken contact group of the ignition switch.
- Failure of the starter switch relay.
- Break or short to ground of the positive wires.
- A break in the “mass” wire of the engine or severe oxidation of its terminals.
This starting method is suitable not only for diagnostics, but can also help out in cases where there is no time to repair the car, but you still need to drive.
Ways to close the starter directly
The wiring to the starter is connected through two contacts located in the solenoid relay cover. The large cross-section wire is constantly connected, even when the ignition is turned off, since it is connected directly to the “positive” terminal of the battery (indicated by a yellow arrow in the figure below). The starter starts working when voltage is applied to the thinner wire. At the same time, the retractor winding moves the core, which presses the contact plate (red arrow) against the heads of the copper bolts.
The starter power circuit is closed - the second power contact is connected to the stator and armature windings. The anchor begins to rotate, and in parallel with this:
- The holding coil of the relay is connected. It ensures reliable contact and prevents the bendix from being “pushed” out of engagement with the flywheel.
- The core pushes the bendix through the lever (fork) to the flywheel.
When the power supply to contact 50 is stopped, the holding winding “releases” the core, which, under the influence of the return spring, opens the electrical circuit and disengages the bendix. If the circuit supplying voltage to terminal 50 of the starter is broken, you can close the contacts with a screwdriver or simply a metal rod. The power terminal of the solenoid relay, to which voltage is always supplied, will serve as a means of “bypassing” the standard wiring. The current will flow to the pull-in winding directly, bypassing the ignition switch and relay.
Closing the starter with a screwdriver
At the moment of switching on, a strong spark occurs between the screwdriver and the terminals, but you should not be afraid of this. It is much more dangerous to connect the positive terminals to ground. For example, by simultaneously touching the contacts and the starter housing or body.
On cars in which the layout of the engine compartment does not allow you to “get” to the contacts on the solenoid relay in this way, you can start the engine differently - by closing the corresponding contacts of the starter activation relay, which is usually installed on the engine mudguard or front panel.
You can do this in two ways:
- Connect pins 87 and 30 (in the diagram below) with a metal jumper.
- After removing the relay cover, manually press the contact plate, simulating the operation of the coil.
Starter electrical circuit
When trying to start the engine by closing the relay contacts, do not forget to turn on the ignition. Otherwise, the spark generation system will not work, and on injection cars, the engine power supply system will not work either.
How to connect a button to the starter
However, the topic of this article is connecting the starter via a button connected to the same relay. How can this be accomplished?
Connecting a button in a car where there is no additional relay
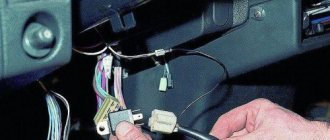
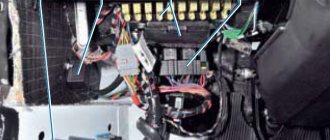
First of all, you should find the contacts responsible for turning on the starter. Then integrate them with the button.
The modernization algorithm generally looks like this:
- The plastic trim under the steering wheel is disassembled;
- There is a connector connected to the ignition switch contacts (as a rule, this connector has locking tabs);
- Press the tabs to release the connector and pull it out.
As a rule, on older cars, after inspecting the connector, two cables with a large cross-section are found. The red one is responsible for controlling the starter.
Note. You can check whether the wiring is really responsible for controlling the starter like this. Turn the ignition key all the way, short-circuit both wires from the removed connector. If the starter turns on, then that's what they are.
Further:
- The button is placed in a place convenient for the driver;
- The found wires are connected to it.
Connecting a button via a relay
In this case, finding the wires responsible for controlling the starter will be much more difficult, because you need to calculate those that are connected to the additional relay.
Related article: Diagnosing and troubleshooting the battery icon light
Experts recommend first ringing all the wires going to the car body with a tester. The identified wires are marked as negative, since they are connected to ground.
How to connect the starter button via a relay
Then you need to connect the tester with one end to each of the positive wires, and the other - connect the measuring device to ground. The device itself must be put into a current measurement operating cycle. Test tasks: find a cable that produces 12V when the key is turned all the way.
How to make a start button instead of an ignition key in a car with your own hands
Oddly enough, this issue very often worries motorists and not only for aesthetic reasons - in the spirit of the times. The contact group located behind the ignition key very often fails, and changing it is far from an easy task.
In older cars, often the wires from the starter itself are connected directly to contacts inside the contact group, which close when the ignition key is turned. When the starter is activated, a very large amount of energy is consumed, which means a large current flows (the contacts strike a spark). Over time, a burnt deposit forms on the contacts or they completely burn out, no longer providing reliable contact. Newer vehicles have a separate relay that closes the starter contacts when the ignition key is turned.
The main advantages of using a relay in the starter power circuit:
— Such a system is more reliable, since the relay is designed for high currents and lives much longer. — The relay can always be replaced — The contact group behind the ignition key works for a very long time, since it only turns on the relay that takes the main load.
Regardless of whether your starter is turned on by a relay or directly by a contact group, all operations to connect the starter are still performed by turning the key.
First you need to determine which contacts are responsible for the start and connect them to the start button.
To do this, you need to disassemble the plastic protection under the steering wheel of your car. Very often, a connector with all the necessary wires is connected to the contact group of the key well at the back. There should be locking tabs on both sides of this connector. You need to press on them and pull out the connector.
If you have an old car, inspecting the contact group connector you will most likely find the two thickest wires. Very often one of them is red - these wires are directly connected to the starter. If you connect them with the ignition key turned, your starter will most likely start spinning.
Then you can go the simple way. You can simply install the button and connect these two wires to it, placing the button in a place convenient for you. The button should be non-latching, that is, when pressed, it should close the contacts, and immediately after you release it, open it.
Do not forget that you will operate the button in the same way as a key. We press the button, wait until the starter spins, and as soon as the engine starts, release the button.
But do not forget that very large currents will pass through the button and most likely such a button will burn out.
We used a vandal-proof chrome button - it failed after about half a year.
If you have a newer car and the starter in it is connected using a relay, you will need to find among the many wires exactly those that are responsible for controlling the relay.
To do this, you can ring the tester in resistance measurement mode on all the wires on the car body. All wires that ring are marked as ground (or minus), since they are all shorted to the body.
Next, touch each of the remaining wires with one tester probe and the other probe to the body in voltage measurement mode.
We need to find the wire on which 12 Volts appears exactly at the moment you turn the key, that is, when your starter starts spinning.