Chevrolet Niva is mainly used in conditions where off-road performance is required. Obstacles can be completely different and you need to be prepared for any surprises. Therefore, it is important to improve all weak points in order to be 100% confident in your car. One of the devices that allows you to achieve high maneuverability is a snorkel.
When driving over rough terrain, you encounter a large number of obstacles. And besides mud, branches and sand, sometimes you have to cross large puddles and wade. But moving through bodies of water can be very dangerous. If water enters the engine through the intake manifold, the engine will stall and the car and its passengers will be stuck in the middle of the water obstacle. But this is not the worst thing. As a result of such an incident, there is a high risk of engine water hammer. As a result, the cylinder block and connecting rods are destroyed.
Therefore, Chevrolet Niva owners often install a snorkel on their cars - a tube that extends from the engine outwards to the roof of the car so that air comes from the highest point. This device is one of the first to be installed on those cars that will be used off-road. But some car owners install them to give the car a more brutal and powerful look.
Where can I find a suitable snorkel?
You can purchase a ready-made model; a large number of manufacturers make additional devices for SUVs, or you can make it yourself. A factory-produced part will have several advantages: build quality, service life and the ability to contact the manufacturer in case of warranty claims.
The only drawback can be the cost, which is usually at least 14,000 rubles. But it is important to understand that the price is determined by the use of high-quality materials, namely especially durable LLDPE polyethylene, which provides a number of advantages:
- resistance to high temperatures and cracking
- mechanical stability
- design created specifically for a specific type of car
But there are also cheaper models characterized by simple design, the cost of which does not exceed 6,000 rubles. It is not recommended to use the cheapest options, because despite the apparent benefits, they may suffer minor mechanical damage over time. But due to the use of less plastic material in the composition, microcracks will appear on the body, through which water can enter the engine when forcing various kinds of obstacles. When using such materials, it is important to periodically inspect the snorkel in order to detect damage in time.
But there is also the most budget option - making a snorkel yourself. To do this, you first need to ensure reliable fastening in the engine compartment in order to prevent air leaks and bring the pipe as high as possible in the hood. To do this, first a horizontal part is laid under the hood, then a connecting tube is inserted into an additionally prepared hole between the windshield and the hood.
It is important to remember that the straighter the pipe and the shorter the path to the air intake, the better the aerodynamic qualities of the snorkel.
How to install a snorkel on a Chevrolet Niva yourself
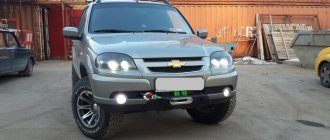
The external air intake of the engine not only saves the car from water hammer, but also helps to overcome water obstacles, because such a useful thing as a snorkel on a ChevroNiva during a long journey will be your reliable companion on dusty surfaces and surfaces that bear little resemblance to the road, and in off-road conditions. This elegant device is “installed” on the left pillar, has a very positive effect on the design, and is not at all noticeable from the cabin. One of the advantages from the manufacturers is the moderately simple installation of this element according to the instructions, and most importantly with minimal requirements - you do not need to have the skills of a professional serviceman.
If you like hunting and fishing with trips out of town, then unexpected weather conditions on the way home will not turn into trouble for you after installing this very useful device on the hood of the Niva. With it you can drive a Chevy Niva almost without risk, even along the coast, if you get tired of the monotonous road surface after natural scenic views, a fire and a delicious barbecue. And for those who doubt it, here is a list of arguments in favor of installing an air intake on the ChevroNiva and the advantages of this device: the point for air intake is located instead of a vulnerable and easily accessible, and relatively low position in a much safer and higher place;
– the snorkel on the new Niva guarantees a constant flow of cool, clean air, thereby reducing the chances of engine damage when crossing gullies and fords from direct water ingress; – ensures more efficient operation of the Niva engine when moving in a convoy in not entirely favorable conditions, that is, from dust and dirt from cars ahead.
The air intake on the ChevroNiva is no longer considered an innovative device, so all kinds of garage “Ateliers” and “Kulibins” have learned to successfully imitate it! And yet, before inventing your own device, you should estimate the difference between the finished product and the results of applied art in terms of such parameters as efficiency, aesthetics, quality, etc.
The homemade external air intake represents a flight of fancy for the car owner using various available materials. Such a device can look different, everything depends on the selected materials, “raw materials” and the skill of the author of such a masterpiece. Sometimes some models can look very extravagant and can satisfy the delicate taste of connoisseurs of beauty, or delight with an aggressive look, amaze with their surreal design, etc.
How to make a snorkel for the Niva with your own hands.
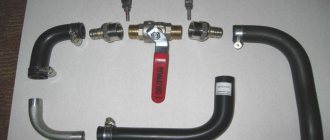
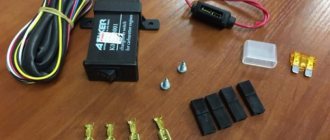
First you need to prepare the material. These are clamps and tubes. To create a more durable structure, it is better to use metal tubes with a diameter of at least 6 centimeters. Don't forget about the top. It should be slightly bent towards the rear of the car to prevent splashes and raindrops from entering the system while driving. Additional pipes are also welded to the product to allow atmospheric pressure to be released. They are installed in the air intake system.
Typically, 3 materials are required to create a finished structure:
- corrugation
- metal
- plastic
You can use plastic corrugation to save a little money. It will also be easier to install due to its flexibility. The main course of work is as follows:
- select the required corrugation length. Typically no more than 2 meters will be required
- securely fix the connection points using clamps
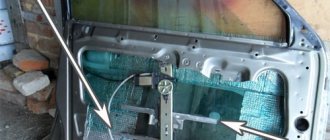
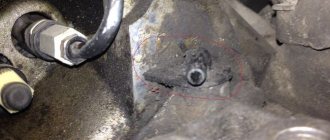
- holes are made in the area of the windshield on the driver's side for further fastening the corrugation to the pillar
- a hole is made in the hood/fender to remove the pipe
- the end of the tube is closed with a ventilation grille, after which the outermost part is bent and fixed with the help of additional brackets.
During work, all holes must be thoroughly coated with sealant and covered with sealing tape to prevent corrosion.
The nuances of manufacturing and installing parts
Here's what you need to consider: the assembled snorkel should not have any unnecessary bends or curvatures. Ideally, there should be 2 of them. The fact is that changes in the direction of air movement will increase its aerodynamic resistance.
You will have to cut your dear Niva with your own hands. There is no way around this, because in order to install the snorkel, you will need to remove the interfering parts of the car. If you are not yet ready for such actions, you can make this device in another way. The metal pipe is replaced with a rubber one and is placed under the open hood. It should be noted that the structure will be much less durable than in the previous case. There is also a rarely used method of holding a snorkel, such as securing its vertical part inside the cabin. It is unpopular among motorists because such a system will make noise when taking in air.
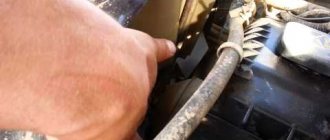
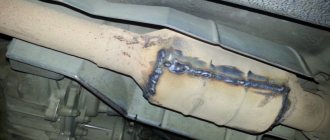
The pipe connects to the air filter
Whatever method of installation you choose, remember the importance of protecting the snorkel from water splashes and foreign components. An ordinary fungus from a tractor will help protect the structure. Such an improvement will cost you very little, but the engine will be safe. You can also provide branches from the main pipe in the snorkel. They will lead to the axle ventilation system, gearbox and transfer case. These branches must be properly welded to prevent air leakage.
To check how well your homemade system works, you can place a piece of rag on the top hole of the snorkel and start the engine. The main thing is to remove your hands from there, otherwise an accident may occur. If everything works, it means that the homemade and high-quality snorkel on the Niva was installed correctly with your own hands.
The benefits of the device are undeniable, because now you can overcome shallow rivers, lakes and swampy places. The main thing is not to forget that this is a Niva, not a submarine.
Installing a snorkel on a Chevrolet Niva.
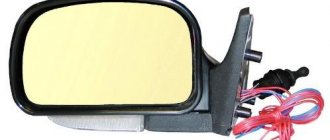
When purchasing a finished element, you should also take into account the features of its installation. Typically, the air duct is supplied as shown in the figure below:
Installation is carried out at the left pillar, on the driver's side. To carry out proper installation and make the necessary holes, you may need:
- jigsaw
- sealant
- scotch
- marker
- drill
- drills for 4 and 10 mm
The installation procedure includes several simple steps:
- It is necessary to lift the car using a jack
- The fender liner and protection are removed. The air filter is disconnected
- The location of the incision is determined. It needs to be cleaned and covered with tape.
- A special marking in the form of a stencil is applied to the wing. You need to attach it to the body and make a hole as indicated in the diagram
- After this, the pipe is connected to the air filter and tucked into the hole
- The holes in the rack are prepared. As in the previous case, you need to cover the drilling site with tape.
- air intake is installed
If the work is done correctly, you can enjoy off-road driving.
Installing a factory snorkel
It comes with almost all the necessary spare parts. You only have to add a sealant - silicone or polyurethane. When installing, most car enthusiasts tend to touch the engine compartment to a minimum, making do only with sealing the air filter. It is not possible to completely isolate the drain plate, but the results are quite satisfactory. The action plan will be like this.
- The washer reservoir is removed;
- Behind it, the expansion tank, which is part of the cooling system, is removed;
- The air filter is removed from the carburetor;
- A washer reservoir is placed on the left side of the engine compartment (preferably a new one, but if the reservoir is in good condition, you can move it);
- The wiring leading from the pump to the tank is extended or replaced with a new, longer one. The second option is preferable: the fewer connections, the more reliable;
- The expansion tank bracket and itself are fixed;
- A pipe is secured in the filter housing with sealant, a fitting is attached on top, and all connections are unrolled as quickly as possible. All manipulations require high speed, before the sealant has time to set;
- The shnvs hose is pulled onto the installed pipe, after which the mass air flow sensor is screwed onto the air filter;
- The pipes are pulled at one end onto the air flow sensor, and at the other onto the air filter cover, after which a gasket is placed on it and it is put on the carburetor;
- A crankcase ventilation hose is connected to the carburetor through the supplied pipe, and a shnvs is installed on the outside of the compartment.
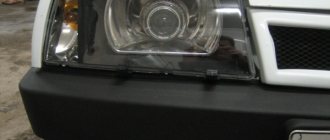
The internal work is completed, all that remains is the snorkel outlet to the outside. For this:
- the fender or hood (depending on which of them is intended by the manufacturer for exit) is covered with masking tape;
- the attached pattern is transferred to the body;
- use a grinder to cut the desired outline;
- the edge is painted to prevent corrosion;
- The sealant is glued along the edge with sealant;
- After drying, the external pipes are installed.
Installation is quite labor-intensive, but it will not bring any difficulties to a person accustomed to fiddling with the machine. Unlike a homemade one, installing a snorkel on a Niva with your own hands, if you bought a factory one, will not add noise to the car, will not spoil its appearance and will not increase the average fuel consumption. On the contrary, it will give the Niva additional charm and aesthetic completeness for further travel on real off-road terrain.