Turning on the heated mirrors and rear window during auto start
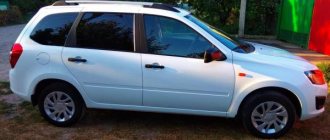
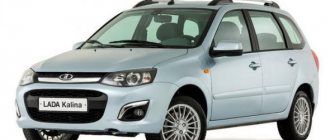
Car Kia ceed cd sw automatic transmission 2020
Alarm system a93 with gsm module. Tell me how to turn on the heated mirrors and rear window?
The heating button has no memory; heating does not turn on at a certain temperature.
Answers 7
For this vehicle, heating control via the CAN bus is not currently supported.
The second difficulty is that the A93 itself does not know how to control heating via a digital bus and control the temperature dependence. For this you need sixth generation systems (E96, S96.)
Therefore, the only way to control the heating is through additional analog connections. I recommend visiting the installers to analyze the problem.
Is it possible to do the following?
Turn on the 1st additional channel, which is in flexible programming mode, after successful startup. (Heated mirrors and rear window)
Turn on the 2nd additional channel, which is in flexible programming mode, when disarming. (Heated driver's seat)
Turn on the 3rd additional channel, which is in flexible programming mode, when disarming. (Heated steering wheel)
Hello. Can. But at the same time, physical connections of these channels to heating control are required.
In this case, the heating will turn on regardless of the temperature, even in summer.
Great, it's better than jumping around a warm car every day and clearing snow and ice from the mirrors and rear window. Activated in the fall and deactivated in the spring!
Today I discovered a contact that, when shorted to ground, turns on the heated mirrors and glass.
I will be very grateful if you tell me how to configure the above algorithm! Thank you in advance.
Contact the installation center if you don’t want to void your warranty or “burn” anything. it will be easier, better and faster
Well, yes, of course, it’s better quality, they take your instructions and do the minimum. And that's it, go home! You call and ask if you can do it? Answer: well, come, we’ll experiment. They charge money for installing the whitefish, but in fact much has not been implemented.
Thanks to all. Connected everything. The heated mirrors are switched on after successful start-up. Heated seats and steering wheel after disarming during auto start. The most difficult thing was to find where the dealer attached these free additional channels; it turned out that the installer almost cut them off at the root.
How to connect heated mirrors to Kalina
Phew, I installed two weekends, now they work Well, everything is in order.
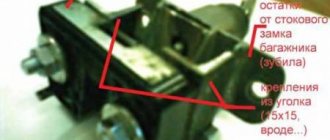
were purchased for installation , since they do not fit on the standard bolts of stock mirrors...
Thermal shrinkage, rear window heating button from Viburnum (for remaking the windshield heating button, since it is not fixed), electric glass lift unit with joystick (700 rubles), double wire with a cross-section of 0.75 sq. mm. (0.5 is possible) for a total of 15 meters (it’s better to take 20), a mounted fuse block, a 10A fuse, connectors for the mirror “chip” and for a 4-pin relay and the relay itself.
Since the connector for the joystick of mirrors is simply not sold anywhere (how is that possible?), connectors from the old system unit were used as connection connectors (those that go to reset, power, etc.) - they fit perfectly.
Now, in order.
1. Connecting heated mirrors.
According to the following scheme.
You need a four-contact relay, pin 86, plus is supplied through the switch and fuse, which I took from the first contact of the rear window heating button, relay pin 86 is connected to pin 30, ground (housing) is supplied to 85. The principle of operation is that when the ignition is turned on, the plus is applied to the first contact of the rear window heating button (I used this button, and put the cap on the windshield heating, since it was not fixed). When the button is pressed, the relay closes and the plus is supplied to contact 87 of the relay, and then goes to the mirror. The mirror heating button is located next to the auto light button at the bottom of the center console.
2. Connecting turn signals.
To do this, you need to remove the dashboard and find two wires - blue and blue and black.
3. Weight
We need three ground wires - the first is for heated mirrors, the second is for turns and the third is for the joystick itself. I connected all three wires to the door, like this. There is a good bolt and a good washer, and this is a good mass :))
4. Pinout of the “chip” of the mirror itself.
5. Pinout of the ESP joystick.
Left mirror (blue to 1; red to 7; green to 6) Right mirror (blue to 3; red to 7; green to 8). Pin 7 is common to both mirrors. 2 contact - plus 12 volts (joystick backlight) 4 contact - plus 12 volt joystick. 5 - mass (minus). The second contact was connected to the white-black wire of the ESP unit itself (12 volts after turning on the ignition), and the backlight to the white one. Visible in the photo
6. Pull the wires...
There were 5 wires coming out of the mirror - three to the right mirror, one to the turn signal, one to the heating. It seemed to me that pulling the wires through the corrugation was the most difficult and tedious thing. Drilling a hole
We drag the wires along the bottom, through the bottom of the heater radiator and then under the carpet into the right door (except for the heating, the heating relay was placed next to the ashtray inside).
Photo of wiring in doors:
And here is the result of the work
I wanted more photos, but alas, there is a limit :((
If I wrote something unclear, ask me, I’ll help in any way I can :))
Good afternoon Autumn is coming, it rains more and more often... When splashes of water hit the mirrors, visibility deteriorates sharply. I decided to correct this situation by installing heated mirror elements.
Going to the store: so, we will need:
1. Heated mirror elements – 2 pcs. 2. 4-pin relay – 1 pc. 3. Button – 1 pc. 4. Relay connector – 1 pc. 5. Button connector – 1 pc. 6. “Crocodiles” - 6 pcs. 7. Small connectors (like on speakers) – 15 pcs. 8. Power cable – 8 m. 9. Heat-shrinkable tubes – (small set). 10. Electrical tape. 11. Nylon ties – 30 pcs. 12. Pistons (if they break when removing the door cards). - 5 pieces.
Required tool:
1. Phillips screwdriver. 2. Slotted screwdriver – thin, long (for disassembling mirrors). 3. Small pliers (for crimping connectors). 4. Wire cutters. 5. Scissors. 6. Knife. 7. WD-40 lubricant. 8. Rags. 9. A piece of rigid copper wire (to pull the wires through).
Let's start installing heated mirror elements:
1. Remove the mirrors from the doors.
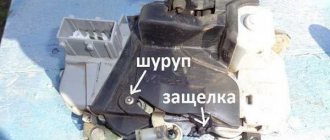
Yes, it's better to take it off. It will turn out more accurately, faster. In one thing, you can restore the flexion function (my mirrors turned sour and did not fold). To remove the mirror, we need to remove the decorative plastic cover from which the lever for controlling the mirror element sticks out (the cover has latches, just pull it towards you). Then remove the retaining ring and unscrew the 3 bolts. Attention!
Unscrew the last bolt while holding the mirror with your hand, otherwise bang. 2. To dismantle the old mirror elements, turn the mirror element as much as possible in any direction so that there is a gap where you can insert a screwdriver. Our task is to pry off the latches of the mirror element. We unclip all the latches and separate the old mirror element.
3. Take the cable and divide it in half. We attach connectors to the wires for connection to the new mirror element. Be sure to use heat shrink tubing. 4. We insert the wire into the technological holes of the mirror housing. We apply the mirror element “at home”. Press lightly until you hear a click. We make sure that the element is in place. 5. We do the same procedure with the second mirror. Attention! I strongly recommend that you try to connect all the wires according to the diagram “on your knees”, make sure that you understand the diagram and understand what to connect and where! Let's make sure the mirrors are warm!
Let's move on. 6. We screw the mirrors to the doors in the reverse order of dismantling. We cut one wire and press it with a bolt to the exposed part of the door. This will give us mass.
7. Remove the door cards (trimming). Look for articles on the Internet or in books. There is nothing complicated. 8. We pass the wire through the technological holes in the door. Disconnect the wiring block between the door and the body (turn the ring and pull it towards you). Our task is to insert the wire into the rubber corrugation. If you do it wisely, you need to prepare small connectors, install them in the block, connect the wires, etc., but I was too lazy... I pulled the wire out from the side of the block and stuck it into the corrugation using solid copper wire. It is better to separate the corrugation from the body, it will be more convenient. Yes, we also unscrew one screw in the plastic cover next to the hole in the body (inside the cabin, you’ll understand...). I cut the edge of the corrugation that goes into the interior and pulled it out through the wire cut. It should be immediately noted that we will have 2 wires coming out of the driver’s door, and one from the passenger door. The fact is that I brought the mass to the relay from the door, in theory it can be done from any place, if desired.
Tuning VAZ 2109
Unfortunately, older Samaras do not have such a useful feature as heated rear-view mirrors. This option improves visibility through the mirrors in wet weather, during snowfall and also in frost, when the mirror glass is covered with frost. When installing heated mirrors, several scenarios are possible. You can purchase assembled heated mirrors, since the choice is quite varied. This option is suitable for those who are not satisfied for some reason with the standard mirrors on the “nine”. The downside is the relatively high price, about 2,000 rubles; installation often requires drilling additional holes in the door. Plus - convenient adjustment using a cable mechanism, much better than the standard system
Heated mirror for VAZ 2109 assembled
If you are completely satisfied with the standard mirrors, a good solution would be to purchase separate mirror elements for the standard mirrors of the VAZ 2109. You can choose an option with an anti-reflective coating and an aspherical surface to increase visibility.
Heated mirror elements
If you go even further in the direction of reducing the cost, you can simply purchase heating elements and stick them on the original mirror glass.
Heating elements for standard mirrors of VAZ 2109
The main difficulty when installing heated rear view mirrors is how to route the power wires to the heating elements of the mirrors. Here you will have to tinker. There are technological holes in the door and body. Using these holes, we stretch the wires from the mirror first inside the door, then through the corrugation from the door into the door pillar, and then to the relay for turning on the heated mirrors. When laying wires, make sure that they do not touch the moving parts of the mirror adjustment drive and door mechanisms.
The power button is conveniently located next to the rear window heating switch. Fortunately, there is a place for installation (plugs), and we will take the control signal to the power relay from the heated rear window button.
We connect electrical circuits according to the following diagram:
Wiring diagram for heated mirrors
We also extend the ground wire into the passenger compartment and secure it to the car body, since the door hinges provide unreliable contact with ground. In the diagram, a separate button is responsible for turning on the heated mirrors, in my opinion this is more convenient. You can make the connection according to a simplified scheme, using the button for turning on the heated rear window to simultaneously turn on the heated mirrors. But in practice, mirrors thaw faster, and often you only need to warm up foggy or frozen mirrors, so a separate button is preferable.
how to connect heated mirrors to the heated rear window button of a VAZ 2114? | Topic author: Arthur
When you take out the button, there are so many connectors and I don’t know which one to connect to, which is plus and minus!
Dmitry, it’s not about the button, but about the plus that goes after the relay to the glass! otherwise the button will burn out
Elena I should have bought a car and not a Zhiguli
Artyom Through the relay to the button.
There is no minus on it, only plus and minus on the body.
Tamara The relay is located in the fuse box under number K-7, but it would be better to connect to the wire in the cabin, I don’t remember the color, but you can look in the rear window area.
Tags:
How to connect heated mirrors on a VAZ 2114
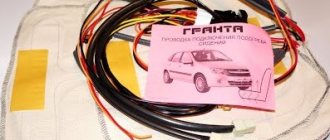
Connecting heated mirrors Lada Kalina
My long-time dream was to install heated mirrors. I looked with white envy at those who drive in the rain with completely dry burdocks and excellent visibility... And so I found an online store at the plant that supplies VAZ with burdocks www.solina-avto.ru and ordered heated mirrors and wiring for him. With delivery it came out to be something like 600-700 rubles.
It took me quite a long time to install it, because I realized that I couldn’t do it in an hour. In addition, I had to figure out exactly HOW I should install them. There are 2 options - on a separate button or on the heated rear window. At first I decided to put it on a separate button, as shown in batyram, but already during the installation process I decided to simplify the task in order not to create a bunch of buttons, since these heaters usually turn on both and I don’t need independent activation anyway... The installation process took 3 days, since the weather interfered (I installed it outside, since there is no space in the garage), I did not have the necessary tools at hand. The sequence is like this (the same for each door, so the photo is only for the right one):
1. Carefully removed the mirror itself. Here I had 3 screwdrivers to help me and I needed my father’s help to bend the mirror, and I used two screwdrivers to remove the latches.
Phew, installed two weekends, now they work