Welcome, friends, to the DIY auto repair website. Periodic inspection of the car is a matter of principle.
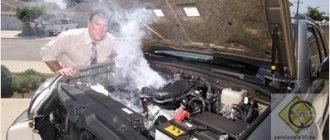
It is advisable to open the hood before each trip, check the levels of main fluids (brake, coolant, engine oil), pay attention to the external condition of the engine and the operation of all systems.
In this case, special attention should be paid to the motor - at least to its appearance.
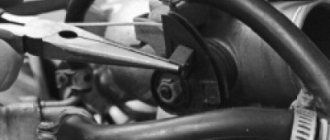
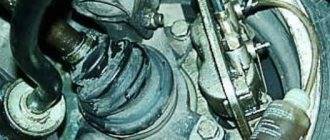
The appearance of a leak at the junction of the valve cover and the main block indicates one thing - the valve cover gasket of the VAZ 2110 has ceased to perform its functions and requires replacement.
The main purpose of the valve cover gasket
The gasket under the valve cover can hardly be called a vital element of the car. But it's not that simple. On the one hand, it really does not affect the technical characteristics and performance of the power unit.
On the other hand, the appearance of a leak can lead to a number of other, more serious problems.
Attention! The gasket is made of rubber, and as you know, it also has its own service life, so as they say, nothing lasts forever.
The main task of the gasket is to ensure a tight connection between two components (valve cover and the rest of the engine). At the same time, the cap itself is not difficult to find - it has a neck for filling engine oil.
conclusions
Replacing the valve cover gasket on a VAZ-2114 is quite easy and simple. The process itself will take 20-30 minutes, which even a novice motorist can handle.
Particular attention must be paid to the choice of gasket, which must be of high quality and have a long service life.
Retail store at Uralmash, Baku Commissars St., 113. 8 (343) 221-35-35
02. By courier for orders over 2000 rubles, in Yekaterinburg from 20:00 to 22:00
When to change the valve cover gasket?
As a rule, high-quality gaskets are installed at the factory. But over time, they can lose elasticity and harden.
Under conditions of long-term operation and high temperatures, cracks appear through which the lubricant flows.
Moreover, even with a small leak, the engine quickly becomes covered with dirt and dust.
The VAZ 2110 valve cover gasket is replaced in the following cases:
- When dismantling the cover for any repair or technical inspection;
- during repair of a power unit (current, major);
- when a clear oil leak appears at the junction between the cover and the rest of the engine.
Most car enthusiasts replace the gasket at every engine oil change. This is the right decision, because you can completely eliminate the possibility of a leak.
How to change the valve cover gasket on a VAZ 2114: when is it necessary and how to do it
Any car enthusiast makes sure that his car is in perfect condition.
If there are any problems with transport, they must be resolved promptly. So, if you see that there is a leak between the valve cover and the engine block, then you should suspect that the cover gasket is leaky. Such an element does not have a global function in the operation of the system. But if problems arise with the gasket, then you should not turn a blind eye to them, despite the fact that the motor will work properly.
The faulty part must be replaced, otherwise oil will leak from under it. This point can cause a number of problems. So the valve cover gasket of a VAZ 2114 can be replaced independently without the involvement of specialists. Some craftsmen are of the opinion that the gasket needs to be changed every time the cover is removed. This point must be taken into account when carrying out various works.
Basic recommendations
Despite the simplicity of the process, the work does not always go smoothly. But this is easy to avoid. The main thing is to follow a few simple tips:
- Buy only high-quality gaskets (preferably original);
- be sure to wipe the edges of the parts from any existing oil;
- rinse the lid (this can usually be done in turpentine);
- try to clean the groove under the gasket as carefully as possible;
- After installing the rubber product, be sure to apply a little sealant to the joints. In this case, the maximum layer should not exceed 2-3 mm;
- upon completion of the replacement, check the oil level in the power unit (top up if necessary);
- start the engine and check the quality of the work done (oil should not squeeze out from under the gasket). Do another inspection after the first trip.
You can do any job. The main thing is to strictly follow the instructions, be careful and never rush when repairing a car. Good luck on the roads and of course no breakdowns.
We change the valve cover gasket on a VAZ-2114 with our own hands: selection and replacement (video inside)
Even a novice motorist who just bought a VAZ-2114 is trying to master the art of self-repairing a car. Replacing the valve cover gasket is the first step in learning how to repair an engine. This process is not complicated and will require 20-30 minutes of time.
Below is a detailed video about replacing the valve cover on a VAZ-2114
The video will tell you how to replace the valve cover gasket on a car, and also tell you about the nuances and subtleties of the process.
Analogues (manufacturers)
Of course, the manufacturer and many automotive experts recommend installing the original valve cover gasket, but, as practice shows, substitutes are often of higher quality and have a much longer service life.
So, let's look at which analogues of the original part are recommended for installation on a car:
| Manufacturer's name | Catalog number | Cost in rubles |
| Glaser | X08964-00 | 300 |
| Goetze | 50-025881-00 | 750 |
| Ajusa | 56021200 | 1000 |
| Trialli | GZ 101 7022 | 1500 |
As you can see, the cost of alternative gaskets is quite high, but as practice has shown, the service life of the parts is twice as long as the original.
Valve cover replacement process
So, in order to replace the valve cover gasket on a car, you will need certain tools. What exactly is needed? Let's consider this question: a ratchet with an extension, a 10-mm socket, a screwdriver with a Phillips head.
Now that everything is ready, we buy a new gasket from the list recommended below and we can get to work.
Let's consider the sequential stage of performing replacement operations:
- Loosen the clamps and remove the hoses shown below.
- After removing the locking plate, disconnect the accelerator cable.
- Unscrew the mounting bolts securing the accelerator cable bracket to the receiver.
- Unscrew the nuts securing the valve cover.
- We remove the rubber seals.
- Remove the valve cover upwards.
- Now you need to clean the oil separator screens. To complete the process, you need to unscrew the valve cover.
- If the nets are dirty, they need to be washed.
- We install a new gasket. When performing the process, we use a sealant.
- If everything is tightened correctly, the gasket will fit perfectly and prevent oil leakage.
- We carry out the assembly in the reverse order.
Design features of the engine on the VAZ-2114
Before moving directly to the process, you need to know some structural elements of the VAZ-2114 engine.
The valve cover gasket is located directly under the cover itself and this can be clearly seen in the diagram below.
So, first, let's look at what the engine consists of:
| № | Detail number | Part name |
| 1 | 2108-1003298 | screw |
| 2 | 2108-1003278-01 | Washer |
| 3 | 2108-1003277-01 | Sleeve |
| 3 | 2108-1003277-02 | Sleeve |
| 4 | 2108-1003274 | Cover pin |
| 5 | 2111-1003260 | Cylinder head cover |
| 6 | 2108-1003271 | Bolt M12x1.25x135 |
| 7 | 2108-1003265 | Washer |
| 8 | 14328201 | Plug 10 cup |
| 9 | 14329101 | Plug 30 cup |
| 10 | 1118-1003011 | Cylinder head |
| 11 | 2101-1002042 | Sleeve |
| 12 | 14329201 | Plug 36 cup |
| 13 | 10158601 | Plug 16 spherical |
| 14 | 11183-1002011-10 | Cylinder block |
| 15 | 14234330 | Bolt M10x1.25x65 |
| 16 | 2108-1003284-10 | Ring sealing |
| 17 | 2111-1003284 | Ring sealing |
| 18 | 2111-1003286 | Bolt |
| 19 | 2111-1003288-10 | Stub |
| 20 | 10725911 | Nut M6 low |
| 21 | 11197773 | Conical spring washer 6 |
| 22 | 13541221 | Hairpin M6x22 |
| 23 | 2108-1003270-10 | Cover gasket |
| 23 | 2108-1003270-11 | Cylinder head cover gasket |
| 24 | 21083-1003020-10 | Head gasket |
| 24 | 21083-1003020-11 | Head gasket |
| 25 | 2112-3855020 | Knock sensor |
| 25 | 2112-3855020-01 | Knock sensor |
| 25 | 2112-3855020-02 | Knock sensor |
| 25 | 2112-3855020-03 | Knock sensor |
| 26 | 2101-1002040 | Sleeve |
Reasons for gasket failure
When all the processes have been sorted out and the choice of valve cover gasket has been decided, it is necessary to consider the reasons for the failure of this element:
- Wear. Perhaps the most common reason is that during use this element tends to crack because it is constantly exposed to hot oil.
- Stretching. Constantly high temperature negatively affects the rubber product, which loses its physical properties and stretches, which entails a loose connection and the passage of lubricant.
- Oil streams. Occurs due to gasket breakdown. This usually happens after the engine overheats severely.
- Pressure. Excessively high pressure can squeeze the gasket out of its seat, which will cause oil to flow like a river.
Consequences of untimely replacement
There are not many consequences, but they are quite compelling to change the gasket in time. Firstly, this is directly related to oil leakage, which reduces the volume in the engine. Even if the loss is insignificant, it may just be enough for the internal parts of the power unit to wear out faster.
Secondly, air constantly gets under the valve cover, which can affect the quality of the air-fuel mixture and the engine will begin to “eat” a sufficient amount of fuel.
Thirdly, dirt and foreign objects, as well as water during winter and rainy periods, can enter through the resulting cracks. This can negatively affect the operation of the power unit, cylinder head and other elements, as well as affect the performance of the entire system as a whole.
Fourthly, leaked oil contaminates the outer part of the block, onto which dirt clings. It can also affect the operation of the power unit and other elements.