Checking the pump on a VAZ-2114: how to determine the malfunction yourself
Most motorists have experienced the fact that the water pump on the engine has failed. Of course, everyone knows how to fix the malfunction - just change it, but not everyone knows the reasons and signs that this unit is faulty until it is too late. Although, knowing this issue, you can get by with little expense and not change the assembly.
Signs and causes of pump malfunction on a VAZ-2114
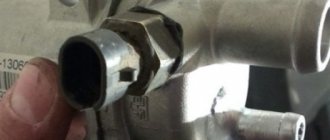
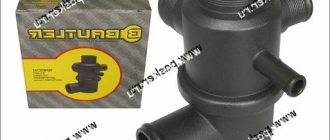
General view of the water pump
Before determining the signs of failure of the water pump on the VAZ-2114, it is necessary to consider the reasons for what in the future will lead to a simple replacement of the pump.
So, let's look at the signs of a malfunction of this unit in more detail:
- Belt whistle . When the belt begins to whistle, this may not only be a signal to replace it, but also mean that the internal bearing of the product begins to wear out and becomes unusable. So, you can remove the assembly and replace only this part.
- Leaks from the gasket . Wear of the gasket and small drops from under it also signal a future malfunction and failure. So, it is worth replacing the gasket itself.
- Product backlash without whistling . A bearing failure or a broken water pump shaft seat can cause this effect. So, you can feel it by slightly shaking the shaft. Here, the only correct solution would be to replace the product, since a new bearing will not eliminate the play on the product itself.
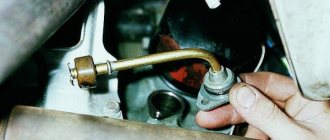
Part of the process of removing the pump from the car
Now that the main reasons have been discussed, we can turn to the issue of signs of malfunction:
- A coolant leak from the water pump indicates that it has failed and the vehicle cannot be driven. This is due to the fact that the coolant will not circulate through the system, and the loss of fluid will reduce the ability to cool the engine.
Traces of smudges are clearly visible
Elimination methods
There are several ways to troubleshoot the problem. So, we can consider the main ones:
- The easiest option is to replace the water pump assembly . Thus, the element is completely replaced, which normalizes the operation of the power unit.
- Replacing the pump bearing . Of course, not the easiest option, but relatively cheap. The only difficulty will be to disassemble the water pump.
- The gasket is replaced in cases where it is necessary to replace only this element if a breakdown or wear has occurred.
Pump selection
The choice of pump has already been discussed in our community in this material.
If traces of scale are visible on the pump, the cooling system must be flushed urgently
All the causes and symptoms of a malfunction in the VAZ-2114 water pump have been examined, and the motorist, knowing this information, can easily prevent the failure of the unit on the road, as well as replace the element prematurely. Of course, if it is not possible to determine the condition of the unit yourself, then it is recommended to contact a car service for diagnostics.
How to Replace the Pump on a VAZ 2115
We change the VAZ-2115 pump ourselves: video This article with video instructions tells how to replace the pump on a VAZ-2115 car with your own hands. Water pump
– a mechanism for ensuring fluid circulation in the vehicle’s cooling system.
Failure of the pump (pump) to work can lead to a change in the temperature regime inside the motor and lead to more serious damage.
To avoid this, it is recommended to carry out regular preventative checks and visual inspection of the engine in order to identify faults and timely replace the pump.
Water pump design
The design of the water pump in passenger cars is essentially the same, this especially applies to Russian car models. So there is no need to look for the location of the pump, knowing that it is powered by a timing belt and is located next to the radiator. Technically, the pump looks like this: a shaft with an impeller mounted on it is fixed in the cover, the rotation of which leads to movement (circulation) fluid in the engine cooling system. On the opposite side of the shaft there is a drive pulley. By means of a timing belt drive and a drive wheel (pulley), energy from engine rotation is supplied to the shaft. In turn, the shaft drives the impeller.
A seal (oil seal) is mounted in the space between the impeller and the housing, damage to which leads to problems with the water pump.
Leakage of liquids (antifreeze, antifreeze) through a poor-quality (damaged) oil seal to the bearings causes the lubricant to be washed out, resulting in faster wear, leading to jamming of the pump, and subsequently to rupture of the timing belt and bending of the valves. As a consequence, the entire cooling structure the engine stops functioning, overheats and fails. This entails significant financial costs and labor-intensive, expensive work than the usual replacement of a water pump . Tools for replacing a water pump on a VAZ:
- car keys for 10, 17 and 19;
- head number 10;
- flat screwdriver.
Replacing the pump on a VAZ 2114 mxf
Replacing the pump
with my hands.
VAZ 2115 water pump replacement or how to change the pump
I show you how to replace the pump
.
Detailed instructions for replacing the pump on a VAZ-2115
Replacing a water pump is a fairly simple operation, provided you follow the instructions properly and have the tools prepared in advance.
- The car is driven into a viewing hole. Before starting repairs, the engine is given one to two hours to cool down. The protection is removed from the crankcase, using keys 17-19, the protective casing is removed.
- The hood rises.
- Coolant (antifreeze, antifreeze) drains through the open valve located on the left side of the radiator.
- Unscrew the bolt on the cylinder block. Through the resulting hole we drain the coolant from the engine. It will be a little easier if you loosen the clamp on the radiator pipe and drain everything into a basin, and then add a new one, thereby completely replacing the fluid.
- Using a 10mm wrench, unscrew the three bolts that secure the outer casing of the timing
. Using a 17 key, we tear off the bolt of the toothed pulley (the main thing here is not to lose the key, having set the marks in advance). - Using the same wrench (17), unscrew the belt tensioner roller nut.
- Remove the belt tensioner.
- We move the belt on top of the standing toothed pulley and pump, moving it towards the radiator.
- We unscrew the bolt holding the toothed pulley and remove it (again paying attention to the safety of the key, it is better to remove it and put it aside). Using a small ratchet and a 10mm socket, unscrew the required number of bolts and nut holding the rear belt cover.
- We remove the protection.
- Use a flat screwdriver to carefully lift the pump and remove it.
- In the cylinder block we remove possible remnants of the old oil seal.
- We clean the future installation site of the new water pump. It is very important to thoroughly clean the area in the cylinder block , because if this is neglected, the pump will be installed unevenly (crooked) at the end of the work, which will lead to new leaks in the future. That is, all the work will go down the drain.
- We lubricate the new seal on both sides with a special automotive sealant and return it to the pump seat.
- We install the new pump in place so that the marking on it is on top.
- We install the parts obtained during disassembly in the reverse order.
Results of the work carried out
After the work is completed and the time allotted for the sealant to harden, we start the car (VAZ-2115) and conduct a test drive a short distance, preferably on an uneven section of the road. If you don’t smell antifreeze in the car’s interior, and there are no extraneous noises or knocking coming from the engine, then the work to replace the cooling system pump has been carried out efficiently.
Thus, you have gained experience in replacing the water pump of your own car 2115 and saved about one thousand rubles, which would have been required when replacing it at a service station. There is a special offer on our website. You can get a free consultation with our corporate lawyer by simply submitting your question in the form below.
Pump malfunctions
Malfunctions of the pump are manifested in significant play in its shaft, violation of the tightness of the seal, wear (corrosion or breakage) of the impeller. All of these defects lead to the fact that the car’s water pump does not work properly, which is why the required pressure is not maintained in the engine cooling system, which, in turn, leads to an increase in the temperature of the coolant until it boils. You have to buy a new pump and install it in place of the old one.
Signs of a pump malfunction
There are only six main signs of a “dying” pump, by which one can judge that the pump is partially (or even completely) out of order and needs to be replaced. So, these symptoms include:
- Extraneous noise . Often, a partially faulty cooling system water pump produces “unhealthy” noisy or “howling” sounds when operating. They can be caused by significant wear of the bearing and/or the fact that the pump impeller touches the pump body when rotating. This also occurs due to partial bearing failure.
- Pump pulley play . It occurs due to damage or natural wear of its rotation bearing. Diagnostics in this case can be carried out quite simply, just shake the pump shaft from side to side with your fingers. If there is any play, it will be tactilely felt. Please note that the formation of play brings closer the moment when the pump seal will become leaky and will leak coolant.
- The appearance of a leak . So, antifreeze can leak both from the seal and from other places, for example, the housing and impeller. Antifreeze or antifreeze in this case can be seen on the pump body, its mounting location, some elements of the engine compartment under the pump (depending on the design of a particular car) or simply on the ground under the car.
- Antifreeze smell appears . In particular, it can be felt not only in the engine compartment (when the hood is opened), but also in the cabin, since its fumes will enter the cabin through the ventilation system. Antifreeze has a sweetish smell, sometimes with a taste of alcohol.
- Mounting misalignment . In particular, in relation to timing gears, as well as tension rollers. This can be seen visually, or by placing some flat object (for example, a ruler) in the same plane as the rollers and pump. In this case, a situation often arises when the belt eats up.
- Significant increase in engine temperature . And not only the engine, but also the coolant, as indicated by the warning light on the dashboard. In critical cases, a banal boiling of antifreeze occurs, and steam will come out of the radiator. However, this is critical and if it occurs, it is prohibited to use the car!
If at least one of the above signs of a car water pump malfunction appears, it is necessary to perform additional diagnostics of both the pump and cooling system malfunctions. When the first signs of a dying pump appear, you can still drive, but for how long is unknown, and it’s better not to tempt fate. In some cases, a car can last 500.1000 kilometers, while in others it won’t last even hundreds. In any case, the cooling system is not something to joke about, and it needs to be diagnosed and repaired on time and in full.
Depending on the brand and quality of the cooling system water pump, the regulations require its replacement after approximately 60 thousand kilometers (depends on each specific case, and is prescribed by the car manufacturer; the relevant information can be found in the manual).
Replacing the Pump for a VAZ 2115 ~ AUTOTEXNIKA.RU
Replacing the pump VAZ 2109-2115
.I am glad to welcome you dear visitors of the site zerga.ru.
Replacing steering rods on a VAZ 2106 car. In this article “ Replacing VAZ 2109-2115 pump
, ” I want to provide you with detailed material on replacing
pump
in replacing
the water pump , the only thing that needs to be done is Remove the timing belt. How to properly remove it and then install it back without serious consequences, I recommend reading the special article “ Replacing the VAZ 2109 timing belt.” As we already know, the pump is driven by the timing belt and its failure can lead to serious consequences. VAZ 2114: pump replacement - ExpertVAZ.ru. What are the consequences? The most serious thing that can happen is the pump
, which breaks the timing belt.
If you have an engine with a displacement of not 1300 cc , then you will need to replace the pump and install a new timing belt, and if you are unlucky and have an engine of 1300 cc , you will have to partially disassemble the engine and repair the cylinder head ( replacement of valves, grinding in of valves and possible replacement
valve guides). I told you how to repair the cylinder head here.
Usually, the pump is changed at the same time as the timing belt, so that you don’t have to disassemble everything again later, but there are different situations when you need to replace it at an unplanned time. pump failure
There may be noise in the engine compartment or a coolant leak. The noise comes from worn bearings in the water pump, which means that a wedge should soon occur, and the oil seal, which begins to leak coolant out, is also damaged from worn bearings.
It is worth paying attention to one more important factor, I would say very serious for owners of VAZ cars with a 1300 cc . Replacement of the heater radiator on a new VAZ 21124, replacement of the heater radiator. the pump fails, it does not make noise or leak, but immediately jams.
What are the dangers of a water pump
this engine, I described above, so I always install ordinary, not expensive ones on these motors
pumps. As a rule, they last 40-50 thousand kilometers and there are enough of them before the scheduled replacement of the belt, but even if it fails before its time, it will squeak and make noise, in general, you will hear it and take certain actions before the worst happens .
So, let's leave the theory and start replacing water pump
or as we all call it the pump.
Replacing the pump on a VAZ 2114 mxf
Replacing the pump
with my hands.
Replacing the timing belt, rollers and pump on a VAZ 2108-2115 (8 valves)
quick replacement
timing belt with roller and pump. for all front-wheel drive vases (2108-2115
)
with a volume of 1.5-1.6 with 8. After removing the timing belt, we need to remove the camshaft gear. To do this, we need a socket wrench, which we will insert into one of the holes in the gear. An operation such as replacing VAZ 2106 steering rods is carried out on the basis of diagnosing the technical condition of the car’s front suspension. The holes in the gear are made in such a way that the key fits in freely and the marks remain in place.
Replacing the timing belt on a VAZ 2110, VAZ 2111, VAZ 2112. Thus, we will stop the gear from turning and calmly unscrew the bolt.
After unscrewing the bolt, remove the gear. Usually it doesn’t sit tight, but if it doesn’t move, you can help it by lightly tapping it with the handle of a hammer. When removing the gear, be careful; the locking key is located at the bottom (if the timing marks are set correctly) and can easily get lost. Or you can slightly pry with a larger screwdriver. Next, do not forget to drain the coolant from the cooling system. Now that we have drained the coolant, we need to remove the protective metal shield. To do this, you need to unscrew all the bolts shown in the photo below and one nut, then remove the shield itself. Now access to the pump is completely open. The bolts that we unscrewed to remove the cover also secure the pump itself, so we can only remove the non-working mechanism. Do-it-yourself replacement of front struts (shock absorbers) on VAZ 2108, 2109, 2110, 2111, 2112, 2113, 2114, 2115 cars. Replacing the VAZ 2112 alternator belt with 16 alternator drive valves using the example of the VAZ 2110.
If you can’t tear the pump out of place with your hands, you can use a wooden stand. Place it on the pulley, apply a few gentle blows with a hammer, and it will come off, or you can simply pry it out with a large screwdriver. Replacing the fuel pump for VAZ 2110, VAZ 2111, VAZ 2112.
If the old sealant holds well, then it is better not to pry too much with a screwdriver, otherwise there is a chance of breaking off part of the aluminum body. As soon as the pump comes out of its seat, pull it out. If you managed to pull it out, then you are very lucky, but if not (the car body is in the way), then we move on. We need to jack up the engine from the front side to slightly increase the distance from the engine and the car body. We place the jack under the front support and lift it a little; if it still doesn’t work, you need to remove the bolt on the cushion and lift it a little higher. Now you can safely pull out the pump.
We throw away the old and worn out water pump and run to the store for a new one. Replacing the steering rack on a VAZ 2110 with your own hands: I recommend reading the relevant article “here” on how to choose a pump.
Before installation, we clean the seat from the old sealant and it is advisable to degrease it for better adhesion. It is also advisable to replace the gasket with a new one, because the old gasket will not ensure a tight fit of the mating surfaces. Apply a thin layer of sealant to the gasket and install the pump in place. The mounting holes are not evenly spaced and only match in one position. You can navigate by the stamps on the pump
inscriptions and numbers. The red arrow indicates the top.
It is advisable not to install the metal shield right away and tighten the three bolts so that the sealant sets and dries. After two hours, you can unscrew the bolts and install the metal shield.
That's it, we have the pump installed. Before assembly, be sure to inspect the condition of the oil seal on the gas distribution shaft and the condition of the tension roller. Now we install the timing belt back and set everything to the marks. That's it, we replaced the cooling system pump ourselves and, using this manual, you can easily cope with this matter. It also happens, that you are just too lazy to delve into the car, then it is better to go to a special workshop, they will do everything for you.
Causes of pump malfunction
What are the possible causes of pump failure? This question interests not only beginners, but also quite experienced car enthusiasts. The following are the main reasons, from the most common and frequently occurring to the “exotic”. Among them:
- Faulty bearing . This unit wears out for natural reasons as it is used. However, accelerated wear is possible due to additional negative factors. This, for example, is an incorrect (stronger) belt tension, which causes more force to be exerted on the bearing. Another reason for significant wear is the ingress of antifreeze onto the rubbing vapors due to depressurization of the gasket and leaks of coolant.
- Seal failure . The pump has two seals - an oil seal and a rubber cuff. And it is the oil seal (gasket) that most often fails. This happens for two reasons - natural wear and tear (tanning of rubber) and the use of low-quality cheap antifreeze without appropriate gentle additives, or even water. In the long term, these liquids “eat up” the gasket, it begins to leak, which leads, firstly, to a decrease in the level of coolant in the system, and secondly, antifreeze or water gets into the bearing, washing out the lubricant from it and the troubles described above.
- Mounting misalignment . This is possible for two reasons - incorrect installation and manufacturing defects. However, incorrect installation is a fairly rare occurrence, since the case has ready-made mounting holes, which are very difficult to miss. Another reason is uneven fit to the engine block (due to dirty, rusty or warped mating surfaces). But, unfortunately, factory defects, especially with budget pumps, are not such a rare phenomenon. Misalignment leads to the pulley rotating misaligned, which, in turn, leads to accelerated wear of the loaded part of the belt, as well as wear of the bearing. In the most critical cases, the belt may break and a collision of valves and pistons may occur. Sometimes misalignment occurs as a result of the car being involved in an accident, which resulted in the displacement of individual elements of the body and/or engine.
How to determine if your pump is faulty
Checking your car's engine water pump for faults is quite simple. The simplest method is to try by touch to see if there is any play or no play on the pump shaft. To do this, just grab the pump shaft with your fingers and pull it from side to side in a direction perpendicular to the shaft itself (that is, across). If the bearing is in order, then there should be no play. If even a slight play occurs, then the pump needs to be replaced.
However, a more thorough check without removing the pump is performed using the following algorithm:
- Warm up the engine to operating temperature. That is, so that the coolant temperature is around +90°C.
- With the engine running, hand pinch the thick coolant pipe that comes from the radiator.
- If the pump is working properly, then pressure should be felt in it. If there is no pressure or it is pulsating, then this means that the pump is partially or completely out of order. Most likely the pump impeller has turned.
Also, to check the pump, you need to visually inspect its seat. To do this, you need to dismantle the protective casing of the gas distribution mechanism in order to gain access directly to the pump (the design is different for different cars, so perhaps there will be no casing or it does not need to be removed). Next, carefully inspect the pump body, its seal and seat.
You definitely need to pay attention to the presence of antifreeze leaks from under the sealing gasket. Moreover, it does not have to be wet at the time of testing. If the seat and seal are dry, but there are dried (and fresh) traces of leaks in the mounting area, this means that at high pressure the seal still allows coolant to pass through. Traces of leaks have a reddish or brownish-brown color, in some cases gray (this depends on what color antifreeze was poured into the cooling system).
Before dismantling the pump for further diagnostics (checking the impeller and bearing), you need to make sure that the cooling system thermostat is working properly and that there is no air lock in the system itself. Otherwise, you need to troubleshoot the related problems.
If the pump is dismantled, then it is necessary to inspect the condition of the impeller. In particular, the integrity of the blades, as well as their shape.
You also need to inspect the location where the pump adheres to the engine block. Ideally, there should be no coolant leaks from the drain hole. However, if there are minor (namely minor...) leaks, then you can not change the pump, but temporarily try to get rid of them by replacing the seal and using sealant.
To check whether it is the pump bearing that is making the corresponding noise and whistle, just remove the belt from the pump pulley and unscrew it by hand, preferably as quickly as possible.
If the bearing is faulty, it will make a hum and roll with a noticeable rumble and unevenly. However, this method is suitable for those pumps whose pulley is rotated by a drive belt. If it is rotated by a timing belt, then for diagnosis it will be necessary to weaken its force and check its operation under such conditions.
What noise does a faulty pump make?
Many car enthusiasts are interested in the question of whether to repair the old pump, or replace it, buy and install a new pump. There cannot be a specific answer in this case, and it depends on the condition of the pump, its wear, quality, brand, and price. However, as practice shows, repairs are only possible by replacing the rubber gasket. In other cases, it is better to replace the pump with a new one, especially if it has been used for a long time. When replacing the pump, the antifreeze also changes.
Step-by-step installation of a pump in a VAZ-2114
Before you begin installing an additional pump yourself, you must first wait until the engine has completely cooled down and drain the coolant. Since antifreeze or antifreeze will still be needed in the future, you need to prepare a clean container of the appropriate size to drain the liquid. Next, installation is performed according to the following scheme:
- You need to unscrew the screws from the new pump and securely treat the rubber gasket in place of the clamps with sealant. Reassemble everything in the reverse order, but instead of self-tapping screws, use bolts and nuts of the appropriate size for better and more reliable fixation.
- Next, you need to determine the most suitable place to install the new equipment. According to experts, the pump can be installed:
- on the washer reservoir retainer;
- on a pin located near the battery;
- on the fastener located on the engine shield.
When installing an additional pump, it is necessary to pay attention to the location of the horizontal pipe, the front side of which should be directed towards the block.
- Hoses. To install the hoses in the additional pump, you need to disconnect them from the standard stove and the pipe that comes out from under the manifold. Using a reinforced or aluminum hose of the required length, the hoses are connected to the stove and additional pump. And to connect the hose to the manifold, you will need a small adapter to prevent bending. It is imperative to secure the connections with special clamps and carefully check the reliability of the fixation.
- To put a new pump into action, you need to install a button to activate it. You can get complete information on this issue and study the connection diagram from a video tutorial conducted by experts in their field on the web resource.
- The operation of the new device is checked. To check how the additional pump works, you need to fill in the coolant and, if necessary, add more antifreeze. Next, you should start the car’s engine, wait a few minutes for it to warm up, and activate the button to start the new pump.
If warm air enters the cabin, it means that the car owner has successfully installed an additional pump, and now the interior of his car will be warm even on the coldest frosty day.
It is quite easy to install an additional heating device in a VAZ-2114 yourself, and in case of any difficulties, car enthusiasts can watch a video on the Internet, in which they can easily find the answer to any question regarding the installation of an additional heating device.
VAZ pump malfunctions
Like any other mechanism of the VAZ 2114 car, the pump tends to break. Its breakdown can be determined by a number of characteristic signs. The first of which is a coolant leak from the system. This happens when the oil seal wears out. It begins to leak liquid and gradually collapses. Of course, not only the oil seal can cause a coolant leak, but also the radiator or pipes. But to determine that it is the pump that is leaking, it is enough to inspect it visually.
The second symptom of a faulty VAZ 2114 pump is that antifreeze or antifreeze circulates poorly and the engine overheats. The cause of this breakdown may lie in the impeller. If it is worn out or damaged, then the circulation of the fluid deteriorates significantly, and as a result, the engine does not have time to cool down. In order to check this part, it is necessary to remove the pump from the engine and inspect it from the inside. Basically, if the impeller is broken, it will be visually noticeable.
How to install an additional pump on a VAZ 2114, 2115
Experienced VAZ know that the “fourteenth” and “fifteenth” are ideal for conducting various experiments on installing certain equipment. For example, if standard heating on a VAZ 2114 through a stove is not enough for the owner, you can install a second (additional pump). The essence of this procedure is that the pump will pump antifreeze in a small circle, thereby providing better engine cooling and maintaining the temperature in the cabin in winter.
The second water pump forces the cooling system to work at maximum power
You will need to purchase the following items in advance:
Water pump (for models 2114 and 2115 the ideal solution is the Bosch pump 0 392 020 034);
Several hoses of different lengths (depending on the diameter of the small circle) with clamps;
Pump mount.
Assembly
This experience will already require some experience in independently servicing a VAZ . Therefore, to install an additional pump it is necessary:
Assemble this block yourself from three parts. pump and two nozzles (the shorter the hose works on the outlet, the longer it is on the frost-resistant pump).
Then drain the coolant from the system.
At the bottom of the machine, feel two hoses coming out of the oven, remove the one running on the branch.
Instead, connect the assembled assembly.
Then connect the pump itself to the manual transmission housing. It is better to use brackets and screws.
The final stage is refilling with new antifreeze.
To mount the pump, you can use any fasteners, the main thing is. ensure reliable connections
VAZ pump diagnostics
Engine overheats
To check, turn on the stove. If the air enters cold, then coolant does not circulate in the system. The pump needs replacing. Most often, failure is associated with a violation of the integrity of the impeller.
Timing belt wears unevenly
The belt becomes loose due to wear of the bushings and bearings. To check the water pump, you will have to dismantle it and examine its current condition.
Coolant leaks
This problem occurs when the water pump operates for a long time. The gasket may be worn out or it was simply installed incorrectly during a previous repair.
Regardless of what kind of problem you have to face, the only correct solution is to replace the water pump. It’s quite possible to do this kind of work with your own hands. To do this, you will need a little time, tools and a new high-quality pump that is suitable specifically for your VAZ 2114.
Replacing the water pump on a VAZ
The procedure for replacing a water pump differs depending on the number of valves in the engine.
This is due to the fact that for “fourteeners” with 8 valve engines, only one crankshaft pulley is provided, while 16-valve analogues have two. Therefore, the systems have slightly different designs.
Pumps for 8-valve and 16-valve engines are not interchangeable. When purchasing, be sure to ensure that the new water pump is compatible with your vehicle's engine.
Before you start replacing, check a few basic things.
- If a sign of pump malfunction is belt wear, check the condition of the tensioner roller. If there is rust, we recommend replacing it along with the pump.
- Check the quality and quantity of lubricant under the rubber seal. If there is a shortage, do not forget to add lubricant.
- Assess the degree of belt wear. If it breaks along the way, changing it is not the most pleasant experience. So think about the potential hazards before you decide to let a worn belt run for a while longer.
If your VAZ 2114 is equipped with an 8-valve power unit, then you need to change the pump according to the following algorithm.
- Remove the protective cover from the timing belt.
- Loosen the tensioner roller slightly. If its condition is questionable and the element needs to be replaced, then the roller is completely dismantled.
- Loosen the fixation of the generator, remove the generator belt and timing belt.
- Disconnect all hoses going to the water pump.
- Drain the existing coolant from the system.
- Disconnect the protective cover, and then remove the failed pump.
- After removal, be sure to clean the surfaces of the flange from the pump, and clean the cylinder block from accumulated dirt and rubber gasket residues.
- If you do not remove the dirt, then such growths will not allow you to install the new pump correctly and evenly. As a result, the timing belt will wear quickly and unevenly.
- When the replacement is made, do not forget to set the timing marks. Quite often the crankshaft moves relative to the camshaft.
To avoid possible coolant leakage, use red sealant and coat both sides with it - the pump and its seat.
If there is a 16-valve power unit under the hood of your VAZ 2114, then the sequence of replacing the pump will look slightly different. This kind of work has certain difficulties, but is done with your own hands. Additionally, we recommend watching the video instructions.
- Remove the plastic cover.
- Remove the cover from your timing belt.
- To remove the casing, you need to remove the timing belt, remove the camshaft pulleys, as well as two rollers - a support and a tensioner. Without these manipulations, it will be impossible to dismantle the water pump.
- Also remove the right front wheel. This way you can finally get to the lower casing mounting bolts.
- Now calmly remove the pump, following the algorithm of the 8-valve power unit.
Do not forget to follow all the subtleties of water pump replacement technology. If you assemble it incorrectly with a new pump, it will leak and show the same signs of malfunction as the old unit. Plus, improper repairs will lead to rapid wear of the timing belt. And this means additional financial losses.
How to change the pump on a VAZ 2115
A malfunctioning water pump can cause serious problems. One of the most common breakdowns is a coolant leak, which can lead to overheating and engine seizure. Bearing wear and coolant leakage from the drainage hole are the main defects of the VAZ-2115 pump. Bearing wear can be identified by a characteristic howling sound. Repairing a water pump with such defects, as a rule, does not give the desired results, which is why it requires replacing the entire assembly. Replacing the VAZ-2115 pump is carried out only on a cold engine. After cooling the engine, it is necessary to drain the coolant into a suitable container by unscrewing the plug at the bottom of the radiator and on the cylinder block. In order to change the pump on a VAZ-2115 you will need: wrenches 10, 17 and 19, a screwdriver, a strobe light. The latter is necessary to check the correct installation of the ignition. First, you need to disconnect the negative terminal from the battery. Remove the timing belt cover and set the piston of the first cylinder to TDC of the compression stroke. To do this, place a mark on the flywheel opposite the cutout in the plate.
In this case, the marks on the camshaft pulley and the cover fastening tooth must also match.
Now remove the timing belt tensioner and camshaft pulley. When removing the latter, be careful not to lose the key that secures the pulley to the shaft. Next, remove the nut and four bolts that secure the rear camshaft drive cover. Now move the back cover aside and carefully remove the water pump by using a screwdriver to pry it off the toothed pulley. Install the new pump in reverse order. Before installing it, you need to check the tightness of the pump bearing lock screw and, if necessary, tighten it. The number on the pump should face up when installed. The camshaft pulley is installed with the protrusion towards the engine. The key can be secured with a small amount of thick lubricant so that it does not fall out of the slot. When tightening the bolt, keep the pulley from turning with a large screwdriver or a spatula. After installing the timing belt, you need to check the quality of its installation.
To do this, rotate the crankshaft several times and try to align it with the marks again. When installed correctly, all marks should match. If they do not match, reinstall the timing belt.
Adjust the timing belt tension and fill with coolant. Before adding antifreeze, do not forget to tighten the plugs on the radiator and cylinder block. Start the engine and check the operation of the pump - there should be no antifreeze leaks. Upon completion of all work, make sure that the ignition is installed correctly using a strobe light.
How to change the pump on a VAZ 2115
Symptoms of malfunction
- Noise from the pump when the engine is running. Extraneous sound appears due to bearing wear. It is recommended to replace the cooling system pump after one or every replacement of the timing belt kit. If you neglect service intervals, wear appears on the rolling elements, inner and outer races, which leads to noise and whistling. Often the cause of accelerated wear is antifreeze, which, due to a leak in the oil seal or rubber cuff, gets to the rubbing vapors.
- Antifreeze leak. Like the pump bearing, the oil seal and rubber seal have a limited service life. The appearance of play due to bearing wear will significantly increase the risk of seal leakage.
- Misalignment with respect to timing gears and rollers (the pump becomes askew). Uneven tension distribution leads to accelerated wear of not only the bearing, but also the oil seal. Incorrect installation or a manufacturing defect, in which the pulley rotates misaligned, leads to accelerated wear of the loaded part of the belt. Such a defect, even with low mileage, can cause the timing belt to break and the valves to meet the pistons.
- Engine overheating. When the impeller blades break off, the pump's performance decreases, as a result of which less coolant passes through the small circulation circuit.
Often a decrease in performance is noticed after using a sealant to repair a radiator leak. The poured mixture clogs the cooling system channels and sticks to the pump impeller.
If the liquid has not clogged the coolant drain channel in the housing, then pouring sealant will not lead to a malfunction of the water pump. But you can’t do without removing the pump and flushing the system.
How to check the cooling system pump?
By checking the pump without removing it from the engine, we can only indirectly assess its performance. When the volume of pumped coolant decreases, the stove begins to heat poorly. But before removing the water pump to inspect the impeller, we recommend checking the thermostat and also making sure that there is no air lock in the cooling system.
After removal, pay attention not only to the integrity of the blades and where the impeller fits on the drive shaft, but also to the shape of the blades. For example, on the VAZ 2121 over many years of production, impellers were installed that differed in the diameter of the pump wheel, the number and profile of the blades. Installing a less efficient pump on a more heat-loaded engine modification will result in the cooling system fan turning on more frequently and an increased risk of overheating.
Cooling system
According to the standard cooling system diagram, we will embed our additional pump into hose No. 19, which is connected to part No. 20 (supply pipe).
Please note that we are not interested in supply hose No. 21, although it is closest to the thermostat (No. 29). If you look under the car and look at the partition, we will see two hoses; we need the right one (more precisely, the one closest to the right wheel). It will need to be replaced with a prefabricated part consisting of this hose (article 21083-8101010-01), a hose connecting to pipe No. 20 (article 2101-8101204) and the electric pump itself (additional pump for VAZ 2114), which you will purchase.
Installing an additional pump on a VAZ 2114 will require you to purchase several additional parts. Initially, we will look at a general kit that may be useful to you, and later, based on the method you choose, it will become clear to you what exactly you need to buy in your case:
- The pump itself can be either a Gazelle pump (article 32.3780-01) with 18 mm nozzles, or a good German BOSCH pump (article 0 392 020 034).
- Electrical equipment – 4-pin relay, 3-pin toggle switch, wires, terminals for “mother” and “father”, as well as corrugation for the wire.
- Hoses and clamps, fasteners and related bolts.
- If you choose the option with a pump from BOSCH, a bracket for the clamp and the exhaust pipe clamp itself will also come in handy. They are worth buying from a VAZ 2101 car.
- If you choose the option with a Gazelle pump, then a sealant will come in handy.
Since there is no space on the panel for an additional button, it will either have to be drilled into the dashboard, or, as an option, the panel backlight brightness control buttons will be replaced (no one uses it anyway).
Symptoms of a problem
Some of the most common signs of pump problems include:
- the engine overheats;
- the timing belt wears unevenly;
- Coolant is leaking.
Engine overheating
With a normally operating pump, the coolant temperature can only reach the red zone in the summer when parked for a long time at idle or driving at high speeds. If the needle approaches 105 degrees while driving, this may indicate a pump malfunction. It’s easy to check - just turn on the stove. If it blows cold air, there is no coolant circulation in the system. The water pump needs to be replaced. The most common cause of pump failure is a broken impeller.
Uneven timing belt wear
One of the common reasons for the belt eating up on a VAZ 2114 is wear of the bearings and bushings of the pump axle. In other words, it starts to loosen and this causes the belt to wear out. For owners of 16-valve VAZ 2114, a broken timing belt can result in bending of the valves. To check the condition of the water pump, it will have to be removed.
Coolant leaking
This problem may appear after using the pump for a long time, when the gasket wears out, or due to its incorrect installation. It manifests itself as loss of coolant and the appearance of leaks in the pump area.
Whichever of the above symptoms occurs, the pump will need to be replaced. The question often arises, which pump is better to install. There are many pumps for the VAZ 2114 on the market, among which there are many low-quality and counterfeit products. When purchasing, you need to visually assess the quality of the build and metal by comparing several options. Be sure to check that the axle does not hang on the bearings and has a clear angle of 90 degrees. Even a slight distortion indicates a defect - such a pump will eat the timing belt.
There is no answer to the question of which manufacturer is better - there are many positive and negative reviews for each. Therefore, you should choose a specific pump, not the manufacturer.
Replacing a VAZ 2114 pump: how to check and signs of malfunction
Signs of malfunction and replacing the pump on a VAZ 2114
The pump is designed for proper operation of the cooling system. On the VAZ 2114, the pump is driven mechanically by the movement of the timing belt. It is also connected to the generator pulley. Because the pump is part of the system, problems with it can result in problems for the engine or electrical part. Therefore, it is extremely necessary to monitor its good condition.
Symptoms of a problem
Some of the most common signs of pump problems include:
- the engine overheats;
- the timing belt wears unevenly;
- Coolant is leaking.
Engine overheating
With a normally operating pump, the coolant temperature can only reach the red zone in the summer when parked for a long time at idle or driving at high speeds. If the needle approaches 105 degrees while driving, this may indicate a pump malfunction. It’s easy to check - just turn on the stove. If it blows cold air, there is no coolant circulation in the system. The water pump needs to be replaced. The most common cause of pump failure is a broken impeller.
Uneven timing belt wear
One of the common reasons for the belt eating up on a VAZ 2114 is wear of the bearings and bushings of the pump axle. In other words, it starts to loosen and this causes the belt to wear out. For owners of 16-valve VAZ 2114, a broken timing belt can result in bending of the valves. To check the condition of the water pump, it will have to be removed.
Coolant leaking
This problem may appear after using the pump for a long time, when the gasket wears out, or due to its incorrect installation. It manifests itself as loss of coolant and the appearance of leaks in the pump area.
Whichever of the above symptoms occurs, the pump will need to be replaced. The question often arises, which pump is better to install. There are many pumps for the VAZ 2114 on the market, among which there are many low-quality and counterfeit products. When purchasing, you need to visually assess the quality of the build and metal by comparing several options. Be sure to check that the axle does not hang on the bearings and has a clear angle of 90 degrees. Even a slight distortion indicates a defect - such a pump will eat the timing belt.
There is no answer to the question of which manufacturer is better - there are many positive and negative reviews for each. Therefore, you should choose a specific pump, not the manufacturer.
DIY pump replacement
Removing the VAZ 2114 pump
The replacement process depends on how many valves are in the car's engine. An 8-valve engine has one crankshaft pulley, a 16-valve engine has two, therefore the system is organized differently. By the way, a pump for an 8-valve engine will not work for a 16-valve engine and vice versa.
If the sign of a pump malfunction is the timing belt wear, then you need to check the condition of the tensioner roller. If there are signs of rust, it is better to change it too. If there is no lubricant under the sealing rubber, or there is not enough lubricant, the supply must be replenished. It is also worth checking what degree of wear the alternator belt has. Although its unexpected break is not critical for the car, changing the belt on the road is a dubious pleasure, especially if there is no spare one.
Replacement process on an 8-valve VAZ 2114
- Remove the timing belt protective cover.
- Loosen and remove (if necessary) the tension roller.
- Loosen the generator, remove the generator and timing belts.
- Disconnect the hoses from the pump and drain the coolant.
- Remove the protective cover and pump.
After removal, you need to thoroughly clean the surfaces of the pump flange and cylinder block from dirt and stuck gasket residues. The growth of a mud “beard” is one of the reasons for the pump being skewed and the timing belt being eaten away.
To avoid leaks, the gasket must be thoroughly coated on both sides with red sealant.
After replacing the pump, it is necessary to set the timing marks: the crankshaft may move relative to the camshaft.
Replacement process on a 16-valve VAZ 2114
On 16-valve cars, changing the pump yourself is more difficult, but it is also quite possible.
- Remove the plastic cover and timing belt cover.
- To remove the casing that separates the pulleys from the cylinder block, you need to remove the timing belt, camshaft pulleys, tension and support rollers. Without this, you will not be able to remove the pump.
- To get to the lower housing bolts, you need to remove the right wheel.
- Remove the pump.
Further actions are identical in content to cars with an 8-valve engine.
When replacing a pump, it is important to follow the installation technology. An incorrectly installed pump will leak, just like the old one. In the same way, it can eat the timing belt. There can be many reasons for motor overheating, and if replacing the pump does not help solve this problem, it is worth reading the corresponding article on the website.
We recommend
- The most useful tips for replacing coolant on a VAZ 2114
- How to correctly replace the cabin filter on a VAZ 2114
- How to remove an air lock from the cooling system of a VAZ 2114
- The procedure for draining coolant on a VAZ 2114
https://nadomkrat.ru
legkoe-delo.ru
DIY pump replacement
Removing the VAZ 2114 pump
The replacement process depends on how many valves are in the car's engine. An 8-valve engine has one crankshaft pulley, a 16-valve engine has two, therefore the system is organized differently. By the way, a pump for an 8-valve engine will not work for a 16-valve engine and vice versa.
If the sign of a pump malfunction is the timing belt wear, then you need to check the condition of the tensioner roller. If there are signs of rust, it is better to change it too. If there is no lubricant under the sealing rubber, or there is not enough lubricant, the supply must be replenished. It is also worth checking what degree of wear the alternator belt has. Although its unexpected break is not critical for the car, changing the belt on the road is a dubious pleasure, especially if there is no spare one.
Replacement process on an 8-valve VAZ 2114
- Remove the timing belt protective cover.
- Loosen and remove (if necessary) the tension roller.
- Loosen the generator, remove the generator and timing belts.
- Disconnect the hoses from the pump and drain the coolant.
- Remove the protective cover and pump.
After removal, you need to thoroughly clean the surfaces of the pump flange and cylinder block from dirt and stuck gasket residues. The growth of a mud “beard” is one of the reasons for the pump being skewed and the timing belt being eaten away.
To avoid leaks, the gasket must be thoroughly coated on both sides with red sealant.
After replacing the pump, it is necessary to set the timing marks: the crankshaft may move relative to the camshaft.