Preparing for adjustment
Before starting work, you need to place the car on a level surface, and then squeeze the handbrake. It is also advisable to use a higher speed to prevent the car from rolling away. Then you need to do the following:
- Raise either front wheel using a jack. And install a reliable support under the car body.
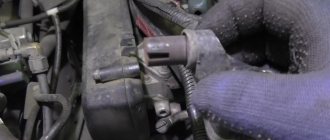
- Disconnect the breather hose.
- Disconnect the drive cable from the throttle valve. To do this you need to remove the bracket.
But after this you need to measure the clearances of the intake and exhaust valves between the camshaft cams. On eight-valve engines this work is very simple.
What should be the gaps?
On 8-valve engines of VAZ-2114 cars, the valve clearances should be as follows:
Permissible deviation is no more than 0.5 mm. Please note that the gap measurement should only be carried out on a cooled engine.
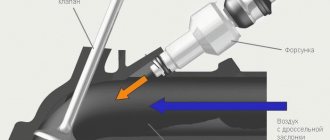
All valves that are being tested must be closed. In order to understand that the valve is closed, you need to look at the camshaft. The cam located on it will be directed upward. All exhaust valves are located opposite the exhaust manifold. The intake valves are slightly larger in diameter than the exhaust valves.
Checking clearances
To check the clearances, you need to set the first cylinder to top dead center. The check should be carried out according to the following scheme:
| Valve no. | Crankshaft position | Camshaft position |
| 6, 8 | 0 | 0 |
| 4, 7 | 180 | 90 |
| 1, 3 | 360 | 180 |
| 5, 2 | 540 | 270 |
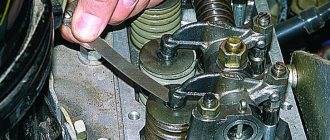
First you need to check the gap size in the 6th and 8th valves; they are located on the third and fourth cylinders. The feeler gauges should pass with little resistance between the cam and the tappet. If the probe does not fit or freely penetrates into the gap, it is necessary to make adjustments. This is done using washers of different thicknesses.
Adjusting valve thermal clearances using a feeler gauge
- First you need to unhook all the tubes from the valve covers, the cables leading to the damper actuators, and dismantle the air filter housing. To make the crankshaft rotate easier, the spark plugs can also be unscrewed.
- Unscrew the two nuts and remove the cover, after which any remaining oil is removed from the top of the cylinder head.
- The front timing belt cover is removed.
- The piston of the cylinder, from which the clearance adjustment will begin, is set to the top dead center of compression. All valves in this position will be closed. During the process, for the most accurate result, you can rely on the marks applied by the manufacturer.
- Next, the crankshaft should be turned clockwise along the sprocket. For optimal valve adjustment, the marks on the crankshaft and the bearing housing must match. For greater convenience, you can add your own marks. Then in the future the position of each cylinder can be determined by the teeth of the sprocket.
- The locknut on the screw used to set the gap is pressed out. The gap is set so that the flat feeler gauge is the limit for turning the bolt. After which the locknut is tightened. At the same time, it is necessary to monitor the tightening force of the locknut, otherwise the obtained parameters can be lost.
- Having finished tightening, you need to check the set gap again with a feeler gauge. The latter should be done with light effort. If the result differs from the desired one, carry out the adjustment again.
- Repeat the process with all subsequent valves.
Above is a method for adjusting valves using a feeler gauge. On many modern cars, special shims are used for this procedure. The entire scope of work is perfectly demonstrated in the video below.
An example of valve adjustment on a VAZ 2108–2115
How to adjust a 6-cylinder in-line engine: video
How is the adjustment made?
In order to remove the washers, you will need a specially designed puller. It is sold in any store. Its cost is not very high, so you can easily purchase it at any store. The adjustment procedure is as follows:
- Screw the puller pipe onto the valve cover mounting studs.
- Place the crescent-shaped part of the lever into the gap between the camshaft cam and the adjusting washer.
- Press the puller lever and retract the valve.
- Place the flag included in the puller kit between the camshaft and the cup.
- After lifting the lever up, remove the washer.
It can be pulled out either with two flat screwdrivers or with thin tweezers. The second tool is much more convenient to use. Please note that it is not advisable to adjust the valves of the VAZ 2114 if you do not have sufficient experience.
Do-it-yourself valve adjustment on a VAZ-2114: features of the work
On VAZ-2114 cars, valve adjustment is necessary when repairing the cylinder head and engine. With high mileage, the metal surfaces of the cams and washers can wear off, which will lead to a change in thermal clearances. The “fourteenths” do not have hydraulic compensators, which automatically maintain the most acceptable clearances. Therefore, it is sometimes necessary to diagnose and adjust the gas distribution mechanism. You can do this yourself, but you will need some shims.
Basic information about the timing mechanism
After adjusting the VAZ-2114 valves, the injector will operate in normal mode, fuel injection will be timely. The gas distribution system is adjusted in a similar way on all VAZ vehicles with front-wheel drive. The thermal gap in the intake valves is set at 0.2 mm, and at the exhaust valves - 0.35. The permissible deviation from these values is no more than 0.05 mm. If you set the gap to 0.2 mm, then a feeler gauge with a thickness of 0.25 mm should no longer fit between the cam and the washer.
But the 0.15 mm probe should pass without resistance. Do the same with the exhaust valves. On sale you can find washers with sizes in the range of 2.0..5.1 mm, the pitch between adjacent ones is 0.05 mm. You can find kits - sets of washers with different sizes (usually from 3 to 4.5 mm). You can also order them individually, but before doing this you will need to measure all the gaps and calculate the dimensions of the new washers.
When to make adjustments
The price of valve adjustment on a VAZ-2114 depends on the technician, usually around 700-1000 rubles. Takes a little time if the required sizes of washers are available. The gaps change due to increased friction in the gas distribution mechanism. As a result, engine power decreases as the valve timing changes. Fuel consumption increases significantly; starting the engine is sometimes impossible.
In some cases, it is possible that the engine will start normally and run without problems until it warms up. But as soon as it warms up to 90 degrees and above, problems begin - the engine stalls, stalls, and traction decreases. There is a feeling that the access of air or gasoline to the fuel system has been blocked. The VAZ-2114 1.6 valves are adjusted every 60 thousand km according to the maintenance card.
Tools for repairs
The first step is to measure the gaps on a cooled engine with old washers. Then, using the formula, calculate what the thickness of the new shims should be. Next, you need to purchase new elements with the calculated thickness. To work you will need the following set of tools:
- Open-end wrenches.
- Key for removing spark plugs.
- Probes (preferably a fan).
- A device for squeezing valves (you can make adjustments without it, just have a good flat-head screwdriver).
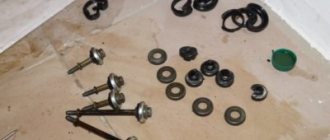
- Adjusting washers (can be a set of different sizes).
- Gasket under the cover.
- Rags.
The cost of the set is at least 2000 rubles, so it will be cheaper to purchase individually. One washer costs 30-35 rubles. You may need a maximum of 8 pieces for adjustment, that is, no more than 300 rubles. And the cost of adjusting valves on a VAZ-2114 at a service station is 2-3 times more. Think, maybe you should overpay a little and entrust the work to professionals?
Preparatory work
To prepare for work, you will need to perform a number of actions:
- Place the car on a level surface.
- Let the engine cool to 20 degrees. If you need to do this quickly, you can use a household fan for blowing.
- Remove the side plastic cover covering the timing gear drive. To do this, use a 10mm wrench and unscrew the three fastening bolts.
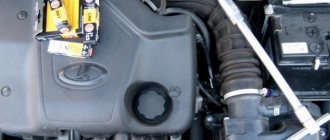
- Remove the top metal cover from the block head.
- Wipe surfaces to remove excess engine oil.
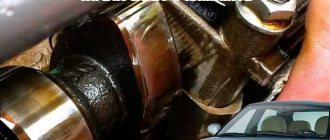
- Inspect the camshaft, cams, and pulley for scoring, signs of wear, and other defects.
- To make it easier to crank the crankshaft, unscrew all the spark plugs.
Checking clearances
Before you start adjusting the valves on the VAZ-2114, you need to check the gaps. To check the clearances in the gas distribution mechanism, you will need:
- Align the mark on the camshaft pulley with the protrusion on the cylinder head casing. This will place the first cylinder at top dead center.
- To rotate the crankshaft, you can use a 19mm wrench. Or you can do it simpler - lift the right side, engage fifth gear and rotate the wheel.
- For convenience, opposite the mark that is already on the pulley, make another one with chalk or a marker. The main thing is that it is clearly visible.
- In this position, measure the gaps, counting from the camshaft pulley, on valves 1 (exhaust) and 3 (intake). To do this, install a 0.35 feeler gauge into the first gap. It should enter barely touching the metal surfaces. You don't need to apply force for this.
- Then you need to check the second and fifth valves - rotate the camshaft pulley 180 degrees.
- Rotate the camshaft another 180 degrees and check the clearances in valves 6 and 8.
- The last to be checked are 4 and 7 - to do this, turn the camshaft another half a turn.
Selection of new washers
To set the correct gap, you will need to do some calculations. To calculate the size of the new washer, you will need a micrometer. We need to look at an example of how new washers are selected:
- Having measured the gap, you found that it is not 0.35 mm, but 0.45 mm. This is 0.10 mm more than normal.
- When the washer was removed, there was a 3.70 mm mark on its bottom. If the mark is not visible, take measurements using a micrometer.
- To calculate the thickness of the new washer, you need to add the difference in the gap to the old one: 0.10 mm +3.70 mm = 3.80 mm.
- If a washer with a thickness of 3.80 mm is not available, you can install 3.75 or 3.85 (permissible deviation from the norm).
If during the calculation you get a number that is not a multiple of 0.05, then you need to choose the washer size that is closest in value. Install a new washer instead of the old one, this completes the valve adjustment on the VAZ-2114.
fb.ru
Selection of washers
The most difficult step in this work is to calculate the thickness of the new washers. According to the procedure for adjusting VAZ-2114 valves, it is necessary to remove the washers and adjust the gap by selecting new ones. The selection looks something like this (the data is approximate, yours will vary):
- Measure the gap between the valve and the cam. For example, it was 0.2 mm at graduation. And it should be 0.35 mm.
- And the washer that is installed in this valve drive has a thickness of 3.4 mm. You found this out by removing it and looking at the bottom.
- You need to increase the gap by 0.15mm. Therefore, you need to install a new washer, the thickness of which will be 0.15 mm less than the old one.
- The new washer should have a thickness of 3.25 mm.
If you get a value that is not a multiple of 5, you need to choose a washer whose size is closest in value to the calculated value. The same principle is used to select washers for the remaining valves. But is it worth adjusting the VAZ-2114 valves yourself? If you have a large set of shims, you can do this work yourself.
If you don’t have such washers, then it’s better to leave this job to professionals. The cost of adjusting the valves is about 800 rubles. A set of washers of various thicknesses will cost you no less than 2000 rubles. Moreover, it is not a fact that one set will be enough. But if there is a problem with good craftsmen in your city, or you are used to trusting only yourself, then you can purchase several kits and not have problems adjusting valves for many years.
The countdown, as before, must begin from the pulley.
After reading this article, you can understand that it is quite simple to independently adjust the valves on the VAZ-2114. However, if you do not want to do this work yourself, then you will have to contact a service station. The cost of adjustment at a car service can vary from 600 to 900 rubles. Experts recommend checking the clearance and adjusting the valves every 25-30 thousand miles, even if, according to the driver, the car is working normally.