And so, the first step is to press out the fastening elements that secure the lock handle to the door panel; you can remove the lining.
Use a spatula and use it to remove all the plugs that are in the armrest.
Next, using a Phillips screwdriver, we need to unscrew a couple of screws that secure the armrest handle and the panel that is located in the door.
Remove the armrest handle.
Using a Phillips screwdriver, you need to unscrew the button that blocks the doors.
Again, using a Phillips screwdriver, we will unscrew the three screws that hold the bottom trim.
Take the trigger glass position switch out of your pocket, you can also pull out the wiring harness block, carefully disconnect the switch.
The bolts (4 pieces) that secure the speaker need to be unscrewed.
The speaker needs to be pulled out.
Let's take a spatula and, using a screwdriver, we need to pull out the six pistons that secure it, and we need to dismantle the door card.
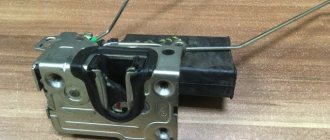
From the lock located inside we need to disconnect the rod and the lock switch.
Next, using a Phillips screwdriver, we need to unscrew several screws that secure the handle inside the car. Next, take out the handle located inside
We unscrew a couple of screws that secure the door lock.
The first step we need to dismantle the external lock
Door lock located inside
Remove the locking bracket from the lever pin and the handle rod from the lever located inside the lock.
Install new lock rods.
Now you can assemble all the parts in reverse order.
Discuss
Select it and press Ctrl + Enter
According to automaker Opel, the Combo Life will now be equipped with a 1.2-liter turbo engine coupled with an 8-speed automatic transmission.
It is also reported that it will be a 3-cylinder turbocharged gasoline engine with a capacity of 130 horsepower. The engine is equipped with an average fuel economy-Start/Stop system. It is stated that gasoline consumption in the NEDC cycle will not exceed 5.3 liters per 100 kilometers traveled. The engine complies with Euro 6d environmental class.
Acceleration of the Opel Combo Life to 100 km/h will be 12.3 seconds, and the maximum speed will not exceed 186 km/h, which is quite enough for a city car.
The Combo Life will not only have a new engine and gearbox, but the standard features of the car will also be updated. The driver's seat will be adjustable in 6 modes, the leather-wrapped steering wheel will be heated, and air conditioning and power windows will be installed.
The multimedia system will be equipped with an eight-inch touchscreen that is compatible with Android Auto and Apple CarPlay, they are available even in the basic version. The car is equipped with driver assistance systems such as hill start, speed limiter, lane keeping, drowsiness alert, sign recognition.
The cost of an Opel Combo Life car with a 1.2-liter engine in the basic Edition configuration will be 27,200 euros or 1 million 924 thousand rubles. Information on when the car will hit the market has not yet been announced.
CONSTRUCTION OF CONVENTIONAL AND SILENT LOCKS
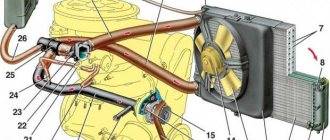
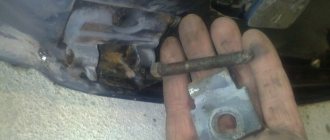
Before we talk about how silent locks work, let us remind you of the door lock design of the VAZ 2114. This locking mechanism of the car consists of several elements:
- The inner housing in which the rotating unit is placed. It is the main door locking mechanism.
- The cylinder, which is connected to the rotary unit, has an individual design that matches the outline of the key. The key is inserted into the cylinder and sets in motion the rotary unit, which opens the door. A button on the door is connected to the body, locking it.
- Rods that control the door handles are connected to the lock body.
- In modern models, a gear motor is associated with locking, which turns on the alarm.
- The locking device, which provides locking, is attached to the car body.
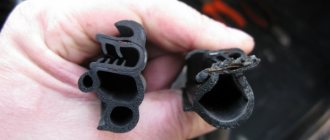
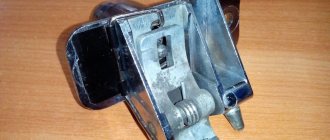
- The operating principle of silent locks on VAZ cars is based on sound insulation of metal parts. To be more precise, the noise-insulating material covers the locking mechanism pin and the metal latch that are in contact with each other. Plastic is more wear-resistant, but rubber absorbs sound more effectively.
- In addition to this, the locking parts of the lock are treated with silicone, which provides additional sound insulation.
The so-called silent bolts, which are used to fasten and are required to complete all silent locks, have a good soundproofing effect. The essence of their noiselessness lies in the plastic clamp, which is put on before the thread. Silent bolts for the VAZ 2114 can be bought at an auto parts store, or you can try to make them yourself. How, you will learn about this below.
Silent locks for VAZ, produced by Ptimash in Dimitrovgrad, enjoy a good reputation.
REMOVAL AND INSTALLATION OF DECORATIVE ELEMENTS OF THE BODY
REMOVAL AND INSTALLATION OF DECORATIVE ELEMENTS OF THE BODY
Removing and installing moldings
You will need a screwdriver.
1. Carefully, so as not to damage the paintwork of the front fender, remove the front piston for fastening the molding and the hole in the fender.
2. Pull out the molding, remove the rear piston from the hole in the wing and remove the molding.
3. To remove the front door molding, carefully, so as not to damage the paintwork, remove the front piston for fastening the molding from the hole in the front panel of the right door...
4. ...and, applying force, remove the remaining pistons. Remove the molding.
5. Similarly, remove the molding from the rear right door; if necessary, remove the moldings from the left side of the body.
6. Install the moldings in the reverse order of removal; if necessary, replace the molding mounting pins.
Removing and installing door sill trims
You will need: screwdriver, pliers.
1. Remove the right wing molding (see “Removing and installing moldings” above).
2. Remove the piston securing the front decorative sill trim to the fender.
3. Remove the five upper and three lower screws securing the front trim to the sill.
4. ...and remove the trim.
5. Remove the three screws securing the rear trim to the sill.
6. Remove the screw securing the rear trim to the bottom of the threshold.
7. ...remove the piston securing the sill trim to the side of the body...
8. ...and remove the trim.
9. Similarly, remove the door sill trims on the left side of the body.
10. Install the removed door sill trims in the reverse order of removal. If necessary, replace the piston fastenings of the facing plates.
Removing and installing a spoiler on cars with a hatchback body
The spoiler is attached to the outer panel of the tailgate by two pressure plates and two brackets.
You will need: a 10mm socket, a wrench.
1. Unscrew the nuts and remove one.
2. ...and the second pressure plate for attaching the spoiler to the tailgate trim.
3. Unscrew the nut securing the tailgate lock (shown by the arrow) and remove the ground wire of the additional brake light installed in the spoiler.
4. Disconnect the auxiliary brake light wire connector.
5. Remove the bolt...
6. ...and remove the clamping bracket securing the spoiler to the left edge of the tailgate.
7. Similarly, remove the clamping bracket securing the spoiler to the right edge of the tailgate...
8. ...and remove the spoiler.
9. Install the spoiler in the reverse order of removal; if necessary, treat the contact areas of the spoiler with the outer panel of the tailgate with an anti-corrosion compound.
Removing and installing a spoiler on sedan cars
This is where the rubber plugs for the spoiler mounting nuts and bolts are located.
You will need: a screwdriver, a 10mm socket, and a wrench.
1. Remove the four rubber plugs from the trunk lid reinforcement.
2. Unscrew the rear fastening nut and remove the bolt of the front spoiler fastening to the right edge of the trunk lid.
HOW TO INSTALL SILENT LOCKS ON A VAZ 2114?
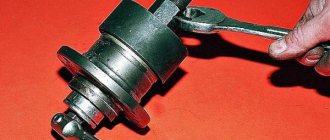
Installing silent locks on a VAZ 2114 will not take much time, and anyone can do it with their own hands. You will need a powerful, preferably impact, screwdriver and a set of new silent locks.
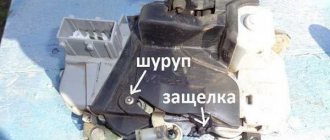
- The locking mechanism is more accessible when the door is open. It needs to be fixed somehow so that it doesn’t swing on its hinges.
- You need to unscrew the bolts holding the lock one at a time, and when you release the second bolt, you need to hold the lock so that it does not fall down under the casing. Otherwise you will have to remove it too.
- First, unscrew and remove the lower bolt, and then the upper one.
Sheathing process
There is no point in repeating the main points; they are almost identical.
The handle is also disassembled and the plug and the upper locking “latch” are removed. But there are no shelves or speakers here.
There is also no power window, that is, there is no wiring that needs to be disconnected. But here there is a regular window handle, as people call it – “oars” or a “muscle power” drive. In order to disassemble it, you need to bend it slightly towards yourself with a screwdriver - pull out the lower locking ring. After which the handle will simply come off on its own.
After removing the old material, you can begin to install the new one.
The metal surface must be cleaned of traces of corrosion. Carefully remove any debris that has accumulated inside and repair any damage found. Since the upholstery has been removed, nothing prevents you from carrying out preventive maintenance along the way.
To improve sound insulation, foil foam rubber is installed inside with glue. This, among other things, will ensure better heat retention in winter.
Read more: Lambo doors on VAZ - car tuning
HOW TO MAKE SILENT LOCKS YOURSELF
But some craftsmen suggest making silent locks on the VAZ 2114 with your own hands. You have removed the lock from the door.
- In its upper part, where the pusher is, there is a thin plate that acts as a plug. This plate must be removed, or rather, broken, otherwise it will not open. Under it there are two springs, which push the locking mechanism. One spring, which is thinner, can be removed completely, and the second one can be placed in its place. Lubricate the lock and you can bolt it to where it stood. The effect of removing the spring is no worse than that of new, silent ones.
- There is another way. To implement it, you will need to buy 40-50 centimeters of heat shrink tubing. Of those clamps that you want to improve, you need to unscrew the fingers. Cut the tube so that the threads do not overlap. The cut pieces of the tube must be heated over an open fire using a lighter or candle. The heat will cause the tube to expand, so carefully but quickly slide it onto the retainer pin. Wait until the tube cools down and fits tightly around your finger. Warm up another tube and also put it on your finger. Trim any rough edges, make sure the tube does not overlap the threads, and the upgraded part can be inserted into the retainer.
But a thicker finger can create a problem with closing. This can also be easily fixed. It is necessary to loosen the fastening of the latch on the body, and the latch itself should be slightly moved so that the door closes easily. The locks on the VAZ 2114 are adjusted in the direction up and down and left and right. By moving the lock, you can adjust the doors and thus achieve perfect closing.
In the same way, you can make silent, soundproofing bolts that secure the lock to the door. But for bolts, a single-layer tube will be sufficient.
Try both methods described above to reduce noise. The locks will work much quieter and softer, and the neighbors will stop looking askance at you.
Common node faults
Often the central locking of the VAZ-2114 is controlled incorrectly due to the fact that the contact pairs are closed with a delay. A common reason for this is a violation of the adjustment of the thrust located between the gearmotor and the lock button, or its jamming. Simply put, when the button is pressed, the position of the rod does not allow the contact pairs of the drive to be completely closed.
The door on the driver's side may be locked, while the others will remain open due to the fact that the contacts of the control unit are not fully closed. This malfunction is purely mechanical in nature, and to eliminate it, it is enough to adjust the rod or the free play of the button in case it gets stuck.
In addition, such a problem can be caused by a malfunction of the VAZ-2114 central locking relay. In this case, you will have to replace the failed element.
In the case when the VAZ-2114 central locking completely stops responding to commands given by the driver, it is worth moving on to checking the electrical part of this unit. It is possible that this behavior of the system is caused by a blown fuse. Note that it can fail not only in the event of a short circuit, but also from constant overloads caused by the heavy movement of the core, or a violation of the adjustment of the rods.
Quite often, the reason why the VAZ-2114 central lock does not work is a violation of the integrity of the electrical wiring supplying power to it. The wires in the driver's door of a vehicle almost always break because it opens and closes more often than others. You can determine the damaged section of the wire using a multimeter. Less often than not, the control unit fails. In this case, the entire system either completely stops working or performs its functions incorrectly.
To prevent module malfunctions, it is necessary to pay attention to the condition of the activator, since its contacts can oxidize or burn, causing malfunctions. Periodic cleaning will significantly extend the life of the module.
Replacement hood 2114
Sometimes it happens that the hood of a car is severely damaged as a result of a collision or complete corrosion. If repairing it turns out to be more difficult and more expensive than replacing it with a new one, then it is better to give preference to the latter option (especially since the replacement can be done independently, without contacting a car service).
Dismantling is carried out as follows:
- Open the hood.
- Place the hood on the stop.
- Disconnect the washer tube from the tee.
- Disconnect the wires from the engine compartment lamp.
- Unscrew the bolts securing the hinges.
- Remove the hood.