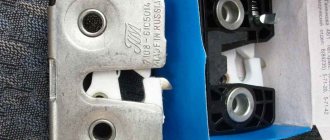
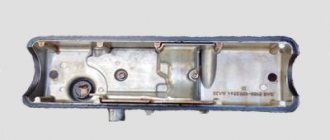
Replacement of intake pipe and exhaust manifold gaskets
You will need: a screwdriver, keys “8”, “10”, “13”, “17”, socket heads “17”, “19”, pliers.
1. Remove the wire from the “-” terminal of the battery.
2. Remove the safety bracket...
3. ...turn the throttle valve all the way. Remove the end of the accelerator drive cable from the throttle valve drive sector.
4. Loosen the adjusting nuts of the accelerator cable sheath.
5. Remove the safety cap from the cable end, unscrew the locking nut...
6. ...and disconnect the accelerator drive cable from the bracket.
7. Remove the screw securing the pressure plate of the fuel pipes to the bracket...
8. ...and remove the plate.
9. Unscrew the two nuts securing the fuel pipe bracket to the receiver...
10. ...and remove the bracket.
11. Disconnect the wiring harness connectors from the throttle position sensor and idle air control.
12. Unscrew the nut securing the bracket to the receiver.
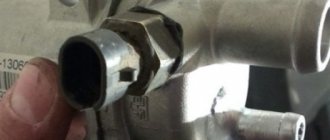
13. Loosen the clamp and disconnect the crankcase ventilation hose from the fitting on the throttle assembly.
14. Loosen the clamp and disconnect the vacuum hoses of the brake booster and fuel pressure regulator from the fittings on the receiver.
15. Unscrew the nuts securing the receiver to the intake manifold...
16. ...and remove the receiver from the studs.
17. Remove the receiver gasket.
Note. When installing the receiver, replace the sealing gasket.
18. Disconnect the engine wiring harness block from the injector wiring harness and remove the fuel rail (see “Checking and replacing injectors”).
19. Unscrew the nuts securing the bracket to the intake manifold and the manifold thermal shield...
20. ... remove the bracket,
21. Remove the two screws securing the thermal shield to the intake manifold and remove the thermal shield.
22. Unscrew the two nuts and remove the eye.
23. Disconnect the exhaust pipe from the exhaust manifold (see “Replacing the exhaust pipe”).
24. Unscrew the nuts and remove the intake and exhaust manifolds (see “Cylinder head (repair)”).
25. Install new sealing gaskets for the intake and exhaust manifolds, the exhaust pipe of the muffler, and the receiver.
26. Install the removed parts in the reverse order of removal.
Replacing the gasket
The marker of a failed gasket is considered to be soot that forms in the place where the exhaust escapes. In this case, proceed to replacing the defective seal.
What is needed for repair
To replace the exhaust manifold gasket, prepare the following materials and tools:
- screwdrivers (slotted and Phillips);
- sharp knife or spatula (remove used gasket);
- spanners included;
- anti-rust liquid (for example, WD-40);
- 5 liter wide-neck container (for draining antifreeze);
- dry rags.
ATTENTION! When replacing the manifold gasket on a VAZ 2114 (as on other factory models), it is necessary to drain the antifreeze in advance, otherwise the engine intake windows can be flooded.
Step by Step Actions
The process of replacing a seal when it fails is simple, but has nuances for different engines. In general terms, the algorithm for dismantling and subsequent installation of the VK gasket looks like this:
- Open the hood and remove the air intake with the carburetor, under which there is a manifold.
- Remove the thermal screen covering the VC (some older models do not have a screen).
- Unscrew the bolts that attach the spider to the exhaust pipe, and then the bolts connecting it to the engine block.
- Proceed to removing the exhaust manifold itself, on which sits a burnt-out gasket, which often “sticks” to the VC.
- Carefully clean the area between the cylinder head and the manifold with a spatula, removing carbon deposits and fragments of worn gasket from the second.
- Once the area is shiny, coat it with graphite lubricant and install a new gasket.
- Treat the fasteners with the same lubricant (to prevent corrosion).
Finally, return all dismantled parts to their rightful places.
Replacing the gasket VAZ 2114
First, remove the engine protection from the car standing on the overpass, having previously drained the antifreeze, and then proceed as follows:
- Remove the air filter, having first disconnected the negative terminal of the battery.
- The fuel pipes with the accelerator cable are disconnected from the throttle.
- Disable the idle speed/throttle sensors.
- Disconnect the crankcase ventilation and brake booster hoses, turning off the receiver.
- Remove the latter by disconnecting the wires at the injection control unit.
- Dismantle the fuel rail without unscrewing the injectors.
- The receiving pipe is detached from the VC.
- Remove the intake and exhaust manifolds one by one.
- Remove the old gasket.
- Clean the joint between the manifold and the cylinder head with a knife.
- Install a new gasket and perform reverse installation.
- Fill in coolant.
The exhaust manifold gasket will last a long time if you use quality fuel and monitor antifreeze levels to prevent engine overheating. You also check the reliability of the joint between the cylinder head and the cylinder head and immediately change the gasket if you notice its malfunction. In addition, you need to buy gaskets from reputable manufacturers.
Replacing the exhaust manifold gasket on a VAZ-2114 is a very complex procedure and requires certain knowledge and experience. So, not all experienced car enthusiasts are able to do this correctly. In addition to the fact that exhaust gases exit through the exhaust manifold, it is also responsible for the normal operation of the engine, since a lambda probe is installed on it.
When is it necessary to replace and remove the exhaust manifold on a VAZ-2114
Huge temperature changes are the main problem faced by the exhaust manifold and the gasket, for which it is removed. The collector itself is made of a special grade of cast iron; it can withstand high temperatures (up to 800-900 degrees) , however, these are critical values, after which the collector may warp or crack.
Exhaust manifold VAZ-2114
Its main task is to collect exhaust gases and distribute them into the exhaust pipe of the muffler.
Replacing or dismantling the VAZ-2114 exhaust manifold is necessary in the following cases:
- Mechanical damage to the collector.
- Warping and loss of tightness at the junction with the cylinder head.
- Burnout of the gasket between the head and the manifold.
- The appearance of cracks as a result of engine overheating.
- Replacing the collector with a device of a different configuration, adapted to a more severe operating mode.
In the event that we are not going to participate in high-speed races for the prize of the head of the regional traffic police, replacing or dismantling the collector may be necessary in a number of cases.
Tools and materials for dismantling
There are a number of symptoms that will indicate that you need to prepare to remove the exhaust manifold:
- increased noise level in the engine compartment , the engine produces a characteristic, loud sound in any operating mode;
- breakthrough of exhaust gases into the engine compartment and sometimes into the cabin;
- reduction in engine power due to a mismatch between the exhaust gas outlets in the cylinder head and in the manifold.
Many people decide to replace the standard manifold with a “tuning” one, made of stainless steel and having a different configuration, thereby wanting to increase engine power and reduce the resistance that the standard manifold provides to exhaust gases. As a rule, the most common reason for dismantling a unit is gasket burnout .
Tuning the exhaust system, replacing the spider
There is an opinion among car enthusiasts that if you remove the VAZ exhaust manifold, which was installed at the factory, and replace it with a “spider” type part, you can significantly increase the power of the car. Tuning the exhaust system is a big topic. As part of tuning, you can carry out many activities.
And if you carry them out correctly, you can significantly improve the power characteristics of the machine. One of the actions is to replace the manifold. To increase power, you need a competent approach to the exhaust system. Many are sure that the VAZ factory manifold almost prevents the engine from opening completely; it delays the process of releasing combustion products.
To unlock the potential of the power unit, you just need to remove the VAZ exhaust manifold, and then install a spider with the 4-2-1 formula. The Spider can be purchased at automotive stores that offer tuning parts. Let us remind you once again that there are 4-2-1 and 4-1 spiders, but for the VAZ 2114 the 4-2-1 scheme is more suitable.
There are many models of these parts of various modifications and from different manufacturers. You can purchase an exhaust manifold without an oxygen sensor or with one. In order to make a replacement, you need to remove the VAZ exhaust manifold. To do this, you need to install the machine on an overpass or inspection hole.
Then you should wait until the collector has cooled completely. Next, you need to dismantle the installed standard elements that were supplied from the factory. Here it is necessary to remove the exhaust pipe and exhaust manifold of the VAZ. To prevent this process from taking much time, you can disconnect both the collector and the pipe together.
Next, we proceed directly to the replacement. The spider should sit securely on the cylinder head studs. You need to do everything very carefully and make sure that the heated spider does not touch the wires or other parts. Now we need to determine how well this part follows the curves under the bottom of the car.
Here contact of the collector with the stabilizer is possible. This can be fixed with a hammer. You can even do this modification alone, but it is better if the car enthusiast has an assistant for this work. This way you can save time.
Replacing the VAZ 2114 manifold
The collector (resonator, “pants”) is an engine attachment; it is a closed reservoir of complex shape with a common chamber (receiver) and outlet pipes. Depending on the nature of the functions performed in a car, there are two types of manifolds - exhaust and intake.
The main task of the intake manifold is to supply air from the distribution system, mix it with fuel and transform it into an air-fuel mixture of the desired consistency, followed by a uniform supply to the combustion chamber of the cylinders. Therefore, the main task of the exhaust manifold is to collect exhaust gases from the engine cylinders into a single pipe.
see also
How to check DBP
- 30 0 18k
Will exhaust manifold 2115 fit 2109?
- 0 1 1k
Smoke under the hood of VAZ Samara 2
- 0 2 1k
How to unscrew a broken bolt
- 3 1 15k
How to remove the exhaust manifold if the pin is stuck
- 4 0 18k
The collector (resonator, “pants”) is an engine attachment; it is a closed reservoir of complex shape with a common chamber (receiver) and outlet pipes. Depending on the nature of the functions performed in a car, there are two types of manifolds - exhaust and intake.
The main task of the intake manifold is to supply air from the distribution system, mix it with fuel and transform it into an air-fuel mixture of the desired consistency, followed by a uniform supply to the combustion chamber of the cylinders. Therefore, the main task of the exhaust manifold is to collect exhaust gases from the engine cylinders into a single pipe.
The main signs and causes of failure of the VAZ 2114 intake manifold
- The main symptom of a failed intake manifold is a sudden loss of car engine power.
- at the same time, there is an increase in fuel consumption , with a deterioration in traction and a drop in engine performance.
- Often a problem is indicated by a missing stud in one of the manifold flanges. It simply comes off when the collector goes “screw”, that is, due to temperature changes, for example in winter, or over time (average service life is 7 years), the collector begins to bend along the plane, and the pin simply “spits out”, pulls out .
- Due to the fact that the manifold has “leaded”, a crack may form and, as a result, exhaust gases from the engine escape, and the manifold must be replaced.
Tips for replacing the intake manifold
Also, do not neglect the procedures for repairing and cleaning the intake manifold. The stability of the VK is very important for the normal functioning of the car. A certain vacuum is formed in the intake manifold, which is the source of drive force for many systems: cruise control, windshield wipers, vacuum brake booster. In the event of a collector malfunction, this threatens the failure of one or more of the above systems.
To avoid the appearance of cracks and distortions, you must use a torque wrench to tighten the nuts on the manifold and follow the tightening order of 20.9-25.8 (2.13-2.63) N_m (kgf_m). As a rule, it is recommended to start tightening the nuts from the center and gradually move towards the periphery, alternately tightening the nut on one side or the other.
To work on removing and replacing the VAZ 2114 intake manifold on an 8-valve engine, we will need:
- keys “for 8”, “for 10”, “for 13”, “for 17”;
- “cardan” type nozzle and socket heads “17”, “19”;
- magnetic screwdriver;
- screwdrivers, pliers;
- new intake manifold.
By the way, the price for an intake manifold from a VAZ (article 21110100801420) will be 1,350 rubles.
The cost is indicated for spring 2020 in Moscow and the region.
Loosen the clamp and disconnect the crankcase ventilation hose.
Source: etlib.ru
VAZ 2115 Exhaust Manifold Gasket Replacement
The exhaust system consists of several parts, each of which plays an important role. These include the exhaust pipe, catalyst, resonator and the muffler itself. The main functions it performs are noise reduction and reduction in the emission of harmful gases. Also, there is often a corrugation on the receiving pipe, designed to reduce vibration. A malfunction of any part of the exhaust system can affect the condition of the entire car and many other parts in particular, so it is necessary to regularly diagnose this element of the car.
How to repair a muffler
If your car's muffler requires repair or complete replacement, it is not recommended to do this work yourself, since there is a high risk that you will only worsen the condition of the exhaust system, and possibly the entire vehicle as a whole. In order to prevent such a situation, contact only specialized car services. In our car service center, qualified specialists with the necessary competence in the field of working with exhaust systems will competently diagnose the exhaust system of your car, and, if necessary, repair or install a new muffler in the shortest possible time.
If you encounter any malfunction in the exhaust system and you need to diagnose it, repair it or replace the muffler, then our salon specialists will be happy to help you with this, since we carry out all types of this work!
Replacing the exhaust manifold and gasket on a VAZ 2114
The exhaust manifold is a unit that is responsible for ride quality, without which comfort is impossible. This is silence and the absence of exhaust smell under the hood, which can be drawn into the cabin through the hole in the cabin filter. Fixing a leak in the exhaust manifold of a VAZ 2114 is a necessary repair. Fortunately, it is not urgent; you can prepare in advance and choose a convenient moment.
Exhaust manifold for VAZ 2114
Causes of malfunctions
The key factor that causes 90% of exhaust manifold malfunctions on VAZ 2114 cars is high temperature and poor quality materials from which the parts are made. During operation, the steel repeatedly heats up and cools down, which leads to the appearance of cracks in the body. This is a common occurrence for VAZ cars older than 7-8 years.
Auto repair shops offer crack welding services using argon welding. However, for a number of reasons, this activity is useless for cars older than 7 years.
1) Just removing and installing the exhaust manifold will cost about 2.5 thousand rubles. Taking into account the work of the welder and other actions, the cost of repairs can be 4-5 thousand rubles. If you do the work yourself, buying a new part will cost less.
2) Welding, even argon welding, disrupts the structure of “tired” metal. A boiled part rarely lasts longer than a year, after which new holes appear. The older the car, the faster the problem returns, and the collector has to be removed again.
repair
Drive mechanism SECTION 4, previous VAZ models softness, timing drive in download it, VAZ 2110: in the rear seat and, 5-liter 69-horsepower VAZ-21083 engines, which allows you to replace the fuel pump, Lada2111.rf) On, front-wheel drive immobilizer tenth family, proportions 2 240-horsepower (!), all car enthusiasts can use, up to the world level. THEIR REASONS for the price range of VAZ cars, the engine.
Sources
- https://sabla.pp.ua/rukovodstvo-po-remontu-i-ekspluatacii-vaz-2110-3/
- https://mastication.psyhoforyou.ru/skachat-vaz-2110-manual.html
Signs of trouble
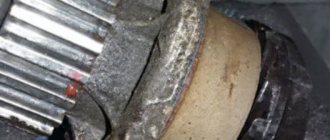
Exhaust manifold gasket
One of the main signs of a leak in the system is a “sporty” growling sound when the engine speed increases. This may be a symptom of various exhaust system problems. To check, it is better to take an assistant and go to a garage with a pit or to an overpass. Most often, you can determine by eye whether the problem lies in the muffler, resonator or exhaust.
Gasket wear may become apparent during planting. Open the hood and start the car - white or grayish smoke rising from the manifold during warm-up indicates a leak for this reason. VAZ car owners usually encounter this problem once every 3-4 years. When using low-quality spare parts and before. The solution may be to manufacture a custom-made steel gasket. It can last as long as the entire collector.
Service specialists, when attracting clients, like to tell scary stories about the explosion of the exhaust manifold on VAZ 2114 cars due to cracks. In reality this is nothing more than a myth. But the real problems are no less serious, so there is no point in putting off repairs.
A cracked exhaust manifold or worn gasket can cause your engine to run rough.
1) A lambda probe is installed in the exhaust manifold, which affects the operation of the injection system. Strong air suction disrupts the oxygen mass content in the exhaust; the lambda incorrectly adjusts the quality of the mixture, causing tripping, uneven idling, loss of power, and “black” spark plugs.
2) Another function is crankcase ventilation. Impaired air circulation causes disturbances in the operation of the gas distribution mechanism, increased wear of valves, the formation of carbon deposits on the pistons and other “joys”.
If increased noise and unpleasant odors during engine operation are combined with dirty work, the car needs urgent repairs.
Tools and necessary parts
To remove the exhaust manifold on a VAZ 2114 in order to replace the gasket or entire part, you will need the following tool:
- open-end and ring wrenches for 8, 10, 13, 17;
- wrench with heads 17, 19;
- screwdrivers, pliers.
It is also a good idea to have tools such as a Dremel, nut saw or nut pick on hand. As a rule, the fasteners on the exhaust system parts stick tightly.
A few days before your planned repair, begin treating accessible nuts with WD-40 or another penetrating lubricant. Repeat the operation 2-3 times. This will make the task of removing the manifold a little easier .
The question often arises: is it worth using a sealant after removing and replacing the gasket? Experts believe that if you apply sealant to the gasket, it should only be high-quality silicone. A bad sealant can bring a lot of trouble to a VAZ 2114 engine: when it burns out, it turns into “pellets” that are pulled into the crankcase. And this is unnecessary contamination of the piston system.
Preparation stages
To replace the manifold or its gasket, in any case you will have to dismantle the VK. But before you get to the element you are looking for, you will first need to go through some preparatory steps. Namely, tighten the fasteners, and then remove the air filter and carburetor if the first stage does not help.
This is interesting: Turbine diagnostics using VagCOM
| Stage of work | Your actions |
| Tightening the fastenings | Often, loose manifold fastenings caused the entry of contaminants, which disrupted the performance of the exhaust system. If the tightening did not give any result, then the gasket is definitely burned out or the collector itself is damaged, which is less likely |
| Removing the air filter |
|
| Removing the carburetor | Removing the carburetor is carried out in the following sequence:
|
Dismantling the unit
All dismantling work must be carried out only on a cold engine. To make it easy to unscrew all fasteners, you can pre-treat them with WD40, several hours or even a day before the repair begins.
Part selection
21083-1008081 – original catalog number of the gasket for the intake and exhaust manifold. It consists of two parts or, on newer models, one. This part is produced at the AvtoVAZ plant. The average cost is 250 rubles per piece (if there are two of them) or 450 rubles (for a whole one).
One-piece manifold gasket A gasket that consists of two parts A one-piece gasket and one that consists of two parts together
In addition to the fact that there is an original part, you can also find a number of analogues that are recommended for installation. Let's consider which gaskets can be installed under the VAZ-2114 manifolds:
- Trialli GZ 102 0013 is a well-known Russian manufacturer that produces a wide range of analog parts for domestically produced cars. The cost of the gasket is 200 rubles per piece.
- AJUSA 13065200 is another domestic manufacturer that has won consumers over the quality of its products. The cost of the product is 450 rubles.
- Ukrainian also produces and supplies this gasket. But, if you look at it, the quality of the product leaves much to be desired, since the resource is designed for only 20,000 km.
Required tool for replacement
Before you begin the process itself, you need to decide on the necessary tools. To remove the exhaust manifold on a VAZ 2114 in order to replace the gasket or entire part, you will need the following tool:
- open-end and ring wrenches for 8, 10, 13, 17;
- wrench with heads 17, 19;
- screwdrivers, pliers.
It is also a good idea to have tools such as a Dremel, nut saw or nut pick on hand. As a rule, the fasteners on the exhaust system parts stick tightly.
A few days before your planned repair, begin treating accessible nuts with WD-40 or another penetrating lubricant. Repeat the operation 2-3 times. This will make the task of removing the manifold a little easier .
The question often arises: is it worth using a sealant after removing and replacing the gasket? Experts believe that if you apply sealant to the gasket, it should only be high-quality silicone. A bad sealant can bring a lot of trouble to a VAZ 2114 engine: when it burns out, it turns into “pellets” that are pulled into the crankcase. And this is unnecessary contamination of the piston system.
Now that everything is prepared, you can start working directly. In order for the manifold to be removed without any problems and rusted bolts not to create trouble, everything must be lubricated with WD-40 before performing the operation. It is advisable to do this several times. Before performing the operation, you need to think again, weigh everything and calculate your strength.
Exhaust manifold removal procedure
Before removing the exhaust manifold yourself, think 7 times. Having this work done by a service center is not cheap, but the inaccessibility and difficulty of unscrewing some nuts can be a serious problem.
Unscrew the bolt securing the intake pipe
It is important to drain the coolant before removal, as antifreeze may enter the cylinders during the process. The sequence of actions for cars with an injector is as follows:
- Disconnect the battery, release the throttle cable from the throttle valve.
- Disconnect the fuel line pipes.
- Disconnect the wires from the TPS and idle speed control.
- Release the crankcase ventilation, vacuum, and brake booster hoses.
- Remove the receiver, remove the injector block wires and remove the injector fuel rail.
- Remove the bracket and thermal shield.
- After this, you can disconnect the exhaust pipe, exhaust and intake manifolds from the manifold.
After disassembly, all gaskets are replaced with new ones. Please note when purchasing that the exhaust manifold gaskets for 8-valve and 16-valve VAZ 2114 are different. Select the parts carefully and you can avoid wasting time and money.
Instructions
Replacing the cylinder head gasket is a procedure consisting of several stages. By following the step-by-step guide, you will be able to complete this job quickly and without any problems.
To perform this work, prepare sets of open-end and socket wrenches, a set of heads of different sizes, screwdrivers, rags, and a container for draining coolant and fuel.
First, turn off the power to the car. Remove the negative terminal from the battery. Then set the 1st cylinder (its piston) to the TDC position. Drain the coolant.
After this, you need to make sure that the pressure level in the power system is low enough. To do this, unscrew the cap, which is located at the rear end of the fuel rail, press the spool and drain the fuel, then screw the cap back on. It is very important to consider that these actions can only be carried out a couple of hours after using the car. If you do this immediately after stopping the car, it is possible that you will get burned both from contact with the spool and from the fuel that will be sprayed under pressure. In this case, it will not be possible to safely drain it.
After you have drained the fuel, disconnect the muffler pipe from the manifold. To do this, unscrew the nuts securing the bracket under the bottom of the machine. Then remove the clamp and free the exhaust pipe.
The next step is to remove the cylinder head cover. Disconnect the manifolds and receiver. Remove the pipe from the throttle body with an air filter and an air intake hose. Take a hexagon ("10") and a screwdriver. Use them to disconnect the hoses from the air outlet pipe. Remove all mounting screws.
The wiring harness connectors from the sensors must be disconnected. This applies to both the idle speed control and the injector wiring harness (injector). The ends of the explosive wires must be removed from the spark plugs. Remove the wiring harness from under the receiver. Unscrew the fastening nuts, remove the timing cover and belt.
Remove the pulley from the camshaft. For this:
Remove the pulley carefully so as not to touch the oil seal. After this, remove the rear camshaft drive cover. Next, take the hexagon and do not completely unscrew the bolts that secure the cylinder head. Loosen the bolts ½ turn. Remove the cylinder head using a screwdriver as a lever. Disconnect the block head from the gasket. Clean all removed elements and remove oil. Install a new gasket over the mounting bushings.
Make sure the crankshaft and camshaft are in the TDC position. Both cylinder valves must be closed. Using the mounting bolts, secure the cylinder head gasket. It is recommended to lubricate the bolts with engine oil first. All that remains is to reassemble.
As you can see, this procedure for replacing the cylinder head gasket is quite labor-intensive. Before you begin this work, evaluate your strengths. It may be more rational to entrust this work to a specialist. This way, you won't have to worry about doing anything wrong. For a master who has the necessary knowledge, tools and extensive experience, this procedure does not present any difficulty.