As a rule, tuning the interior of a VAZ 21099 begins with modifying the instrument panel. In most cases, this is where it ends, which cannot be said about the older domestic model - VAZ 2109, the modernization of the interior of which requires much more cost and effort. What methods of changing the interior of a VAZ 2109 are available to each of us - we will consider in more detail.
Tuning the interior of the VAZ 2109
The VAZ “nine”, despite its advanced age, is still popular to this day. There are many car owners who speak negatively about this car, but there are also those who like the model. The car is especially popular among young people and novice motorists. The affordable price allows you not only to purchase this car, but also to carry out various modifications. Tuning can affect both the exterior and the interior of the VAZ 2109. It is worthwhile to dwell on interior modifications in more detail, because it is in the cabin that the owner and passengers spend most of the time.
Improved instrument panel lighting
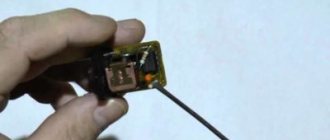
The standard lighting of the instrument panel of the VAZ “Nine” does not suit everyone, since the yellow glow is not only dim, but also does not give the tidy any expressiveness. To correct the situation, you have to resort to replacing standard lighting elements with modern LED ones. To upgrade the instrument cluster you need to prepare:
- diode strip of the desired glow color;
- soldering iron;
- wires;
- light bulb base;
- hot glue gun.
Direct modification consists of the following steps:
- Remove the shield from the torpedo.
- Disconnect the sockets with the light bulbs and remove the board, after which the glass with the visor is removed. To do this, press the corresponding latches.
- The diode strip and the base are connected by soldering.
- Using a gun, apply glue and fix the tape and wires to the cover.
- Reassemble the shield in the reverse order.
Free holes for the base must be sealed to prevent dust from entering.
Video: installing an LED strip in the instrument panel of a VAZ 2109
Refinement of instrument cluster scales
In addition to the lighting in the instrument panel, you can replace the scales, which will make the instrument more modern and readable. For tuning this unit, today a wide selection of linings are offered, which provide all the installation holes. After purchasing the overlays, you can begin upgrading:
- Remove the shield, and then the glass itself.
- Carefully remove the instrument arrows.
- Remove the standard trim from the shield.
- Secure the new trim with a glue gun.
- Install the arrows and assemble everything in the reverse order.
If the new scale is designed for clearance, then an LED element can be installed on each device, which will significantly transform the panel.
Dashboard upgrade
Often, interior tuning affects the dashboard, since the standard product does not have a very attractive appearance. Leather is mainly used to finish the panels. It is quite difficult to do quality work with your own hands. Therefore, it is better to entrust the reupholstery to professionals. The essence of modernization comes down to the following actions:
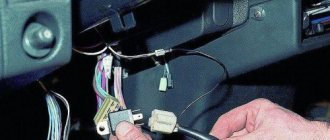
Sometimes owners of "nines" install panels from other cars, for example, from a BMW E30 or Opel Astra.
This procedure is not easy, since choosing the size and then adjusting the torpedo to its location is not easy. In addition, you will have to completely redo the mount. When installing a different panel, the instrument panel must also be replaced.
Interior reupholstery
Interior tuning is not complete without reupholstering interior elements. Factory-made plastic and fabric in the decoration do not evoke any emotions, they look gray and ordinary. Those car owners who want to add some zest and improve the interior decoration resort to replacing standard ones and using modern finishing materials. Among the most popular are:
- leather;
- Alcantara;
- eco leather;
- velours;
- carpet;
- vinyl.
Door panels
One of the elements that cannot be ignored is door cards. Typically, the “nine” panels are trimmed with fabric or made entirely of plastic.
To improve the elements, you need to select the desired finishing material and prepare the tools:
- scissors;
- marker;
- glue "Moment";
- screwdriver.
After the preparatory activities, perform the following steps:
- The panel is removed from the doors and the fabric insert is removed.
- Measure out the required piece of fabric and make markings.
- Degrease and apply glue in two layers with some exposure after the first.
- Apply the door card to the material according to the markings.
- Allow the glue to dry according to the instructions.
- Bend and stretch the material at the corners. To make the finish more pliable, you can use a hair dryer.
- The insert is finished in a similar way, using a material of a different color for contrast.
Noise insulation
An increase in the level of comfort, one way or another, is associated with a decrease in the level of vibrations and noise that enter the cabin from the outside from the wheels, engine, wind, etc. To carry out high-quality vibration and noise insulation, the entire body from the inside, i.e. the roof, is treated , doors, floor, trunk, engine shield. Today, the choice of materials for the purposes under consideration is quite wide, but from all the variety the following items can be distinguished:
- Vibroplast;
- Vizomat;
- Bitoplast;
- Splen;
- foam.
The following list of tools will be needed:
- construction hair dryer;
- cutter;
- roller
To begin work, it is necessary to completely disassemble the car interior, that is, remove the seats, front panel and all finishing materials. The old sound insulation is removed, the body in places of corrosion is cleaned and primed.
Motor baffle
Floor and arches
In continuation of vibration and noise insulation, the bottom of the cabin is treated:
Video: noise reduction of the “nine” interior
Roof
When treating a roof, Vibroplast is applied between the crossbars, for which the material is cut into pieces of the required size. Splen is applied over the vibration isolation, securing it with double-sided tape.
Doors
Although noise insulation on VAZ 2109 doors is present from the factory, it is in minimal quantities and there is no particular use from it. Doors are processed as follows:
Plastic elements
Interior elements made of plastic should also be treated with sound insulation:
- Dismantle all parts and linings.
- The part of the torpedo that touches the body is treated with 4 mm thick foam.
- The lower part of the dashboard, as well as the shelf of the storage compartment, the space for the speakers and the side panels of the panel are covered with Vizomat and Bitoplast.
- The visor of the instrument panel is treated with Visomat.
- To prevent metallic rattling of the latches, they are coated with sealant.
- The central panel is treated with the same materials as the torpedo.
- The inside of the glove box lid is covered with Vizomat, and the carpet is fixed underneath with double-sided tape.
- After all procedures, the salon is reassembled in the reverse order.
Video: noise insulation of a torpedo using the example of a VAZ 21099
Steering wheel upgrade
The steering wheel is one of the first elements that people pay attention to when getting into a car. Tuning the steering wheel involves using a braid made of modern materials or completely replacing the part with a sports version. When choosing a finish for a “nine” steering wheel, you should focus on a size of 37–38 cm.
Among the most popular materials are leather and eco-leather. The simplest version of the braid has the form of a cover. To install it, just pull the product onto the steering wheel. There are options when the braid needs to be sewn together with thread or cord. In this case, each car owner decides for himself what he likes.
If you consider a sports version of the steering wheel, then you should consider some points:
- to install it you will need a special adapter;
- a tuned steering wheel, as a rule, has a smaller diameter compared to the standard, and it is not always convenient to control it.
Seat reupholstery and replacement
The factory seats of the VAZ “Nine” can be improved in two ways:
- constriction;
- replacement with new chairs.
You can update the seats by simply reupholstering them or by completely redoing the frame with the installation of lateral support. To do this, you will have to completely disassemble the product. Carrying out such work requires certain skills, since incorrect actions can lead to an uncomfortable landing and, in general, unpredictable consequences in emergency situations.
The most common choices for reupholstering seats are:
- leather;
- suede leather;
- Alcantara;
- flock;
- velours.
After selecting the material, work is carried out in the following sequence:
- The seats are removed from the interior and disassembled, removing the old material.
- If the old frame is damaged, they resort to welding.
- Foam casting is applied to the frame.
- Using the old cover, blanks are cut out from the selected finishing material.
- Sew the elements together using a sewing machine.
- Pull the upholstery over the back, hooking the material onto special teeth.
- The seat cover is tightened using wire.
- All seats are reupholstered in the same way.
- After the procedure is completed, the seats are mounted in place.
If the goal is to completely replace the VAZ 2109 seats with more comfortable ones, then the selection should be carried out in such a way that modifications are minimal. With minor modifications, seats from the Opel Vectra are suitable for the car in question.
Not every vehicle owner has the right to be called a car enthusiast, but only those who care about their beloved car. Beautiful tuning of the VAZ 2109 interior is one of the ways of careful care and care, because in this way your car is given individual features and its own unique design. It is no secret that the interior of the VAZ 2109, which was tuned by hand, will look original and according to the tastes of the owner.
Experts' opinion
Alexander. It is recommended to abandon GPS navigators with external installation: there is no need to mount them on glass, as the view from the driver’s seat is significantly reduced. If the navigator is really needed, then you can create a special niche for it in the dashboard. The VAZ torpedo is quite simple and has a large amount of free space to accommodate various control units and multimedia systems.
Alexei. I installed a new torpedo from another car - a difficult job that required patience, precision and a lot of free time. I’ll say right away that you need to be well versed in the placement of important elements of your car: wiring, air ducts, and so on. Dismantling must be carried out carefully, since the original torpedo may still be needed.
Models of carburetors for VAZ-2108 (2109) cars
VAZ “eights” and “nines” were equipped with licensed Solex carburetors from the Dimitrovgrad Automotive Component Plant. Depending on the volume and other features of the engine, the manufacturer installed one of the seven models listed in the table below.
VAZ “eights” and “nines” were equipped with licensed Solex carburetors
There are no fundamental differences between the models. They all have the same design, but the sizes of the dosing elements (nozzles, diffusers) differ, and there are features of some components.
Table: models and their descriptions
| Carburetor model | Peculiarities | Automobile model | Engine capacity (l) |
| DAAZ 2108–1107010 | VAZ-2108VAZ-2109 | 1,3 | |
| DAAZ-21081–1107010 | VAZ-21081VAZ-21091 | 1,1 | |
| DAAZ-21083–1107010 | VAZ-21083VAZ-21093VAZ-21099 | 1,5 | |
| DAAZ-21083–1107010–31 | semi-automatic starting device | VAZ-2108VAZ-2109 | 1,5 |
| DAAZ-21083–1107010–35 | two-stage starting device | VAZ-2108VAZ-2109 | 1,5 |
| DAAZ-21083–1107010–62 | electronic fuel mixture control | VAZ-2109 | 1,5 |
| DAAZ-21083–1107010–05 | for engines with microprocessor ignition | VAZ-2109 | 1,5 |
Idle speed adjustment
The second setting of the VAZ-2109 carburetor is idle speed, it can be partial or full. The first is for minor speed adjustments, the second is for adjusting the amount of air (setting CO emissions in the exhaust gases).
Partial adjustment is performed using the air-fuel mixture “amount” screw. This screw sets the opening angle of the throttle valves, which ensures that the air-fuel mixture enters the cylinders when the accelerator pedal is released. The “quantity” screw rests on the throttle valve control lever and when screwed in, it pushes the lever, causing the valves to open slightly.
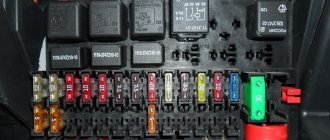
Problems and repairs
Very often, Solex carburetors encounter a problem such as clogging of the inlet hole in the first chamber. This is due to the fact that after long-term operation of the engine, carbon particles appear on the cylinder walls, which enter the chamber along with the air entering the carburetor. Repairing this problem is quite simple. In order to clean the holes and chambers from carbon deposits, use a special liquid that is sold in every Automotive store. It eats away carbon particles and cleans the carburetor. If such a breakdown caught you on the road, and you did not have a cylinder with such a liquid at hand, then the following scheme of actions will help you:
- Without turning on the ignition, pull the choke lever towards you until it stops;
- Start the engine;
- Gradually and smoothly release the choke, and when you feel that the car is about to stall, press the gas pedal all the way. You need to provoke the opening of the second chamber, and then the carbon particles will fly out of the hole under high pressure.
Remember that this method will relieve you of the problem for a while. To completely solve it, contact a service station, where the carburetor will be repaired.
Another weak point of Solex carburetors is the small hole in the idle jet. This is fraught with the fact that even a small speck can clog the hole, and the car will stall at idle. In such a situation, no repair is required. Simply remove the jet and blow it out thoroughly.
The third problem, which very often occurs on carburetors of VAZ 2108 cars, is wear of the economizer gasket. At the same time, the engine's idle speed will not be stable, and the exhaust gases will turn black. Repair is carried out by replacing the gasket.
There are rarely cases when the amount of carbon deposits entering the chamber is very large. This mainly happens to those cars that have not undergone major repairs in a timely manner. Since the previously described scheme will not help you get to the nearest service station, you need to act more radically. Experts, in this case, recommend disconnecting the breather from the carburetor, directing its flow downward, using a long hose. This will help you somehow get to the station where repairs can be carried out.
Remember to periodically clean the Breather
Don't forget that the carburetor must be adjusted correctly. The VAZ 2108 carburetor is adjusted as follows: tighten the quality screw and the quantity screw until it stops, turning them clockwise with a screwdriver. Next, unscrew the quantity screw by one and a half turns, and the quality screw by 3.5. This is a mixture adjustment with minimal spark plug wear. If the spark plugs are worn out enough, add 1 - 1.5 turns for quality. With normal settings, the Solex should provide the engine with 800 - 900 rpm at idle. Under such conditions, repairs will very rarely be necessary.
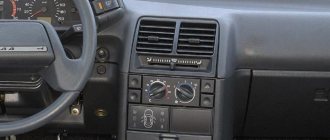
Instrument panel and its tuning
As a rule, any interior tuning begins with the instrument panel, which needs to be given a delightful and stylish appearance. Of course, we should not forget about the practicality of this part of the car.
Backlight
Probably every VAZ 2109 owner dreamed of having the same lighting on his car as on imported models.
Note. The appearance of the car interior largely depends on the lighting.
Let's get started:
- We remove the standard one and disassemble it.
- We remove the instrument needles, as well as the old trim.
Note. In order for the backlight to shine better on the overlay, it is recommended to make cutouts yourself from the inside. They are easy to make using a heated knife or soldering iron.
- Take the LED strip.
- We cut it into pieces of three diodes.
- Using regular foil, the glow is uniform.
- We take three pieces of LED strip for the tachometer and speedometer, and one piece is enough for the temperature and fuel level indicators.
Note. The car's factory lighting will be retained, because it will be assigned the function of illuminating the arrows on the instrument dial. If it doesn’t look very good, you can upgrade it by gluing LEDs in place of the standard light bulbs. It also doesn’t hurt to tint them slightly so that they aren’t too bright.
- All necessary contacts are connected to the contacts on the plate of the factory backlight lamps.
- Before connecting the contacts, we determine their polarity.
- To stabilize the current and power the LEDs, it is best to use a driver.
- We supply a current of 12 volts and check how everything works.
- If everything is good, we calibrate the hands.
Refinement of the panel
The instrument panel can be made much brighter and more original if it is modified and modified. Started:
- We purchase beautiful numbers, ordinary light bulbs with sockets, paint, an ultraviolet lamp and a scale panel.
- When removing the panel, do not forget about the black plastic around the glass.
- We disassemble the standard insert for the arrows and make the holes much wider than those made in the standard one.
- We take out the board with the light bulbs.
- Instead of the usual ones, we insert neon bulbs.
- We insert plastic on top for protection.
- We screw in the instrument lighting bulbs, running them parallel to the neon lamp.
- We lay the wiring from the inside, first making holes.
- We paint the arrows twice with special fluorescent paint.
- We put the arrows in their place.
- We check everything and if there are no problems, we reassemble in the reverse order.
We change the interior design beyond recognition
If the above changes can only be appreciated by those who constantly drive a car, then those discussed below will immediately catch the eye - we are talking about changes in interior design.
As previously noted, by modern standards the interior design of the car in question looks truly historical. That is why we will consider the following methods for improving it from a design point of view:
- A fairly common modification is changing the instrument panel. You can do this work yourself, and at minimal cost. Changes, as a rule, consist of creating a new backlight and changing the design of the scale. Recently, a method that involves installing a new panel, which is made specifically for tuning a domestic car, has become very popular. The choice is quite large, the price cannot be called high.
- A more complex improvement to the vehicle can be called changing the front torpedo. To do this, you can use a unit from another car or upgrade an already installed one. In this way, you can almost completely change the design of the car interior.
- Installing a new steering wheel from another car will also significantly change the interior design. It is worth noting that the factory-installed steering wheel is extremely inconvenient to use. Therefore, the method under consideration will not only change the interior design, but will also increase the comfort of driving.
- Significantly changes the interior design and lighting. An example is the installation of lighting on door handles and important elements of the control panel. When driving at night, such lighting will create an interesting effect; you can also make the lighting react to the level of illumination and change its brightness - it all depends on what budget is allocated for changing the interior and what skills the person who will carry out the work has.
- Various panels, trim and other trim elements also change. Their installation is simple; it is quite difficult to find panels that will be installed on the car without any problems.
- You should also pay attention to the little things that can be replaced enough, and the result will be very attractive. Examples include door handles, gear shift levers, and so on.