Installing autostart on a carburetor engine. Increasing the level of comfort
For many drivers, installing autostart on a carburetor engine is something unrealistic.
In fact, this is quite possible. With this device, your car will immediately become more comfortable. It will be possible not to shake in a frozen car, waiting for it to warm up. Just press a button on the remote control and the car will be completely ready for your trip when you leave. Autostart has especially many advantages in winter. By programming it to start at certain hours, you can be sure that in the morning it will easily start in any frost. But this matter is far from so simple. Installing autostart on a carburetor engine is quite complicated. It is not enough to purchase and install an alarm system with this capability. The structure of any carburetor does not in itself provide for the installation of such gadgets. But you can fight this. Installation
. In cars with such carburetors, the on-board computer is completely absent, as unnecessary. The fuel flows independently through the pipeline. It also enters the cylinders on its own, flowing there through the intake manifold. The role of the metering valve is performed by the carburetor. No fancy electronics required here. Therefore, there is no on-board computer on such engines. But you can still set up autostart without replacing the fuel supply system.
Self-assembly
- You will also need patience. Setting up the assembled device takes a lot of time.
- First, we place the main parts of the structure. The engine is mounted on the wall of the engine compartment. The sensor is installed on the engine. Some craftsmen connect to a standard sensor. But you can make a mistake here, so it’s better to just mount it on the engine. It is better to install the microcontroller next to the electric motor, but some of them can easily stand on the carburetor;
- The motor is connected to the damper using a cable;
- All parts of the auto choke are connected to the microcontroller. It in turn connects to the alarm system;
- First testing is underway. If the system responded to the command, you can move on to the next stage;
- The entire system must be configured. To do this, adjust the length of the cable in the drive. The microcontroller is configured for several operating modes, depending on the readings of the temperature sensor. The operation of the system should be brought to perfection.
Assembly should begin by turning off the choke drive. The drive cable does not need to be pulled out, but secured somewhere under the hood. Perhaps it will be useful for something in the future. If you have a carburetor with automatic choke, then it is better to change it. It is possible, in principle, to remake the suction. To do this, disassemble the carburetor and remove the sensors located there.
Switch the drive to external. You can start assembling:
In general, any car enthusiast can handle this type of work. The most difficult thing here will be the setup. You will have to spend quite a lot of time.
FakeHeader
Comments 69
I liked SAUVZ-8 more. I've been using it for a long time. There are various settings, the presence of settings for additional outputs, configuration from a smartphone via Bluetooth without leaving home. Three damper control modes, automatic warm-up, self-learning driving mode on a cold engine, and manual mode either using buttons or from a smartphone from home.
I bought this device for myself a long time ago. But I still haven’t put it in... My hands can’t reach it...
I have such a device. Having calibrated correctly, you can forget about the suction. But due to the transition to motorcars I have to say goodbye to it ((
how much does it cost? Where to buy?) How is it configured? via computer?
Google it please! I can’t post a link, they’ll punish me for advertising! I can PM you if you can’t handle Google!))
And for me too, if it’s not difficult) it’s a very interesting thing)))
Google it please! I can’t post a link, they’ll punish me for advertising! I can PM you if you can’t handle Google!))
Write to me too - I wonder what and how much...
how much does it cost? Where to buy?) How is it configured? via computer?
And me too, please. I’ve been looking for such a device for a long time and haven’t found anything suitable.)
Cool, I've never seen such things!
That’s why I posted it... to convey it to the people on a silver platter... I believe that... many people thought about this... but had no idea how to make it a reality. )))
"Sadko"
A full-fledged car factory can be made by installing an air damper servo drive on the car. With its help, you don't have to worry about the position of the damper. This device is installed on the wall of the engine compartment; some craftsmen place it directly on the carburetor itself. This device is produced under the Sadko brand. The device is available in two types. The basic includes:
- Microcontroller;
- Electrical engine; Cable.
- Control block;
- Temperature sensor.
The easiest way is to install the maximum build. It works something like this. Having received a signal from the remote control, the control unit analyzes the sensor readings, closes the damper and starts. If necessary, the damper opens. The minimally assembled device will have to be configured manually:
- Turn on the ignition and close the throttle manually;
- After waiting for the engine to operate normally, we again close the damper with our hands;
- After waiting a little more, open the suction completely;
- Let the car run at idle speed. The device must not interfere with the operation of the engine.
Having turned off the engine, wait until it cools down and start the car with the button. If you have configured everything correctly, the device will repeat all the manipulations you made when starting it on its own.
Conclusion
. Many owners of carburetor cars in winter look with envy at drivers of injectors, who can afford to warm up the car without leaving home. Although installing autostart on a carburetor engine is not difficult. It is enough to purchase or make your own devices to ensure normal engine starting and stable operation.
Differences between “Sadko-2” and “Sadko” (this is the version before 2013):
- "Sadko-2" is filled with sealant, this is a waterproof version.
- "Sadko-2" has connectors for all connected wires.
- "Sadko-2" uses a magnetic programming button; it does not break due to the lack of mechanical presses.
- With "Sadko-2" a gearmotor with a rotary resistor on the shaft can be used; accordingly, using an external voltmeter or our specialized LED scale, you can control the position of the carburetor air damper.
- In the setup procedure, two colors of LEDs are used for indication; this is much clearer than in Sadko.
- Control profiles have been introduced. To preserve seasonal (summer-winter) or other differences in operating modes, there are up to 8 independent settings for all modes (profiles). The warm-up start time, warm-up speed, internal combustion engine warm-up temperature, and the temperature of the damper being completely closed in each profile are saved.
The price of "Sadko-2", despite the additional advantages and sealing, is equal to the price of "Sadko" minus the cost of the gearmotor and internal combustion engine temperature sensor.
Automatic control of the carburetor air damper... family of front-wheel drive VAZs... to implement full autostart of a carburetor engine!
“+ Video”
Hello everyone...
The conversation will focus on installing a gear motor for controlling the air damper of the Silych carburetor
A device with brains...
after settings and calibrations... he knows when... how long... to keep the damper in one position or another! In simple words... your carburetor engine during autostarts and warm-ups... turns into an injection engine. )))
Initially, the manufacturer offers us to install the gear motor in any convenient place under the hood... and use a cable to adjust the damper!
This kind of perog is not suitable for us
...let's go simple... install the gear motor directly on the carburetor. and the damper will be controlled by direct thrust from the gearmotor. )))
The design is very simple
...the whole difficulty is to correctly configure and calibrate the device!
It doesn't get in the way under the hood and is not noticeable at all!
Well, different videos of the gear motor operation!
And if suddenly the engine stalled! starts again!
If something is not clear...ask questions!
Features of installing an autostart system in carburetor power units
Cars with carburetor engines are not equipped with on-board computers, since they are not necessary. This is the main difficulty for equipping such machines with this starting system. Car owners often wonder how to install autostart on a carburetor engine. This possibility exists.
List of necessary equipment for self-installation of automatic start:
- signaling;
- microcontroller in the form of a special chip;
- temperature sensor;
- electric motor;
- cable;
- cables.
Description of the sequence of installation operations
To install autorun with your own hands, you will need a lot of time and patience. The work is carried out in several stages:
- Disconnect the choke drive; in this case, the drive cable is not removed, but secured in a convenient place.
- With the auto choke installed, it is necessary to disassemble the carburetor, remove the sensors, and switch the drive to external mode.
- Place and secure the electric motor against the wall of the engine compartment.
- A temperature sensor is installed on it.
- Place the microcontroller closer to the electric motor.
- Connect the damper to the electric motor using a cable.
- Connect the suction elements to the microcircuit.
- Connect the microcontroller to the alarm.
At this stage, it is necessary to check the system's response to the control command. After successful testing, they proceed to further operations to configure the entire system:
- set the required length of the drive cable;
- adjust the microcircuit to operating modes depending on the data received from the temperature sensor.
Setup takes quite a long time. As a result of the adjustment, the system should work perfectly. This work can be done by every car enthusiast.
We install autostart with our own hands
Before you begin the installation work of the autostart on the VAZ, you need to prepare everything required for this. Installing one alarm will not be enough; it will require long and painstaking work. To bring your plan into reality, you will need to prepare the following:
- alarm system with auto start, in this case you can use the simplest model from the manufacturer StarLine;
- a temperature sensor and a controller are purchased separately;
- small electric drive, can be used from a Ladovsk washer;
- a thin cable, preferably soft, made of copper or aluminum, but it is better to give preference to the copper option;
- wiring in the required quantity, it is better to prepare with a reserve;
- In addition, patience will be required, since setting up equipment and autostarting a carburetor is a long and painstaking process.
Advantages and disadvantages of a carburetor engine autostart system
The autostart system has the following advantages:
- Comfortable temperature in the cabin at any time of the year, both summer and winter.
- Significant savings in time spent starting the engine.
- Possibility of programming to turn on the engine at a certain time.
A device built into the system, called a turbo timer, allows you to gradually stop the turbine of the power unit, significantly increasing its resource.
The disadvantages of automatic start include the following system features:
- increased fuel consumption;
- accumulation of condensate in the exhaust pipe with subsequent icing;
- freezing of the parking brake and brake pad cables when the vehicle is fixed in neutral gear;
- there is a danger of car theft, because when the autostart is turned on, the security system is turned off.
Frozen brake pads and discs are restored using a special defrosting fluid or hot water. By rocking the car back and forth in order to break the ice shackles, the brakes are brought into working condition.
When the parking brake mechanism is weakened, special wheel chocks are installed under the wheels.
Car owners are increasingly coming to the conclusion that in harsh winters and hot summers, installing modules for automatically starting the power motor is a reasonable action.
Only after carefully studying all the pros and cons inherent in this system, you need to make the right decision about the advisability of equipping your car with an additional function.
Automatic carburetor engine flap control
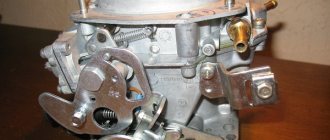
The essence of solving the problem of auto-choke for a carburetor is to make a modification, as a result of which the valve will move without your intervention. Today there are several types of automatic air damper control systems (ACCS) on sale. For example, "Sadko" and its modification "Sadko-2" . The principle of operation of these devices is that the movement of the damper is implemented on the basis of a stepper drive, which is controlled by a special electronic unit. The software is built on an algorithm for depending on the temperature and speed of the power unit. As a rule, there are two operating modes: warming up and driving on a cold engine.
How to install auto engine start - sequence of steps
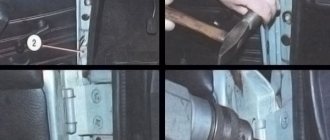
The engine autostart connection diagram is as follows. First of all, you should unsolder the wires responsible for starting the engine from and remove the airbag. In this case, you must act very carefully and do not lean the working tool on the hole in the steering wheel, otherwise you can damage its casing. Next, we connect all the main wires of the autostart system to the ignition switch according to the diagram indicated in the instructions included with the alarm. In the case when the car is already equipped with a standard immobilizer, it is necessary to additionally purchase a “crawler” (an additional module into which the second ignition key will be inserted).
Thus, during automatic or remote starting of the engine, information will be read from this key and transmitted directly to the ignition switch.
Now the autostart control wire is connected to the generator or oil sensor. Program the engine autostart unit according to the instructions. In order to have the possibility of emergency shutdown of this system, another wire is drawn from the module block to the handbrake or to the main brake. This completes the operation, as you can see, it doesn’t require a lot of physical effort, just a little racket in electronics.
Once upon a time I saw someone start autoplaying from a simple whitefish. The problem with my whitefish is that it is not designed for autostart and therefore it does not have the correct voltage supply time. Let me explain. It has two modes that are intended for activators - 1c or 4c. 1s is not enough for a starter, but 4s is just right, but if it starts well, then that’s plenty.
As you can see there are only two buttons. And its big drawback is that channel 2, originally intended for opening the trunk, does not work when the ignition is turned on.
So here is the autostart scheme itself.
If anyone is not aware of the ZPTF relay (rear fog lights), I had it for some time, but there is the same drawback of 1 and 4 seconds described earlier. Afterwards, I had to slightly modernize the circuit because after the car sits at night in winter at sub-zero temperatures, as a rule, turning the starter for 1 second will not be enough to start it. (if you set 4c, then whitefish will also pull 4c activators on the doors).
The starter relay has been replaced with a timing relay. Well, the first thing you need to install is the starter interlock relay.
There are several ways of such a design.
- 1. Install a 5-pin relay and cut the wire to the starter and connect it to 30 and 88 relay contacts, ground to 85 and 86 and “+” from the generator.
The circuit is simple, but in this case, when the Car is running, the relay will be closed, which I did not like.
- 2. Install a 4-pin relay. The wire to the starter also needs to be cut and connected to relay contacts 30 and 87. 85 and 86 contacts are connected to one “+” from the remote starter switching equipment (the same can be done from the ignition switch), to another terminal D from the generator (initially on terminal D “-“, but after the engine starts, it appears there "+").
Then you need a time relay of the following circuit.
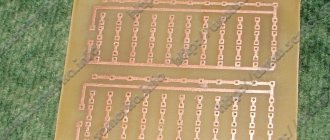
Taken from www.12v.ru/site.xp/050056052124.html A time relay is needed for the “correct” starting of the engine (the fuel pump must first be pumped). The delay is approximately 4s. And of course, a relay for 250 rubles is not enough. You need to do it yourself. After surfing the sites a little and trying several electrical circuits, I found a suitable one.
Using variable resistor R3, you can set the desired delay time. In my case, R3 = 160KOhm, which gives a delay of about 5s. Well, all that remains is to manage to “shove” all this into the relay housing.
Placed diodes 1st side
Placed diodes 2nd side
Final assembly 1st side
Auto start for a car is a function with which the consumer has the opportunity to start the car engine while being at a distance. But to implement this option, the vehicle must be equipped with a special device - a module.
[Hide]
Installation of SAUVZ
The system is supplied with a gearmotor, the housing of which contains a built-in electronic board and the necessary wires for connection. Software settings are individual for each car model and are set by the driver. The design of the gearbox uses plastic parts, which eliminates the formation of frost inside. Traction force ensures movement of the damper in any frost.
The device is installed in accordance with the user manual. First we connect the ground. To do this, attach the required cable to the nearest convenient place. After this, we connect the wires to the power plant speed sensor and to the handbrake button-lamp.
We attach the temperature sensor, which is supplied in the kit, to the cooling system hose (SOD), closer to the engine block. It is recommended to cover the sensor to prevent cold air from blowing in. This will eliminate the possibility of underestimating the SOD temperature readings.
After this, we connect the power directly to the battery or through the ignition key. It is not recommended to connect directly to the ignition coil terminal, as there may be large interference. If there is no other way out, then the connection to the ignition coil connector must be made only through an additional relay.
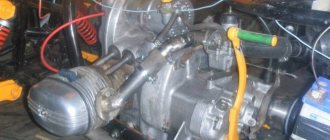
To fasten the gearmotor, a set consisting of a plate, a traction lever, a cable clamp, bolts, washers and nuts is provided. Flexible traction (cable) must be purchased separately. SAUVZ is mounted next to the carburetor. In this case, the damper control cable should be as short as possible and without bends.
Depending on the type of carburetor, you can install the auto choke directly on the carburetor, so that the damper is controlled by turning the air intake axis without a cable. In this case, you will have to do the fastening yourself.
We remove the flexible rod that goes from the passenger compartment to the damper and replace it with a new cable. It must be connected to the gearbox. The auto-suction pump is attached to the plate using bolts and nuts with washers. To adjust the installation height of the drive, additional nuts are provided. The plate with the lever is mounted between the main plate and the gearmotor. We thread the central core of the flexible rod into the hole of the lever and form it. We fix the shell on the plate, adjusting the desired position. The lever assembly must be placed on the drive axis in the “extended” position.
How to make an auto choke
When connecting an autostart to a carburetor car, people often face the problem of installing an autochoke, and some do not know how to install and make an autochoke. This video contains detailed instructions on how to install an auto choke on a carburetor engine, as well as what you can use to make a choke with your own hands in the garage.
Winter is no longer tanning and the time will come again to dream of being able to get into a car with the engine already turned on and warmed up in the chilly twilight of a December morning...
Unfortunately, most budget-class alarm systems are not equipped with a remote car start function (the so-called autostart), however, the traditional presence in such systems of free additional channels allows, with little effort and money, to implement this opportunity on cars of any brand and, in any case, , on a VAZ 2110.
In order to provide remote start of the VAZ 2110 you will need:
- Alarm system with feedback already installed on the car and equipped with a key fob with at least two additional buttons (for example, for panic mode and opening the trunk);
- Four-contact relays in the amount of four pieces;
- Connection blocks for connecting relays;
- Insulating casings, electrical tape, and a soldering iron with all the necessary consumables.
Practical implementation of the autostart scheme
Below is a schematic electrical diagram of autostart with color-coded wires for almost all variants of the VAZ 2110 car (to be on the safe side, you can conduct a comparative analysis with the wiring diagram of your particular type of car).
In order to implement the circuit in hardware, first of all we fasten the pads in one row using electrical tape, after which, if the pads have more than 4 contacts, we remove the excess wires from them (this way there is less chance of mixing something up). Also, in order to make our device more compact, the wires of the pads can be shortened somewhat. Next, we carry out soldering in strict accordance with the diagram, protecting the joints with cambrics and insulating tape.
As mentioned above, this device is designed to work with standard feedback signaling having two additional channels.
There are usually no problems with having at least one free channel, but to use the second channel you often have to limit yourself in some way (say, refuse to open the trunk remotely). The first and second relays are connected to the indicated second and first channels, respectively. We connect the fourth relay to the handbrake limit switch - on a VAZ 2110 this is most conveniently done on the universal connection block of the instrument cluster. This relay is designed to prevent relays No. 2 and No. 3 from turning off after the first alarm channel opens (on some alarm systems this happens in less than three seconds, which is clearly not enough). Relay No. 2 supplies +12V voltage from the ignition switch (thick pink wire) to the power circuit of the electric pump and to turn on the instrument cluster.
As for relay No. 3 (with the green wire coming from it), then, at your discretion, it can be connected to the headlights or dimensions. This solution will make it easier to find a car in the dark and will confirm from a distance that the device has been activated.
And finally, relay No. 1 plays an important role in starting the starter. It is this relay that supplies current to the starter after the second alarm channel circuit is closed.
For ease of placement in a car, the assembled device is placed in a case of a suitable size, or, without further ado, all four relays can be connected to each other with ordinary electrical tape (the main thing is not to forget to clearly mark the output terminals). At the next stage, all the above wires are connected (after first disconnecting the power wires from the battery). The additional unit itself is located behind the dashboard or in the free space of the steering casing.
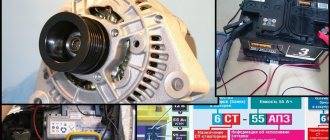
Automatic startup sequence (using the Tomahawk alarm as an example)
- We disarm the car;
- Using the button of the first additional channel, we start the fuel pump;
- Using the control button for the second additional channel, we start the engine (if the pause in the channel is too short, try again).
Please note that without installing the car on the handbrake, the car will not start remotely (and therefore will not move without a driver in the cabin). According to the logic of the operation of some security systems, after removing the handbrake, the car may stall. You shouldn’t be afraid of such situations - this is just another step of protection from intruders (as a rule, to avoid turning off the engine, before removing the handbrake, you should insert the key into the lock and turn it one notch).
In this article we will share tips on how to install an automatic engine start with your own hands. What is this system? This is a remote automatic start of a car engine without a driver. If you are interested in this prospect, read on for our recommendations.
Setting up SAUVZ
Programming is carried out in accordance with the passport. The system is initially in the closed damper position. After starting the engine and warming up, at a time when it is guaranteed not to stall, press the programming button once. This will be followed by a decrease in speed. As soon as they drop to the value that you define as the warm-up mode, press the key a second time. After the engine has warmed up to the required temperature, press the button a third time.
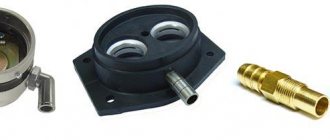
Automatic choke without drive
The principle of this modification is based on the installation of an additional thermostat, which will provide control of the air damper. Many drivers are familiar with such a device as a thermostat, which is used on air filters. This device is designed to open the cold air damper by extending the rod when the temperature of the air flow increases.
To install this auto-suction pump on the carburetor with your own hands, you need to buy a thermostat for 8 and 9 and install it in a 0.5-inch tee. In addition, you will need fittings, a plug, a tee, a lever and a bracket. You don’t have to buy the last two elements, but make them yourself.
On both sides of the tee we screw fittings under the tube, which provides heating to the collector. The third outlet must be plugged, and then a hole must be drilled in the plug. After this, we cut a thread for the thermostat and screw it into the tee. We connect a lever to the resulting structure, which is connected through a cable to the air damper. We also screw the fasteners under the shirt.
When the engine is not warmed up and there is cold fluid in the system, the damper is closed. As the temperature of the antifreeze rises, the thermostat is activated, which moves the lever. The cable tightens and opens the valve. The air intake closes under the action of a spring when the engine cools down.