The engine of most modern cars is located above the level of the gas tank, which prevents the supply of fuel by gravity and forces it to be pumped forcibly. Moreover, for normal operation of the power unit it is necessary to create decent pressure in the system. This is why a fuel pump is installed on the car. Over the past few decades, it has not only changed structurally, but also changed its location. Therefore, it would be useful to remind you where the fuel pump is located, its structure and operating principle.
Design of the carburetor injection system
Before replacing the fuel pump on a VAZ, it is necessary to consider its design. There is nothing complicated about it, but the work is influenced by many factors. In fact, the entire design of the injection system consists of several elements:
- Fuel tank.
- Highways.
- Carburetor.
- Fuel filter.
- A fuel pump driven by a camshaft.
To understand how a pump works, you need to understand its design.
How to Remove the Fuel Pump on a Chevrolet Cruze
Experienced car owners know that replacing the fuel filter
attention should be paid, since the quality of the ride depends on the performance of this element.
Now we will tell you where the Chevrolet Cruze
(or gasoline filter) is located, what is needed to repair it and a video of replacing the element.
Where is the filter located?
There is no such element as a fuel filter in Chevrolet Cruze cars. mitsubishi lancer club - Mitsubishi Lancer how to remove the headlight?, on your car)). The developer considered it unnecessary to install it on their cars. More precisely, there is no filter itself, but there is a mesh that is responsible for filtering the fuel being refilled. It can be conventionally called a filter.
The fact is that, according to the manufacturer, the fuel pump
installed on the Cruze vehicle for the entire life of the vehicle. Therefore, its replacement is considered inappropriate by the developer. But due to the low quality of gasoline at Russian and Ukrainian gas stations, Cruze owners often need to change the filter element.
The mesh itself, as mentioned above, is located in the fuel pump, which, in turn, is located in the fuel tank. How to remove the gear motor on a Priora, how to remove the door trim on a VAZ. Stove gear motor. To get to the filter mesh, you will need to remove the back seat of your Chevrolet Cruze, and then dismantle and disassemble the fuel pump.
How often should it be changed?
If you feel that:
- your car’s engine runs unevenly, in other words, it sometimes stalls;
- the car loses power when you press the accelerator pedal, “dips” are recorded;
- the vehicle became the least lively;
- when you sharply press the accelerator pedal, the car begins to twitch;
How does a fuel pump work?
Let's figure out how the pump works. It consists of a housing in which there is a membrane and two valves - inlet and outlet. The membrane is acted upon by a spring, which returns it to its original position. When replacing the fuel pump mesh, you will have to completely disassemble the housing. In some cases, you may have to install a repair kit. It includes gaskets, membrane and valves.
The pump is driven from the camshaft - it has an ellipse-shaped section. The convex part of the camshaft pushes the rod, which drives the fuel pump mechanism. At the same time, the spring is compressed, the membrane moves, the inlet valve opens, and the outlet valve, on the contrary, closes. Gasoline is injected into the pump chamber. When the membrane moves in the opposite direction, the intake valve closes, the exhaust valve opens, and gasoline flows through it to the carburetor.
Please note that a filter must be installed in front of the pump to clean gasoline from harmful impurities.
When to change the pump?
When replacing a fuel pump, you need to perform simple manipulations, but what can lead to this work?
A list of reasons why the fuel pump malfunctions is given below:
- Rod wear can be solved by replacing it. In some cases, it is sufficient to remove one or more gaskets installed under the housing.
- Destruction of the membrane leads to gasoline leaking out of the housing. Air leakage begins, no pressure is created at the outlet.
- Valve malfunction - usually due to excessive heat. When cooled, valve operation returns to normal. As in the previous case, no outlet pressure is created.
And, naturally, physical damage to the pump housing leads to the fact that it stops working normally.
How to change a gasoline pump on carburetor engines
The procedure for replacing a fuel pump on carburetor cars is not complicated. First, you need to turn off the engine and let it cool to make repairs more comfortable. Then perform simple manipulations:
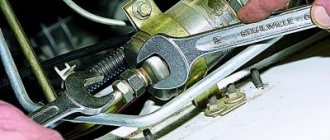
- Remove the hoses from the inlet and outlet of the fuel pump.
- Unscrew the two nuts that secure the pump housing to the motor.
- Carefully remove the housing.
- Remove the pump rod and remove the old gaskets.
Reassemble in the reverse order, change the rod if necessary and install a sufficient number of gaskets. It is important that the rod protrudes no more than 1.2 mm above the surface.
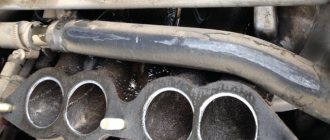
Installation of injection pump, injectors, high and low pressure pipes D-245
The injection pump mating plate must be clean;
nicks and other damage to the slab are not allowed. The fuel pump gasket must not show any visible damage.
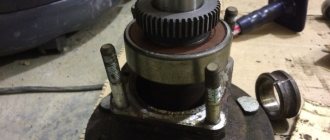
When installing the fuel pump, you must align the marks of the fuel pump drive gear and the splined flange.
The splined flange of the fuel pump gear must fit freely, without jamming, onto the splines of the fuel pump shaft bushing.
The fuel pump gear flange mounting bolts must be tightened to a torque of 18…25 Nm.
When installing the fuel pump, be sure to check the fuel injection advance angle.
This is done in the following sequence:
- set the regulator control lever to the position corresponding to the maximum fuel supply.
- Disconnect the high-pressure tube from the fitting of the first section and connect the momentoscope instead (Fig. 1).
- Turn the diesel crankshaft clockwise with a wrench until fuel free of air bubbles appears from the glass tube of the momentoscope.
- remove some of the fuel from the glass tube by shaking it.
- Turn the crankshaft counterclockwise by 30....40°.
- Slowly rotating the diesel crankshaft clockwise, monitor the fuel level in the tube; at the moment the fuel begins to rise, stop rotating the crankshaft.
- If the latch does not coincide with the hole in the flywheel (Fig. 2), make adjustments by doing the following:
- remove the hatch cover;
- Unscrew bolts 1, 2 and 3 (Fig. 3) and loosen bolt 3 by ½…1 turn (do not unscrew the bolt);
- align the locking rod 2 (see Fig. 2) with the hole in the flywheel, turning the diesel crankshaft in one direction or the other; Using a wrench, turn the fuel pump shaft and splined flange by the nut until the fuel begins to rise in glass tube 1 (see Fig. 1) of the momentoscope;
- install bolts 1,2 and 3 (see Fig. 3) into matching holes, trying to position them as evenly as possible around the circumference;
5. tighten bolt 3 first, then bolts 1 and 2;
- Reinstall the high-pressure tube and remove the locking rod from the hole in the flywheel;
- Replace the hatch cover.
The alignment of the splines of the fuel pump bushing and the splined flange when installed on a diesel engine is ensured by turning the diesel crankshaft or the pump camshaft.
Diesel engines must be equipped with injectors of the same group.
The sealing gaskets on the side adjacent to the injectors must be lubricated with solid oil US-1 GOST 33-51.
The injector mounting bolts must be tightened to a torque of 20…25 Nm.
High pressure pipes must be secured at a distance of 10...15 mm from the union nuts with clamps with gaskets.
Low pressure fuel pipes should be purged with compressed air before installation on a diesel engine.
Injection injection system
The injection system looks a little more complicated - it uses an electrically driven pump. It is placed inside the fuel tank and has a mesh filter for cleaning gasoline.
When replacing the fuel pump filter, you will have to completely remove the entire unit along with the fuel level sensor. The system works as follows:
- When the ignition is turned on, power is supplied to the electronic control unit.
- All sensors are polled, including the one that measures pressure in the fuel line. If the pressure is insufficient, the control system sends a pulse to the fuel pump switching relay. The pump turns off after the nominal pressure is reached in the line. You may hear a humming sound when you turn on the ignition.
- When the engine starts, the fuel pump works intermittently - it turns on and then turns off. The frequency depends on what operating pressure range is “sewn” into the control unit.
- When the engine stops, the electric pump also turns off.
In general, as you can see, nothing complicated. Let's now move on to fuel pump failures.
What kind of breakdowns can happen?
On a Ford Focus, replacing the fuel pump is carried out in approximately the same way as on any other injection car. But what can lead to such, frankly speaking, expensive repairs?
Let's look at what malfunctions can happen to the pump:
- Failure of the switching relay or fuse.
- Impeller destruction.
- Wear of the brush assembly.
- Damage to electrical wiring.
- Failure of the stator or rotor winding.
- Filter element clogged.
Troubleshooting and repair
Failure of the pump or its inadequate operation leads to malfunctions of the engine or other systems and components. The operational condition of the Gazelle vehicle depends on the prompt execution of repairs. Replacing the fuel pump is an effective way to restore your car.
To determine whether it is worth replacing the pump, or whether it is sufficient to repair it, the operation of the device is diagnosed and faults are identified. The most common symptom of improper operation is intermittent operation of the motor and jerky movement of the machine. Another sign is a long winding time, with the standard speed starting from a half turn. This sign indicates a deterioration in performance and that the fuel pump will soon fail, although it is still able to work for a certain time.
If you do not pay attention to such “bells” and continue to operate the car, then one day the car may not start. The reason for the inoperative condition is a drop in pressure in the fuel system, and it is the faulty pump that affects this.
An instrumental check of the fuel pump is carried out using an indicator sold in a specialized store. To find out whether the fuel pump is to blame for the pressure drop or whether the pressure regulator, injectors or other devices are not working, install an indicator on the fuel pump. Mount the device in accordance with the attached instructions, turn off the engine and wait about 10 minutes. If after this a significant decrease in pressure is detected, then the fuel pump is working.
Signs of pump failure
Before replacing the fuel pump on a Nissan or any other car, you need to make sure that it is the one that is faulty. One of the main signs that the fuel filter is clogged is that when you turn on the ignition, the pump runs for too long and makes a loud noise. This suggests that he cannot quickly gain pressure. As a rule, this does not happen abruptly - it cannot be that everything worked perfectly yesterday, but today it pumps poorly. If this happens, then the reason is most likely not in the filter, but in the pump itself.
If the filter is clogged, it will contain a huge amount of rust, as well as other suspended particles. If they get into the fuel system, they can greatly damage the injectors - they have very small holes and can clog very quickly. And if you start cleaning the injectors too often, then think about whether you changed the gasoline filter too long ago (check the air filter too, it won’t hurt).
The second obvious sign of a malfunction is the complete absence of “signs of life” in the fuel pump. If you do not hear a hum when you turn on the ignition, then the relay may have failed. But it’s also worth checking the fuse and the fuel pressure sensor - how the pump functions depends on it. If nothing has changed, try directly applying voltage from the battery to the fuel pump. If it does not work, then it needs to be replaced or repaired. The first is preferable.
Replacing a VAZ fuel pump with your own hands
Once I sat behind the wheel of my car and turned the key in the ignition, I could not start my car. The situation is probably familiar to everyone, the first thought was that the fuel had run out, looking at the instruments, I realized that there was plenty of gasoline, the second question arose: what was the matter then and what to do now? After turning the starter a little, the car started up, but after a couple of minutes it stalled again.
After thinking a little, I came to the conclusion that most likely my car has problems with the fuel pump
.
A fuel pump malfunction
is a rather unpleasant, although completely solvable, phenomenon. This
was my first time replacing a fuel pump
Today I want to share with you my achievements in this matter and tell you how, if necessary, the VAZ fuel pump is replaced,
so that you don't repeat my mistakes.
What is a fuel pump and what is it for?
So, the first thing I want to talk about is what a fuel pump is.
and what it is intended for. As you can already understand from the name, the gas pump comes from two words: gasoline and pump, that is, it is a pump that pumps gasoline, everything seems to be clear here, and there is nothing complicated about it.
Fuel pump in the fuel system
- if compared with the human body, it can be called a heart, since our heart is also a kind of pump or pump that pumps blood, providing the body with everything vital. Life is impossible without a heart (fuel pump), and this also applies to a car with a non-working gas pump.
The car turns into a static pile of metal that is incapable of anything.
Where is the fuel pump located?
The fuel pump can be located in three places - this largely depends on the car model and the brand of the gas pump itself. Mechanical fuel pumps are located outside the fuel tank, while electric fuel pumps are located inside the fuel tank. In addition, some models of fuel pumps can be placed in the engine compartment, that is, directly on the car engine, for example, as in my case with my VAZ 2107
.
Cause of fuel pump failure
There are usually two reasons. The first is severe contamination of the fuel filter. the second is the car owner’s habit of driving with a half-empty tank.
We have figured out the purpose and location, now I bring to your attention instructions for replacing the fuel pump, that is, further we will talk about how to replace the VAZ fuel pump with your own hands
.
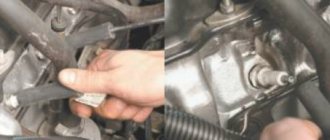
1. First of all, you should prepare the car for this procedure; to do this, use a rag to clean the engine, cylinder block, and the fuel pump
from dust and dirt using white spirit or a special cleaner.
2. For the next stage, you will need two M8 bolts to plug the holes in the hoses, since when they are disconnected, fuel will leak out.
3. Next, using a Phillips screwdriver or an “8” wrench, loosen the fastening clamps that hold the fuel hoses and remove the hoses from the fuel pump fittings.
Now you can actually plug the ends of the fuel hoses with the previously prepared M8 bolts.
4. Replacing a VAZ fuel pump
continues and the next step will be to remove the fuel pump; to do this, unscrew the two fastening nuts that secure the fuel pump to the cylinder block, using a key set to “13”.
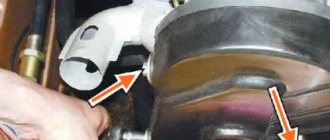
5. When everything is ready, you can begin to remove the fuel pump from the studs, while paying attention to the condition of the gasket and, if necessary, replace it.
6. Remove and clean the heat-insulating spacer from dirt and dust, just as in the previous case with the gasket; if necessary, replace the gasket located between the cylinder block and the heat-insulating spacer.
VAZ fuel pump replacement - installation
Changing gaskets on a VAZ 2107 car with a mileage of 100 thousand km before replacing the fuel pump
it is necessary to check the minimum protrusion of the pusher, since the correct position and stroke of the fuel pump diaphragm assembly largely depends on it. If this is not done, either the fuel supply from the fuel pump will be reduced, or the diaphragm will fail prematurely due to a rupture. The protrusion of the pusher can be changed by selecting gaskets between the cylinder block and the spacer.
Replacing the pump
To replace the fuel pump, you need to arm yourself with a set of tools. After this, proceed to dismantling:
- You fold down the rear seat and underneath there is a niche with a pump installed.
- Disconnect the block with wires.
- Remove the tubes and hoses that go to the fuel pump.
- Unscrew all the nuts that will secure the housing to the gas tank.
- Carefully remove the pump along with the fuel level sensor.
- Disconnect the pump from the fuel level sensor.
If it is not possible to replace the pump, repair it. To do this, as a rule, it is enough to install new brushes.
But it also happens that one or more windings on the rotor or stator fail. In this case, of course, it will be easier to install a new electric pump. But if you have suitable wire or working spare parts from old pumps, you can try to repair it. As a rule, this is quite difficult to do - the damage is usually so severe that the pump elements cannot be restored. Therefore, the best way out is to install a new or used device.
After repair work, everything must be reassembled in the reverse order. And don’t forget to install a rubber gasket, otherwise gasoline will start leaking out. When replacing the fuel pump mesh, you will have to perform similar manipulations, but you do not need to install a new electric drive.
It so happened that most people install fuel pumps by simply replacing them using the unscrew-and-screw method. Like everything is ready. But this is not entirely true, because... There are a number of reasons that affect the correct and durable operation of it. Some of them are the size of the rod, the eccentric cam, and the fuel pump itself. This would all be ideal, but alas, this is not and cannot be.
For this reason, I already wrote an article on one of the forums, namely “SAMARA CLUB”. But the forum disappeared along with my articles, it’s a pity that I didn’t save it.
In order for everything to work correctly, you will need a little patience.
Let's start with the fact that we unscrewed the two clamps and disconnected the gas hoses (inlet and outlet). We unscrewed two nuts, this is key No. 13 classic and Samara, Tavria and No. 12 UFA motor. Here it’s better to use a long head, it’s easier.
The next stage is the stock. A sore spot for the VAZ because for some reason many people changed it, moving away from the factory hardened one to a raw one. So, its length should be 82.5 mm (measured with a caliper) or a metal ruler, there are now small divisions there. This is the factory size and is the starting point for assembling the entire system.
Next, we must return the rod back to its place. Arm yourself with a tool so that you have something to turn the crankshaft, while unscrewing the spark plugs to make it easier for yourself to turn it, until the moment when the rod reaches its MAX value. Here the question arises - how to find out when? Everything ingenious is simple - turning the HF with your finger, we rest against the rod. You will feel the moment of its full exit; it will seem to stop in this MAX departure position. It didn’t work the first time, try again and everything will work out!
Electric fuel pumps
Here the system is more complex, because there are two types: submersible devices placed in the tank, and remote ones, fixed separately. Both are powered by an electric motor located directly in the pump. How to check the fuel pump?
Voltage
Take a regular tester, or if you don’t have one, a car light bulb with the wires attached. Now you need to detect your device. If the fuel pump is remote, it is located somewhere near the tank. If submersible, look for the output terminals (usually they are under the rear seat). Further:
- turn on the ignition;
- touch the voltmeter probes or wires from the lamp to the contacts;
- if the device readings correspond to 12-12.5 volts or the light comes on, it means that voltage is supplied to the pump.
Wiring
Assessing its condition is easy: take a pair of long wires and connect directly to the pump. If it “squeals”, consider that the cause of the malfunction has been found. And if not? Go ahead.
Fuse
Everything is clear here: you need to find where it is and replace it, or insert a bug. If the fuse blows, the problem is most likely related to the positive wire going to the fuel pump, which shorts to ground.
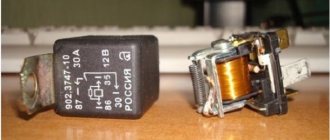
To find it, read the labels on the fuse box cover. Pull the part out of the socket. Just in case, you need to check the serviceability of the relay with the battery terminals removed. Wind a wire onto its plus and connect it to two points of the relay: “85” and “30”. Connect the negative electrode to the light bulb contact and the relay terminal “86”. The second wire from the lamp must be connected to pin “87”. If the lamp lights up, the relay is working properly. If you have a multimeter, connect its probes to terminals “85” and “86”. An infinitely high resistance indicates a winding burnout. But what to do when you find that the relay’s performance is zero, and there is nowhere to purchase the part? Just bridge its contacts “87” and “30”.
How to check fuel pump pressure
It happens that the device works, but the engine does not start. In this case, you need to check the pressure, which should be from 2.5 to 3.2 kg/sq.m. cm (check the operating instructions for your machine). When you press the accelerator, it rises by an average of 0.5 kg/sq.m. see. If this is not possible, try inspecting the coarse filter. To remove it, if the pump is a submersible type, remove the hatch by unscrewing the bolts. Next, check the fuel pipes for fuel leaks. Finally, replace the fine filter.