Removing the front bumper Grant
We will approach the process in detail with preparation and step-by-step illustrations.
Necessary tool
Cooking:
- Torx hexagon T-20;
- Phillips screwdriver;
- Wrenches 10: ring or open-end, ratchet with corresponding head;
- Pit or lift.
How to remove step by step
Let's get to work.
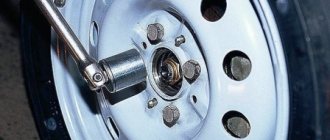
Step 1 : remove the license plate frame from the front bumper - there are 2 10mm bolts under it. Unscrew them.
For bolts, a socket wrench or ten-point socket is suitable. Photo from Drive2 website, Lada Granta MAGMA logbook
Step 2 : open the hood. We unscrew 6 bolts: 4 hold the radiator frame from above, one more to the right and left of the frame.
Use the same head to unscrew the bumper mount from above.
Step 3 : remove the star screws (Torx wrench required) that secure the fender liners. 2 on each side.
If the wheels are in the way, you can turn them one by one to their extreme positions for better access.
Step 4 : from below we find 2 screws (on the right and on the left) closer to the wings - we unscrew them.
We remove the screws either from the hole or by lying under the bumper.
Step 5 : remove the last three fastening bolts from the bottom closer to the protection. If the protection interferes, unscrew the edge that interferes with dismantling.
It is not necessary to remove all protection.
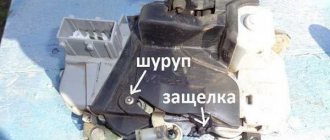
Step 6 : along the edges near the wings, carefully pull the bumper towards you until it comes off the latches.
Reassemble in reverse order
.
Radiator grille Lada Granta
In any car, the radiator grille is one of those elements that catches your eye when you first look at the car. It is located on the front of the car and is therefore so noticeable. The “facial expression” of a car also very much depends on how the radiator grill looks.
It is for this reason that many car owners change it or perform tuning to give their car some individuality. The Lada Granta radiator grill is no exception. You can see many attempts to improve it in various ways.
Many owners complain that this model has virtually no protection for the radiator from dust and dirt entering from the outside. Proper tuning helps eliminate this problem.
Tuning the radiator grille of Lada Granta
How to remove the radiator grille of a Lada Granta
Before tuning this element, let's figure out how it can be removed from the car.
The Lada Granta radiator grill can be removed in 2 ways. According to the classical method, you need to proceed as follows:
- remove the front bumper;
- on its inner side, unscrew the nuts securing the grille, there are 9 of them;
- Click to open 2 locks under the headlights.
Removing the radiator grille along with the bumper on the Lada Granta
The second method makes it possible to do without dismantling the front bumper. The algorithm looks like this:
- Unscrew 6 bolts from the top of the grille;
- bend it, stick your hand in, find by touch 4 bolts at the top and 5 nuts at the bottom - for this you will need a figure eight wrench;
- Under the headlights, use a screwdriver to open the 2 clamps.
After dismantling, you can begin tuning. After this, installation is performed in reverse order.
Tuning using a utility net
Tuning the front part of a Lada Granta car using a Chain-link mesh is very common. Such a mesh can be bought at any hardware store - it can be metal or plastic.
We choose the option with medium-sized cells. This is important to avoid excess dust getting under the hood of the car.
Fine mesh netting for making radiator grilles
Next you need to follow a simple algorithm:
- using one of the methods described above to remove the radiator grille;
- cut off all horizontal and vertical jumpers, leaving only the outer frame;
- using cold welding, seal all the holes that were created after the jumpers were cut off;
- clean the surface from all irregularities and burrs;
- Cut the mesh to size and attach it to the frame. If the mesh is plastic, you can simply glue it. If it is made of metal, heat the frame so that it does not burst, and screw the mesh with self-tapping screws;
- paint and wait for it to dry. At this point the tuning can be considered complete.
Tuning the radiator grill using mesh on the Lada Granta
Installing a radiator grille on a Lada Granta car
After tuning is completed, the Lada Granta radiator grill is installed back. To do this, the finished part is placed in the standard opening in front of the radiator and secured with nuts, bolts and clamps. Next, you need to check how correctly the fit is made and inspect the front part of the machine for irregularities, burrs and protrusions. If any are found, clean them with a file or fine sandpaper.
Installing a bumper with a radiator grill for Lada Granta
Conclusion
Tuning the radiator grille is a good way to make the appearance of a car more attractive, make it stand out from the crowd, and add originality. This can significantly change the visual perception of your car when looking at it from the front.
The car will acquire a more modern, stylish and attractive exterior. It is precisely these considerations that drive those car owners who decide on tuning.
In the case of the Lada Granta car, the argument in favor of alterations of this type is the actual lack of protection of the engine compartment from particles of dirt, dust and moisture entering from the front. This is unlikely to benefit the car. Therefore, many car enthusiasts resort to making radiator protection with their own hands.
okuzove.ru
How to remove the rear bumper
We won’t break the article into different ones – we’ll talk about the rear bumper too. To remove you need :
- Crosshead screwdriver;
- Wrenches 10 – open-end or socket;
- Torx hexagons 20 and 30;
- Preferably a lift.
Let's see step by step how to remove the rear body kit on a Grant:
Stage 1 . We dismantle the 5 mounting points of the bumper from below. You can lift the car on a lift - this will make the task easier.
Remove 3 bolts and 2 screws as shown in the photo. Source: lada.online
Stage 2 . Let's move on to the mounting in the rear arches. Here we remove the clamp 3, screws 1 and 2.
We carry out this stage on both sides.
Stage 3 . We dismantle the rear lights - from the trunk side, remove the lamp chip and three fastening nuts.
How to remove rear lights in 5 steps - see here.
We look at the rear of the car with the lights removed - in front of us are the last 8 mounting points. Four in the place where the trunk lid comes.
Read more: Replacing rear stabilizer struts for Octavia A5
2 more under each lamp.
If you do not remove the lights, the body kit cannot be dismantled. No way.
Stage 4 . The bumper is free. Do not rip it abruptly to the side! All that remains is to disconnect the wiring.
We put everything back together in reverse order.
Replacing the radiator grille. — Lada Granta, 2012 on DRIVE2
I installed the grille as promised in the review and photo.
I had an analog grille, so installation took 15 minutes. Unscrew the 4 bolts at the top and the two nuts on the sides.
I installed the new grille in the same way. At the bottom of the grille there are 5 studs, the nuts on them are 5. I also took a photo of the studs. There is no need to solder them, since they are already in place and are not poorly made. The holes for the bolts are also drilled at the top.
I don’t know who had what didn’t fit, but for me everything fit perfectly. The pins fit exactly into the holes - I was pleased)))
Let me note that I physically cannot tighten all 5 lower nuts without removing the bumper. The hand doesn’t fit)) Only 2 on the sides, but in my opinion this is quite enough.
I also wanted to tell the guys who will remove the original grille without removing the bumper - this is a real hassle) Removing the bumper for the first time when installing the fog lights took 30 minutes. Don't be lazy, take pictures. It's actually easier to remove the grille; there are a lot of bolts.
The grille is painted well. Everything seems to be there)) Photo after washing)))
In the photo, the bottom of the grille is not screwed on, I dropped the nuts and didn’t look for it, but screwed it on later.
Issue price: 1,600 ₽
www.drive2.ru
General questions about body kit 2190
Let's answer a couple of basic questions about Granta bumpers.
Differences between sedan and liftback bumpers
The principle of working with front and rear bumpers on a sedan and a liftback is the same! There are no fundamental differences.
Why you may need to replace the bumper
Possible reason for replacing the body kit on a VAZ 2190:
- Minor (or major) accident;
- Installation of a non-original body kit;
- Installation of additional devices: emergency parking sensors, rear view camera, etc.;
- Curiosity.
There are many options for non-standard body kits for Lada today.
Non-native body kits are made unofficially. This can lead to problems with joints and color mismatches.
Where to find the front bumper amplifier
Unlike pre-restyling Kalinas, Grant comes with a bumper reinforcement from the factory . Many people confuse it with a regular mount. You will gain access to the part only after dismantling the front body kit.
The amplifier on the Lada is rather symbolic, like the factory crankcase protection. But there is no such thing on Kalina.
Video instructions on how to shoot
Here are videos with the work process:
Reminder
- To remove the front/rear body kit, it is better to use a lift ;
- You will need: a Phillips screwdriver, a 10mm socket wrench, a 20/30 Torx sprocket, a ratchet with a set of sockets;
- Simple, but important: wash the car before work, since we will be tinkering with the dirtiest part of the car;
- After dismantling all mounting points, check and disconnect all wiring, such as PTF, license plate lights or parking sensors.
Do you like working with Granta? See other articles. For example, how to install acoustics yourself.
Write comments . This is important - otherwise we will miss details or lose motivation.
Increasingly, car enthusiasts with any problems arising with their car rush to a car service center, while removing the front bumper on a Grant is not at all difficult. Here are detailed step-by-step instructions for removing and installing the front and rear bumpers of a car (they are also called “skirts” or “whirlwinds”).
Preparation
Before removing the front bumper on the Lada Granta, you need to prepare the following.
- Crosshead screwdriver.
- Open-end wrench No. 10 and No. 12.
- Ratchet No. 10.
- Fasteners with Torx slot T No. 20.
- Fasteners with Torx slot T No. 30.
- Rags.
- Any penetrating lubricant, such as WD-40.
- Grease.
If the crankcase protection is of a non-standard type, then you will need some rectangular object on which to place it just right after removal. This could be a small plastic canister, cardboard box, etc.
The dismantling of the front body kit on the Grant, as well as its installation, must be carried out very carefully. A slight misalignment or carelessness can lead to breakage of latches or latches, the repair of which will be quite expensive.
What you need to prepare
To complete the work you will need very few tools. This:
- a Phillips screwdriver (for the rear “whikhur” you may also need a flat one);
- open-end or socket wrench with 10mm head and ratchet;
- TORX T-20 key for removing the front cowlick and TORX T-30 for the rear one.
For some Lada Granta models, a TORX T-30 wrench may also be required when working on the front bumper. It is more convenient to carry out the work by lifting the machine with a lift or placing it on a pit or overpass. In extreme cases, you will have to lay something on the ground. Before starting work, disconnect the battery.
Removal and installation can be done by one person, but it is better to have an assistant.
Results
Replacing the rear bumper of a Lada Granta is a fairly simple task. You just need to take into account that the plastic from which the bumper is made can be easily broken. The same applies to fastenings. The fact is that screws made of metal can exert excessive pressure on the surface of the plastic, causing it to simply burst. To avoid this, you need to tighten the bolts with a certain force set on the handle.
But, in general, you shouldn’t have any problems with removing and then installing the bumper.
How to remove the front bumper on a Lada Granta
For a car enthusiast who has driven a Lada Grant, removing the front bumper is a common thing. After all, this is often required to repair or replace the front “whisker”, as well as to access what is behind it, install fog lights, a signal, etc. It is possible to replace the radiator grille or the entire bumper with an improved model that improves aerodynamic characteristics and modernizes the external type of car.
Read more: What to do if you need to turn around
Before you begin dismantling, make sure that all tools are at hand and that access to the front of the underbody is sufficiently clear.
- It is necessary to remove the license plate, behind which there are 2 bolts. They should be unscrewed with a 10 mm wrench.
- Lifting the hood cover, use the same key to unscrew the 6 bolts located under it that secure the bumper and radiator.
- Unscrew the 2 bolts on the fender liners, at the top and bottom of the arch. To be more precise, these are not bolts, but self-tapping screws with an asterisk head. They are unscrewed with a TORX T-20 key. To access them, turn the wheels all the way to the left and unscrew the screws from the right fender liner. Turning the wheels to the right, unscrew the screws from the left fender liner.
- Another 4 self-tapping screws attach the bumper to the fender liners from below - 2 on the left and 2 on the right. They are also unscrewed with a TORX key.
- Using a 10mm wrench, you need to unscrew the 3 bolts securing the part from below. Depending on whether there is an engine guard and how it is installed, you may need to remove 2 more bolts that hold the crankcase cover in place at the front. When they are unscrewed, the cover should not hang on the rear bolts. To prevent the fastening from deteriorating, place an object under the crankcase protection.
- Now the bumper is free, only the latches hold it in place. But you should unhook them carefully, because the plastic can easily break. First unhook the latch on the left side, then also carefully on the right, or vice versa. If fog lights are already installed, be sure to disconnect the connector. Place the part aside to avoid accidental damage.
Installing the front bumper
Installation of the part occurs in the reverse order.
- If necessary, connect the fog lights.
- Carefully place the bumper in place and secure it with the latches using gentle pressure. If the latches do not engage, check the installation accuracy. Make sure that no foreign objects get into the connections.
- After fastening the latches, tighten all the bumper fasteners in sequence.
- Replace the license plate.
Front bumper Lada Granta: tuning and replacement
08.12.2017
That’s why he himself always suffers first.
Usually, a special amplifier is hidden behind the rear bumper, which is made of directionally located metal, which programs the initially designed deformation of the body upon impact in order to protect passengers in severe collisions.
In addition to all of the above, the bumper also adds a unique aesthetic appeal to the car, no matter whether you have a sedan or a liftback. Completing the overall design idea of the vehicle, it is part of a complete picture, blending perfectly with the overall style.
The shock-absorbing characteristics of the “timber” also meet its standards. If initially they were made capable of withstanding an impact at a speed of 5 miles per hour (about 8 km), then in 2009 it was decided to leave the standard at half that speed.
Read more: Instructions for repairing a distributor and diagnosing its slider at home video
Supposedly it is safer for pedestrians.
It doesn’t matter why, but you suddenly need to replace the rear bumper on your Lada Granta.
Maybe it’s not even necessary to replace it, but simply remove it to install parking sensors (APS - acoustic parking system), a rear view camera, detect hidden damage after an accident, etc. But you’re encountering this for the first time and don’t even know which way to approach it. him. We will help solve this problem.
For everything you need free time, skillful hands and a banal set of tools:
- TORX key T30 or T20 for a sedan - a star-shaped screwdriver;
- key to 10;
- Phillips screwdriver.
It is better to work with handyman gloves, since disassembling the car does not always happen immediately after washing.
Removing the rear bumper of the Lada Granta:
- Remove the rear fenders.
- There are a pair of screws underneath them on each side that help secure the bumper to the arches. We need to get rid of them.
- There is also a fastening to the body below – three bolts. They will have to be unscrewed.
- Remove lighting devices (lanterns). Their fastenings extend into the luggage compartment and are hidden under the trim.
- Additionally, the bumper is attached to the body with 6 or 8 bolts along the entire perimeter. They also need to be unscrewed.
- There are latches on the sides of the protective element. It is easy to disengage them by simply pulling correctly on the edge of the bumper.
- Move the part to be removed aside until the wiring harness is sufficient.
- The rubber seal of the above-mentioned harness must be pryed out of the body hole with a screwdriver. Then you will be able to pull the tourniquet out of it.
- Disconnect the connectors of the wires that lead to the license plate lights.
- Only now can you carefully remove the bumper itself from its rightful place.
- Sometimes it is necessary to remove the license plate light unit.
To do this, you will need to unscrew the 3 screws with which it is attached to the protective element.
Installing a new or old bumper occurs in the reverse order.
You see - nothing complicated.
This described the option of removing the bumper from the Lada Granta liftback. The sedan is simpler in this regard and everything will go much faster.
The process seems intricate and dreary, but this is only at first glance. Almost everything is intuitive: you need to have knowledge of the theory, which is what we helped you with.
Removing the rear bumper
The fastening of the rear “skirt” of the Lada Granta in liftback and sedan versions is no different. In both cases, removing the rear bumper of the Lada Grant is a little more difficult than the front one.
- Remove the rear mudguard, if installed. To do this, you need to unscrew 3 screws located behind the rear wheel. Using a TORX-30 wrench, remove the self-tapping screw securing the bumper to the arch of the same wheel. Repeat the same operations on the other side of the machine.
- Remove the 3 bolts securing the bumper to the bottom of the car.
- If the trunk trim does not have pockets for access to the rear lights, you should remove the trim by unscrewing 8 screws. You will need to remove the taillights. First check that the battery is disconnected. Bend back the trunk trim and disconnect the wiring harness connector from the lamp. To do this, you need to squeeze and pull the connector latch towards you. Unscrew the 3 screws securing the light, carefully pull it out and disconnect it from the car. Repeat these steps for the second lantern.
- Unscrew the 8 bolts of the upper fastening of the “whikhur”: 4 of them are located under the trunk lid and 2 behind each lamp.
- Carefully unfasten the latches located on the rear wheel fenders. When removing the bumper, move it as far as the wiring harness will allow.
- Using a screwdriver, pry up and pull out the rubber seal through which the wiring harness comes out. Pull out the harness so much that you can unplug the wire blocks going to the license plate lighting unit. Unhook the pads and move the bumper to the side so as not to accidentally damage it.
Read more: How to write a message to a friend in Odnoklassniki
How to put the rear bumper back
Replacing the rear bumper on a Lada Granta, like the front one, may be necessary not only if it is damaged, but also in order to improve its image. Installation is in the reverse order.
- Having installed the rear cowlick behind the car, connect the blocks of wires going to the license plate lighting unit. Hide the pads in the housing and insert the rubber seal in place.
- Fasten the rear bumper with the latches and tighten the upper mounting bolts.
- Place the light on the guides, push it all the way and tighten the 3 fastening screws. Insert the wiring harness connector until it clicks. Cover with trunk trim. Repeat the steps for the second flashlight. If necessary, attach the trim with screws.
- Tighten the remaining bolts and screws, attach the mudguards.
After completing the work, connect the battery. Check the operation of electrical appliances. If everything is in order, you can hit the road.
Greetings to everyone who came to my page to read the BZ!
I have plans for the weekend, one might say grandiose and long-awaited.
For a very long time I could not find the time to install the fog lights. I've had them collecting dust in a box for almost half a year. Finally, the installation time has come! To install fog lights, you must remove the front bumper. And since I don’t want to do this procedure a thousand times, it was decided to immediately change the standard signal (fart in one word), and also install an ambient air temperature sensor. But I will write about all this in the following posts. And today I decided to write down detailed instructions for removing the front bumper of a Lada Granta. True, the Internet is full of all sorts of manuals, but still. Maybe someone will need a manual from me) So, what tools do we need:
1.
Open-end or socket wrench 10 mm. You will also need a 10mm socket. with a ratchet. 2. Phillips screwdriver. 3. TORX T-20 key. Where would we be without torx screws? On the Grant there is no way to do without them))
We remove the bumper in the following sequence:
1.
Unscrew the front license plate. 2. There are two bolts under the sign.
10 mm head. unscrew these bolts. 3.
Unscrew the six bolts securing the bumper and radiator grille.
4.
Using a TORX T-20 wrench, unscrew the 4 screws (2 pieces on each side) securing the fender liners to the front bumper. For convenience, you can turn the wheels all the way.
Procedure for dismantling the rear bumper
Once all the tools are selected and are in close proximity to you, you can begin to work. To do this, you will need to take a TORX T-30 wrench with a 10mm head, as well as a Phillips head screwdriver.
- Carefully remove the mudguards, if present.
- After this, you will reach a part, on both sides of which you can find a screw. They secure the bumper to the wheel arches. As you might guess, you need to unscrew the screws on both wheels.
- Now you need to remove three bolts at once that hold the bumper to the car body.
- After this, you will have access to the rear lights, which will need to be carefully removed. They are practically not held back by anything, so this should not be a problem.
- Unscrew the two screws under the headlights.
- Now comes the turn of the eight screws that secure the bumper to the top of the body. They are all located in one row. Just keep in mind that there are screws under the headlights. And, if you don’t unscrew them, the bumper will remain motionless.
- There are special latches on the sides of the bumper that secure the part to the car. You need to be very careful with them, as they are extremely easy to break. This is especially easy to do if the car has already been sitting outside for several winters.
- And only now can you carefully move the part away from the car body a short distance. But it should not exceed the size of the wiring harness that is located there.
- This tourniquet is carefully pryed off with a screwdriver or any other suitable object. It is important to carefully remove the harness from the rubber, as it is tightly packed into the body holes. If you cannot cope on your own, then you should call another person for help.
- Once the harness is within your reach, you can carefully unplug the wire blocks. This will turn off the license plate light and make it possible to remove the bumper completely.
Naturally, the installation of the Lada Granta bumper is carried out in the reverse order with strict adherence to all points.