Replacing the turn signal lamp (PY21W)
- turn lamp socket 4 towards you until it stops;
- remove the lamp socket from the headlight housing;
- press and turn the lamp counterclockwise until it stops;
- remove the lamp from the socket.
Installing a new lamp is carried out in the reverse order.
By the way, do you know that the mode of operation of the low and high beam headlights may differ depending on the configuration of the Kalina 2?
The daytime running light bulbs have burned out. They served for 2.5 years, I think this is a good period. For comparison, I have already changed the low beam several times. It so happened that 2 lamps burned out with an interval of a week. So, I bought 2 Philips W21/5W W3x16d (12V 21/5W) light bulbs for 115 rubles each. The right lamp is much easier to change than the left one, since the ABS control unit does not interfere there.
Lighting devices are a guarantee of safety
Today, there is probably no driver who is not aware of the regulatory requirements for operating a car. These standards also apply to external lighting devices; the brake light lamp also falls under the standard, since the use of a car with these components that do not comply with the factory regulations in terms of design is prohibited. This approach is dictated by safety requirements, which involve ensuring sufficient illumination and visibility of the car on the roadway, but at the same time eliminating the risk of blinding not only pedestrians, but also oncoming drivers by the light beam. In addition to headlights, the indicated requirements also apply to stern lighting fixtures.
Read more: Car interior tuning photo
The main element in any headlight is the lamp. The efficiency of illumination of the road surface depends on its quality conditions. Many people are interested in the question of what kind of light bulbs are in Kalina.
Review of block headlights Lada Kalina 2
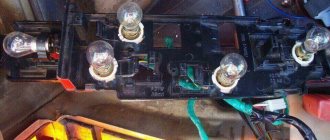
Above is a photo of the left headlight, everything on the right is identical. 1 - ventilation tube; 2 — low beam section cover; 3 — cover of the high beam section; 4 — light beam regulator in the vertical plane; 5 — lamp socket for side light and daytime running light; 6 - electrical connector; 7 — regulator of the light beam in the horizontal plane; 8 - turn signal lamp socket
All about Lada Kalina lamps
In our material, we tried to collect the most important information about the lamps that are used in the Lada Kalina model, popular among domestic car enthusiasts. This will primarily be useful to know for those owners who, for various reasons, have to choose and purchase lamps for installation in the lighting fixtures of their cars.
Today, a retail network of goods of the relevant type is able to offer a lot of options for lighting components, where even a professional, not to mention a beginner, can get confused. LED sources are becoming especially popular, considered by the owners of Lada Kalina 2 as an alternative to standard lighting elements.
Next in order.
1. Let's touch on the headlights.
These devices contain three lamps with different purposes. Let's make a reservation right away: direction indicators don't count.
1.1. A traditional lamp with an “H1” socket is responsible for the high beam. If there is interest in the LED analogue, then its marking is “4456”. Note that a standard lamp is preferable due to more correct beam formation through the optics reflector.
1.2. Low beam is provided by using an “H7” type bulb. An analogue is the LED source “3528”. In this case, the halogen device has advantages, since the Chinese LED product is not able to provide the required level of illumination.
1.3. Side light. There is a light component “W21/5W” here. The source implies a combination of traditional side lights and running lights. In this case, it is very difficult to select similar LED lighting equipment, since its pinout type is “7443” or “3157” (you can get confused).
2. Stern lighting fixtures.
2.1. The most common components here for the rear of the Lada Kalina 2 car are brake light sources. These are “P21W” type bulbs. As an analogue for use, let’s use the LED device “1156”. When installing the lamp, you will need to achieve a beam dispersion angle of 360°.
2.2. Lamps responsible for reverse gear. Their type is "R10W". The products are small-sized and have a similar base as that of the “P21W” sources. They differ only in length. The overall dimensions of the lamp considered here should not exceed 3.75 mm.
Read more: Renault Duster disk stamping
Care must be taken when selecting an LED emitter as the alternative "1156" component must meet the specified size limitation.
2.3. Lamps used for reversing the universal version of the body. Here we have a “W16W” source, which can rightly be considered a baseless analogue of the “P21W” lamp. Would you like to use an LED lamp? Look for the “T15” option with a 360-degree dispersion angle.
2.4. Side lighting element and daytime running light. Here the manufacturer used a dual “P21/4W” design. The lamp has two filaments and a base identical to the “P21W” device.
Attention! The last one has two contacts! Don't get confused!
If you are interested in the LED option, purchase the “1157” device.
3. Turn signals.
These important elements of periodic lighting in Lada Kalina 2 are “P21W” lamps. Their flasks are endowed with yellow color. LED analogues are “1156” sources, which have a similar color.
4. Side repeaters.
Here the manufacturer uses common “W5W” type lamps.
A similar device with LED technology is the “T10” product.
5. Anti-fog optics.
If you become the owner of a “Luxury” Lada Kalina, you will have to install (when replacing) the well-known “H11” type lamps in the designated headlights.
When the owner of a Lada Kalina likes LED devices, then you should find lamps of a similar type (“H11”) on sale, but it is desirable that the scattering angle be equal to the same 360 degrees.
6. Other sources of Kalina.
At the end, it remains to “walk” through some more lamps.
6.1. Lighting of the salon space. “C10W” elements are used. The length of the device does not exceed 41 mm. We pay attention to this aspect!
6.2. The registration number is illuminated by W5W lamps.
6.3. Luggage compartment and glove compartment. Here we decided to combine the categories, since identical sources are used to illuminate both spaces - “C5W”.
6.4. Lamps used to illuminate the interior space near the front seats. The element "T4W" is used. Its length is 26 mm, which is also important at the time of selection.
Instructions for replacing lamps on Kalina 2
Low beam
Carefully remove the rubber boot from the low beam (it is larger in size)
Disconnect the block from the lamp
Next, press the spring clamp and remove it from the clamps to the side and move it away
We remove the burnt out one and install a new lamp. The H7 Osram lamp is installed from the factory; if you want to install brighter lamps, you can choose the Philips H7 +30.
We reassemble in reverse order.
High beam
Remove the rubber boot from the high beam
Disconnect the block from the lamp (Only the + wire is attached to the lamp)
Press the spring clamp of the lamp and move it to the side
We take out the old lamp and install a new one. Be careful when installing, it can only be installed in one position.
We also perform assembly in reverse order.
Replacing DRL lamps
Take the cartridge and turn it counterclockwise.
Next, remove the socket from the socket, take out the old lamp and install a new one. Toshiba lamps are installed from the factory; it is impossible to buy them in retail stores, so we choose an analogue.
Which Low Beam Bulbs Are Better for Kalina
Video Backlight Replacement Conditions Low Light Loss Conditions There are several circumstances in which low beams may fail, some of which result in normal lamp burnout. It should be noted that in Kalina there is a tendency towards such a failure with an enviable period of one and a half to two months. Lack of headlight density or dust or moisture, once in the test tube, settles on the reflector mirror and lamp tube, which leads to its overheating.
To learn more about the causes and solutions of fog lights, please follow the link; A change in the voltage in the car network towards an increase in voltage also leads to the burnout of the halogen lamp.
There are also other possible problems that cause the lack of low beam: which lamps are better to use in low beam headlights Typically, Hada headlights use halogen lamps in the low beam headlights from the German company OSRAM volt, 55 W.
You can replace it with an equivalent lamp from a German manufacturer, or choose, for example, a halogen light source from Philips Extreme Vision, which is bright and extremely expensive.
READ Replacement Low Beam Lamp Peugeot 407
But you can ask this question in the smallest way, such as buying GE SportLights or even simpler: getting the latest lamp, one or two necessary tools, wrenches, screwdrivers, pliers, gloves, the best cotton, a clean cloth and a bottle of alcohol. Before replacing the low beam lamp in a Kalina car, you must do the following. Firstly, it is best to place the car on a flat surface, turn on the parking brake, protect the wheels under the wheels, which cover the lights on the viburnum, it is better to avoid rolling.
Replacing all headlight bulbs on a VAZ 2110-2112: low and high beam, dimensions and turns
Then open the hood of the car.
Then disconnect the wire from the negative terminal of the battery so that the wiring is not covered. To change the bulb in the right headlight, you need to remove the washer reservoir. It may be possible to replace the low beam bulb after the entire optical headlight assembly has been removed from the car, but we will learn how to replace the halogen without removing the light assembly from the car body. Which dim light bulbs in Kalina are better than removing dim lights by pulling the rubber stopper onto one of the petals; remove dim light bulbs in Kalina from dim light; We remember and better record the correct placement of the halogen lamp wires and disconnect them; We carefully remove the spring clip while holding the lamp.
READ Opel Astra G Heater does not heat well
Press the protruding part of the latch and press; To avoid complete disassembly of the headlights, you must carefully handle the latch so that it does not jump out of the mount during a sudden movement and does not fall into the optical device.
Installation of the last halogen lamp. In particular, installing the last halogen lamp is best done with gloves, as contact of the glass tube with the skin of the fingers will subsequently lead to darkening of the lamp and its malfunction. If the glass surface of the lamp is still in contact with your skin, wipe it with a swab soaked in alcohol.
Bulb Installation Procedure Insert the bulb into the headlight hole?
Please note that the holding antennas are located near the center of the base where the contact group is located. Hold the lamp lock until it clicks; We connect the wires, install the protective rubber cap and connect the battery and make sure that the lighting works correctly. Replacing the high beam Replacing a damaged low beam lamp on a Lada Kalina car is easy to operate.
H7 lamp test Select the brightest one
Follow the comments carefully and you will be sure that the appearance of such a breakdown will not cause you to panic or indignation. And having spare bulbs in your car will make your trips pleasant and safe at any time of the day.
Source
Brake light lamp Lada Kalina hatchback
Mass production of the compact 5-door hatchback
Lada Kalina of the first generation (1119)
started in November 2004. The time from the start of development to the implementation of these cars in reality took more than 10 years. The first prototypes of the Kalina with a hatchback body were shown in 1999. The appearance of this model aroused serious interest among the public. On the one hand, AvtoVAZ has created a modern new product with a pleasant, streamlined body design and a fairly comfortable interior. On the other hand, this car turned out to be a little “damp”. For example, due to a defect in the steering column, 6,200 units of the Lada Kalina I were recalled. 8,400 units of the Kalina had problems with the engine supports. A number of shortcomings identified in the Lada Kalina family were gradually eradicated.
Cars Lada Kalina I can truly be called “folk”. For example, in 2009, 60,745 Kalin were sold, and in the first half of 2011, 59,250 of them were sold. This is undoubtedly the best indicator in terms of the number of sales. Among the undeniable advantages of the Lada Kalina family of cars, it is worth highlighting a spacious interior for its class (B), excellent visibility, and a wide selection of trim levels. For the Kalina with a hatchback body, one of two engines is provided: an 81-horsepower 8-valve engine and a 16-valve engine with a power of 98 hp. In 2013, the first generation of Lada Kalina was discontinued due to the expansion and modernization of the Kalin production line of the next generation.
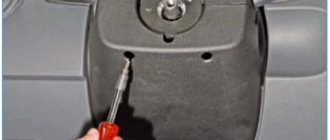
“Lada Kalina 2 hatchback: how to replace a brake light bulb” - that’s exactly how I was looking for at least some kind of guide for replacing a burnt out brake light bulb.
I found a large number of detailed photos for the Kalina with the previous body (Kalina 1). The first viburnum has a lantern mounted inside the cabin. On the second viburnum everything is done from the outside.
To replace a light bulb you will need: 1) TORX 8mm socket + extension or screwdriver. 2) Light P21W (brake light).
Method of installation of lighting devices
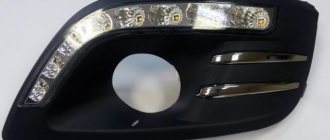
The installation of DRLs on Lada Kalina cars, like on all other cars, can be done at a car service center or independently. There are no restrictions in this regard either in the rules or in GOSTs. The main requirements for the location of daytime running lamps are:
- The distance between the closest inner sides of the lamps must be at least 60 cm. If the overall width of the car is less than 130 cm, a distance of up to 40 cm is allowed.
DRL installation diagram for Lada Kalina - The distance from the outer side of the lamp from the overall edge of the car should be no more than 40 cm. The lamps can be located at a maximum height of 150 cm, at least 25 cm from the surface of the roadway.
- In terms of length, the lamps are installed on the front side of the engine compartment, observing the height clause.
- The correct installation is considered to be the position when the light reflected in the rear and side mirrors of the car driving in front does not interfere with its driver. Angles of deviation from the axis of movement of the vehicle are allowed up to 20° in both directions horizontally and 10° vertically (down or up).
- In addition to observing the installation dimensions of fluorescent lamps, GOST regulates the brightness and size of the area illuminated by the devices. Basically, homemade devices do not pass testing based on these parameters.
The process of installing DRLs on the Lada Kalina must begin by removing the upper and lower grilles. If you decide to install lamps in the bumper, you need to remove it too. But the optimal place is the bottom grill, since it can use existing holes.
In the selected places, it is necessary to make markings according to the shape and size of the lamps, and carefully check for compliance with GOST requirements. Then use a regular knife or any other suitable tool to cut or widen the holes for the devices. It is advisable to be careful when working and not to exert much force to avoid damaging plastic parts.
After adjusting the holes for the devices, you need to secure them with standard fasteners from the purchased kit, lay and secure the wires along the grille. After this, the parts can be installed in place. It is not advisable to secure the lower grille or other part with fixed lamps thoroughly until the devices are fully checked after connection.