It would seem that we are talking about German quality products, which by definition should be better than their domestic counterpart. But in reality things are somewhat different.
Let's look at the key features of Kirzhach and Bosch headlights to determine which ones you should choose for your VAZ 2110 model.
- The purpose of any low beam is to provide good visibility of the roadway at night, while at the same time avoiding dazzling oncoming traffic. Headlights from German and domestic manufacturers cope equally well with these functions.
- The headlights from Kirzhach have a low beam lens, and a reflector is provided for the high beam. German products have two reflectors - for low beam and high beam. The lighting is ultimately the same, but Bosch has better brightness.
- Lenses are actually better than reflectors. They create a clearer line of light and allow the installation of xenon optics.
- As a study of reviews of VAZ 2110 owners using German devices shows, they are characterized by worse illumination in low beam mode.
- Bosch headlights have a very important advantage for many - when the car is driving in cloudy and rainy weather, it provides a better quality glow compared to Kirzhach devices. It's all about the larger surface of the low beam reflector.
- This Bosch plus also comes with a minus - you are deprived of the opportunity to install xenon optics.
- Note that, regardless of the manufacturer, these headlights contain H1 format lamps.
- If we take into account all other characteristics, then the undisputed leader here will be the products of the domestic manufacturer.
Based on all that has been said, it becomes clear why headlights from Bosch are cheaper than Kirzhach, and also why experts recommend installing a headlight unit from a domestic company on a domestic car.
It is noteworthy that this is one of the few exceptions when domestic products turned out to be better than foreign ones. Sad but true.
The problem with new headlights
It happens that after installing new headlights, purchased for a lot of money from a reliable, excellent manufacturer, the quality of the glow leaves much to be desired.
Inexperienced drivers attribute everything to a defect or the purchase of a fake disguised as a trusted company. But in reality everything is completely different.
Headlights shine efficiently and efficiently not only depending on the manufacturer. Settings that someone doesn’t know about or simply forgets play a big role.
Headlights that have just been removed from the factory packaging and installed in place of the old optics do not have the adjustment required specifically for your car. You can do it yourself, but this will require a perfectly flat area, a similar wall and the skills of a draftsman. In practice, this is quite difficult to implement, so the optimal solution is to entrust the adjustment to specialists from a service station.
Alas, the VAZ 2110 is not a modern, advanced car in which the headlights are automatically adjusted electronically. Here everything has to be done manually.
Selection of fog lights using specific examples
PTF from Bosch is very popular among VAZ-2110 motorists. A fairly decent and justified price for the product would be 800 rubles per piece. The headlights have proven themselves very well among motorists; they are pleasing with their build quality and reliability.
When choosing “Boschevsky” PTFs, it is very easy to purchase a Chinese fake, because structurally they copy their older brother in everything. If you look closely, in the eastern analogues you will not see a reflector limiting the horizon of the light flux, and the manufacturer is also not indicated. A fake is also easy to distinguish by the build quality, because it leaves much to be desired. However, if you really want to save money, then the price of such crafts may seem very attractive to you, because it is almost five times cheaper than Bosch.
Original optics for VAZ-2110 cars in our country are produced by the well-known “Avtosvet Plant”, producing them under the “Kirzhach” brand. Everything is simple here: high quality, reliable and sure. Our manufacturer is no worse than Italian “Bosh” quality. By the way, Bosch PTFs are also produced in Russia. So the slogan “support domestic producers” probably makes no sense.
There are also a lot of offers from other brands offering so-called alternative PTFs for the VAZ-2110 (there are a lot of photos of alternative “foglights” on the Internet). Usually, sellers of this kind of product promise that their headlights will shine slightly better than the original ones, because this is the whole point of redesigning the design. Somewhere here, perhaps, lies the truth, but the selection criteria, as you understand, remain the same: the quality of the housing, electrical contacts and the presence of a reflector mechanism that limits the horizon of the line of light.
Fog lights can also be made on the basis of lens optics. In this case, the light flux is more focused and directed. The line of light in them is limited by special curtains. The main problem of this kind of PTF is the limited working area of the lamp, and therefore any contamination can have a very significant effect on the illumination of the road surface during fog.
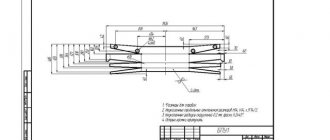
Fog lights VAZ 2110 wiring diagram
Wiring diagram for fog lights.
connection option 1
1) Open the fuse box, then unscrew the screw, pull it out and turn the fuse box over. Wires marked in green do not come from the factory and must be added.
Reverse side of the fuse box.
2) From the bundle of wires included in the kit, cut off two wires, 15 centimeters each. At the ends of both wires we attach female connectors.
- The red wire, marked 1 in Figure 2, is positive, you can even check it with a test light. We stretch it to the leg number thirty on the back of the relay.
We connect the first positive wire.
3) The wire labeled number 4 in the figure as 2 is the pole running from pin 87 back to the fuse box.
We connect the second positive wire.
4) We connect the red positive wires to the fuses in Figure 5 (they are intended for PTF), after which they separate one at a time to the right and left headlights.
Fuses for PTF (10 amps each) installed from the factory.
5) We mount the wires as shown in Figure 7. We attach thirty-centimeter wires with “mothers” at the ends to the double-female connector.
We create a convenient installation connection.
6) We insert the wires with single “mothers” into the white plug, in the places marked with circles on the fuse block.
Connection points for single females on the fuse block.
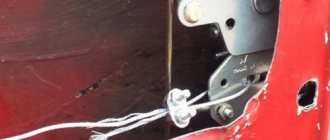
7) We remove the double female connector from the fuse block and connect it to the double male connector, which is located behind the trunk release button.
We connect our connector to the connector behind the trunk release button.
 The black wire numbered 3 comes from pin 86 located on the relay and is a minus. It is best to draw the negative from the top of the fuse block. There are already factory black wires there, inserted under the 10 nut. The wire marked with the number 4 is responsible for turning the PTF on and off.
Negative and PTF switching wire.
- Several options for where to run the PTF control wire.
1) From the side lights directly, when the side lights are turned on, the PTF turns on.
2) From dimensions with an additional button. Then turning on the dimensions only supplies power to the button, and the button itself turns on the PTF.
3. We run the wire from the ignition switch through the button, as in method 2. This is the most convenient option.
- In photo No. 11, number 1 indicates the PTF turn-on relay, and number 2 indicates the place for the electric lift relay. We take two wires from it, extend them and connect them to the headlight switch button. One of them (pink thin in our case) when you turn on the ignition, a “plus” will appear, and the black wire will be a “minus”.
- To correctly connect the PTF, it is important to know that the left output is located near the radiator, under the left headlight, and is easily secured with a clamp to the car body. The right exit is located symmetrically under the right headlight.
Instructions for installing and connecting fog lights on a VAZ 2110, 2111, 2112 with your own hands
For independent installation and connection, you will need plumbing skills, the ability to read and understand electrical diagrams, and a willingness to incur certain material costs.
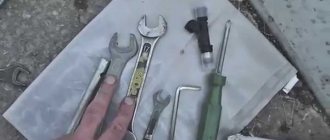
Tools and materials
To install PTF you need to have on hand:
- multimeter (multitester);
- control light;
- a combination screwdriver with a slotted and cross-shaped working body;
- pliers;
- wire cutters;
- wrenches 8x10, 12x14;
- light hammer;
- electrical tape;
- packaging of heat-shrinkable tubes.
You can purchase a ready-made set of fog lights for the VAZ 2110 or buy everything separately (cheaper option):
- PTF - 2 pcs.;
- right and left frames made of plastic for VAZ 2110 fog lights - 2 pcs.;
- a key with a yellow backlit indicator;
- relay;
- wire with 2 copper cores of different colors with a diameter of 0.5 mm (for more powerful lamps, a diameter of 0.75 mm is preferable) - 5 m;
- narrow female connection terminals (single) - 8 pcs.;
- wide (double) female/male block for connection to each fog lamp - 2 pcs.;
- M8x45 bolts - 4 pcs.;
- “wings” for M8 bolts - 4 pcs.
Self-installation and connection
Before installing the PTF, you need to remove the plugs on the front bumper and secure the fog lights with frames. The best option: do not use self-tapping screws, but M8x45 bolts with wings, which provide more durable fastening and quick dismantling.
The fog lamp is inserted into a special frame, with which it is attached to the hole in the front bumper
Installing PTF will take a minimum of time if you follow this algorithm:
- Connecting to the electrical network should begin by pulling the wires from under the dashboard into the engine compartment. They must first be placed in a protective corrugation.
- The operation described above may require partial disassembly of the torpedo. On the VAZ 2112, the factory wiring provides this option for connecting the PTF, so you just need to find the connection pads, which are located near the socket plugs in the front bumper.
- Remove the positive terminal from the battery.
- Open the relay and fuse mounting block (located at the bottom left of the steering column near the clutch pedal).
- Unscrew the self-tapping screw with a screwdriver and remove the block.
The mounting block with fuses is located on the left side near the driver's left foot
After this, you need to find the terminals of fuses F4 (protects the right PTF) and F14 (protects the left fog lamp).
The location and purpose of fuses in the VAZ 2110, 2111, 2112 mounting block are indicated on the inside of the protective cover
Fuse F20 provides protection for the rear PTFs, which were originally built into the rear lights of the VAZ 2110 model range in the form of side light lamps with two filaments. In unfavorable weather conditions, the second thread is activated by a special button located on the dashboard.
At the final stage, you need to put copper connectors of the “female” type on the ends of the wires and insert them into the plug according to the attached electrical and wiring diagrams.
Electrical diagram for connecting fog lights VAZ 2110, 2111 and 2112 using a backlit key and relay
The choice of location for installing the fog lamp switch depends on the type of front panel. There are certain nuances in connecting the old PTF and the European panel.
Simple do-it-yourself connection of fog lights on a VAZ 2110 and VAZ 2111 with an old front panel without connecting the PTF switching relay
On VAZ 2112 models with a Europanel, wires for connecting fog lights are installed in the car wiring at the factory.
Wiring diagram for connecting the VAZ 2112 PTF wires to the factory wiring connected to the PTF sockets, mounting block, relay and to the backlit power button (connects independently)
General algorithm for connecting and connecting fog lights
Installation of fog lights will take approximately 1–1.5 hours if you proceed in the following sequence:
- The PTF wiring is laid on top of the main wiring, which runs along the left front fender.
- According to the factory's recommendation, power to the PTF power button, inserted into the socket on the dashboard, should be taken from the fuse for the right side lights. With this option, the PTFs will remain on when the ignition is turned off. If you don't turn them off with your button, the battery will quickly drain. But if the PTFs are powered from the main headlights button or directly from the ignition switch, they will light up when you turn the ignition key.
- Connect the plugs to the fog lights and turn them on. If the PTF on the VAZ 2110 and its modifications does not light up, it means that an error has crept into the wiring diagram. In this case, each element of the circuit should be checked again.
Video: connecting fog lights VAZ 2110
Making sure your fog lights are lighting correctly is relatively simple. You need to drive onto the road in the evening or at night and turn on the PTF. If the light flux is directed slightly downwards and illuminates not only the roadway, but also the side of the road, then everything has been done correctly. In this case, oncoming drivers will not be blinded by the light of your PTF and sufficient visibility is guaranteed in bad weather conditions.
- Yuri Yakovlev
Pensioner, widower, higher education. More details about me are written on the website https://starlotildar.ru
fog lights VAZ 2110 installation outside
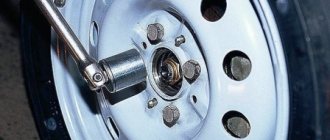
1) Remove the plugs in the bumper to install the headlights.
Remove the plugs in the bumper.
2) Install the fog lamp trim.
3) We fasten the fastenings with two self-tapping screws.
We fasten the PTF fasteners with self-tapping screws.
4) It remains to connect the fog lights to the VAZ 2110 by connecting the connectors.
We connect the wires by connecting the “male” - “female” connectors.
- If the PTF is equipped with xenon, then you need a headlight range control to adjust the light output.
connection option 2
1) choose a place for installation - usually a small compartment located under the bumper. For VAZ2110 there are two types of PTF: corrugated (scattering light) and transparent (light comes in spots). Transparent ones are a more fashionable option, but the least useful.
2) you need to purchase a key with a yellow indicator, wires, relays, a ground terminal, narrow wide male terminals and corresponding female terminals, as well as blocks and frames for headlights.
3) Under the hood, disconnect the wires going to the fluid level sensor and washer reservoir. To do this, unscrew the washer reservoir nut and pull out the bundle of wires located under the left side member.
4) In connector Ш-1 we need three wires: two yellow-black and one yellow.
5) Then we cut off two pieces from the yellow wire and stretch them inside the car. We strip the wires, attach wide male-type terminals to them, then insert them into the block so that the marked wire connects to the yellow-black one. We connect the block and press the two yellow wires to the harness, put the washer reservoir in place.
6) Next, take two more pieces of wire, each 50cm long. We attach a ground terminal to them and screw it to the stud along with the ground wire from the headlights.
7) stretch the fog lamp wire from the front side member, pull out both wires where the headlight itself will be attached. We attach a wide ground terminal to each wire.
Next, we put the brackets on the bumper, and the wide female terminal blocks on the wires
9) Insert the light bulbs into the headlights.
Tip: insert the light bulbs into the headlights without touching the light bulbs with your fingers. Otherwise, after heating, the bulbs will burst. If you happen to touch the light bulbs, degrease their surface.
10) Connect the yellow wire to the light bulb and the black wire to the body.
- The entire PTF installation procedure takes about two hours.
connection option 3
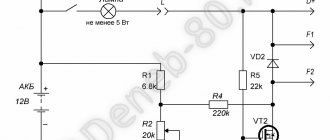
2) Take the PTF block, and stretch the red wire to the black box (BY), connect it to the relay block No. 85.
This is the same wire.
3) Contact No. 3 in block Ш-1 is powered from terminal No. 30 located on the relay block.
4) Contact No. 5 from block Ш-1 is connected to terminal No. 87 in the relay block.
Contact number five.
5) Using a connector, we connect the black wires on the relay block No. 86 and on contact No. 4 from the Sh-2 block.
6) Then we connect the yellow wire to contact No. 1 of the Ш-1 block, and lead it to the left headlight.
We connect the Ш-1 block to contact No. 1.
7) We connect the right headlight to contact No. 6 of the Ш-1 block using a yellow-black wire.
Connect the right headlight.
We insert the Ш-1 block into the connector.
Connected block Ш-1.
9) Place the relay block on the back wall of the black box.
10) Go to the dashboard. We connect the green wire from the PTF block, located on contact No. 10, to contact No. 58R (in the photo it is on top).
Above we see the same wire.
11) Connect the two white wires. One from the PTF block, and the other from the light switch using a connector. Black wire with black respectively. We return the instrument connections, buttons and visor to their places.
We connect the white and black wires with connectors.
12) Return the button with the PTF wires back to the dashboard housing.
We return the wires and the button to the housing.
13) The remaining two wires: black coming from contact No. 7 and pink coming from contact No. 9 are connected to the fog light indicator through the block.
We connect the wires through the block.
14) Insert the button into the panel.
Attention: Be sure to check whether the button backlight and the PTF on indicator are working.
We check the operation of the backlight.
Let's check the indicator's operation.
The connection of the fog lights is completed; we also recommend watching the training video.
We install xenon in the foglights of a VAZ 2110 with our own hands
- First, we install the H1 bulbs in the cap of a plastic bottle. Then, using sealant, into the headlight.
A light bulb installed in a bottle cap.
- There are often cars with xenon installed in the main headlights. If the beam of light has even boundaries, it is even possible to legalize xenon when preparing documents for a car.
We install the light bulb using sealant into the headlight.
- When there are no lenses in the headlights (there is only a reflector), your car exhibits glare beyond the permissible limits and leads to dazzling of other road users.
Xenon fog lights with lenses.
- All the benefits of xenon light come with a focusing lens that ensures the correct distribution of the light beam. PTF with xenon light - they do not dazzle if they have a focusing lens, and make the fog function better.
In the next section we will tell you how to install a zero resistance filter on a VAZ 2110.
The latest VAZ 2110 models received fog lights, but most cars were left without this useful element. PTF significantly increases safety on the road, because the driver feels confident in foggy weather. As a result, there are fewer accidents. Installation of fog lights can be carried out either in a car workshop or on your own. Some motorists prefer to upgrade their optics with xenon, after installing which the glow becomes even more spectacular.
Which fog lights for the VAZ 2110 are better to choose and why
Let's start with the fact that there is more than one version of the PTF VAZ 2110 on the market. At the same time, there are both good quality solutions and analogues that are worse. Moreover, sellers offer foglights of different shapes, with different housings, lamps, etc.
- First of all, when choosing, you should pay attention to the diffuser, as it can be glass or plastic. You need to remember that the fog lights are low, water gets on them, stones often hit the headlight, etc. Of course, plastic under such conditions quickly becomes cloudy and cracks.
- As for the shape of the body, it is better to purchase standard PTFs for the VAZ-2110 bumper. Such fog lights can be installed in their standard place without any problems and will not require any modifications. In this case we are talking about rectangular fog lights with a standard mount.
- Kirzhach fogs can be presented in two versions: for a lamp with an H3 base, as well as an H1 one. In practice, the version for the H1 lamp allows you to get a more concentrated and dense light flux. The disadvantage is that PTFs come without a lamp, which must be purchased separately.
- OSVAR headlights are of slightly worse quality than Kirzhach; they have a non-removable lampshade, which is glued in with sealant. Replacing such a lampshade is more difficult. However, the optics are 25-30% cheaper than the product from Avtosvet, and are supplied immediately with the lamp. In general, the headlights shine well, slightly inferior to the analogue discussed above.
- PTF Bosch produces a plant in Ryazan, the optics are designed for installation of an H3 lamp. This option is the cheapest, supplied without lamps and the light is quite mediocre and is suitable for rare use in conditions of poor visibility.
Let us also add that in some cases the quality of light can be improved by replacing PTF lamps with other types of lamps (for example, from H3 to H1). This will require modifications, but you still shouldn’t count on drastic changes.
Also, in addition to halogen lamps, you can equip the PTF with a xenon lamp and even a lens. So, high-quality ready-made solutions are quite expensive, and cheap ones are not reliable and have a long service life. If you convert halogen fog lights to xenon, modifications are also needed.
It turns out that in all cases (both for installing xenon in the PTF, and for installing initially xenon fog lights), a whole series of installation work will be required.
It is for this reason that such headlights must be installed and adjusted with extreme precision, and the maximum color temperature of the lamps should not be higher than 3000-4500 K.
Ignoring these rules will lead to the fact that the xenon PTF of the VAZ 2110 or the non-standard fog lights of any other car will only dazzle oncoming traffic. You also need to be prepared for the fact that such optics will impair visibility instead of illuminating the road.
- Let us also add that LED PTFs have recently appeared on sale. So, such products of good quality are expensive today, while more affordable solutions last only a short time and shine frankly poorly.
The reason is that even expensive, high-quality LED fog lights have reduced efficiency compared to halogen or properly selected xenon. The fact is that the light source (LED) usually creates light with a temperature, on average, not lower than 6000 K.
Necessary tools and elements
Before purchasing everything you need, decide on the color. Today, white optics are most popular among VAZ 2110 owners, but you can also find classic yellow. Now to the purchase: some people prefer to take a ready-made kit, which includes wiring, while others choose the parts separately. The second option is not only cheaper, but also provides more installation options.
To work we will need:
- Headlight kit;
- Key as well as indication;
- Relay;
- Plastic pads;
- Headlight frames;
- Terminals called “male/female.” Recommended to be purchased separately, no wiring included;
- The terminal that will go to ground;
- Wiring.
The wires of the VAZ 2110 need to be given special attention. It is recommended to go to a specialized electronics store to get them. We need an option with two copper cores, as well as double insulation. As for the cross section, here you need to build on the power of the lamp. If the power indicator is high, then it is better to take 0.75 millimeters. At normal power, 0.5 mm wires are used.
Connection process
The connection of fog lights begins with determining the area of their installation. If the car is quite old, then there will be no regular place on the body - it will have to be mounted under the bumper. The diagram should come with the kit - we will do the work according to it. If you have skills in working with electrical engineering, then the circuit can be changed, because you need to take care of the adjustment.
The installation proceeds as follows:
- First of all, we must lay the wiring to the fog lights. The process is carried out under the hood. You can make the laying parallel to the standard wires.
- Supplying power to the button on the dashboard. The factory diagram says that connections are made from the fuse on the side lights on the right.
As an alternative, you can take power from the terminal from the ignition switch or from the button responsible for the lighting. Using this method, the new headlights will only work when the ignition is on. If you wish, you can go according to the standard scheme, that is, take power for the PTF from the dimensions. Then you need to carefully monitor the fog lights turning on and off so as not to drain the battery.
- The final stage is connecting the optics to the plug.
If everything is done according to the diagram, then light should already appear. All that remains is to make the adjustment. Ideally, the PTFs should look slightly downward, while illuminating both the side of the road and the road. In this case, they will not blind other motorists.
Which fog lights are better for the VAZ-2110
Outwardly, you may not notice much difference between high-quality headlights and “analogs” of unknown origin.
Making the right choice in this case is very difficult, since a huge number of headlights have appeared on sale, different in shape, light source and color spectrum.
The design of the case, as well as the material of its manufacture, is also of considerable importance.
It is also important what material the diffuser is made of - glass or polycarbonate. Since PTFs are installed low, puny plastic cases do not last long. And if we take into account that in the rain we will have to often wipe the diffuser with improvised means , then the low-quality material will rub off and all the work of the lamps will go down the drain.
Regular and similar PTFs
Rectangular fog lights with standard mounts fit into the VAZ-2110 bumper in a standard place without additional modifications. They are produced by a lot of manufacturers, but, again, all these headlights are different both in the quality of the optics and in the light source.
- The most common are two types of domestically produced PTFs OSVAR and headlights from the Avtosvet plant from Kirzhach . The latter have two modifications - for a lamp with H3 and H1 sockets. According to user reviews, headlights with H1 lamps provide a denser and more concentrated luminous flux over the entire illumination range. Their price is about 900 rubles apiece. But they are sold without a lamp.
Fog lamp Kirzhach.
PTF from Ryazan Bosch.
Xenon installation
It is very important that the headlights themselves have the letter “D” - this is what indicates that xenon can be inserted into the headlights. If the letter “H” is written, then problems may arise with the authorities. Before installing xenon in the VAZ 2110, it is necessary to remove the standard block lamps. The xenon is dismantled and installed according to the following scheme:
- Remove the negative terminal from the battery.
- All connectors from the headlights must be disconnected.
- Carefully unscrew the bolts securing the optics unit.
- We dismantle the radiator grille.
- There will be a bolt at the bottom that secures the headlight from below. Pry up the cover and remove it completely.
- Using the 10th wrench, unscrew the nut securing the block to the bracket.
- The block can then be removed.
- The next step is to turn the lock, which belongs to the hydraulic corrector cylinder. Now we remove it completely.
- Before installation begins, it is necessary to remove the turn signal - it is held in place by several bolts.
To avoid problems with the law, it is better to install a legal xenon module. Alternatively, you can take headlights from Hella. Both the first and second generation models are suitable. They are designated by the name Lens G2; headlights are standardly installed on BMW E60, so there can be no questions about quality.
Useful videos on the topic
Wiring diagram for fog lights VAZ 2110 in VAZ 2112
I decided to add a photo of instructions for connecting fog lights, maybe someone will find it useful.
equipment (not all kits include a PTF power indicator, see the note on the package)
Connecting PTF to VAZ 2110, 2112, 2111 with an old panel
PTF button. 7 - weight, 9 and 10 on Ш1-5, 58R
Today I figured out how to connect the PTF. (Yesterday they started working, but then went out). The point was this: the Internet is full of diagrams with PTF relays. I did with him. Today I realized that a relay is not needed AT ALL. It heats up and turns off. It is needed for a short launch. It works on the principle of a magnet (current is conducted, the plate is magnetized, closes the contacts, and supplies “+”). In short, it is needed for short starts (for example, a starter). And here we need burning PTFs all the time. Therefore, we remove it from the diagram. (The fog lights go through fuses 4 and 14, so don’t be afraid that all the wiring will short out). Today I made a wiring diagram for fog lights, I hope it will help someone. The colors are conditional to make it easier to see, so look at the facts. I present to your attention a diagram for connecting fog lights. Well, my little engine :3