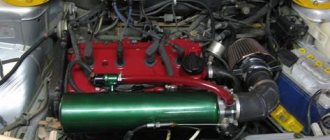
Replacing the VAZ chain damper is necessary when the normal operation of the timing belt is disrupted, which manifests itself in the appearance of extraneous clicking sounds in the area of the front engine cover.
The gas distribution mechanism (GRM) in classic VAZ models is driven by a double-row steel roller chain. The chain tension is carried out by a tensioner, which presses on the shoe, tensioning one branch of the chain, and the second branch works by coming into contact with the damper.
When the chain has no wear or is minimal, the tensioner is working properly, the chain operates almost silently. As the chain wears out, it stretches out and the tensioner can no longer tension it properly, and when it is shifted, when the engine passes the top or bottom dead center, the chain hits the guide (since it is not tensioned), trying to tighten. The chain may not be tensioned due to the tensioner being “reset”, which is also worth paying attention to.
The driver should hear this moment, as an extraneous sound appears in the area of the circuit. If you do not take measures to eliminate it, then over time the chain will simply mechanically break off the welding points at the damper mounting and it, having broken off from them, will fall down into the area of the auxiliary shaft (more familiar to many as a pig).
The distance between the chain and the wall of the block in this place is minimal and, as a rule, the chain breaks the detached damper over time into several parts. Sometimes when repairing engines I had to see more than 4 broken dampers in the oil pan. Apparently they were simply “stupidly” changed, without going into details of why this was happening.
There can be two options in this situation, either the broken damper will fall into the pan, or it can jam the chain with all the ensuing consequences.
From the above it follows that at the first signs of abnormal operation of the circuit (the sound of the motor has changed), it is necessary to immediately take measures to identify the malfunction and eliminate it. Beloved by many, “later” can get by with a decent amount of beer that hasn’t been drunk, since if there is a wedge in the engine, it will end in a complicated and expensive engine repair.
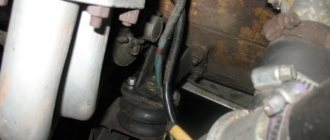
The first signs that the chain will soon “break” the stabilizer or has already done so are, in addition to the clicking of the chain, traces of oil on the stabilizer mounting bolts and their free rotation. In this case, it is better to postpone the trip and repair the timing assembly; besides, the operation of replacing the damper takes very little time.
When purchasing a new dampener to replace it, pay attention to two points. First, check the threads in the stabilizer eyes (for this, take with you any 6 mm bolt with a good thread), and also see if the rubber is well vulcanized to the steel base of the stabilizer. Without immediately checking the presence of threads and their quality (the bolt should be easily screwed into the hole by hand), you can spend a long time trying to fit the bolts with enthusiasm when installing a new damper.
Release the choke cable and remove the valve cover. Next, you will need a long, thin object that can be used to pick up the fallen damper. A medical clamp with long “tentacles”, shaped like scissors (I’m not an expert in medicine, so I don’t know its exact name), does this job perfectly. The good thing about the tool is that once you have caught at least the edge of the torn damper, the clamp can be fixed and it will firmly hold the damper when pulling it out.
Sometimes it was possible to pull out a piece of the damper using a telescopic screwdriver with a magnetic tip. You may not find the damper at all, as it may fall into the pan. It will no longer bring you any trouble, and you can leave it there until the first removal of the pallet.
When the fact of finding a foreign object in the pan irritates you and you still want to get rid of it, then before removing the pan, remove the crankcase ventilation cover (it removes accumulated gases and is connected to the air filter housing with a rubber pipe). Then, unscrew the pin, pull out the oil cut-off and, using a magnet on a thin wire, “sweep” the pan. Usually it is possible to catch a fallen damper the first time.
If you are lucky and the damper is not completely broken off (it is held on by at least one fastener), then you need to hold it with something and unscrew the bolts of its fastening.
The bolts must be unscrewed in any case, since the eyes of its fastening remain hanging on the threads of the bolts. They must be fixed from the inside in any convenient way and the bolts removed. Carefully inspect the removed bolts, as they are most likely damaged by the chain and must be replaced.
Insert a new damper and first tighten the lower bolt (from experience) then the upper one and tighten them. Check the serviceability of the tensioner and tension the chain; to do this, you can help the tensioner with the tip of a large screwdriver, placing it under the shoe. This completes the replacement of the chain damper. Reassemble everything in reverse order. Good luck!
The VAZ-2107 engine has a chain guide installed. In order to correctly replace this part, you should understand what breakdowns may precede this procedure. In our article we will look at all the key points of replacing it with a VAZ-2107.
Features of the functioning of the chain damper on the VAZ-2107
It turns out that such a part as a chain guide is not available on all vehicles. It is installed where there is a timing chain drive - gas distribution mechanisms. Such cars include the domestically produced passenger car VAZ-2107.
The main function of this part on the VAZ 2107 is to prevent the timing chain structure from excessive vibrations during operation of the car engine (both at low and high speeds). If the damper is damaged, the chain links will skip when driving, that is, move from one sprocket to another.
Chain release and wear indicator
There is a wide variety of marc of different sizes from different manufacturers. It is worth noting that this tool is definitely necessary for those who want to change the chain themselves. Chain wear can be determined using a regular ruler. But for constant monitoring, it is better to purchase a special tool - a chain wear indicator.
That is, in bad weather and dirty roads. Place the chain on the large plate and on the freewheel idler gear. First and with a cloth, wipe the entire length of the chain to remove as much sediment as possible. You can turn the gear upside down and tighten the chain in the hand holding the cloth.
Once the largest residue has been removed, repeat the procedure with a cloth soaked in degreaser. Update the cleaning if necessary. For very dirty chains, you can use an old toothbrush and a lot of patience to clean each link. Dry the chain thoroughly at the end of the operation.
Bicycle chain
The chain in a bicycle is one of the key components of the transmission. It is the maintenance of the chain in ideal condition that guarantees adequate operation of the entire mechanism. When buying a bicycle, no one will choose a new chain, but over time, replacing a part that has become unusable is inevitable. How to choose the perfect chain for your bike? How many chains do you need to have on a bicycle? How to change the chain yourself correctly, so as not to contact a bicycle mechanic for every trifle? These skills and knowledge will not be superfluous.
It is preferable, as much as possible, not to spray degreaser directly onto the chain to prevent it from getting between the axles and rollers. The cleaning operation is long and messy, but necessary. New chains feel greasy to the touch. This material is intended to protect them during storage and should never be used as a lubricant. Therefore, it is necessary to degrease them before assembly. Here the operation is easier in the absence of disordered matter.
A dry chain is subject to oxidation and premature wear. It is also noisy and has trouble shifting gears. Therefore, it is necessary to lubricate it and insist on the quality of the lubricant. It should be thin enough to penetrate well into the elements of the compound and not too greasy to minimize possible impurities. In general, specialty trade products meet this need.
For what reasons can the chain guide on a VAZ-2107 fail?
Experienced car enthusiasts have noticed that the chain guide needs to be changed in several situations:
- When a knocking sound is heard in the area where the chain structure is located.
- When the chain oscillates.
- When the chain links jump over the teeth on the sprocket.
In the first situation, a loud knocking sound is heard from the side of the intermediate shaft cover. It will be evidence that the damper has broken.
Most often, such a part begins to break if the timing chain structure is weakened.
Another reason for the breakdown of this part may be the result of accidentally unscrewing the nut at the place of its fastening. Unscrewing of the nuts occurs due to increased vibration of the running engine. This is due to the location of the part in question:
- opposite the timing chain tensioner shoe;
- secured with two bolts of different lengths.
Replacing a torn damper is a necessary measure, as the entire engine may break down. Even when worn out, it causes a lot of trouble, one of which is a loud knocking sound while driving.
Replacing a chain on a bicycle: removing and installing correctly
Experts advise following some simple recommendations that will allow the bicycle owner to avoid possible problems with the chain:
- Do not drive in heavily skewed gears;
- done on time will help you protect it from early breakdown.
- do not use thick lubricants or WD40-type products as chain lubricants;
- use multiple replacement chains to extend their life.
Chain lock.
If the chain still needs to be replaced, it is important to approach this issue competently and professionally. Before starting work, check which chain is on the bike: with a lock or not. As a rule, chains with locks are only found on children's or cheap bikes. To achieve such a design, you just need to find the lock and remove it with a simple screwdriver.
Chain with pin.
Squeeze.
The situation is more complicated if the bicycle has a chain without a lock, that is, with a pin. To work with it, you will definitely need a special tool - a squeeze tool, which will allow you to quickly and easily remove the chain without damaging the links. The sequence for removing such a chain is as follows:
- You need to select a chain segment for disassembly (experts advise choosing different segments for each new procedure with the same chain, since disassembly loosens them).
- Insert the chain into the release device. This can be done this way: either using the seat located at the fixing screw, in which you can press in or press out the axle, or - in the second position, only the inner part of the bushing is adjusted.
- Squeeze the axle towards the strengthening screw (the squeeze screw is tightened using the handle).
IMPORTANT!
During work, you should carefully monitor the absence of defects on the axle, because then it will be used in the assembly of the link.
Before installing the chain
The exact length must be determined for the bicycle: if the length is insufficient, the chain will not allow you to easily change gears, and if it is too long, it will dangle.
Chain installation
on a bicycle - the procedure is simple and, with proper skill, is easy to perform, you just need to carefully perform the following steps:
- We install the switches on small stars.
- We put the chain on the bicycle, taking into account the correct location of the tensioner rollers - the lower one goes around on the left, and the upper one on the right.
- After the links are aligned and secured with a screw, you can clamp the chain in the squeezer.
- Carefully press the axle in, slowly rotating the release handle: monitor the immersion level relative to the adjacent links.
- We check how the axle works - freely and without jamming, whether it protrudes.
How to correctly replace a chain guide on a VAZ-2107
To correctly carry out the procedure for replacing the timing chain guide, you need to prepare the tools for the job:
- Screwdriver Set;
- a set of keys;
- set of socket heads;
- long tweezers (you can use a wire hook instead).
In addition to tools, you will need a new damper, engine head cover gasket and special sealant for cars.
This procedure can be performed independently in a garage. In this case, the following conditions must be observed:
- spacious room;
- bright lighting;
- absence of dust (it should not get on the parts of the gas distribution mechanism when the cover is removed).
The first step is to remove the chain guide. This process consists of several steps (with the car in running mode at neutral speed):
- Remove the engine head cover by first unscrewing the eight mounting bolts (note: the gasket must not be damaged, otherwise it will need to be replaced).
- Align the camshaft sprocket (the mark on it should coincide with the boss on the camshaft housing).
- Partially unscrew the tensioner cap nut for the timing chain structure (it should be loosened slightly without unscrewing completely).
- Press the tensioner shoe using a suitable screwdriver to loosen the tensioned timing chain structure.
- Screw the cap nut into place to secure the chain in the loose position.
- Hook the tensioner with tweezers or a hook (the hooking tool must be inserted into the technological hole) so that the dismantled part does not fall into the engine oil pan during dismantling.
- Unscrew the chain guide mounting bolts (there are two of them).
- Dismantle it.
If the damper breaks, it can be removed with tweezers or a stiff wire hook. If during dismantling this part fell into the engine crankcase pan, it will be necessary to remove this pan to remove the damper.
The second stage is the installation of a new chain guide. The procedure is the reverse of that described above. When performing this, several important points should be taken into account:
- Be sure to tension the chain structure to the required level.
- The location of the engine shaft marks - crankshaft and camshaft - is monitored.
- All seats for bolted fastenings are coated with automotive sealant (this measure is necessary to prevent engine oil from seeping through).
As the vehicle is used, wear and tear on parts increases. At first, this does not in any way affect the operation of components and assemblies, then, as the service life of the parts is exhausted, various malfunctions make themselves felt. It is extremely important to promptly identify and eliminate them, otherwise a malfunction of one part or assembly can trigger a “snowball” of breakdowns. One of the easily repairable breakdowns that can cause trouble if it is not promptly corrected is a break in the VAZ 2107 chain guide.
Chain: choice and proper care
For people who still remember, the sentence “choose a new chain for a bicycle” sounds somewhat wild. For some reason, the chains lasted almost longer than the bicycle itself. The answer is simple: those bicycles had only one speed, so the chain was constantly in a calm state and did not wear out as quickly as on modern bicycles. Nowadays, even the most budget iron bike is equipped with the ability to change gears, which leads to chain wear. Modern chains are undoubtedly stronger and more reliable if they are able to withstand such loads during such use.
You can either spray the product directly onto the chain or run it through a soaked cloth. In the first case, the risk is that the lubricant spreads to various nearby elements, either the wheels, tires or frame. Impregnated fabric avoids these shortcomings.
Once the lube has flowed through the chain, rotate the transmission several times, replacing sprockets and plates. The purpose of this operation is to force the chain to work in all directions and thus help the lubricant to penetrate where it should be, that is, to the center of the links.
So, it’s time to replace the chain on your own bicycle: what should you pay attention to, which chain to choose? The most popular manufacturers are considered
KMC, Shimano and SRAM. In the lines of these manufacturers you can find chains of varying prices and different qualities. All these chains easily replace each other and, if the cyclist has a desire, he can sort through the chains ad infinitum until he finds the one that suits him completely.
Always rotate the gearbox and wipe the wafers thoroughly. This is the useless fat that causes sediment. Lubrication should be light. An ideal creature after every issue, but no one is perfect! Chiffons for chain and hand soap! The drift chain is an indispensable tool for carrying out the operation, except for the use of special links offered by some brands.
All brands of cycling tools offer it, and it is present in the racks of cyclists or supermarkets for the sport. This tool must be of good quality, and this is especially true for narrow 9 or 10 speed chains. Here the best advisor or advocate is your speedster.
ADVICE!
For a cassette with 7-8 stars, you should purchase a chain for 8 gears, for 9 – for 9, and so on.
When purchasing a chain, you should pay attention to the markings: usually companies include information about the quality of the chain in the numerical designation of the model. For example, the CN-HG53 will be much simpler than the CN-7701.
Cassette.
For adequate operation of the chain, it is important to be able to notice in time the moment when the chain already requires replacement or repair, but the rest of the transmission is still safe and sound. Excessively worn chain
not only threatens with driving problems, but also gradually “kills” the sprockets: in this case, you will have to change not only the chain itself, but also a rather expensive mechanism - the cassette, and sometimes the system. The most accurate way to determine chain wear should not be considered mileage (sometimes 100 km of country walks on off-road and muddy roads can pass for 1000 km of quiet city bike rides), but the length of 24 links on the chain:
- in normal condition this figure is 304.8 mm;
- 306.5-307.5 mm is a reason to change the chain;
- 307.5-308 mm - indicates not only chain wear, but also problems with sprockets;
- More than 308 mm - serious difficulties with the chain, cassette and system condition.
Another way to “by eye” find out how worn a chain is is the following: after installing the chain on a large sprocket, you should pull it lightly with your fingers and check how many teeth are visible on the chain. If you can see two teeth on the sprocket, the chain is worn out, but is still suitable for driving, and three teeth indicate that the chain is completely worn out and needs to be replaced immediately. Also, extraneous sounds from a lubricated chain often indicate its wear.
Signs of a faulty chain damper
A break or other breakdown of the damper can manifest itself in several ways:
- A loud knocking sound appears in the engine. The sound comes from the front of the engine, from the installation side of the intermediate shaft cover.
- Disturbances and malfunctions of the engine, which can be caused by a shift in the valve opening phases due to a dangling chain slipping through the teeth of the timing drive.
- Engine breakdown (jamming) due to a strong shift in the phases of the timing parts and the “meeting” of the valves with the pistons.
Chain stabilizer VAZ 2107
most often breaks due to a loose chain. It must be tightened regularly, which is described in detail in the article “How to tighten the chain of a VAZ 2107.”
The damper is located opposite the chain tensioner shoe and is attached to the engine body with two bolts that have different lengths. The fastening nuts may break or become unscrewed due to strong vibration of the chain while the engine is running. A torn damper often causes engine damage, and a severely worn one causes noise during operation. In any of the cases, to solve the problem, the VAZ 2107 damper should be replaced.
What is needed to replace the VAZ 2107 damper
The set of necessary tools, parts and materials looks like this:
- Set of keys and socket heads.
- Screwdriver.
- Long tweezers, magnetic telescopic handle or stiff wire hook.
- Engine head cover gasket.
- Automotive sealant.
- New chain guide for VAZ 2107.
To replace the damper, an inspection pit or lift is not required. A little space and good lighting are enough. The work can be done both in the garage and on the street. In the latter case, you should avoid getting dust on the timing parts when the cover is removed.
Installation of damper VAZ 2107
Installation of the damper is carried out in the reverse order. In this case, you should tension the chain and check the positions of the marks on the camshaft and crankshaft of the engine.
The seats of the damper mounting bolts must be lubricated with sealant. This will prevent oil from seeping through.
Sometimes a car enthusiast encounters extraneous sounds that come from the area of the front engine cover and resemble a kind of tapping. This may be a sign that the chain guide needs to be replaced. The damper on the VAZ 2107 model is necessary to soften the vibrations of the chain during its rotation. If you can clearly hear a clattering or metallic tapping sound, this means that the damper is very worn and needs to be urgently replaced. Another possible cause of the problem is that the chain tension is too loose. In this car model, the damper is located on the left, in front of the cylinder block. Use the diagram supplied with the machine to determine the exact location of the part to be replaced.
Dismantling the timing belt on a VAZ 2106