Changing the ignition switch on your favorite Lada Kalina
The ignition switch on any car, including the Lada Kalina, is a unit that allows you to start the engine by turning the key. Failure of this mechanism will lead to the impossibility of driving the car, so if malfunctions are detected in its operation, it is necessary to determine the cause as quickly as possible and make repairs. Read more about replacing the unit below.
Do I need to remove the immobilizer to repair the ignition switch on Kalina? First of all, let's get acquainted with the basic information regarding this node. The ZZ is a complex unit in its design, necessary to control the transmission of voltage to the starting system and prevent battery discharge.
On a Lada Kalina car, the ZZ includes several elements:
- the mechanical part, that is, the cylinder of the device itself;
- the electrical part, which is a group of contacts designed to close signals when the key in the lock is turned to different positions.
ZZ for Kalina, removed with a key.
It should also be noted that this unit can operate in several modes:
- In mode 0, the driver can remove the key without any problems. In this mode, optics, alarms and radios work.
- Mode 1 is fixed, since in this case it is impossible to extract the key from the lock. In this mode, the ignition system is activated, and voltage is supplied to all components except the starter. Leaving the key in this position for a long time may cause the battery to discharge.
- In mode 2, the starter starts working.
Typical faults
Typical malfunctions for 3Z operation:
- Moisture getting into the protection structure and constant dampness in the interior will lead to oxidation of the contacts. In this case, the contact group will need repair.
- The contacts themselves could burn out; this is usually caused by voltage surges. As a rule, jumps in the system occur at the moment when the power unit starts up.
- Mechanical failures. For example, if, when trying to turn the key in the lock, the driver encounters a problem, then most likely the fault lies in the assembly cylinder. It is quite possible that it was simply clogged with dust, but the possibility of a defect cannot be ruled out (the author of the video is Alexey Wolf).
Replacement instructions
How is the ignition switch replaced on Kalina? A detailed scheme of work is given below.
Stages
- First of all, you should remove the negative battery cable from the terminal. Using a Phillips head screwdriver, unscrew the fasteners located on the steering column. For greater convenience, consider the location of the fasteners - two screws are located on the right and left, two more are in the middle and below, and two more screws are located at the bottom. Directly under the steering wheel there is another screw.
- You need to dismantle the clamps that secure the steering column switches, and then the devices themselves need to be removed, having first disconnected the wiring.
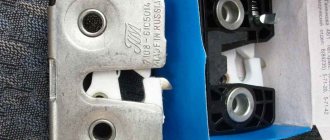
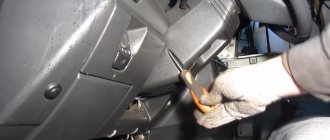
- Next, using a chisel, unscrew the bolts as shown in the photo. Try not to hit hard as these bolts can be damaged, but you will have to work hard anyway as the screws will stick over the years. When you see that the screws have begun to move, you can try to unscrew them using pliers.
- You need to get to the connectors of the mechanisms, there are two of them - the power supply of the unit, as well as the immobilizer antenna, the connectors themselves are located under the plastic cover of the console. To gain access to the connectors from the 3Z, lightly pull the wiring harness.
- These connectors should be disconnected, and then the device should be dismantled. After this, you can replace the old seal with a new one, further assembly is carried out in the reverse order. Do not forget that when replacing the 3Z, it will be necessary to change the cylinders on the doors.
1. Disconnect the steering column switch pads. 2. Using a chisel, unscrew the mounting bolts. 3. Pull the 3Z towards you and remove the connectors.
Replacing door cylinders
The doors and ignition switch must have cylinders from the same set, otherwise the key will only work with the ignition switch, but the doors will not open. Therefore, we will consider in detail the process of replacing door cylinders.
To replace the so-called larvae, you must perform the following steps:
- Using a Phillips head screwdriver, unscrew the screws that secure the door trim, after which it can be removed.
- When the upholstery is removed, using a 8mm wrench you will need to unscrew the metal shaped holder; it is secured with three screws.
- Next, you need to reach out to the rods and pry them off with a screwdriver, after which the rods can be removed.
- Next you will need to get to the screws that secure the handle. There is a screw at the end, and if you look at it from the back, you will see a nut that can be unscrewed using a size 8 wrench.
- Carefully dismantle the door handle and dismantle the so-called cylinder, before doing this you need to find the latch and press it with an awl or a needle.
Video “How to change cylinders on door locks?”
Instructions for replacing the cylinders on the door locks of the Lada Priora are given in the video below (the author of the video is In Sandro’s garage).
AvtoZam.com
Rules for using the lock
- Position 0 is fixed. The ignition key can be removed from this position. In this position, external lighting devices can operate, including fog lights, illuminating the road ahead of the car. The hazard warning system works, you can use high and low beams, and turn on the audio system.
- Position 1 is fixed. The key cannot be removed from this position. The ignition is on. In this case, electrical power is supplied to all energy consumers of the vehicle, with the exception of the starter. Leaving the key in this position for a long time can drain the battery. Before turning on the starter, it is recommended to hold the key in this position for several seconds. During these seconds, the electric fuel pump will create the required pressure in the fuel system, which will greatly facilitate starting the engine, especially when it is cold.
- Position 2—turn on the starter. The key does not lock in this position. When released, it returns to position 1.
Do not hold the key in the starter position for more than 10 seconds. If the engine does not start, you need to take a break for 10-15 seconds and try again. Do not hold the key in this position while the engine is running. While Kalina’s car is moving, it is prohibited to remove the key from the lock. If you do this, steering failure will occur due to locking of the steering column and a sharp deterioration in the functioning of the braking system.
If during operation of the car the key remains in the lock, then when the driver's door is open, a continuous trill will be heard, signaling this. If the ignition is completely turned off and the key is removed from the hole, but the side lights are on, short beeps will be heard when the driver's door is open. The lock is capable of blocking the starter from turning on while the engine is running.
- directly from the ignition key;
- key for trunk and all door locks;
- remote control;
- immobilizer key APS-6.
- ignition;
- trunk and door lock key;
- APS-6 immobilizer learning key.
Replacing the ignition switch
Greetings to all readers of my blog, and this article will show you the process of replacing the ignition switch on a Lada Kalina car. For a long time now I have had a similar review of other front-wheel drive cars, and I could have posted it on the website, but I decided to show everything specifically using Kalina as an example.
So, to perform this procedure we will need:
- Phillips screwdriver
- Sharp and narrow chisel
- Hammer
- Head for 10
- Ratchet with extension
Photo report on removing and installing the ignition switch on the Lada Kalina
The first step is to unscrew all the screws and screws securing the steering column casing. I won’t dwell on this point in detail; I think that there shouldn’t be any problems here.
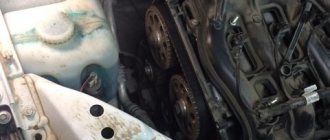
There is no need to remove the steering wheel, although in my photo it is removed, since the process was carried out while disassembling the car. So, we set the chisel on the bolt heads, as shown in the photo below:
You can see this more clearly in close-up.
In this way, we remove all 4 bolts securing the ignition switch one by one. And after that we finally turn them off with long-nose pliers:
When they spin quite easily, you can even do everything by hand.
When the 3 bolts are unscrewed, the lock is almost completely released and must be held on the other side so that it does not fall. We unscrew the last one and remove the part, as well as the clamp.
All that remains is to disconnect the plugs with the power wires from the lock, as is clearly shown below.
The lock is now completely freed and ready to be replaced. When installing a new one, please note that you need to buy special bolts with tear-off heads in order to install everything as required by the factory!
The lock is installed on the shaft, and the bolts are tightened with a certain force until the caps of each of them break off. This photo is shown using the example of the tenth family, but the essence does not change.
We reconnect the plug, install the casing and you can check the functionality of the mechanism. If you have any questions, you can watch the video on this topic below.
Video review on replacing the ignition switch
This manual was demonstrated on a car of the tenth family, but, as mentioned above, there is practically no difference in performing this repair. There are a couple of things that will be different:
- There is one power plug on the ten, and there are two on Kalina
- The steering column cover is attached slightly differently
If you have any questions, ask them in the comments to the article or on the channel! A new ignition switch for Kalina can be purchased at a price from 1100 to 1500 rubles, bare and with door cylinders, respectively!
ladakalinablog.ru
How to replace the ignition switch on a VAZ 1117-VAZ 1119?
Note! Before you start changing the lock, disconnect the negative terminal from the battery, you still have to work with electronics! (For information on how to remove the terminal, see the article: “Replacing the battery on a VAZ”, in paragraph 1)
Removal: 1) At the beginning of the operation, you will need to remove the casing from the steering column, to do this, use a screwdriver and use it to remove the seven screws that secure the casing (see photo 1), after all the screws have been unscrewed, fully pull out the handle by which the steering wheel is adjusted (see photo 2, it is indicated by an arrow) and then remove the lower casing, and then lifting the upper one, also remove it from the steering column.
Note! When you remove the lower and upper casings, look at the side of them or look under the pedals for the rubber o-ring that is needed to seal the ignition switch from dust and dirt!
2) Then you will need to look at the lock itself and pay special attention to the wires that come from it, Kalina also has an immobilizer in addition, so there will be a lot of wires coming from the lock itself, and there will be only two wire connectors (One of the connectors will go to the starter is thus responsible for starting the car, and the second connector will go to the immobilizer and it is responsible for preventing the car from being stolen), so disconnect each connector from the pads (Each connector will be connected to the other two pads), to do this, grab your hand connector and simply disconnect it from the block using a little force (Do the same operation with the other connector).
Note! The photo above shows an example with an arrow where the wire connector coming from the ignition switch is connected to another block (This connector goes to the starter, the one that goes to the immobilizer looks a little smaller)!
3) Next, as shown in the photo below, using a hammer and chisel, remove the four bolts (They have no edges and are indicated by arrows) that secure the lock to the steering column, how do you remove them, you ask? Let's explain! Take a chisel and a hammer in your hands and place the chisel on the edge of a bolt, then hit it and thereby try to move the bolt out of place, etc., until the bolts are completely turned out.
Note! If you don’t like this method, then you can also drill out these bolts, but only in this case, be careful not to damage anything!
4) When you have removed all four bolts, remove the bracket on one side of the steering shaft, which is indicated by the arrow, and on the other side, remove the ignition switch itself and put it aside if you no longer need it and you are going to put a new one in its place.
Note! In the event that you still suddenly need the old lock (For example, not all new locks are sold with a contact group, so you have to remove it from the old lock and install it on a new one), to remove the contact group from the lock, you must first be convinced that it’s not all about it, but about the lock and it needs to be replaced, for example, if you have problems with the electronics in the cabin, let’s say you turn the key and the devices don’t light up, then most likely it’s all in the contact group and the lock itself can’t be changed necessarily (But it’s not a fact that there may be a problem with the immobilizer, to do this, disassemble the contact group and check which contacts it has, oxidized or not), so here’s how to remove the contact group from the lock, for this:
1. Using a screwdriver or by hand, bend the lock that is located on the wire connector and then remove all the terminals together with the wires from this connector (see photo 1, but be sure to remember the location of each wire in the connector, although just below we described how you can install the wires into the connector without previously remembering their location, but it’s still better to remember so that problems do not arise in the future), then squeezing the latches of the contact group cover (see photo 2) remove it from the lock body itself (see photo 3) and then bending two plastic latches (see photo 4), separate the contact group cover and the contact group itself (see photo 5), and after the contact group itself is in your hands, remove the moving part from it and inspect all its contacts as shown in the sixth photo, if the contacts are found oxidized or burnt, then try cleaning them with fine-grained sandpaper, and if the contacts are severely damaged and cleaning them will not lead to anything, then in this case replace the contact group itself.
Note! When you reassemble the moving part of the contact group, install it so that the widest part that is present on it engages the protrusion on the cover as shown in the photo below:
Installation: The new lock is installed in the reverse order of removal and assembled the same way, but only during assembly there are some nuances, namely, when you install the terminals of the wires coming from the contact group into the wire connector, pay attention to the fact that each terminal must have its own position , so find the block of wires to which this connector will be connected and, looking at it, connect all the wires into the connector exactly in the same places where they go on the block, for example, on the block of wires you see that the red wire runs on the far left side, then, accordingly, do it on the wire connector in such a way that the same red wire can be connected to that wire, so that you can at least understand the situation a little lower, we posted a photo showing two terminals, and so the terminals and the wire connector will be exactly the same same terminals (there will be Males on the connector and females on the block) so try to combine them so that each color of the wire matches.
How to replace and repair the ignition switch of a Lada Kalina car
Page 1 of 3
Usually the ignition switch is removed to replace it, as well as to replace the contact group of the switch or the APS coil.
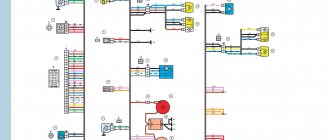
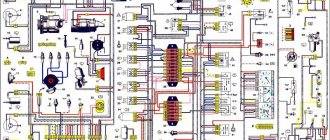
| rice. 1 |
Connection diagram for the ignition switch in Figure 1.
You will need: hammer, chisel, flat-blade screwdriver.
First of all, disconnect the negative terminal from the battery.
Remove the steering column switches.
| 1. Ignition switch mounting bolts with cut heads. Therefore, we unscrew them with a chisel. As soon as the bolts are loosened, they can be unscrewed using pliers. | 2. Remove the bracket from the steering column |
| 3. Remove the ignition switch Using a screwdriver, pry up the clamp of the APS coil wire block | 4. Disconnect the coil wiring block from the APS block wiring block |
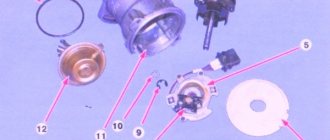
| 7. Remove the locking rod drive. Remove the rod spring from the drive | 8. Remove the stopper with the spring Push the cylinder out of the switch body |
| 9. Remove the locking ball. | 10. Remove the cylinder from the switch body |
avtomechanic.ru
Removing and installing the Kalina ignition switch
| The Kalina ignition switch is removed to replace the assembly, or to replace the contact group of the switch or the APS coil. |
Necessary tools: chisel, hammer, pliers and flat-head screwdriver. Disconnect the wire terminal from the negative terminal of the battery.
First you need to remove the Kalina steering column switches.
- Since the ignition switch mounting bolts have heads, so we unscrew them using a chisel. Then the bolts can be unscrewed with pliers.
- Remove the bracket from the steering column.
- Remove the Kalina ignition switch.
- Pry up the clamp of the APS coil wire block using a screwdriver, and disconnect the coil wire block from the APS unit. Then disconnect the ignition switch contact block from the wiring harness block.
Installing the Kalina ignition switch is done in the reverse order.
Keywords:
- ignition switch Kalina 2
- Kalina ignition switch
Similar materials
xn—-8sbabr6ahc3e.xn--p1ai
Ignition switch Lada Kalina: diagram, wires, how to connect, remove, replace
The voltage in all electrical equipment of the vehicle, excluding parking lights, brake lights, interior lighting and hazard warning lights, is controlled by the ignition switch. To increase the car's resistance to theft, the ignition switch is combined with a lock. The lock, in turn, is held on the steering column by special bolts with break-away heads.
It is impossible to remove such bolts with a wrench; you need to firmly tighten the bolt and tear off the head. The ignition switch is also equipped with a mechanism that locks the steering shaft. The shaft is fixed by means of a latch, which does not allow it to rotate when the steering wheel is turned.
You can check the operation of the ignition switch as follows. First of all, you will need to prepare the car for inspection; you will need a multimeter as part of the equipment. Disconnect the wire terminal from the battery negative. After this, you need to remove the decorative trims from the steering column.
The next step is to disconnect the ignition switch wiring harness connectors. Next, you should check whether the terminals in the block are properly connected using a multimeter. The key in the lock must be in the zero position (off).
Then you should do the same check procedure for key positions 1 and 2 - “on” and “starter”. If there are any problems with the ignition switch, it must be replaced with a new one.