How to replace the fuel level sensor on a Priora
Many owners of VAZ cars have encountered the problem of unreliable reflection of information about the amount of remaining fuel. And, unfortunately, there may be several possible faults.
The wiring is faulty, the fuel level sensor has failed, or mechanical damage to the gas tank itself is the most common problem with this defect. If during the diagnostic process it turns out that the problem is in the sensor, it needs to be replaced.
In terms of how the fuel level sensor is located in the car, Priora inherited a similar location from its predecessors. Replacement consists of the following items:
1. Removing the fuel module
2. Removing and installing a new sensor
3. Installation of the fuel module
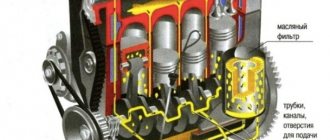
In a Priora car, the fuel level sensor is located in the fuel module, which also includes a fuel pump and fuel filter.
To dismantle it is necessary to remove the rear seat. There is a small hatch underneath it. Unscrew the two screws holding the hatch cover. Below it is located directly the fuel module. We disconnect the block from the connector, which is located on the top of the module.
Then we disconnect the tips of the tee and the gasoline supply tubes. To do this, press the spring clips and disconnect them. The fuel module is secured with a pressure plate and screwed with 8 nuts. We unscrew them, and then remove the spring washers and the wire going to ground.
Then remove the pressure plate and the fuel module itself. At this point you need to act very carefully, as there is a high probability of damaging the sensor float.
After dismantling, it is time to remove the faulty sensor. If the fuel level sensor does not work in a Priora car, then most likely the whole point is that the contacts on the rheostat have become unusable. And this can only be solved by replacing the entire sensor. It is held on the fuel module body by only two clamps.
Before pressing them out and moving them towards the cover, you need to disconnect the wire from the fuel pressure regulator. Then you need to carefully disconnect the block from the module cover. You need to be very careful here, since the block itself is quite fragile. It will be more convenient to pry it off with a screwdriver. The sensor should be removed along with the accompanying wires. We install the new sensor in the reverse order.
Before installing the module in place, we check the correct position of the rubber seal and the plastic ring spacer. Please note that the spacer has a cut. It must be laid so that the cut coincides with the protrusion of the fuel module cover. Then install the remaining parts in reverse order.
Fuel level sensor in Lada Priora
What is the most unpleasant thing for the Priora engine power system? Right. Miss the fuel level. This is monitored by a special sensor in the fuel tank.
That's what it's called - a fuel level sensor. It is present on all cars. But on cars with an ECM (electronic engine control system), it takes on special significance. Why is that.
About this and the structure of this part in the article.
The value of the fuel level sensor (FLS) for the Priora ECM
The fact is that “injection” cars are equipped with an electrically driven gasoline pump. This is a submersible device. The idea is that the running pump is cooled by gasoline.
And accordingly, if all the fuel is exhausted, the pump is deprived of this cooling. There is a huge risk of the fuel pump burning out. This is not a cheap device. And replacing it is not the easiest thing.
This is precisely what makes accurate readings of the gasoline level in the Priora tank important for the driver.
Operating principle and location of FLS
As motorists know, fuel level sensors are installed on all cars. And their operating principle is, in general, the same, based on changing the resistance in the network when the rheostat slider moves. In general, as on all cars, the Priora fuel level sensor consists of three elements:
- Plate with rheostat.
- Barbell with contact slider.
- Float.
The dielectric plate, on which the rheostat contour is applied, is fixed motionless. But a rod with a contact slider works like a rocker arm. A plastic float is attached to its long arm. It tends to the surface of the fuel in the tank, accordingly moving the contact of the closing sector on the plate.
Attention! All fuel level sensors are of different modifications and have different connections and number of contacts.
This device is installed on an electric fuel pump module submerged in the tank. On a plastic case, in a special groove.
Marking of various FLS
In order to distinguish these fuel level sensors from each other, the model markings are applied on the plates, right next to the rheostat sectors:
- DUT 1-01
- DUT 1-03.
- DUT 2-04
And so on. This depends on the system, model and configuration of the Priora. Therefore, if there is a suspicion of a malfunction of the sensor, it is necessary to first accurately diagnose it, and then, before replacing, specify the type of plate installed on this machine by the manufacturer.
Functionality check
Usually, many different and supposedly effective methods of checking using a tester or shorting a wire to ground are described. Alas, on a Priora there is only one 100% correct way to check the FLS. And this is done on the removed fuel pump module.
The description of removing this module is available in many articles and takes up a large amount of space. Therefore, we can only clarify that it is located under the rear seat of the Priora under a special hatch in the body. Above the gasoline tank.
Therefore, the transition to an already removed module.
Carefully! The check must be carried out with the ignition on! But you cannot turn on the pump without immersing it in fuel! In no case!
Therefore, the procedure is as follows. Disconnect the chip with wires from the module connector. Turn on the ignition. Wait for the fuel pump relay to operate. Use a test lamp to check the presence of current on the wire to the sensor.
Important! The connector usually contains 4 wires. Two thick ones, usually gray and white, are the pump drive. There will be no load on them. But 2 thin ones are a sensor. One will have 12 volts. Close them together and to the body. The pointer arrow should rise sharply. This means the panel pointer is working. Then the sensor.
Make sure that the fuel level sensor float is in its lowest position. Connect the wires. Wait 5 seconds. The gas tank reserve light on the panel should light up.
Slowly raise the float to half its free stroke. The indicator arrow should accordingly show half the tank. Raise the float all the way. Accordingly, the arrow will show a full tank.
This is with a working sensor.
If this does not happen, visually inspect the contact plate, wipe it and try again. If there are no changes. You can change the device.
Replacing the FLS
This is very easy to do with the module removed. The new unit is sold complete with a bundle of wires and connectors. You just need to disconnect the wires from the pump. Remove the chip from the inside of the module cover and, by snapping the two levers, remove the sensor plate up the wall. That's all, you can install a new one. And check its operation using the above method.
Video showing the device described in the topic:
Source: https://mashintop.ru/articles.php?id=3191
Removing and disassembling the fuel module
We are carrying out work to replace the fuel level indicator sensor, fuel pressure regulator, strainer and fuel pump. Relieve the pressure in the power system (see “Replacing the fuel filter”). Disconnect the wire terminal from the negative terminal of the battery. Inside the car, lift the rear seat cushion (see “Removing the rear seat”) and bend the sound insulation valve that closes the hatch cover in the floor of the body under the rear seat.
Use a Phillips screwdriver to unscrew the two screws securing the hatch cover...
...and remove the cover. Lifting the wire harness block clamp...
...disconnect the block from the fuel module cover connector.
By pressing the spring clamp, disconnect the tip 1 of the tee from the fitting of the fuel module cover. By squeezing the clamps (in the direction of the arrows) of tip 2 of the fuel supply tube, disconnect the tip from the fitting of the fuel module cover.
Using a 10mm socket with an extension, unscrew the 8 nuts securing the pressure plate of the fuel module. Remove the spring washers and the ground wire from the tank neck studs.
Remove the pressure plate.
Carefully, trying not to damage the fuel level indicator sensor float, remove the fuel module from the tank. We drain the remaining fuel in the module into a previously prepared container.
If replacement is necessary, remove the ring plastic spacer.
Please note: when installing the spacer subsequently, its cut must coincide with the protrusion on the fuel module cover.
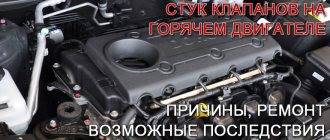
Operation of knock and fuel level sensors on Priora and the nuances of their replacement
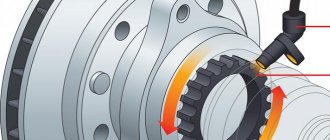
During explosive self-ignition in the combustion chamber of the fuel assembly, engine detonation appears. To monitor the occurrence of engine vibrations, a knock sensor (DS) is designed (video author – StarsAutoCom).
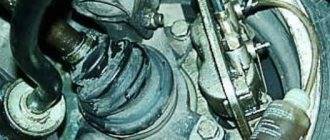
The DD is a plastic case, inside of which there is a sensitive piezoceramic disk element that generates an electrical impulse under mechanical influence from the resulting vibrations, and transmits information to the ECU controller. The detonation device is located on the front side of the cylinder block under the intake module.
Location of the device on Priora
Typical faults
If the Lada Priora DD is faulty, the computer will display an error code - 0327. This error is the main reason why the device is changed.
Possible malfunctions:
- broken wires;
- damage to the connector with wires;
- failure of the device itself.
The reasons why the power unit detonates may be different. Therefore, to make sure that the cause of detonation is the DD, it must be removed and checked.
How to check and change?
To provide access to the knock sensor, the car should be placed on a lift.
To remove the device, you need to do the following:
- Turn off the power to the car by disconnecting the negative terminal from the battery.
- Next you need to remove the engine protection.
- Having found the DD, you need to press the metal clamp, thanks to which the connector with wires from the controller is held, and disconnect the connector.
- Using a key set to “13”, you need to loosen the bolt securing the device and you can remove the DD.
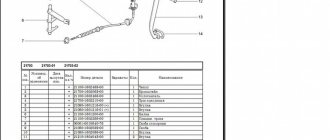
Photo gallery “Replacing the knock regulator on a Lada Priora”
1. New replacement device2. Unscrewing the mounting bolt3. Disconnecting the connector with wires
The knock sensor is checked using a multimeter, setting it to voltage measurement mode. Accurate diagnostics can only be carried out on a special stand.
If the device is faulty, it cannot be repaired; it must be replaced. Installation of a new device is carried out in the reverse order of dismantling.
Purpose and location of FLS
The FLS is located in the fuel module, which also includes a fuel pump and fuel filter.
FLS location
- float;
- dielectric plate with a located rheostat;
- the rod on which the contact slider is located.
FLS appearance
Typical faults
If the instrument panel displays incorrect information about the amount of fuel remaining, the reason may be:
- mechanical damage to the gas tank housing;
- float failure;
- electrical faults;
- disruption in the power supply chain;
- FLS malfunction.
To determine the cause, you need to conduct a diagnosis.
How to check and change?
To change the FLS on a Priora, you need to remove the fuel module.
To do this you need to do the following:
- First we remove the rear seat.
- Then unscrew the two screws and remove the hatch cover.
- At the top of the module, disconnect the connector with wires.
- Next, by pressing the latches, the tubes through which gasoline is supplied and the tips of the tee are disconnected.
- Then we unscrew the fastening nuts, remove the wire that goes to ground, and the spring washers.
- The next step is to remove the pressure plate and module.
- After dismantling the module, the wire connector is disconnected from the FLS.
- After installing the new device, assembly is carried out in the reverse order.
Loading …
Video “How to replace the FLS on a Lada Priora car”
This video demonstrates how to change the FLS on a Priora (the author of the video is DmitruY Channel).
Source: https://AvtoZam.com/vaz/lada-priora/datchiki-detonatsii-i-urovnya-topliva/
Detonation device on Priora
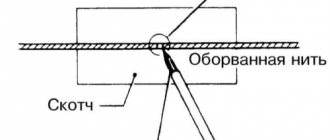
The knock sensor on the Priora is made in the shape of a circle, it has a hole for connecting wires. Inside it, in a special place, there are certain threads that, when detonation occurs, begin to emit impulses. The threads are made of a thin and rather soft alloy, and even though they are protected by a certain substance, it is under no circumstances recommended to throw the sensor forcefully onto the floor.
Detonation device on Priora
Where is
To improve the sensitivity of the knock sensor, it was installed on the Priora engine block. It is attached to a special ledge, as well as a platform, which is located near the second cylinder. This is where the noise from the detonation process is strongest. This place is located on the radiator side, just below the engine itself.
We recommend:
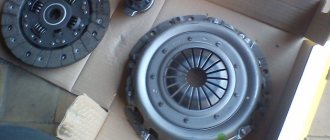
Car clutch - description of the device, principle of operation
If the Priora is equipped with such technologies, in particular as power steering, air conditioning and many others, then access to them will be a little complicated, but still possible. Simply put, it is accessible from the front bumper of the car.
knock sensor location
Symptoms of a problem
The main malfunctions in the car's knock control system are:
- The device has failed.
- The wire to it broke.
- The device connector is broken.
In all these cases, eliminating all these troubles is an easy task. The main thing is to be able to identify them correctly. In any case, when working with a car with an ECM, diagnosing problems is a rather complex and important area of repair. Fixing the first two problems will require having the following kit on hand:
- Multimeter tester.
- Indicator light.
- Wires.
- Insulating tape.
- Wire cutters or knives.
Then connect the multimeter to the 2 holes of the connector and turn on the ignition. If everything is fine with the circuit, the tester will indicate a voltage of up to 5 Volts. And if nothing happened to the indicators, then the circuit may have broken and needs to be found. You need to disconnect the connector from the ECU and examine both circuits. Find the break and fix it using wires and electrical tape. If the tester shows a working circuit, then the problem is with the sensor.
Knock sensor error
If a network break occurs, this error appears under code 0325. In many cases, the cause of the error is oxidized contacts. But the problem may also not be in the sensor or even in the wiring: so check the timing belt, maybe it has slipped a couple of teeth - check the marks.
We recommend:
What is a rear stabilizer bar used for?
How to diagnose the ECM
As I already said, when errors like check engine appear, the Priora car owner has two options: solve it yourself or you can contact a car repair shop. The car owner can use a portable mobile device to read the fault codes from the electronic control unit that contributed to the appearance of the check on the Priora vehicle.
Similar article How to properly break in an engine after a major overhaul
It is necessary to correctly understand the cause of Check Engine on Priora and decipher it. Some error numbers can be found in the operating book for the “heart” of the vehicle. The rest can be found on the Internet.
For example, if the check engine light is on, this means that the following causes of engine malfunction have arisen:
- broken track sensor;
- adsorber is faulty;
- The mass air flow detection device does not work.
Fault codes will tell you that one of the systems or components has failed and needs to be replaced.
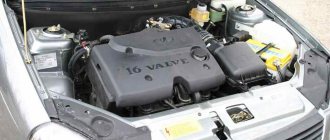
Where are the sensors on the Priora 16 valves?
They ask me in PM from time to time, so I decided to post it here. Materials from the network. Engine control system sensors
The VAZ-21126 engine is equipped with a distributed phased fuel injection system: gasoline is supplied by injectors to each cylinder in turn in accordance with the operating order of the engine. The electronic engine control system (ECM) consists of a controller, sensors for engine and vehicle operating parameters, as well as actuators. The controller is a special-purpose mini-computer that consists of random access memory (RAM), programmable read-only memory (PROM) and electrically reprogrammable memory (ERM).
The controller is mounted on a bracket under the instrument panel console. The controller receives information from system sensors and controls actuators such as the fuel pump and injectors, ignition coils, idle speed control, oxygen sensor heating elements, canister purge solenoid valve, cooling fan electric and various system relays. When the ignition is turned on, the controller turns on the main relay, through which the supply voltage is supplied to the system elements. When the ignition is turned off, the controller delays turning off the main relay for the time necessary to prepare for the next turn on (to complete calculations, set the idle speed control, control the electric fan of the cooling system). The controller also performs diagnostic functions for the engine management system (on-board diagnostic system). The controller detects the presence of malfunctions in the control system elements, turns on the malfunction indicator in the instrument cluster and stores fault codes in its memory. If a malfunction is detected, in order to avoid negative consequences (piston burnout due to detonation, damage to the catalytic manifold in the event of misfire of the fuel-air mixture, exceeding the limit values for exhaust gas toxicity, etc.), the controller switches the system to emergency operating modes. Their essence is that if any sensor or its circuit fails, the controller uses replacement data stored in the EPROM to control the engine.
The engine management system malfunction indicator is located in the instrument cluster. If the system is working properly, then when the ignition is turned on, the indicator should light up - this way the ECM checks the serviceability of the indicator and control circuit. After starting the engine, the indicator should go out if the controller memory does not contain the conditions for turning it on. Turning on the indicator while the engine is running informs the driver that the on-board diagnostic system has detected a malfunction and the further movement of the vehicle occurs in emergency mode. In this case, some engine operating parameters may deteriorate (power, throttle response, efficiency), but driving with such malfunctions is possible, and the car can drive to the service station on its own. The only exception is the crankshaft position sensor; if it is faulty, the engine cannot run.
Causes and troubleshooting when the check engine light comes on on a Priora
If the check light is on on a Priora, there are two ways to solve this problem. This means resetting the error codes and driving on as if nothing had happened. However, such negligence can lead to the engine soon failing. And the next time the check on the Priora is on, the VAZ will simply stop.
Attention! A reset is only done if the diagnostics find no problems. For example, wiring faults. The car owner resets the check engine and replaces the wires.
Another option is to find and treat the problem that has arisen. Incorrect operation of the valves can lead to the appearance of a check on the Priora. Since exhaust gas systems may not work properly. This will lead to frequent detonation of the engine and cause it to fail.
Triggering of the check lamp after washing the car
If the check light on a Priora comes on after washing, then the reason most likely lies in a shorted wiring. You should dry the Priora engine thoroughly and turn on the ignition again. If the problem does not go away, then try resetting the ECU error.
- Stop the car and turn off the engine.
- Open the hood.
- Locate the fuse box under the hood.
- Find the yellow group and remove F1.
- Wait a minute.
- Reinstall and close the hood.
Similar article Engine temperature indicator and sensor on Lada Grant
Start the engine and see if the light goes out or not. If it doesn’t disappear, then it’s not the wash. Most likely there is a problem with the oxygen sensor.
Oxygen sensor
Many inexperienced car owners ask: “Why does Priora’s fuel consumption increase?” This is due to the oxygen sensor. This is often why the check engine lights up and indicates that the sensor is broken and needs to be replaced.
It can be detected by the vehicle's falling power. And the sensors break down due to the large amount of used oil that remains on the engine parts after several years of operation. The tightness is broken due to the deterioration of the plastic, since in domestic regions cold winters and hot summers destroy the plastic on the sensors.
A broken sensor sends signals to the ECU indicating a malfunction. The check light on the Priora comes on. It is necessary to check the condition of all sensors. There are only four of them. And replace the faulty one.
The device can be found in two places: 1. in the exhaust manifold, 2. after the catalyst.
Faulty spark plugs and more
The car makes sudden jolts when driving. The check engine light comes on in a Priora. This all indicates that the spark plugs are faulty. The spark is so delayed that the mixture is ignited at the wrong time. Therefore, only an experienced mechanic can figure this out. It is not recommended to climb into the engine yourself.
The engine starts to stall. The spark plugs are also faulty. They have a service life. Typically, spark plugs last no more than 50 thousand kilometers. After a similar amount of mileage, it is recommended to replace them.
If the check light was on on a Priora only for this reason, then after changing the spark plugs, the lamp will stop flashing or burning. If you change this equipment yourself, you will need a spark plug wrench.
Other
A leaky fuel system on a Priora 16 can also cause the check engine light to light up. To avoid this mistake, the car owner will need to check whether the fuel tank cap is tightly closed. If not, then unscrew and re-tighten the cap.
Similar article VAZ 21126 engine, technical characteristics of the engine
If it doesn’t help, it means that the rubber gasket is leaking. We remove the old one and install the new one.
Problem with the gas pump and fuel filter. They can also be the culprit for the check engine light being on. To correct this situation, change the filter device and the pump that pumps fuel.
Fuel with a low octane number in Russia is a leading problem among car owners. Bad fuel clogs injectors, destroys spark plugs and other components of the Priora engine. You just need to replace the fuel with a higher quality one, and all the problems with the engine check on the Priora will disappear.
Another problem if the check light on the Priora is low is the lubricant level. You need to add oil, and the light will go out on its own.