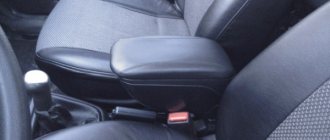
Connecting heated seats of Lada Priora
The “chip” with terminals must be connected to the block of heating buttons.
The black wire (“ground”) is attached to the car body. Alternatively, you can place it under the bolt in the area of the hand brake.
The white wire is responsible for the button illumination. connect it
to the cigarette lighter illumination.
The red wire is the supply wire (+12 V), stretches along the wiring harness under the driver’s seat and leads out to the mounting block.
After assembling the central tunnel, a block of buttons is installed in it instead of the factory plugs. Pass the wires between the tunnel and the floor, combine them with the wires of the chairs and fasten them with clamps. After this, you can install the chairs in their places. Installation
carried out in reverse order.
Seat heating kit for VAZ 2170-2172 /Lada-Priora SE/
APPLICABILITY: VAZ 2170, 2171, 2172 (Lada-Priora SE restyling). Built-in heating kit for the two front seats.
Today you rarely see a modern car that does not have a heated seat function from the factory.
But, unfortunately, not every LADA configuration has such an option. Heated seats in a car are a very convenient and essential attribute in the autumn and winter. Many car owners who do not have automatic engine start or heated seats in their car are familiar with the unpleasant feeling of sitting on a cold seat in frosty weather. This seat heating kit is designed for installation on cars of the Lada Priora family. The product is created according to the formula: the length of the heating filament - the resistance of the material - the voltage of the on-board network. This means that a heating filament of this length, at a voltage of 12.0-13.5 V
, cannot heat up more than
53 °
C.
The fabric heating base is made of non-flammable material. A nichrome thread with fluoroplastic insulation is used as a heating element. Thus, the likelihood of the product catching fire is completely eliminated. TECHNICAL CHARACTERISTICS:
— normal supply voltage 12 V; — current consumption 3-5 A; — rated power 55 W; — heating time of the module surface to operating temperature is 5-10 minutes; — heater surface temperature +53 °C; — overall dimensions of each module are 270x395 mm and 250x280x300 mm.
Set contents:
— module with heating element — 4 pcs.;
— installation kit of mounting wires; — push-button heating control unit. Installation on a car.
Heaters can be installed in special pockets on the inside of car seats or under seat upholstery. The inadmissibility of creasing or displacement of heater elements during their operation must be ensured by their additional fastening. When installed in car seat covers, the heaters are inserted into additional pockets on the back and seat of the covers from the inside. Heaters can be attached to covers in the following ways: using double-sided tape; using fabric glue (the glue should be odorless!); If the materials of the covers are thin, the heaters can be hemmed to the covers; for this purpose, fastening zones are provided at the edges of each heater. When installed under the seat upholstery, the heaters are glued to the foam lining of the chair with double-sided tape: one heater to the seat, the second to the back. The heating control keys have three modes (weak, medium, strong), the button block is installed in a regular place on the lining of the floor tunnel.
Connection diagram in the fuse box
Work on connecting the wires should be carried out with the battery disconnected.
Install the relay (1119-3747210-10) into the mounting block, connector K11.
The 87th contact of the relay is connected to the red wire of the button block.
The 86th contact of the relay is connected to the body ground.
The 85th contact of the relay is connected to the black-blue wire from the ignition switch.
The 30th pin of the relay is connected to the pink wire of the 30th pin of the high beam relay.
The fuse can be installed between the high beam relay and relay K11 on the pink wire.
As can be seen from the description, the Lada Priora heating connection diagram is very simple.
If, after all the steps taken, the heated seats on the Priora do not work, then you should check point by point that the wires and relays are connected correctly. You can also watch the video instruction “Heating the seats of a Lada Priora with your own hands.”
source
Power supply or how to connect the heated front seats on the Lada Granta correctly
The cost of installation work at an unofficial service station is at least 2,500 rubles. For this money, already purchased heating elements will be installed in the car seat and the circuit will be connected according to the manual. All that remains is to make an anti-freeze product according to a home recipe and hit the road. This is for the quick ones. Painful owners will probably not like the electrical part of the integration.
Disadvantages of the standard kit
The instructions indicate how to install heated seats on the Grant and connect it to the on-board network. According to what is written, the electrics connect and function like this:
- The permanent plus is taken from the hazard warning button.
- The ground is connected to the bracket for fastening the standard wires of the negative pole.
- The standard fuse is replaced with a more powerful one.
- The heating is turned on/off using the buttons directly.
Only one function is correctly implemented - turning off the heating when the ignition is turned off. Otherwise, the connection scheme is not entirely successful:
- The positive wire that goes to the emergency light is thin and will probably work at the limit.
- The contact group of buttons operates in a dangerous mode, since it is not intended for power loads.
For your information. The kit offers simplified buttons for installation - they do not have a power indicator in the form of a yellow lamp (as on the rear window heating control).
Competent connection diagram
An unfortunate result of the standard connection algorithm is a melted fuse. Such a reaction indicates that the circuit is operating at its limit. An alternative scheme for connecting heated seats will help to avoid this. It involves the use of two four-pin relays and powering them from switch K4, which supplies the output “+” after turning on the ignition.
Lada Priora Sedan › Logbook › Heated seats part 2 (diagram + operation)
Good afternoon everyone, the day has finally come when at 9:00 am I went to a friend’s service center to install the standard heated seats, which I wrote about in the first part of the blog. My father and I installed the heating; the service kindly provided us with a warm box, for which we thank you very much. What is necessary:
1) Various types of wrenches (head 10/13 + open-end 10, flat Phillips screwdrivers, hammer) 2) Pliers, wire cutters, 3) Heat shrink, wires (4 pcs. 15A (no one forbids you to take a larger cross-section)), ground terminal, repair kit for the relay (4-pin) - it’s much easier so as not to isolate everything at the outputs from the relay, 4-pin relay, it doesn’t matter what the outputs are from (Kalina/Priora/2110, etc.) there are the same as the circuit of this relay itself, pants if anyone wants to use them, electrical tape, a “case” for a 15A fuse (why 15A, because “our” wiring is also 15A, put the one with a higher rating, it will melt first the wiring is then done before.) 4) the heating kit itself 5) plastic clamps for tying the wiring and laying it 6) multimeter
- this thing is simply irreplaceable, it will show what is where and how it was installed incorrectly 7) soldering iron, this is not for everyone, you can make twists everywhere
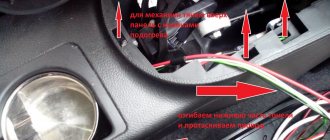
Installation: Let's agree to begin with that I took as a basis the diagram of a friend, the link to which I gave in the first part (here I will post a photo of the diagram I drew) 1) Unscrew the retaining mechanism of the front part of the seats (torsion bars be damned, and plastic holders); 2) We remove the tunnel, I think there is no need to explain how this is done, everything is quite simple and intuitive, the only thing is that if this is your first time, be patient or buy beer); 3) then the next topic on hooking up wires:
we connect the output to the seats with the chips on the right/left seats, we hook the blue wire with a soldered ground terminal to the bolt that holds the bottom plastic
(part of the tunnel)
we connect the yellow wire to the white wire
(comes from the cigarette lighter chip) - this is the illumination of the button block;
we lead the brown wire through the fuse to input 30 of the purchased relay
; output 87 with a pink wire; high beam relay; output 85 with yellow-blue (x2 you will see this blue stripe but you can do it, I believe)) output 86 to ground (I attached it to a pin above the fuse block (you will see in the photo))
Ps: all “outputs” are outputs from the relay we purchased!
Installation
- kit “heated front seats”, for example, from a VAZ 2110 or Priora (article 2170-6513010-03);
- seat heating control buttons (for example, those from the VAZ 2110 have article number 2110-3709710);
- relay 4-pin (1119-3747210-10);
- wires.
Installation of heating mats
:
- Remove the rear sofa and rear seat backs (instructions for XRAY, Vesta, Granta/Kalina).
- I removed the trim from the seats (held on by rings).
- Insert heating into the backrest and sofa.
- Install the seat trim in the reverse order.
Lada Priora Hatchback “Star Maggie” › Logbook › Heated seats
I decided to meet the winter in comfort and installed heated front seats.
The kit includes: — 4 heating elements (2 backrests, 2 seats) with wiring and 2-pin connectors; — wiring harness with connectors for connecting heating elements to the button block; — block of heating buttons.
Additionally you will need: - 4-pin relay 1119-3747210-10 or 98.3747-111; - fuse 15A; — terminals of the “mother” type (medium and small); - ring terminal for ground; — locking terminals for connecting wires 2 pcs; - Double-sided tape; — thin corrugated tube 2 m; — 1.5 m wire for connecting “+12V” from the relay to the heating button block.
For ease of heating installation and proper wiring, it is necessary to dismantle the seats and remove the lining of the central tunnel.
We put on the covers in the reverse order.
We lay the main harness with wires in the tunnel from the block of heating buttons to the armrest, having previously placed a corrugated tube over the wires. In the tunnel for the harness there is a channel in the plastic partition between the button block and the cigarette lighter.
Disconnecting the harness: - attach the black wire (“ground”) under the bolt near the handbrake; — connect the white wire (“button illumination”) to the cigarette lighter illumination; — we extend the red wire (“+12V”) and pull it along the standard wiring harness under the floor covering under the driver’s seat and along the left threshold to the mounting block; — installing a central tunnel; — connect the terminal block to the block of heating buttons.
Wiring in the mounting block: — we place the relay in the free slot K11 (to connect to the relay we use small female terminals); — relay contact “87” is connected to the red wire from the heater button block; — connect relay contact “86” to “ground” (bolt on the body near the mounting block); — relay contact “30” is connected via a fuse directly to the “+” battery (ideally).
source
Kit for connecting seat heating for Lada Priora
This kit is designed to connect heated seats.
Applicability:
- Lada Priora (VAZ 2170, 2171, 2172)
Equipment:
- Wiring harness – 1 piece
- Heating button block – 1 piece
The product is certified.
Payment to a Sberbank VISA card.
The most convenient and profitable payment method for you.
Payment can be made through the Sberbank Online system, through a payment terminal (Sberbank ATM), provided that you have a card from this bank. If you are not a client of this bank and you do not have a card, then you can top up your balance at any bank branch through an operator; they will accept cash payment and top up your balance. Commission from 0 to 1% Cash on delivery (payment upon receipt)
Payment for the order will be made at the post office upon receipt of the goods. For cash on delivery services, Russian Post takes an additional commission - approximately 4% of the cost of the order (parcel) upon receipt.
The postal commission based on the amount of “Cash on Delivery” for your parcel is described below, i.e. In addition to the delivery cost, the post office will also charge you a commission for the “cash on delivery” service.
Postal commission for cash on delivery service:
· up to 1,000 rub. inclusive – 80 rub. + 5% of the amount
· over 1,000 to 5,000 rubles. inclusive – 90 rub. + 4%
· over 5,000 rub. up to 20,000 rub. inclusive -190 rub. + 2%
· over 20,000 rub. up to 500,000 rub. inclusive – 290 rub. + 1.5%
Attention! Advance payment for delivery 100% (via Sberbank payment). This is included in our “Cash on Delivery” terms and conditions.
Check with the manager for additional information.
Yandex money.
This payment method involves issuing an invoice in the Yandex.Money system.
You will be able to pay from your Yandex.Money wallet. ATTENTION
! There are restrictions on the payment amount: anonymous wallet 15,000 rubles, registered wallet 60,000 rubles, identified wallet 250,000 rubles. After payment you will receive an electronic cash receipt.
QIWI Wallet.
This payment method involves issuing an invoice in the QIWI system.
You will be able to pay from your QIWI wallet. ATTENTION
! There are restrictions on the payment amount: RUB 250,000. After payment you will receive an electronic cash receipt.
Attention! Regardless of which delivery method you choose, check the integrity of the goods and packaging upon receipt of the cargo (parcel).
Heated seats Lada Priora - breakdowns, installation instructions
In frosty weather, it’s not very pleasant to sit on an icy car seat to start the engine - so heated seats come to the rescue. Inventive owners of the Lada Priora almost immediately began installing heated seats in their Prioras. Of course, the seat does not warm up instantly, but it noticeably saves you from frostbite. While the heater is not heating up (since the engine has not yet warmed up!) is it necessary to sit in complete cold? Factory seat heating is installed only in luxury versions of the Priora car. Installing it is not very difficult, the main thing is to connect everything correctly. Heated seats, like “Emelya”, do not need to be installed, the seat upholstery is not removed, because it is just a cover for the seats - it is inserted into the cigarette lighter - although for some reason, over time, they burn out the cigarette lighter fuse.
You can install heated seats on a Priora yourself; it will cost relatively little (compared to the fact that your health can suffer greatly from warming up a frozen car). The heated seat control unit can be installed in the Priora where it is convenient: the main thing to remember is that this is not the most necessary button when driving a car, it should not interfere with pressing other levers and buttons. Read the article to the end and your car will be warm even at minus 45.
Connection diagram for heated seats
There are 2 types of kits: original, designed for a specific car model, and universal. Built-in models If you decide to install heated seats in your car and want to use a built-in type, then you need to take into account that this method is difficult to install.
We make the connection as indicated above. Of course, you can do this, but it’s one thing to install the system and forget it, and quite another to experience inconvenience with this very pad, which constantly falls off, fidgets around the seat, and gets in the way with protruding wires. In systems manufactured in China, switch buttons often break, short circuits occur, etc. Next, the fabric is pulled. heated seats. VW Passat b3. trade wind how to connect heated seats
What is needed for this?
For an untrained driver, one seat usually takes about four hours. The heating areas are also different: some heat only the seat, others have a heated back.
Which one is better is up to you to choose! The standard heating warms the seat and lower back.
Installation of standard seat heating on Lada Priora
The standard seat heating kit for Priora should include:
- Heating elements (4 in total, two for each seat);
- Block for the control unit with wires;
- Priora seat heating unit.
At the same time, the article number for heated seats for the Lada Priora must contain the numbers 2170 - this, as any Priora owner knows, is the model number. It is worth distinguishing the standard heating kit for Priora 2 by catalog number - in comparison with the kit for Priora 1, they are different. The entire installation of seat heating on a Priora is best described with a detailed step-by-step algorithm, which has been tested by time and other car enthusiasts:
- We remove the front seats. Remove the factory covers from the seats, which are secured with a metal spoke and three plastic latches. You can disassemble the seats without dismantling them, removing only the covers, but then the process will become a little more complicated - it will be inconvenient to deal with wiring and laying out heating elements;
- We attach heating elements to the seats - one on the lower part, the second on the backs, in the lumbar area. Some people recommend attaching it with double-sided tape, but over time it can come off. It would be safer to sew the heating element to the pillow so that it does not move out of its place;
- Pull the wires from the heating elements through the hole in the mount under the pillow (run the wires from the lumbar heating elements to the place where the seat upholstery is attached). The piece of wire that passes through the hole can be protected from chafing using some kind of plastic tube. The power plugs for all four elements are out, all that remains is to connect them;
- Disassemble the central tunnel. Buttons for heated seats will be in place of the plug near the handbrake;
- The wiring is connected strictly according to the connection diagram for heated seats. Before doing this, it is recommended to disconnect the battery from the network. We install a terminal block to the heating control unit. The (-) black wire is attached under the bolt near the handbrake. A gray-red wire (for aesthetes, it is responsible for illuminating the buttons) is connected to the lighting of the cigarette lighter rim. The red 12V wire is pulled to the mounting block. You can't do without a fuse here. Then everything goes strictly “by the numbers”. Connect pin 87 to the red wire, pin 86 to the black wire. Connect the blue-black 12 V wire to pin 85, the pink wire to pin 30. You can connect to the mounting block via cut-in clamps to hold the wires tighter;
- Reassemble the tunnel and install covers on the seats.
The standard seat heating on the Priora is guaranteed to last for several seasons if it is connected correctly. And if immediately after installation the heating does not work, it means the wiring connection was incorrect.
Repair of heated seats on Hyundai Solaris
If the multimeter shows a break, we will repair the heating element.
We disconnect the power supply chips for the heated seats and begin the analysis.
To do this, you need to remove the seat, then remove the trim. This is easy to do - you need to remove all the plastic decorative elements, after which the upholstery can be easily removed.
We unscrew everything that spins.
The heating element itself is a wire covered with film. The place of the cliff should be immediately visible from the black burnt mark. The break point is thoroughly cleaned, the wires are tinned and soldered, and then insulated with heat-resistant tape.
Electrical breakdowns
In addition to troubles with the heating element, the reason for non-working heating may be the failure of one of the fuses, the temperature controller, or lack of contact on one of the power terminal blocks or control circuit.
They are checked with a multimeter, according to the electrical diagram. You also need to remember that the plant provides a guarantee on all Solaris electrical equipment for 5 years or 150 thousand km, except for the audio system.
How to remove the front seats
Instructions for dismantling the front seats will be needed not only for installing heating. The front seats in the Priora are installed simply, and to install and disassemble them you will need several tools and strength. By the way, on the Priora 2 seats in the “Lux” configuration have become softer and more comfortable, but the adjustment is still the same - you cannot adjust the height.
There are not many instructions on how to remove the front seat, everything is simple:
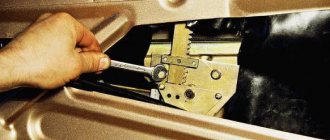
First you will have to move the seats all the way back and remove the torsion bars. You will need a size 8 wrench (for five bolts securing the slide) and a size 13 wrench (for four bolts on the bracket fastenings). First you need to unscrew the bolts on the bracket, then tilt the back of the chair back as far as possible and unscrew the two bolts on the slide. After this, tilt the backrest as far forward as possible and unscrew two more bolts. The seat can be removed from the passenger compartment.
How to remove the back sofa
Removing the rear row of seats is rarely done - only for cleaning or upholstery with new covers. However, also read the instructions for removing the rear sofa and keep it in mind “just in case.”
- Unclip the seat cushions on both sides (they are angular) and remove them from the passenger compartment.
- Find the locking strap above one of the backrests and pull it up. Do the same with the other back.
- Unscrew the bolts securing the armrest and remove it;
- Unscrew the bolts securing the hinges to the body.
Composition of a seat heating kit and how to install heaters on Granta with your own hands
Preparation for installation of heating elements
Before connecting the heated seats on the Grant, you need to secure the heaters under the upholstery of the seats. Of course, it is more convenient to do this on dismantled “seats”, previously disassembled into two parts: the back and the support. Creating acceptable conditions for installing heating elements is the goal of the preparatory stage. By the way, when determining the reasons for the knocking of hydraulic compensators, there is a slightly different logic.
Preliminary activities are carried out according to the following scenario:
- Disconnect the power supply to the seat belt sensor located under the seat. In many trim levels, this option is available only to the driver.
- Using an E10 head mounted on the knob, unscrew the four bolts connecting the base of the seat frame to the body and remove the seat. For ease of access to fastening elements, move the seat to the farthest or closest position. Similarly, remove and pull out the second front “seat” from the passenger compartment.
Lada Priora Sedan Sochi edition › Logbook › Installation of heated seats from Priora2
Good day! I installed heated seats from the new Priora (with a three-level regulator). The installation is trivial and simple but at the same time very labor-intensive.
1. Remove the seats and the central part of the tunnel.
2. We disassemble the seats down to the foam rubber.
3. Install the heating and pull the wires through the hole (which needs to be made in the foam rubber)
4. In the stub of the standard buttons, we cut out the middle so that the block of buttons of the new model will fit there.
5. We lay the positive wire to the mounting block and the wire to the air ducts of the rear passengers' feet.
6. Assemble the center console, install the button, connect the connectors.
7. We install the seats and connect them.
8. Connect in the mounting block via a fuse (no relay needed)
9. Enjoy the result.
Heated seats on Hyundai Solaris
heating element and internals.
The system of electric seat heating on Solaris is not complicated - it consists of two heaters (cushions and backrests), a two-stage temperature controller and a wiring harness.
Protection
The system is protected from short circuit and overload by two fuses. One protects the control circuit, the second the power circuit. The power circuit fuse is located in the mounting block and is marked F33, its rating is 15 A.
The heating system control circuit is protected by a 10 A fuse, designated F17 in the diagram.
Articles
In the event that we have neither the time nor the desire to bother with replacing the heating elements ourselves, we can always set aside about five thousand rubles and contact the service.
At the same time, it’s still worth buying heating elements for the seats yourself, it will be cheaper. The seat cushion heating element has catalog number 88199-4L070, the back heater is sold under the number 88399-4L070, and they cost around 4.5 thousand rubles.