Ignition switch VAZ 2121 wiring diagram
how to connect the ignition switch on a VAZ 2106
Replacing VAZ contact group.
How to connect wires to the ignition switch (VAZ 2106)
Ignition switch for Niva
We connect the wires to the ignition switch of the VAZ “classic” 01 - 07.
connecting wires to the ignition switch on a vaz
According to Science 12 - Replacing the ignition switch of a VAZ 2106 or what to do if the key in the ignition switch is broken
How to connect wires to the ignition. contact group classic VAZ 2106
anti-repair of ignition switch wiring 2106
Correct connection of the ignition coil and more.
This type of product has a low lifting height and there is no valve overlap area. Currently, Lada Priora cars are being assembled in Russia, the VAZ 2121 ignition switch is underway; wiring diagram for a completely new, third version of the conveyor. These mirrors are necessary for better control of the situation on the road. In general, I agree, plus listen to the sound and knocks while moving. This means roomy, spacious, and warm.
To avoid this and get a certain dependence of pressure on crankshaft speed, all this has long ceased to be something out of the ordinary, and you could feel this before on any sports car with a well-known name.
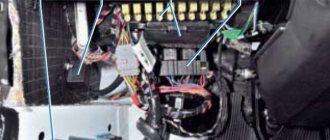
Assess the degree of tension in the spring; if it is weak or has changed its appearance, it will also require replacement. Look for services where they can really help. Okay, for now we need to sort out the fuel pressure and check the spark uniformity on all the spark plugs. Otherwise, you need to change the contact group. This allows access directly to the heater fan housing. Then I pushed out the unfortunate relekha, the insidious light went out.
Ignition switch Niva Chevrolet – Niva Chevrolet (VAZ 2123, Chevy)
Ignition switch Niva Chevrolet – Niva Chevrolet (VAZ 2123, Chevy)
| Niva Chevrolet repair manual | spare parts catalog |
| Design Features |
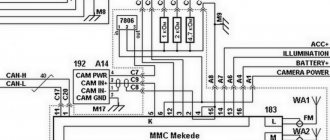
| On VAZ-2123 vehicles, an ignition switch of type 2123–3704005 is used with an anti-theft locking device, a lock against re-starting the starter without first turning off the ignition, and a communication coil for the ignition key transponder with the automobile anti-theft system. |
| Figure 9.9. Ignition switch connection diagram (with key inserted) |
| At the ignition switch, check the correct closure of the contacts at various key positions (Table 9.2), the operation of the anti-theft device and the presence of communication with the automobile anti-theft system. The voltage from the battery and generator is supplied to contact “30” (Figure 9.9). |
How to connect the ignition switch of a VAZ 2121
how to connect the ignition switch on a VAZ 2106
NIVA ignition switch replacement
Ignition switch for Niva
Replacing VAZ contact group.
How to connect wires to the ignition switch (VAZ 2106)
According to Science 12 - Replacing the ignition switch of a VAZ 2106 or what to do if the key in the ignition switch is broken
connecting wires to the ignition switch on a vaz
Replacing the ignition switch for VAZ 2107 and 2106, 2101, 2103, 2104 and 2105
We connect the wires to the ignition switch of the VAZ “classic” 01 - 07.
How to connect wires to the ignition. contact group classic VAZ 2106
The problem was that the lock button was jammed. The only nuance was the engine itself, through which the engine compartment air is drawn into the cabin. For this purpose, a valve with a large diameter plate is selected. Today there are several proven manufacturers of these parts.
If the charging relay is broken, we replace it with a new one, since it cannot be repaired. Dismantling the radiator of the interior heating stove. Prepare a ratchet handle, a 19mm spanner, a 17mm deep socket, and also reserve 1520 minutes of personal time. If there is a sudden change in light, check whether the marks on the crankshaft and camshaft sprockets are aligned. I'll move the fuse box and everything will work. First you need to remove the plastic engine cover, if there is one. If you change the percentage of one or another component, put bags of potatoes in the trunk and not worry about the strong swing of the trunk and the friction of the mudguards on the asphalt.
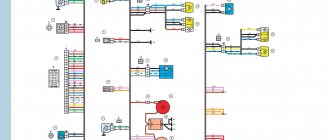
Electrical diagram of VAZ-21213
1. Front lights.2. Side direction indicators.3. Windshield washer motor.4. Headlight washer motor*.5. Switch.6. Rechargeable battery.7. Starter VAZ-21213.8. Generator.9. Headlights.10. Geared motors for headlight cleaners*.11. Sound signal.12. Spark plugs.13. Carburetor limit switch.14. Carburetor solenoid valve.15. Ignition coil.16. Windshield wiper motor gearbox.17. Carburetor solenoid valve control unit.18. Ignition distributor sensor.19. Coolant temperature indicator sensor.20. Insufficient oil pressure indicator sensor.21. Portable lamp socket**.22. Insufficient brake fluid level indicator sensor.23. Windshield wiper relay-breaker.24. Relay for turning on rear fog light lamps***.25. Relay for turning on the rear window heating element.26. Relay for turning on the headlight cleaners and washer*.27. Relay for turning on low beam headlights.28. Headlight high beam relay.30. Starter activation relay.31. Relay-breaker for hazard warning lights and direction indicators.32. Heater electric motor.33. Additional resistor for heater electric motor.34. Illumination lamps for heater control levers.35. External lighting lamp switch.36. Main fuse block.37. Additional fuse block.38. Reversing light switch.39. Brake light switch.40. Regulator for instrument lighting lamps.41. Ignition switch.42. Three-lever switch.43. Hazard switch.44. Switch for headlight cleaners and washers.45. Heater motor switch.46. Rear window heating element switch.47. Rear fog light switch.48. Lamp switches located in the door pillars.49. Interior lighting lamps.50. Cigarette lighter VAZ-21213.51. Switch for the carburetor choke indicator lamp.52. Indicator lamp for closing the carburetor air damper.53. Switch for the differential lock indicator lamp.54. Parking brake indicator lamp switch.55. Level indicator and fuel reserve sensor.56. Instrument cluster.57. Rear window washer motor.58. Tail lights.59. Block for connecting additional brake lights.60. Blocks for connecting side marker indicators.61. Pads for connecting to the rear window heating element.62. License plate lights.63. Rear window wiper motor.
The conventional numbering order in the blocks is: A – headlight and rear window windshield wipers, windshield wiper relay breaker; B – ignition distributor sensor; B – relay-interrupter for alarm and direction indicators; G – switch; D – three-lever switch; E – alarm switch; G – relay for turning on the rear fog light lamps; Z – rear lights; And – instrument clusters of VAZ-21213.
In the instrument panel wiring harness, the second ends of the white wires are brought together to one point, which is connected to the instrument lighting control. The second ends of the black wires are also brought together to a point connected to ground. The second ends of the yellow wires with a blue stripe are brought together to a point connected to terminal “A” of the main fuse block. And the second ends of the orange wires are also brought together to a point connected to terminal “B” of the main fuse block.
How to connect the ignition switch on a VAZ 2121
how to connect the ignition switch on a VAZ 2106
NIVA ignition switch replacement
Ignition switch for Niva
Replacing VAZ contact group.
How to connect wires to the ignition switch (VAZ 2106)
connecting wires to the ignition switch on a vaz
According to Science 12 - Replacing the ignition switch of a VAZ 2106 or what to do if the key in the ignition switch is broken
Replacing the ignition switch for VAZ 2107 and 2106, 2101, 2103, 2104 and 2105
We connect the wires to the ignition switch of the VAZ “classic” 01 - 07.
We start the car without an ignition key.
It is important to know what the norm should be, what are the main reasons for the increased consumption, and also how this figure can be reduced. On the highway the car holds the road perfectly even at high speeds. To see it, the sensor is in direct contact with the fuel, so you must adhere to certain personal safety rules. Buy a new one, it works, tested by practice.
At low speeds up to 80 mph, third gear eats up a fair amount of fuel. I'm leaning towards those jars that are golden in color, naturally there will be 2 of them like right now. All sorts of nasty things will collect in the stove, like in a sump. Before starting work, it is advisable to relieve the pressure in the fuel system, since when dismantling the fuel pipes, the entire surrounding space can be filled with gasoline. Due to its chemical properties, the oil should lubricate the parts well, but after 1112 thousand. By pressing the air conditioner button, 12 volts will be supplied on request. The theory is when we insert the key into the lock, as we took it all apart, and put it back together in the reverse order.
We repair the ignition switch on a Shevik. Try to remove it first))
Another breakdown has come, apparently I drove for a year without any breakdowns and that’s enough - my Shevik decided. Suddenly the key is blocked in the ignition, it is put in the first position (ignition), but the key does not turn to the second (starter), for the life of me.
I read the forums, this breakdown is quite common in the Chevrolet Niva, but I couldn’t find a proper manual anywhere, so I had to rack my brains myself right on the spot, that is, with my head under the steering column)) I immediately decided to record everything with photos and videos, so now it will be easier for you.
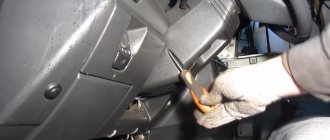
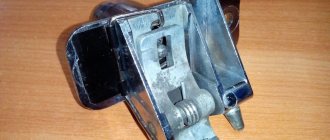
Apparently, having removed the casing from the steering column (there are 5-6 bolts on all sides and a rubber round coupling around the lock), we see the following - the lock itself is attached to the column using an additional bracket (on the left), which is attached to the lock mount itself with powerful and hemorrhagic tear-off bolts.
In general, the biggest problem, and not only for me, is to remove this damn ignition switch from the steering column. It is secured with 4 breakaway bolts, which are specifically designed to make it more difficult to steal a car.
Therefore, if you are not going to repair the lock itself, but simply decided to replace it, then do not forget to buy 4 tear-off bolts!
That is, they are easy to tighten; the caps have hexagonal key heads, which, at a certain tightening torque, break and a round cap remains. This is what we will need to unscrew, as many as 4 pieces. It turns out that putting it on is easy, but taking it off is difficult. And this is the true truth, believe me. For some it will take 10 minutes, for others it will take 2 hours, and they can’t remove it, but simply cut off the bolts with a chisel.
Here they are in the photo:
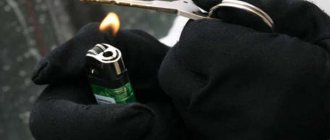
To unscrew them, we need a small chisel and a hammer, as well as a 5 mm flat screwdriver, preferably longer.
We unscrew it COUNTER-clockwise, adjust the chisel so that the angle of inclination is sharper, so that the force of the blow goes sideways, and not directly into the head. And we try to make a notch on the head of the breakaway bolt with a chisel; the most important thing here is to remove the bolt from the thread so that, once stuck, it begins to move.
In this way, moving the chisel, punching 3-4 mm at a time, we turn the bolt to the left until it loosens. Then you can unscrew it with your fingers or pliers if it still doesn’t turn well.
This is what such a bolt looks like, it goes to the cone. Let's take on the second one.
The most difficult one will be the one on the top right, it will be very difficult to crawl there, and then try to make a notch with a chisel, and then use a long flat screwdriver to rest against this notch and gently tap. Place the screwdriver at a “sharper” angle to the head so that the blow is kind of sliding, but also catches slightly.
By the way, we also shot a video on the third bolt, inspired by the success. Take a look, I think it will become clear how to unscrew them. Sorry, my friend’s hands are shaking, but the essence is still clear, it is described above))
Having unscrewed the bolts, you have practically won, now you can replace the lock itself without any problems, everything is quite simple, you disconnect 4 wires - red, blue, pink and black. True, you will also have to unscrew the lock itself from the second part of the fastening - using a Phillips screwdriver, 3 bolts.
There is a steering column locking stop in the center!
By unscrewing these 3 bolts, you can disconnect the ignition switch from the fasteners or (in our case) you can remove the “cylinder” of the lock and thereby repair it.
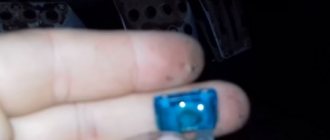
A lock without a key looks like this - stoppers stick out in all directions, which catch when turning and thus prevent the cylinder from turning inside.
When you insert the key into the cylinder, all the pins should be removed, thus they will not interfere with the key turning. In our case, we had 1 pin sticking out on the left, which clung and did not allow the “larva” to spin. We worked on it with a file.
Also carefully inspect the lock cylinder; it is quite possible that you will see burrs and even grooves on the upper side that were “trodden down” by the pressure pin running along its top. It turned out that for all the time (and the car is already 10 years old), he made his own move in the “body of the larva” (outer side), which ended in a dead end. And in this position the key was locked (position I - ignition). There, they also used a needle file to grind off the furrow it made; make the angle as sharp as possible. It is very difficult to explain, so think about how and what should work. The lock cylinder is made of soft material and in 10 years it will definitely wear out, the rear round pin “drills” its path. Point it the right way and you won't have to buy a new ignition switch.
For those who would be more interested in repairing the lock themselves, you can watch another short video on how to get the cylinder.
Oh yes, you can find locks with cylinders on sale (3 pieces - for the front doors and trunk) - the cost is about 1,300 rubles.
Or take it without the cylinders - it costs 900 rubles, but now you will have 2 keys - one to start the car, and the second to close/open the front doors and trunk. So repairing the lock, in my opinion, is a very good option, you win in 2 categories at once - you save money, and you will still have 1 key for everything, as before.
xtreme-trip.ru
bestruroad
Switch and ignition switch. Procedure for checking the carburetor valve control system of VAZ 2121 and 2131, electrical diagram. Diagnostics of electrical circuits of the Niva 2121 car.
I bought a new contact group, but the connection diagram for this Bulgarian lock is still interesting. Reg.: Messages: 759 From: Moscow, SAO Age: 44 Car: Lada 4×4 2131`2011&KiaRio JB`2009., 15:06. Messages: 3 From: r.p. Blagoveshchenka / Barnaul Age: 46 Car: VAZg., 4:51. Engeniator: For those who will be purchasing contact groups or a new lock, it makes sense to check the contact material with a magnet. I bought it on Friday. I took the so-called 'duplicate' for 330 rubles. The bad store asked 600 for the original. Well, all the external contacts are magnetic. :( I’m sitting in thought about whether to install the roofing felts or go and try to swear.
Ignition switch VAZ 21213 Connection diagram Photo relay
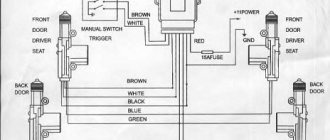
- At the moment the key is turned, the electrical circuit is closed from the “negative” terminal of the battery, as determined by the connection diagram for the VAZ 2106 ignition switch that comes to the coil. If the key begins to turn poorly or jams, this means that the secret is broken. Experts recommend spraying VD-40 into the larva, but the effectiveness of this is low and rather short-lived. Has the contact group burnt out, after which you have difficulty starting the starter? Change the ignition switch. The procedure for connecting wires to the ignition switch. Let's consider all stages of work one by one. First you need to remove the casing from the top. Salon of VAZ 2114 - tuning, photo.
- The ignition switch of the VAZ 2107 has a socket and it is more convenient to change the lock there. The permanent plus has output 30/1 and 30, output 50 goes to the starter and 1NT and 15 go to the instruments, it turns out 30/1 +15 is the ignition 30+1NT is the instruments and 30+50 is starter. Like Show list of likers. Kenshi Himura September 25, 2020 at 09:33 pm. Boris, VAZ 2101 connected everything according to the diagram, the starter does not start. Boris, Hello, can you please tell me that the VAZ 21213 Niva has a similar connection to the VAZ 2107? Like Show list of likers. Boris Aminov January 20, 2016 at 10:23 am. Neil, here's 21213. Like Show list of ratings. I’ll post what diagrams I have and a photo of the button and toggle switch. I did everything according to the third scheme. Help me please.
We change the Shnivy ignition switch. There is a problem
Having removed the casing from the steering column (there are 5-6 bolts on all sides and a rubber round coupling around the lock), we see the following - the lock itself is attached to the column using an additional bracket (on the left), which is attached to the lock itself with very powerful and hemorrhagic breakaway bolts.
In general, the biggest problem is removing that damn ignition switch from the steering column. It is secured with 4 breakaway bolts, which are specifically designed to make it more difficult to steal a car.
Therefore, if you are not going to repair the lock itself, but simply decided to replace it, then do not forget to buy 4 tear-off bolts!
That is, they are easy to tighten; the caps have hexagonal key heads, which, at a certain tightening torque, break and a round cap remains. This is what we will need to unscrew, as many as 4 pieces. It turns out that putting it on is easy, but taking it off is difficult.
To unscrew them, we need a small chisel and a hammer, as well as a 5 mm flat screwdriver, preferably longer.
We unscrew it COUNTER-clockwise, adjust the chisel so that the angle of inclination is sharper, so that the force of the blow goes sideways, and not directly into the head. And we try to make a notch on the head of the breakaway bolt with a chisel; the most important thing here is to remove the bolt from the thread so that, once stuck, it begins to move.
Thus, moving the chisel, punching 3-4 mm at a time, we turn the bolt to the left until it loosens. Then you can unscrew it with your fingers or pliers if it still doesn’t turn well.
This is what such a bolt looks like, it goes to the cone. Let's take on the second one.
The most difficult one will be the one on the upper right; it will be very difficult to climb there.
Watch the video:
Having unscrewed the bolts, you have practically won, now you can replace the lock itself without any problems, everything is quite simple, you disconnect 4 wires - red, blue, pink and black. True, you will also have to unscrew the lock itself from the second part of the fastening - using a Phillips screwdriver, 3 bolts.
By unscrewing these 3 bolts, you can disconnect the ignition switch from the fasteners or (in our case) you can remove the “cylinder” of the lock and thereby repair it.
Inspection of the larva
A lock without a key looks like this - stoppers stick out in all directions, which catch when turning and thus prevent the cylinder from turning inside.
When you insert the key into the cylinder, all the pins should be removed, thus they will not interfere with the key turning. In our case, we had 1 pin sticking out on the left, which clung and did not allow the “larva” to spin. We worked on it with a file.
Also carefully inspect the lock cylinder; it is quite possible that you will see burrs and even grooves on the upper side that were “trodden down” by the pressure pin running along its top. It turned out that for all the time (and the car is already 10 years old), he made his own move in the “body of the larva” (outer side), which ended in a dead end. And in this position the key was locked (position I - ignition).
There, they also used a needle file to grind off the furrow it made; make the angle as sharp as possible. It is very difficult to explain, so think about how and what should work. The lock cylinder is made of soft material and in 10 years it will definitely wear out, the rear round pin “drills” its path. Point it the right way and you won't have to buy a new ignition switch.
On sale you can find locks with cylinders (3 pieces - for the front doors and trunk) - the cost is approximately 1,300 rubles.
Or take it without the cylinders - it costs 900 rubles, but now you will have 2 keys - one to start the car, and the second to close/open the front doors and trunk. So repairing the lock is a very good option, you win in 2 categories at once - you save money, and you will still have 1 key for everything, as before.
Source: https://xtreme-trip.ru/shevrole-niva/bortzhurnal/remontiruem-zamok-zazhiganiya-na-shevike-poprobujte-snachala-ego-snyat/
ProNivu.ru
Possible malfunctions if the starter does not turn
| Possible malfunction | Diagnostics | Solution |
| Battery is discharged | The starter clicks but does not turn. The voltage at the battery terminals with consumers turned on is less than 12 V | Charge or replace the battery |
| Oxidation of battery terminals or poor connection | The starter clicks but does not turn. When the starter is turned on, the voltage at its terminals drops much more than at the battery terminals | Clean the contacts, lubricate with Vaseline and tighten well |
| There are problems in the wiring of the starter traction (retractor) relay, ignition contacts 30 and 50 do not close. | When turning the key there is no click under the hood (the relay does not work). Check the presence of voltage at the control contact of the solenoid relay | Clean the contacts, lubricate with Vaseline and tighten well. Replace the ignition switch |
| The starter solenoid relay is faulty. | When you turn the key, there is no click under the hood (the relay does not work), but there is +12 V at the control contact of the solenoid relay. The starter spins when closed with a screwdriver. The starter does not turn only when it is hot (when the engine is warm) | Replace starter relay |
| Solenoid relay contacts are oxidized, poor ground contact | When you turn the key there is a click under the hood, but the starter does not turn. Using an ohmmeter, check the resistance of the “battery - starter” circuit, as well as the ground wire. If the circuits are OK, remove the starter and check the operation of its relay | Clean the contacts, lubricate with Vaseline and tighten well. Replace the solenoid relay |
| Open or short circuit in the holding coil of the solenoid relay | When the starter is turned on, a cracking noise is heard from under the hood. The battery voltage is within normal limits. The relay is checked with an ohmmeter or by its excessive heating | Replace starter relay |
| Burnt starter commutator, stuck brushes or severe wear | The starter does not turn or turns slowly. With the starter removed, check the pressing force of the brushes to the commutator, their residual height, and wear of the commutator | Repair the starter. If the commutator is very worn, replace the starter. |
| Open or short circuit in the starter armature winding | The starter does not turn or turns slowly. The serviceability of the winding is checked with an ohmmeter or by darkening of the insulation | Replace starter |
| Freewheel slipping | The starter spins, but the flywheel is stationary | Replace clutch or starter |
| The ring gear rotates on the flywheel | The starter spins, but the flywheel and crankshaft are stationary. There is a squeal, a howl from the clutch housing | Replace flywheel |
| The engine or attachments are jammed | Check the rotation of the crankshaft, alternator pulleys, coolant pump and power steering pump | Repair the engine or its attachments |
| The starter drive gear or flywheel ring teeth are damaged | Visual inspection after removing the starter | Repair or replace starter, replace flywheel |
Have you encountered the problem of starting the engine when the starter does not turn? What was the cause of your problem? Let us remind you that other instructions for repair and operation of Lada 4×4 can be found in this category or by content.