Replacing the cabin filter
To independently replace the cabin filter on a Chevrolet Lacetti, you do not need additional tools.
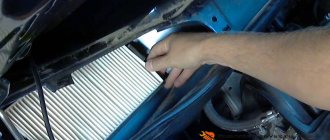
- Removing the cabin filter is not an easy task, as it might seem at first glance; to replace it you will have to remove the glove compartment. Prepare the vehicle for work. To do this, empty the glove box.
- The cabin filter cover is located inside the passenger compartment, behind the glove box. For easier and more convenient access to it, you will need to remove the glove compartment. With light force, pull the glove box towards you and disconnect the electrical wire going to the backlight and switch.
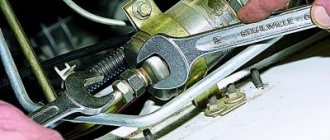
- Then, use a mirror, guide it into the opening, with its help you will find four screws that hold the air conditioner hatch. Take a 7mm wrench or use a Phillips screwdriver, unscrew the screws that secure the cabin filter cover to the air conditioner housing, and remove it.
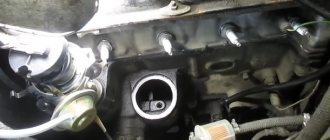
- Remove the carpet located under the feet of the passenger seat from the passenger compartment. Begin to pull the cabin filter element out of the mounting housing until it rests against the carpeted floor. Then, on the filter frame you will see technological cuts, fold the filter along them, you need to give it the shape of a parallelogram, so it can be easily removed from its seat through the hole in the air conditioner. Remove the cabin filter element from the housing.
- The new filter is installed in the same way, only in the reverse order of removal.
DIY cabin filter installation
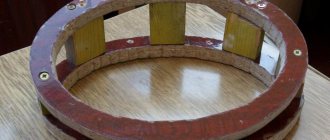
When making your own filter, you can use a universal filter from a household air conditioner. Glue, a metal mesh and a frame from an old filter will also come in handy.
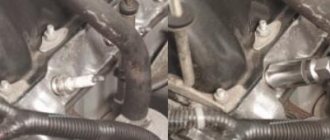
Having determined the location of the filter, you need to remove the hood grille and remove the right side of the trim. Next, the tubes and protective casing are removed. The old filter is held in place by plastic latches, which can be removed to change the filter. The arrows indicate the direction of air, you need to focus on them for proper installation. After completing the installation, reassemble in the reverse order.
Installing a cabin filter on a car. Replacing the filter.
On some models (mostly Russian-made), there is no filter at all. For such machines, installing a homemade filter is even more important. The installation location may be the stove air intake, located under the hood. Having decided on the size of the filter, a frame with carbon filler is made and glued with sealant.
Removing the cabin filter from a car. Replacing the filter.
Useful tips
- According to all recommendations, the filter element requires replacement, but if you decide to simply clean it, this option is also possible if replacing with a new one is not possible at the moment. In this case, mark its installation position.
- When assembling, do not overdo it; when installing a new filter, try not to damage the foam pads located around the perimeter of the filter.
- When installing the hatch, draw your attention to the fact that in addition to the four installation holes, there are two more on it; they are intended for guiding bosses in the body. To avoid confusion with the holes on which of them to mount the hatch, you can again use a mirror.
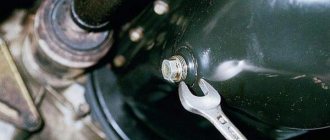
- When you tighten the screws, you should not use unnecessary force, otherwise there is a risk of damaging the threads on the plastic body.
- When installing and securing the glove box, make sure that its position is level. Do not completely screw it on right away; first, you should inspect the gaps in the panel opening when the glove compartment is closed, and after that you can secure it completely.
Cabin filter
The cabin filter is designed to clean the air flows entering the car interior, ridding its contents of dust, pollen, fungi, bacteria, fluff and plant spores, while allowing us to breathe easily. All this is ensured subject to timely replacement of the filter element and the quality of its manufacture.
Strict requirements are applied to the cabin filter; it must clean the air entering the car interior as much as possible. The estimated quality of purification will be 90%, and in the remaining 10%, the presence of harmful substances and particles should be minimized. Fulfilling these requirements, the filter must also not lose its operating properties and continue to work under harsh operating conditions for as long as possible, trying to meet the replacement periods recommended by the manufacturer. In addition, its main function remains to allow the maximum purified amount of air into the car interior.
The cabin filter element may have several layers. The simplest and most necessary layer is made of paper; it is capable of trapping large dirt particles, more than 10 microns, that enter the filter. After the paper layer there is an electrostatic filter layer; it traps smaller particles, less than 10 microns. Further, some models of cabin filters are equipped with a special layer that contains activated carbon.
Using activated carbon impregnation, the filter purifies the air and does not allow unpleasant odors and harmful gases to pass through. This process is called adsorption. The final layer is an additional filter element that completes the cleaning, as they say, a reserve parachute. Thus, cabin filters can be single-layer or three-layer, it all depends on the manufacturer, which filter he will choose to install on a particular brand of car.
Replacing the cabin filter in a Chevrolet Lacetti is a standard procedure during a routine inspection. To save time and money, many drivers prefer to replace this part themselves. How to change the cabin filter with your own hands, read below.
How to change the cabin filter device
In fact, this element can be changed quite simply; you just need to correctly determine its location and then get close to it. It is extremely important, when removing the plastic inserts behind which the filter is located, not to damage the snap elements that secure them. It is advisable to read the car’s instructions several times, which detail how to remove the mount, how to restore it, or completely replace the element due to a breakdown.
After dismantling the used filter, do not rush to install a new element in its place. Experts advise using a vacuum cleaner or otherwise cleaning the area where the filter device was located. After this, you can begin installing a new filter. At the same time, do not forget to look at the indicators on the device - they will indicate which side to install the filter device correctly.
Old and new filters
Some companies provide installation diagrams for the filter device. Usually, this is an arrow that indicates the direction of air flow: when the pointer is pointing down, it means the air flow is coming from above.
If there are no indicators, you should determine on which side the grooves are deeper. It is through this side that the air passes before it is cleaned. The logic is that grooves with greater depth require a longer collection of large debris and leaves. Let's look at how the filter device changes on some car models.
Changing the filter on Toyota
In the Corolla model, the cabin air filter is located at the passenger's feet behind the glove box. To change the filter, you don't need anything, just a new device.
This is interesting: Instructions for replacing the fuel pump yourself
There are special latches on both sides of the glove compartment. When they are unfastened, the drawer lowers slightly. This will give access to the filter unit. The block is held in place by 2 latches that must be released. Now nothing will prevent the installation of a new filter device.
If during installation the drawer dropped lower, you should check the micro-lift drive (small piston), which ensures smooth opening of the drawer. Most likely, it simply flew out of the mount.
How to change the filter
Changing the filter on a Chevrolet Cruze
The sequence of actions when replacing the filter device is as follows:
- From the sides, inside the glove box, you need to remove 2 snap-on stops, moving them slightly and then pulling them towards you.
- Unfasten the travel stop from the right edge.
- When the glove compartment is lowered, the plastic cover of the filter device will become visible. The element can be changed by removing the cover, which is held in place by three snap elements.
Changing the filter on Daewoo
In the Lanos model, the internal filter is installed in the space under the hood. The steps to replace the filter element are performed in the following sequence:
- Remove the rubber hood seal.
- We unscrew the three fasteners on the left side of the “jabot” - the plastic part in which the wipers are attached. Then you need to slightly pull it towards the near wing and remove it.
- Reach through the opening to find the top of the filter device. The new cabin filter is placed in the same place.
Note that when replacing the filter element on Lanos, you will need to show some resourcefulness.
Step-by-step instructions for changing the cabin filter
The driver can replace the cabin filter in a Chevrolet Lacette himself. To do this you will need a screwdriver, a clean sponge and a new air filter part.
How to replace the cabin filter:
- Empty the glove compartment from unnecessary things;
- Remove the glove compartment. To do this, you need to press the fasteners on both sides and move them;
- Afterwards, using a screwdriver, unscrew the bolts securing the cover of the protective box, inside of which the SF is located;
- Carefully remove the part and wash the seat with a clean rag;
- Install a new SF.
Choosing a cabin filter
Chevrolet Lacette car manufacturers recommend purchasing only original GM 96554421 consumable parts. If these are not available in the store, you can use high-quality analogues:
- fabric SF - FC22 from AMD. The surface of such parts is covered with coal, which prevents the development of microbes, mold and mildew;
- antibacterial SF PMC-003 from Parts-Mall are also often installed in Chevrolet cars;
- Russian SF TSN 9.7.18 from the manufacturer Citron. The price of the cabin filter is 350 rubles;
- paper SF - AG 628 CF from Goodwill.