How often to change the fuel filter? – According to the regulations, replacement must be carried out every 30 thousand km. mileage However, if the car is operated in dusty conditions or low-quality fuel is used, then replacement must be done more often.
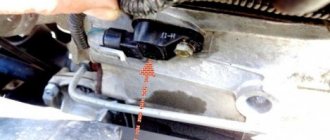
Where is the fuel filter located? – If the filter meets Euro-2 toxicity standards, then it is installed in the engine compartment on the left front mudguard under the spare wheel.
– If the filter meets Euro-3 toxicity standards, then it is installed under the bottom of the car, in a recess, above the additional muffler.
We carry out the work on a cold engine.
You mean that the fuel in the power system (with the ignition on, as well as for some time after) is under pressure. Therefore, before replacing the fuel filter, the pressure must be relieved. If the car’s ignition has not been turned on for more than 3 hours, then there is usually no pressure in the fuel system. You can check the pressure by unscrewing the cap of the fuel rail fitting and pressing the spool rod. (see here)
You also need to keep in mind that the filter is located below the level of the fuel tank and when it is removed, fuel can flow out of the tank through a tube disconnected from the filter. Therefore, you need to have a container to collect fuel.
To relieve pressure in the system, remove the lining of the left front sidewall (see here).
We disconnect the connectors connecting the wiring harness of the engine management system and the rear wiring harness.
We start the engine and let it idle until the fuel runs out. Then turn on the starter for 2-3 seconds. After this, the pressure in the power system will be released.
Disconnect the negative cable from the battery.
To remove the filter under the bottom (Euro-3)
To remove the filter under the hood (Euro-2)
Remove the spare wheel support bracket.
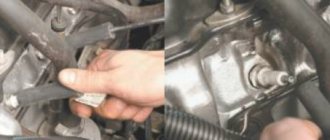
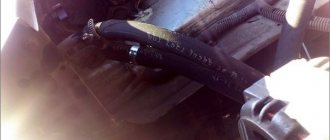
Holding the filter with a 19mm wrench, use a 17mm wrench to unscrew the fuel pipe fitting, gradually bleeding the gasoline into the substituted container.
Fuel filter Niva 21214 injector where is it located
Attention! We carry out the work on a cold engine.
Disconnect the negative cable from the battery.
Remove the spare wheel support bracket (see Removing the pipe and spare wheel support).
Holding the filter with a 19mm wrench, use a 17mm wrench to unscrew the fuel pipe fitting, gradually bleeding the gasoline into the substituted container.
We remove the fuel pipe from the filter. Similarly, disconnect the fitting of the second tube.
Each tube has a rubber O-ring, which we replace with a new one if damaged.
Use a 10mm wrench to loosen the clamp bolt.
. and remove the fuel filter.
Install the filter in reverse order.
The arrow on the new fuel filter should point toward the rear of the vehicle.
Having installed the new filter, we check the tightness of the connections while the engine is running.
everything useful is here
Replacing the fuel filter
EXECUTION ORDER
We carry out the work on a cold engine.
Disconnect the negative cable from the battery. Remove the spare wheel support bracket.
Holding the filter with a 19mm wrench, use a 17mm wrench to unscrew the fuel pipe fitting, gradually bleeding the gasoline into the substituted container.
We remove the fuel pipe from the filter. Similarly, disconnect the fitting of the second tube.
Each tube has a rubber O-ring, which we replace with a new one if damaged. Using a 10mm wrench, loosen the clamp bolt... ...and remove the fuel filter.
Install the filter in reverse order.
The arrow on the new fuel filter should point toward the rear of the vehicle. Having installed the new filter, we check the tightness of the connections while the engine is running.
The fuel filter on a VAZ 2121 and Niva 2131 with an injection engine is removed to replace it with a new one if it becomes clogged. The main sign indicating a filter malfunction is the appearance of interruptions in engine operation in different operating modes. Prepare a standard set of tools, and then perform the following sequence of actions:
- De-energize the vehicle by disconnecting the negative terminal from the battery. Next, remove the spare tire, and then remove the bracket for its support to provide free access to the filter.
- Next, prepare an empty container into which fuel will be drained when the fuel pipes are disconnected.
- Then, using a nineteen key, we hold the filter from turning, and with a seventeen key, we slowly loosen the nut securing the connection of the supply tube and gradually unscrewing it, bleeding off the fuel and, accordingly, the pressure.
- Similarly, unscrew the second tube and move them to the side. Copper O-rings are installed at the junction of the tubes.
- Next, use a socket head to loosen the tightening of the bolt of the clamp holding the filter and remove it.
- We install the new one in the reverse order, with the arrow on its body directed towards the rear of the car.
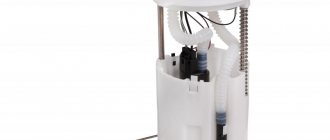
Removing and replacing the fuel pump on a Niva Chevrolet
- The negative terminal is removed from the battery.
- It is necessary to reduce the pressure level in the power system. One way to unscrew the valve on the fuel rail.
- You need to get to the back seat and fold back the cushion on it on the right side - the fuel pump is located there.
- Having discovered the sound insulation, with a special cutout for the fuel tank hatch cover, you need to bend it.
- Remove this cover by first removing the screws.
- After such small operations, you will have direct access to the fuel pump.
- You need to disconnect the block with the power wires on the pump.
- Remove the fuel hoses by releasing the spring clips. At this point, it should be taken into account that gasoline vapors create pressure in the fuel tank, which, after removing the fuel hoses, will displace gasoline. To prevent this from happening, it is recommended to remove the fuel filler cap before removing the fuel pump.
- The pump is secured with eight nuts that must be removed.
- After this, you need to remove the pump, lifting it up, then tilt it so that the fuel level sensor comes out of the hatch. Next, the pump is finally removed.
Installing a new or repaired fuel pump is done in the reverse order.
Fuel filter Niva 21214 injector where is it located
Attention! We carry out the work on a cold engine.
Disconnect the negative cable from the battery.
Remove the spare wheel support bracket (see Removing the pipe and spare wheel support).
Holding the filter with a 19mm wrench, use a 17mm wrench to unscrew the fuel pipe fitting, gradually bleeding the gasoline into the substituted container.
We remove the fuel pipe from the filter. Similarly, disconnect the fitting of the second tube.
Each tube has a rubber O-ring, which we replace with a new one if damaged.
Use a 10mm wrench to loosen the clamp bolt.
. and remove the fuel filter.
Install the filter in reverse order.
The arrow on the new fuel filter should point toward the rear of the vehicle.
Having installed the new filter, we check the tightness of the connections while the engine is running.
everything useful is here
Replacing the fuel filter
EXECUTION ORDER
We carry out the work on a cold engine.
Disconnect the negative cable from the battery. Remove the spare wheel support bracket.
Holding the filter with a 19mm wrench, use a 17mm wrench to unscrew the fuel pipe fitting, gradually bleeding the gasoline into the substituted container.
We remove the fuel pipe from the filter. Similarly, disconnect the fitting of the second tube.
Each tube has a rubber O-ring, which we replace with a new one if damaged. Using a 10mm wrench, loosen the clamp bolt... ...and remove the fuel filter.
Install the filter in reverse order. The arrow on the new fuel filter should point toward the rear of the vehicle. Having installed the new filter, we check the tightness of the connections while the engine is running.
The fuel filter on a VAZ 2121 and Niva 2131 with an injection engine is removed to replace it with a new one if it becomes clogged. The main sign indicating a filter malfunction is the appearance of interruptions in engine operation in different operating modes. Prepare a standard set of tools, and then perform the following sequence of actions:
- De-energize the vehicle by disconnecting the negative terminal from the battery. Next, remove the spare tire, and then remove the bracket for its support to provide free access to the filter.
- Next, prepare an empty container into which fuel will be drained when the fuel pipes are disconnected.
- Then, using a nineteen key, we hold the filter from turning, and with a seventeen key, we slowly loosen the nut securing the connection of the supply tube and gradually unscrewing it, bleeding off the fuel and, accordingly, the pressure.
- Similarly, unscrew the second tube and move them to the side. Copper O-rings are installed at the junction of the tubes.
- Next, use a socket head to loosen the tightening of the bolt of the clamp holding the filter and remove it.
- We install the new one in the reverse order, with the arrow on its body directed towards the rear of the car.
We install the engine on the Niva from a foreign car. It's worth it |
Remove the hood and spare tire.
We dismantle the spare wheel supports.
Disconnect the tip of the negative wire from the exhaust manifold.
Drain the oil and coolant from the engine.
We remove the radiator (at the same time, on a VAZ-21213 car we remove the fan casing, and on a VAZ-21214 car we remove the electric fans).
Remove the thermostat with the cooling system hoses.
Disconnect the coolant inlet and outlet hoses from the heater radiator pipes. Remove the air filter housing (on an injection engine, remove the housing with the mass air flow sensor).
Disconnect the throttle valve drive cable from the throttle assembly and the receiver of the injection engine.
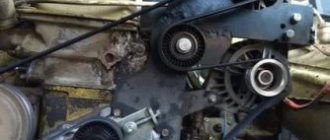
We disconnect the air and throttle valve drives from the carburetor of the VAZ-21213 engine. We dismantle the generator and starter.
Disconnect the exhaust pipe from the exhaust manifold and gearbox.
Also interesting: Engine jerking at idle: causes of malfunction
Disconnect the brake booster hose from the engine.
| We disconnect the air supply and crankcase ventilation hoses from the throttle assembly of the injection engine,... |
...as well as the adsorber purge hose.
On the VAZ-21213 engine, disconnect the fuel supply hose from the fuel pump, and the drain hose from the carburetor.
On an injection engine, disconnect the fuel drain hose from the fuel pressure regulator tube,...
| ...and from the fuel rail and fuel filter - a fuel supply pipe with a hose (gradually releasing the fuel pressure in the system). |
On an injection engine, remove the ignition module and disconnect the “mass” wire from the camshaft drive cover mounting stud; Engine wiring harness connectors from idle speed control, fuel rail, knock sensors, crankshaft and throttle position, coolant temperature (two sensors), oil pressure.
On a carburetor engine, disconnect the engine wiring harness connectors from the carburetor, ignition distributor, oil pressure and coolant temperature sensors. We take the wire harnesses to the side.
Disconnect the central high-voltage wire from the ignition sensor-distributor cover. We unscrew the nuts securing the left and right power unit support cushions to the front suspension cross member brackets. (see picture)
We dismantle the middle steering rod so that it does not interfere. For this…
...using a 17mm spanner, unscrew the nuts of the two bolts securing the pendulum arm bracket to the right side member.
We remove the bolts securing the pendulum arm bracket...
.and lower the pendulum arm assembly with the middle steering rod.
On the right side of the car...
... using a 19" head with a cardan joint, unscrew bolt 1 securing the front axle gearbox, and with a 17" spanner, unscrew nut 2 of the stud securing the right support cushion of the power unit to the cylinder block bracket (or the nut of the stud securing the support cushion to the front suspension cross member bracket ).
From the left side…
...with a 19" head we unscrew nuts 2 and 3 of the studs securing the front axle gearbox to the front and rear cylinder block brackets, respectively, and with a 17" spanner we unscrew nut 1 of the stud securing the left support cushion of the power unit to the front cylinder block bracket (or nut) studs securing the support cushion to the front suspension cross member bracket).
Using a 17mm socket, unscrew the three bolts securing the bracket to the cylinder block and remove it.
We unscrew the bolts securing the clutch housing cover to its lower part and the bolts securing the clutch housing to the cylinder block.
In order not to damage the clutch slave cylinder when dismantling the engine, disconnect the cylinder from the clutch housing (without disconnecting the hydraulic drive) and move it to the side on a hose.
And also interesting: Engine VAZ 21213 Niva | Niva engine tuning and repair
The implementation of the listed operations is given in the relevant sections.
We fasten the lifting device cable to the engine: on the right side - to the front eye; on the left side - behind the rear bracket of the cylinder block, to which the front axle gearbox was attached.
Lifting the engine, remove the studs of the left and right power unit mounts from the holes in the cross member brackets.
Then we move the engine forward to remove the end of the transmission input shaft from the bearing located in the crankshaft flange and from the clutch driven disc hub.
| We remove the engine assembly with the clutch and side supports of the power unit from the engine compartment. To fix the gearbox, we insert a wooden block of a suitable size between the clutch housing and the anti-roll bar. |
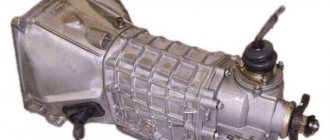
We install the engine on the car in the reverse order of removal. When connecting the engine to the gearbox, the input shaft of the gearbox must fit into the splines of the clutch driven disc.
Replacing the fuel filter VAZ-21214 | Car enthusiasts
Replacing the fuel filter
EXECUTION ORDER
We carry out the work on a cold engine.
Disconnect the negative cable from the battery. Remove the spare wheel support bracket.
Holding the filter with a 19mm wrench, use a 17mm wrench to unscrew the fuel pipe fitting, gradually bleeding the gasoline into the substituted container.
We remove the fuel pipe from the filter. Similarly, disconnect the fitting of the second tube.
Each tube has a rubber O-ring, which we replace with a new one if damaged. Using a 10mm wrench, loosen the clamp bolt... ...and remove the fuel filter.
Install the filter in reverse order. The arrow on the new fuel filter should point toward the rear of the vehicle. Having installed the new filter, we check the tightness of the connections while the engine is running.
HdSxozARNdCZoZ0rmlIZmTSTN29TNdkrbraqebaqo3I5Ndk9etIUo3AwmLs6nl5wnl5SFlEwN2GVh4OUMDIuhRk4gDA4h3QSnlOuOBu0gBAypbefebaqebAsmLIQFlCsFlGwnlKxOB0rm2cWoDKrF JcZgBk2hJgZgBm4GJszhBarbraqebaqMdC0mj1QMb1ZNd90HjeZhBi4hBq0gZg4eR48F2SxoZ4=
Replacing the fuel filter VAZ 21214 injector Niva
Replacing the fuel filter (engineering) Niva VAZ 21213, 21214, 2131 lada 4×4
How often should you change the fuel filter? - According to the regulations, replacement must be carried out every 30 thousand km. mileage However, if the car is operated in dusty conditions or low-quality fuel is used, then replacement must be done more often.
Where is the fuel filter located? - If the filter meets Euro-2 toxicity standards, then it is installed in the engine compartment on the left front mudguard under the spare wheel. If the filter meets Euro-3 toxicity standards, then it is installed under the bottom of the car, in a recess, above the additional muffler.
| We carry out the work on a cold engine. |
You mean that the fuel in the power system (with the ignition on, as well as for some time after) is under pressure. Therefore, before replacing the fuel filter, the pressure must be relieved. If the car’s ignition has not been turned on for more than 3 hours, then there is usually no pressure in the fuel system. You can check the pressure by unscrewing the cap of the fuel rail fitting and pressing the spool rod. (see here)
You also need to keep in mind that the filter is located below the level of the fuel tank and when it is removed, fuel can flow out of the tank through a tube disconnected from the filter. Therefore, you need to have a container to collect fuel.
To relieve pressure in the system, remove the lining of the left front side panel (see here) ...
We disconnect the connectors connecting the wiring harness of the engine management system and the rear wiring harness. Start the engine and let it idle until the fuel runs out. Then turn on the starter for 2-3 seconds. After this, the pressure in the power system will be released.
Disconnect the negative cable from the battery.
To remove the filter under the bottom (Euro-3)
To remove the filter under the hood (Euro-2)
Remove the spare wheel support bracket.
| Holding the filter with a 19mm wrench, use a 17mm wrench to unscrew the fuel pipe fitting, gradually bleeding the gasoline into the substituted container. |
We remove the fuel pipe from the filter. Similarly, disconnect the fitting of the second tube.
| Each tube has a rubber O-ring, which we replace with a new one if damaged. |
| Use a 10mm wrench to loosen the clamp bolt... |
| ...and remove the fuel filter. |
Install the filter in reverse order.
The arrow on the new fuel filter should point toward the rear of the vehicle (in the direction of fuel flow).
Having installed the new filter, we connect the connection block between the wiring harness of the engine management system and the rear wiring harness. We check the tightness of the connections with the engine running.
lada-niva.ru
Where is it located and how to replace the fuel filter on a Niva Chevrolet
The Chevrolet Niva fuel system requires systematic maintenance. If this is not done, the driver will be in for unpleasant surprises: the engine starts to run jerkily, some noise is heard in it after starting, and fuel consumption increases significantly. These are all signs of a clogged fuel filter that needs to be replaced. We will tell you how to replace it with your own hands in this article.
Where is it located and why is a fuel filter needed?
Before restyling it was located under the hood, after 2009 - next to the rear wheel
The purpose of this element is clear from its name: it must purify the fuel that is supplied to the engine from the tank through the fuel line. Any fuel, even the highest quality, contains foreign particles, water and other substances. All this remains in the fine filter, which on the Chevrolet Niva produced before 2009 was located under the hood, and on new cars that have undergone restyling, this filter is located under the bottom, at the right rear wheel, under a protective cover. This article will discuss replacing the filter on new machines.
The arrow shows a plastic casing on the bottom of the machine, behind which there is a fine fuel filter.
Which consumable to choose
You can install an original fine filter. (its GM OEM number is 21231117010). However, many car owners prefer to install imported filters, for example, Bosch 0450905273 or Hummel WK512. Such filters are more expensive than the original ones, but they will also last longer.
Replacement tools and supplies
- New fine fuel filter.
- Set of open-end wrenches.
- Set of socket heads with a wrench.
- Phillips screwdriver (medium size).
Sequencing
- The car is installed on the inspection hole.
- The interior opens and the right rear seat rises to an upright position.
Underneath there is a layer of soundproofing material. He leans to the side. The rear seat is raised, the sound insulation is removed, there is access to the cover - This gives access to the square fuel pump cover, which is secured to the floor with four self-tapping screws.
These screws are unscrewed using a Phillips screwdriver. The cover is attached to 4 self-tapping screws, which can be unscrewed with a Phillips screwdriver. - A block with wires is attached to the pump, which is held in place by a metal retainer.
The latch rises, the block is disconnected. The block with wires is disconnected manually, just lift the latch - After this, the car starts and idles until the engine stalls on its own. After this, the starter turns 3-4 more times, as a result of which the fuel pressure in the system is relieved.
- At the right rear wheel, under the bottom of the car, unscrew 2 nuts and 1 bolt, which hold the plastic casing.
This is done using a 10mm socket head. The casing is removed, allowing access to the fine filter. This can be done conveniently with a 10mm socket socket. - There are 2 plastic fittings at the ends of the filter.
They are squeezed with your fingers and removed from the tubes. These fittings are easy enough to squeeze with your fingers. - Using a 10mm wrench, loosen the bolt on the mounting bracket holding the filter, and it is carefully removed from its original location.
To remove it, loosen the bolt by 10 on the mounting bracket - A new filter is installed in its place, after which all components are reassembled.
Video: How to change the fuel filter on a Niva Chevrolet
Important points
- Any work on the fuel system must be carried out either
Replacement instructions
It would be logical to find out how much oil is in the VAZ Niva 21214 engine and how much motor fluid is required to purchase. If we talk about the volume of liquid being filled, then for the Niva engine it is 3.75 liters. The actual volume of oil in the engine is usually less than that indicated in the vehicle's data sheet.
This is due to the fact that when draining the waste, some of the oil still remains in the system. It is almost impossible to clean the engine 100% on your own. You should take plenty of oil, but not much. It is better to take a 5 liter canister of high-quality lubricant. This will allow you to fill the full volume into the crankcase, plus periodically add it as the level changes.
To work, you will need to collect some materials and tools. This list includes:
- fresh motor oil in the right quantity;
- an empty container where the waste will be drained;
- funnel for filling;
- fuel filter;
- 12mm hex or 17mm wrench;
- puller for the oil filter (you can do without it);
- inspection hole;
- rags;
- lighting;
- overalls (gloves, closed shoes, thick clothing).
If you have everything ready, you can start working. Be sure to follow the instructions step by step, do not rush and do not try to unscrew or tighten anything by applying great force. Otherwise, you risk breaking some parts, which will lead to more expensive repairs. We begin the procedure for changing the engine oil, changing the filter at the same time.
- Place the car on an inspection hole to have easy access to the bottom where the oil pan is located. The engine should be warmed up first so that the oil acquires a more liquid structure and can easily drain from the sump.
- If you warmed up the engine at idle, wait a few minutes so that all the liquid drains down. You can still unscrew the filler plug in the engine compartment. This will allow the oil to come out from below faster.
- Carefully unscrew the drain plug. It comes in different types, so you will need a hexagon or wrench to dismantle it. Before you begin to unscrew the cap, place an empty container under it. Unscrew completely and let the oil drain. This will take about 10 – 15 minutes. Therefore, at the same time, work on the oil filter.
- If the oil comes out very dirty, then a lot of debris, chips and dirt will remain in the system. In this condition, it is recommended to flush the engine. To do this, use special additives, flushing mixtures or fresh oil.
- There are additives that you simply add to the filler neck while the old grease is still there, start the engine and let it run for a few minutes. Then they are jammed and everything is removed from the pan.
- The option with flushing oil or regular fresh engine oil looks different. First, the old fluid is drained, then the drain plug is closed, fresh oil is added, the engine is turned on and it runs at idle speed for 5 - 10 minutes. Now the pan plug is unscrewed again and drained. If the engine is heavily dirty, it is recommended to repeat the procedure 2–3 times. This takes a lot of oil, but it gives the engine new life.
- Only after complete washing is the old filter removed and a new one installed in its place. The filter is unscrewed with a puller, manually or with an improvised tool. The puller is the most convenient, but is not always available to the car owner. Be careful not to damage adjacent pipes and wiring. For safety reasons, it is better to remove the negative terminal from the battery.
- Clean the holes for the drain plug and the filter if there is dirt there. Otherwise, they may get into the fresh motor fluid.
- Before reinstallation, check the plug gasket and replace it if necessary. The filter seal is lubricated with oil, and engine fluid is filled to 50% of the volume of the new filter. Now you can install them in place.
- Make sure that the filter and plug are firmly in place and that there are no leaks through them.
- We move on to the engine compartment, where we use a funnel to pour fresh composition through the filler neck. Fill in about 3.5 liters first, since some of the oil remains in the system. Close the lid and run the engine at idle speed for 2 - 3 minutes.
- Turn off the engine and let the oil drain. Take the dipstick and check the level. A trace of the oil film should remain between o and “Max”. If the level is closer to the minimum value, open the lid again, add a little more lubricant and repeat the procedure.
When you start the car, the oil pressure light will come on. It's not scary, it always happens. The indicator will go out after a few seconds. Over the next few days, monitor how your Niva behaves. Check under the car for traces of fresh oil. Leaks may occur due to a poorly installed filter or drain plug. Tighten the connections and recheck the level.
Owners of the VAZ Niva 21214 car are advised to periodically monitor the oil level, add it as needed and react promptly if the liquid suddenly changes color, becomes cloudy, its consumption increases or the engine overheats. Signs like these indicate more than just a leak.
Replacing the Fuel Filter VAZ 21214 ~ SIS26.RU
Replacing the fuel filter VAZ 21214
The VAZ 21214 engine can be used for installation on VAZ Niva cars: 2121, 21213, 21214, 2131; "Nadezhda" 2120 and their modifications.
The basis for the new unit was model 21213. Many structural elements of the 21214 motor are slightly different from the corresponding parts of the base model. The introduction of most configurations into the design is associated with the transition to an injection system, the introduction of parts that ensure compliance with Euro 2 (3) environmental standards and the introduction of hydraulic supports for valve levers. Installing power steering on a car required additional modifications to engine parts.
During its development, the engine underwent several modifications. The first models were equipped with centralized injection. Model 21214-20 already had pairwise-parallel fuel injection, a Bosch MP7.0 controller and complied with Euro 2 requirements. The transition to Euro 3 and the introduction of hydraulic supports for valve levers from the INA office required the upcoming modification of the engine. Engines of subsequent modifications are now being mass-produced.
21214-41 - modification with a power steering pump, with an iron welded manifold, YAZTA hydraulic supports, Euro 3.
21214-34 - modification without power steering pump, with a metal manifold, INA hydraulic mounts, Euro 3.
21214-33 - modification with a power steering pump, with a metal manifold, INA hydraulic mounts, Euro 3.
21214-32 - modification with a power steering pump, with a metal manifold, INA hydraulic mounts, fuel pipes for fast connectors, a flywheel for a 215mm clutch, Euro 3.
21214-31 - modification with a power steering pump, with an iron welded manifold, INA hydraulic supports, Euro 4.
Chevrolet Niva - replacing the fuel filter - Behind the wheel magazine
In accordance with the maintenance regulations for a Chevrolet Niva, we replace the fuel filter every 30 thousand kilometers.
Attention! If the car is operated in dusty conditions or with low fuel quality, the filter must be replaced more often than specified in the regulations.
The fuel filter is installed at the bottom of the car, in front of the right rear wheel and is covered with a plastic casing.
We carry out the work on an inspection ditch or overpass.
The fuel in the power system (with the ignition on and for some time after it is turned off) is under pressure. Therefore, if we replace the filter immediately after a trip or after turning on the ignition, it is necessary to relieve the fuel pressure in the power system. If the ignition has not been turned on for a day or more, there is usually no fuel pressure in the system.
Chevrolet Niva
To relieve pressure in the system, set the right rear seat cushion to a vertical position.
To relieve pressure in the system, set the right rear seat cushion to a vertical position.
Chevrolet Niva
Using a Phillips screwdriver, unscrew the two self-tapping screws securing the hatch cover...
Using a Phillips screwdriver, unscrew the two self-tapping screws securing the hatch cover...
Chevrolet Niva
...and remove the cover.
...and remove the cover.
Chevrolet Niva
Having released the block retainer, disconnect the wiring block from the fuel module.
Having released the block retainer, disconnect the wiring block from the fuel module.
We start the engine and let it idle until it stops due to fuel exhaustion. Then turn on the starter for 2-3 seconds. After this, the pressure in the fuel system will be released.
Chevrolet Niva
Using a 10mm socket, unscrew the bolt and two nuts securing the casing.
Using a 10mm socket, unscrew the bolt and two nuts securing the casing.
Chevrolet Niva
Remove the fuel filter housing.
Remove the fuel filter housing.
Chevrolet Niva
Squeezing the two clamps of the tip of the fuel outlet pipe, remove the tip from the filter fitting.
Squeezing the two clamps of the tip of the fuel outlet pipe, remove the tip from the filter fitting.
Chevrolet Niva
How to replace the fuel filter on a Chevrolet Niva
The fuel filter on a Chevrolet Niva must be replaced according to regulations every 30,000 kilometers. But the operating conditions for most cars in our country are quite harsh, especially compared to Europe. A large number of unpaved roads, low-quality fuel, lack of control over harmful emissions in megacities. There are many reasons that can be named, but all these factors primarily affect the level of wear of parts. Therefore, you should evaluate the quality of the fuel filter in Niva cars a little earlier than recommended in maintenance.
Attention! When working with flammable substances and the fuel system, it is strictly prohibited to smoke, as well as to place tools and materials near open sources of fire. When carrying out work in winter, it is recommended not to use heaters and heat guns
It is also necessary to remember that high pressure is constantly maintained in the fuel system and the fuel pump, so after stopping the engine you must wait at least three hours before loosening the fuel drive fasteners.
How can you reduce the pressure in the fuel system? There are several ways:
- It is necessary to unscrew the nut that secures the cover of the engine control unit, which is located inside the passenger compartment.
- After removing the cover, turn off the fuse that controls the operation of the fuel pump.
- Turn the engine on at idle speed and let it run until it has used up all the fuel remaining in the drainage system.
- After the engine stalls due to lack of gasoline, you can return the fuse to its place.
- Behind the fuel rail, there is a system control valve, which is usually closed with a plastic cap. Externally, it is similar to a spool used to control tire pressure.
- To drain the fuel, you need to press the spool with a screwdriver. This operation should only be carried out with the engine turned off and cooled down, because the fuel will come out under high pressure and it may get on some engine components.
Signs that the fuel filter needs to be replaced.
- First of all, this is the appearance of extraneous noise when the engine is running.
- When driving uphill, the car feels insufficient power.
- The engine speed fluctuates and jerks are felt.
- Fuel consumption increases with a quiet driving style.
- problems starting a cold engine.
If all or several of the above problems are present, and the possibility that they are caused by other structural elements of the car is excluded, then it’s time to start replacing the Niva Chevrolet fuel filter.
Fuel filter location
Before you begin replacing the fuel filter, you must remove the plastic protective cover, which is located at the rear of the car, on the right side.
It is better to carry out all replacement work on an overpass or lift.
To work you will need the following tools:
- set of keys with heads for 10, 17 and 19
- rags or rags
- container for draining remaining fuel
- set of o-rings.
Replacement instructions:
- Before replacing the gasoline filter, you must disconnect the battery terminals.
- Removing the spare wheel bracket
- Using keys 19 and 17, unscrew the fuel line fitting and drain the gasoline into a previously prepared container.
- We move the tubes to the side, freeing the filter. It is recommended to change the o-rings every time the filter is replaced, since their service life and the filter element are approximately the same.
5, Loosen the clamp using 10mm wrenches.
6, Remove the worn filter.
7.We are installing a new filter on a Niva Chevrolet.
8.After this, we install all components in reverse order.
When installing the filter, pay attention to the presence of marks indicating the direction of fuel movement. https://www.youtube.com/embed/bFlS2_Nlhtk