- Car make: Niva 2131
From: St. Petersburg
Tar deposits are caused by untimely oil changes or low-quality oil. I have people with a mileage of more than 150,000 km on our oil, they have never cleaned the ventilation, as it was not necessary. There are no deposits in the engine, system, or valve cover. In the photo: view under the valve cover of 2115, 2006, mileage 150,000 km, never washed. The car is serviced by us from the factory.
Attached images
Post edited by VMSP: 05 May 2014 - 07:08
Cleaning the crankcase ventilation on VAZ 2101-VAZ 2107
Cleaning the crankcase ventilation - in a “Classic” engine, this must be done constantly before replacing the engine oil with new one. If you do not follow this procedure, the crankcase ventilation system in the engine may become clogged over time, which will lead to a loss of power in the car, and in the literal sense of the word, the life of the engine may be reduced due to the fact that dirty air with particles will enter the engine emulsion that accumulates in the crankcase ventilation hoses after some time.
In addition to the fact that dirty air will enter the engine, due to the formed emulsion it will also pass through the hose with great difficulty, and therefore the gas pressure in the hoses and in the engine will increase, which will lead to oil leaks through the seals.
In fact, very few people clean the crankcase ventilation over time, and this must be done and is mandatory, so especially for those who do not yet know how to clean the system, we have prepared an interesting article in which everything is described in detail!
To clean the system, you will need to stock up on: A screwdriver, as well as a set of wrenches, which will include keys “8”, “10” and “13”. You will also need to take clean rags, a container in which you will wash the parts (Hoses, breather, etc.), as well as kerosene itself for washing these parts!
When should you clean the crankcase ventilation?
- It needs to be cleaned regularly, namely at intervals of “15,000-20,000 thousand km” of the car’s mileage.
It is best to clean the system before each oil change, because after changing the oil, it can deteriorate much faster due to contamination of the system!
- If the ventilation system is heavily contaminated, oil will be squeezed out of all the cracks in the engine, so pay attention to your engine (namely, whether it is oily) regularly.
Oil leaked from the gearbox — Lada 2107, 1.6 l., 2006 on DRIVE2
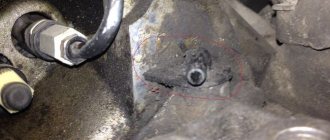
I was driving home without thinking about anything and suddenly I smelled oil, since I can distinguish the smells of oil, I immediately realized that it smelled like transmission oil. Without hesitation, I went to the garage to the pit to see what happened. The picture was like this!)
Oil leak at gearbox
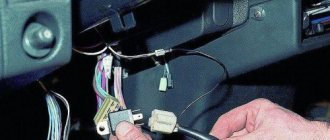
And all the suspicions were on the gearbox input shaft oil seal. After 3 hours of disassembly, removing the cardan and muffler, I saw that the oil seal was there like new. I began to think what it was, at first there were suspicions of a checkpoint sniffle, but it wasn’t like that, the snort was also clean. My friend Maxim, thanks to him for his help, stuck his hand into the upper part of the gearbox and removed a piece of the gasket. Well, I climbed up to disassemble the interior and take a look. I went online from my phone and looked up how to properly disassemble the slide. And this is what happened.
View of the gearbox with the rocker removed from the passenger compartment
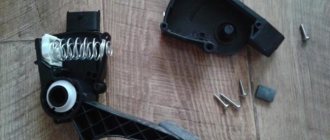
Next, I began to examine the rocker itself and found the cause of the oil leak. Here it is, you can clearly see it.
The old rotten gasket fell apart
It was necessary to change it, but it was already 23:00 and the shops were all closed. As a result, I cut out a new gasket from the paranit and assembled this drawstring with difficulty. So I assembled it and now the leak has been fixed) All that remains is to put everything in its place))
drawstring assembly
Note: If you remove the rocker from the interior, there is a wide and narrow circle, each of which has 3 nuts, so you need to unscrew the wide circle, and under no circumstances touch the narrow one. The point is that if you untwist a narrow circle, then all the springs, plates and other parts will all fall into the inside of the gearbox, PAY ATTENTION.
Visual explanation)
Like and comment
Issue price: 0 ₽ Mileage: 81,500 km
How to clean the crankcase ventilation on a VAZ 2101-VAZ 2107?
- First, remove the air filter housing from the car engine. (For information on how to remove the housing from a car engine, see the article “Replacing the Air Filter Housing”)
When removing the housing, be sure to remove the flame arrester from the crankcase ventilation hose, and then rinse it with kerosene if it is very dirty!
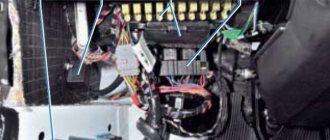
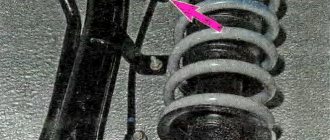
- Then loosen the clamp that secures the additional hose to the breather cover (Indicated by the red arrow), and then disconnect the additional hose from the cover. After disconnecting the additional hose, proceed to loosening the clamp of the main hose (Indicated by the blue arrow), and after loosening, also disconnect the hose from the cover.
- Next, remove the engine oil level dipstick.
- Then unscrew the bolt that secures the breather cover and then remove the cover from the car engine.
- Next, soak a rag in kerosene and wipe the entire internal cavity of the oil separator with it.
When you wipe the cavity, be careful not to get any dirt particles inside the engine. And also, if it is inconvenient for you to clean off dirt on the installed oil separator, then in this case, remove it from the car by unscrewing the nut that secures it (indicated by the red arrow), and then put the removed oil separator in a previously prepared container containing kerosene!
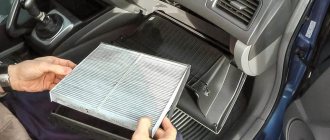
- Next, clean the entire air filter housing from dirt by wiping it with a rag soaked in kerosene.
When cleaning the air filter housing, remove the sealing gasket from it and also clean it of dirt!
- Install all previously removed parts in the reverse order of removal.
When installing all parts, replace torn and cracked gaskets with new ones. And also check that metal bushings are inserted into the gasket of the air filter housing!
1) If a large amount of kerosene gets into the engine crankcase, change the engine oil! (For information on how to change the oil, see the article “Changing Engine Oil”)
Question: What does the oil separator look like?
If you find an error, please select a piece of text and press Ctrl+Enter.
Breather hose VAZ 2107
Hello everyone, after cleaning the breather and replacing the hoses, I decided to install oil trap filters on them, since the oil was pressing into the air pipe and the throttle was getting dirty.
So, we will need: - a filter for washing machines of the “Geyser 1PF” type
— a 3/4-inch barrel (squeegee) for the filter, preferably plastic — direct-flow carburetor fine fuel filter — stainless steel iron sponge — clamps — high-temperature silicone sealant — epoxy or oil-resistant hot melt adhesive — knife
For a large hose, we will use a filter housing for washing machines, which has a similar cross-section of inlet holes. To do this, remove the filler and all the insides from the filter housing and insert a metal sponge.
The sponge was specially selected from stainless steel - it is soft and does not crumble, which is important in terms of safety. Screw the lid tightly, screw a suitable hose fitting onto the upper end, coat all connections with silicone sealant just in case - the filter is ready. For a small hose, at first I tried to simply install a paper sediment filter, but the paper immediately became clogged with emulsion and oil.
Therefore, I decided to do the same as with the first filter - insert a metal sponge. To do this, I purchased the same filter, but without a sump, a direct-flow one, so that the oil, after condensing on the sponge, could flow down, back into the crankcase.
Using a knife, we cut the body at the joint, cut off and remove the paper corrugation, insert a small piece of metal sponge. Glue the two halves back together with epoxy glue, sealing the sponge.
Do-it-yourself: Oil separator filters for VAZ-2107 breather hoses
Hello everyone, after cleaning the breather and replacing the hoses, I decided to install oil trap filters on them, since the oil was pressing into the air pipe and the throttle was getting dirty.
So, we will need:
– filter for washing machines of the “Geyser 1PF” type
– 3/4 inch barrel (squeegee) for the filter, preferably plastic
– direct-flow carburetor fine fuel filter
– stainless steel iron sponge
– high temperature silicone sealant
– epoxy or oil-resistant hot melt adhesive
For a large hose, we will use a filter housing for washing machines, which has a similar cross-section of inlet holes. To do this, remove the filler and all the insides from the filter housing and insert a metal sponge.
The sponge was specially selected from stainless steel - it is soft and does not crumble, which is important in terms of safety.
Screw the lid tightly, screw a suitable hose fitting onto the upper end, coat all connections with silicone sealant just in case - the filter is ready.
For a small hose, at first I tried to simply install a paper sediment filter, but the paper immediately became clogged with emulsion and oil.
Therefore, I decided to do the same as with the first filter - insert a metal sponge. To do this, I purchased the same filter, but without a sump, a direct-flow one, so that the oil, after condensing on the sponge, could flow down, back into the crankcase.
Using a knife, we cut the body at the joint, cut off and remove the paper corrugation, insert a small piece of metal sponge. Glue the two halves back together with epoxy glue, sealing the sponge.
Now we try on under the hood and cut the breather hoses to length, connect the filters, and securely fix them with clamps.
It is important that the filters are located vertically and away from the engine - they heat up less for better condensation of oil vapor.
Based on the results of operation, it is clear that the small filter is more susceptible to contamination and the formation of an emulsion, apparently, since the cross-section of the hose is very small and the crankcase gases work like a pump.
However, some of the oil still condenses and flows back into the pan.
The large filter, in appearance, remains almost “dry”, although occasionally the emulsion is still present.
In the summer I will remove the throttle for cleaning and check the result.
- Manufacturer: Balakovorezinotekhnika
- Availability: In stock
- Length: 33 cm x Width: 3 cm x Height: 3 cm
- Weight: 0.10 kg
- Product code: 996
- Catalog number: 21010-1014056-00
- Cash upon receipt (cash on delivery)
- Online payment by bank cards without commission
- Electronic wallets
- According to the organization's account (excluding VAT)
- Post office
- SDEK | DPD | PEC
- Business Line
- Energy | GTD (KIT)
- Baikal Service
- ZhelDorExpedition
- Dispatch from 1 day
- Delivery from 2 days
- Product didn't fit? Easily return it within 14 days
- Read about other store guarantees
19/ ASSEMBLY OF TRANSMISSION VAZ 21074 — Lada 2107, 1.6 l., 2007 on DRIVE2
Five-speed gearboxes of the classic design since 2004 or after 2004 have received a number of changes and are slightly different from the previous ones.
This is how teeth should be. Spicy from top to bottom!
New fork, clutch and gears with 3rd gear synchronizer.
Fork and clutch for 5th gear and reverse gear. Also completely new.
The 1st and 2nd gear clutch and the 3rd and 4th gear clutch are the same. Clutch 5 and reverse are different. It is impossible to confuse them!
Secondary shaft.
Gearbox housing.
We start the secondary shaft. We install the bearing into the housing and screw the bracket.
Now we install the input shaft. Don't forget about the retaining rings, as well as the needle bearing inside the input shaft.
We put 1-2 and 3-4 gear forks. The forks are placed with the holes for the bolts facing up (in this case, the gearbox with the pan facing up).
We install the rod of the first and second gear, tighten the fork with a bolt (turn the shafts) and lay in a long cracker.
We put the 3-4 gear fork. We install the third-fourth gear rod. We do not thread it into the fork all the way and insert the cracker into the hole in the rod. Push in the rod and tighten the fork bolt. Similarly to the holder of the first-second gear rod, we install a short holder.
Now install the intermediate shaft.
The middle intermediate shaft bearing has an internal bearing race, which consists of two parts: a bushing and a ring. The bushing should be oriented inside the box housing.
We install bearings. Bearings should not dangle in the box body. They come in tightly. I used a tube with a large thick washer, having an internal diameter just enough to fit it onto the shaft. And using a hammer, he carefully pressed the bearings.
After installing each next part, rotate the primary and secondary shafts several times. They should rotate without jamming.
The intermediate shaft bolts are different so you can't mix them up. Just remember that the front one has a thick washer, and the rear bolt does not have a washer or Grover washer.
Assembling reverse gear and 5th gear.
Don't forget about the clever stopper!
Don't forget the ball.
Don't forget about gaskets without wings. You don't need to put sealant everywhere. It can bring with it not only good, but also a lot of bad.
We install the rear cover and clutch housing.
To fix the flange nut (elastic coupling) to the secondary shaft, I used thread sealant. The three of us unscrewed it, so I think it was intended that way.
This is how it turned out.
Can't fit more photos.
During assembly, do not forget to check that everything rotates and moves, and even switches.
The 5th gear spring is longer than the other two.
Don't lose the crackers and balls! ________________________________________
ATTENTION! BEFORE INSTALLING THE TRANSMISSION ON THE ENGINE, YOU MUST LOW THE REAR OF THE ENGINE DOWN.