Changing rear brake pads
If the inspection shows that everything is in order with the mechanism, you can begin to dismantle the pads themselves. The manufacturer allows a minimum thickness of the lining of 1.5 mm, however, this is a critical thickness. It is worth changing the element even if the thickness is about 2-3 mm.
Then everything is simple:
- Remove the tip from the lever, the cotter pin, do not lose the washer.
- Remove the handbrake lever.
Now you need to remove the spacer bar. It can be removed later. The spring can also be removed with pliers. - We remove the springs.
Here you will have to play around if you don’t have a suitable tool at hand - and this is a long, strong screwdriver or good pliers. We hook the spring by the hook and remove it from the hole in the block. Remove the block and springs. - That's it, the pads can be removed. We look at how far we have reduced the linings, clean the brake shield from dust and dirt, and once again make sure that the working cylinder is not leaking and the boots are in order.
How to replace the front brake pads on a VAZ 2113-VAZ 2115?
Note! Always remember a few things, firstly, try to always replace the pads on your car on both front wheels at once, even if it is expensive but it is still necessary, because if you replace the pads only on one side and not on the other, then this will lead to uneven braking of the car, that is, one wheel will slow down much more strongly than the other. Because of this, during sudden emergency braking, the car can very easily drift in any direction but not in a straight path, and in connection with this you will create other people an emergency situation that can lead to different outcomes!
And secondly, after replacing the pads with new ones, always remember that the first 100 km of the car will need to be driven moderately, because at the very beginning the new brake pads will first have to get used to the worn brake disc and until they get used to, you will have the car braking is bad, so after replacing, try to drive carefully, and as smoothly as possible press the brake pedal until the car comes to a complete stop, thereby you will reduce the mileage it takes for the new pads to wear in, and thus literally after 50 km, the car will brake as it should !
Removal: 1) Before you begin replacement, be sure to remove the wheel from the car. (For information on how to remove a wheel, see the article: “Replacing a wheel on a VAZ”)
2) Next, when the wheel is removed from the car, take a wrench in your hands and use it to completely unscrew the upper bolt that secures the caliper bracket.
Note! You won’t be able to just take and unscrew this bolt, and all this is because it is secured against turning off when driving, with a counter-key, so if in order to unscrew this bolt, you will first need to bend the tip of this same counter-key and After that, start unscrewing this bolt!
3) After the top bolt is completely unscrewed, move to the bottom one and use a wrench to loosen it slightly, while bending the same counter key.
4) Then find the hose that is attached to the shock absorber strut, and after finding it, pull it slightly and thereby remove it from the bracket to which it is attached. (Just under no circumstances disconnect this hose from anything, just remove it from the bracket and that’s it)
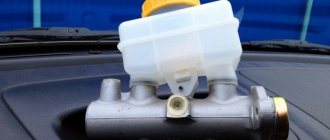
Note! When the hose is removed, the following situation may occur: the reservoir in which you have brake fluid is filled (If it is full), then some of this fluid may go out through the cap and some will pour out of the reservoir, so to prevent this from happening in the first place open the reservoir containing the brake fluid (shown in the photo below) and use a rubber bulb to suck out some of it, and after everything has been replaced, pour the fluid back in! (In general, in fact, it is best to pour new fluid into the reservoir, because the old one may already contain air particles, so it is better to generally try to take a little from the reservoir or do not take anything from there at all, but just carefully watch how the brake fluid level rises if too high, then insert the hose into place and collect a little fluid from the brake reservoir)
Never take all the fluid from the tank, empty it only halfway, and if all the fluid is drained from the tank, then bleed the brakes on the car! (For information on how to bleed the brakes, see the article: “Bleeding the brakes on a VAZ car”)
5) Next, grab the metal bracket with your hand and then pull it up and thereby fold it away.
6) When the caliper is folded back, remove both brake pads by hand and replace them with new ones.
Installation: Installation of new brake pads occurs in the reverse order of removal.
Note! When you put the new pads in place, make sure that they fit tightly and that there are no stones or other debris that will interfere with braking!
Additional video clip: For more information on how to replace the pads with new ones, see the video clip located just below:
The brake system is responsible for stopping or reducing the speed of the car; it is a rather complex mechanism, the most important part of which is the brake pads.
The pads are responsible for the quality of braking, and, therefore, for the safety of the car.
That is why it is so important to change them on time, because otherwise, an accident cannot be avoided. This article will tell you what the pads are and how to change them.
This article will tell you what the pads are and how to change them.
Replacing rear brake pads on a VAZ 2114 (video)
In cars, rear brake pads last longer than the front ones, so they are replaced around seventy or eighty thousand kilometers.
But the pads can be replaced earlier due to detachment of the working part or when they become oily. The wear of the pads occurs earlier if the driver welcomes an aggressive driving style, as well as when the driver, due to his inexperience, forgets to release the handbrake. In VAZ models - 1119, 1118, 117, 2115, 2110, 21099, 2109 and 2108, the braking system fully complies with the VAZ 2114. Therefore, we will dwell in detail on how to change the rear brake pads on a VAZ 2114. You can do this at home without going to the dealer. help at the service station. True, you still have to buy them. Brake pads are an important and integral part of the braking system of cars. When you press the brakes, the pads are pressed against the drum and it stops spinning. Thus the car stops.
Brake pads need to be replaced when:
- they are in oil;
- the disk is deformed;
- they have chips and scratches;
- when braking, you can hear a creaking sound;
- their thickness is less than 1.5 mm (measurements should be taken with a caliper);
- The pads do not connect well to the base.
Procedure for replacing rear brake pads
1. For work you will need an inspection hole or overpass. It is unsafe to release the handbrake cable under a car that is raised on a jack. Lifting the body onto a curb or on removed wheels is contrary to safety regulations. To dismantle and install new brake pads you need: a flat screwdriver, a wrench or a ratchet handle, pliers (long-nose pliers), and a deep socket (photo 1)
Replacing rear brake pads on a VAZ 2114 – photo1
2. Block the car from moving by installing wheel chocks under the front wheels. Set to first gear, then release the handbrake. Remove the muffler from the rubber cushions. After this, unscrew the wheel mounting bolts. Next, use a jack to raise the rear of the car and remove the wheel. In this case, you should turn the steering wheel of the car towards the removed wheel, it is more convenient to work.
3. Unscrew the guide bolts on the drum and turn it thirty degrees in any direction. Then tighten the guide bolts. Pull out the drum. If the drum does not spin, then you need to take a handle, attach it to the drum and hit it with a sledgehammer. Perform such blows over the entire surface until the drum begins to rotate (photo 2).
Replacing rear brake pads on a VAZ 2114 – photo2
4. Remove the brake pads. First, remove the four springs that hold the pads in place. The small (retaining) springs are removed first, then the two springs that tighten the pads are removed. It is best to remove springs with pliers. Lower the pads down so that they come out of the piston grooves, then turn them to the side and remove (photo 3).
Replacing rear brake pads on a VAZ 2114 – photo3
5. Remove the drive lever from the old block. Install the lever on the new block and put the cable on it. Next, install the block in place. It should fit into the piston groove. Install the retaining spring and spacer bar. After this, a second block is installed. Press it too with a spring. Using an awl, install the lower and upper tension springs. Before installation, clean the guides from dirt.
6. Using screwdrivers, move the pads inward. Next, install the brake drum and check that it rotates easily. If there are no jams, then the wheel is installed.
7. When the pads are installed, you should press the brakes several times, this way the pads will “find” their place.
8. Adjust the handbrake cable. Install exhaust pipe hangers. Check the car in motion.
Below you can see all the details of replacing brake pads in the video.
How to replace the rear ones
Replacing rear pads on VAZ-2110 series cars and their derivatives is somewhat more difficult, since they are of the drum type. Replacement work is carried out as follows:
- The rear of the car is jacked up, after which the wheel is removed.
- The guide pins located on the drum are unscrewed (if the pins become soured, it is possible to remove the drum along with the hub after unscrewing it).
- If the drum cannot be dismantled, tap it.
- Using long-nose pliers, remove the cotter pin located on the left side.
- Using pliers, disconnect the spring that tightens the brake pads at the bottom.
- The fastening side springs are removed (steps 1–4), the spacer bar (5), after which the pads are removed from the drum body (6 and 7).
- Installation of the pads is carried out in reverse order.
What's next
Now we can safely remove the lid. You will see in front of you a brake cylinder, springs and two worn pads. To remove the latter, you will first have to disconnect the guide springs. This is done using pliers. You can make homemade hooks from solid wire. Next, you should remove the lining with the lever. We don’t throw away the last one - we will still need it when installing new pads. But replacing the rear brake pads on a VAZ-2114 does not end there. Installation instructions will be described below.
Substitutes for originals: list of analogues
Among the analogues in the vastness of the country, there are several foreign options from the company Ferodo, Akyoto and other brands that have already proven themselves to be the best. A list of articles and approximate prices will help you navigate the choice of parts:
- ARTEX – from 500 rubles per set.
- AT 2090-008BP – from 490 rubles.
- MASTER SPORT 2108-3502090 – from 480 rubles.
- QAP 03-622 – from 350 rubles.
- Zollex Z2108B – from 580 rubles.
Foreign brands offer higher quality products than their Chinese counterparts. Before choosing, it is recommended to familiarize yourself with the compatibility of the brake pads to avoid any troubles in the future.
Choosing new pads
When purchasing new front brake pads, it is important to pay attention to a few key points.
- Quality. Examine the part visually, check the assembly level. Some details even outwardly indicate that they are not worth buying.
- Certificates and packaging. Packaging can often say much more than the part itself. Study it to see if it matches the original. Nowadays, it’s not difficult to find manufacturers’ websites online and study how their products are packaged and certified. Never be afraid to ask sellers for documents for a particular spare part.
- Price. Good pads cannot be cheap.
- Manufacturer.
Brake lining kit
As for manufacturers, a certain group of leaders has now formed who produce high-quality brake pads that are suitable just for the VAZ 2114.
Reassembly
Rear Brake Mechanism
The procedure for reassembling the brake system is not difficult if you have already gone through all the steps to dismantle and install new rear brake pads. But it’s still better to describe the procedure in detail.
- Install the new blocks and accompanying new elements of the brake system into place, compress them together, as it was before disassembling the unit.
- Press the brake cylinder until it fits snugly into its rightful place.
- Reinstall the brake drum. At this stage many people have problems. Here the reason may be the fact that the handbrake cable is too loose or stuck. Also, the reason often lies in the brake cylinder not being clamped tightly enough. Check out these options.
- Reinstall the wheel.
- Go inside and press the brake pedal all the way down several times. This will allow the new rear pads to sit firmly in their new location.
- Get out of the car and head to the wheel where the rear brake pads were replaced. Don't rush to remove it from the jack. Be sure to spin it by hand first. Nothing should prevent the wheel from spinning smoothly. The force applied by hands should not be strong. If the move is free and easy, you did everything right.
- Similar activities are carried out on the second wheel.
- Once the repair work has been completed, check that the handbrake is operating effectively. To do this, you need to remove the wheel again and tighten the cable of the manual braking system.
- If after replacing the pads the wheel does not spin or rotates with obvious snagging on the pads, you have done something wrong. Therefore, you will have to disassemble the system and reassemble everything again, strictly following the instructions.
Installation
After dismantling the old elements, we compress the side parts of the brake cylinder with a slotted screwdriver. Be careful - make sure that the new pads fit exactly into the grooves of the cylinder, and that the strip hits the connector. After this, you need to hook the springs into place. We perform this operation with both lower and upper overlays.
After dismantling the old elements, we compress the side parts of the brake cylinder with a slotted screwdriver. Be careful - make sure that the new pads fit exactly into the grooves of the cylinder, and that the strip hits the connector. After this, you need to hook the springs into place. We perform this operation with both lower and upper overlays.
Then we check again that the elements are installed correctly and install the drum cover. Please note - it may be difficult to enter. In this case, you need to check whether the brake cylinder is fully clamped and whether the handbrake is loosened. Perhaps the cable is jammed and because of this the cover does not fit into place.
Having fixed the problems, we put the drum and wheel in place. Before lowering the car from the jack, check how easily it rotates. The wheel should spin without jamming or rubbing the pads. Next, the rear brake pads are replaced on the VAZ-2114 from the opposite side. Remember that elements are changed in pairs, even if the wear on the adjacent wheel is less significant. The procedure is carried out in a similar way. But that's not all. The final step will be adjusting the handbrake.
How to remove rear brake pads?
- We drive the car onto the overpass and put it in first gear.
- For reliability, we put so-called “shoes” under the front wheels so that the car does not roll away.
- We check whether the handbrake is removed and climb under the car. Remove the exhaust system pipe (muffler) from the rubber cushions in the area of the handbrake tensioner. (It is not necessary to remove all the cushions from the muffler; you must leave the last cushion, which is located under the trunk next to the bumper, so that the exhaust system does not hang in the air).
- We loosen the handbrake; to do this, unscrew the cable tensioner nuts with a key set to “13” (look at Figure 1). Loosen the cable as much as possible so that there are no installation problems in the future.
- Take the wheel wrench and loosen the wheel fastenings on both sides.
- We put the jack on, raise the car and completely unscrew the wheel.
- Using clamps or other improvised means, unscrew the guide bolts on the drum (see Fig. 2).
- Next, we try to rotate the drum in some direction. After rotating the drum about 30 degrees, tighten the guide bolts back evenly. Since there are no bolt holes under the current position of the drum, screwing the bolts into the cast surface will pull the drum out.
What to do if the drum does not spin? To do this, we take our sledgehammer and a handle.
We place the handle on the surface of the drum and begin to hit it with a sledgehammer. You don't need to knock in one place, you need to go around the whole circle. Knock until the drum starts to spin
Attention: do not hit the drum with a sledgehammer, otherwise you will split it
- Having removed the drum, we see in front of us two pads, springs and a brake cylinder.
- We disconnect the guide springs from the pads using pliers, homemade hooks and other devices (see Figure 3).
- Remove the tension spring (see Figure 4).
- We remove the pads together with the lever, transfer the lever to a set of new pads.
- After removing the pads, compress the side lubs of the brake cylinder. Make sure that the new pads fit strictly into the grooves of the brake cylinder and the handbrake bar fits into the connector on the pads (see figure). Next, we hook the springs into place, do not forget about the handbrake cable - it needs to be hooked to the drive lever on the block.
Stages of independent work
Having carefully studied the following stages of work on replacing the pads, any car owner will understand how to fix this breakdown and continue to operate his car safely, namely the following:
- The car is driven onto a flat surface into a room, preferably with an inspection hole. The important point here is that you need to wait some time for the brake drums to cool down; during driving and constant braking, they heat up and in order to carry out work, they need to cool down.
- Having placed a wheel chock under the front wheel, loosen the wheel mounting bolts with a wheel wrench, jack up the car, and completely dismantle it.
- Having removed the wheel, we proceed to dismantling the brake drum, having first checked whether the car is on the hand brake, otherwise this will cause great difficulty in removing it and can lead to mechanical failure of the part. The drum is attached to the rear hub with two 12 mm bolts, unscrew them, treat the seat with a brush and remove it with a specialized puller. If you don’t have a puller, you can use a hammer and tap it through the piece of wood from the back side, constantly rotating it after each blow.
After removing the drum, it is necessary to loosen the tension on the parking brake cable; this is done on a special adjusting pin located under the bottom of the car, next to the middle part of the muffler.
Having loosened the handbrake cable, we begin to remove the brake pads. First of all, we pull out the fixing pin on the parking brake mechanism pin on the rear block, then press out the fixing spring (the so-called soldier), remove the lower and upper return springs from the bottom of the block, the brake mechanism spacer bar and remove the old, worn pads from their seats brake cylinder.
- Having removed the old pads and carefully inspected the brake cylinder drum for wear, it is necessary to thoroughly clean the protective shield and all seats of new parts from old dirt. Next, we proceed to install new pads; it is advisable to assemble the entire brake mechanism in advance (spacer bar and upper return spring) and then mount everything in its seats. Having carefully installed the new pads, we fix them with a lower spring and soldiers, after which we mount back the brake drum and all previously removed parts. Having completely assembled one side, we proceed to replacing the pads on the second side, performing all the steps again.
- Having changed the pads, we begin to adjust the handbrake, pulling the cables until the lever in the car's interior rises two-thirds up or until four clicks of its ratchet.
Front brake mechanism
The front brake mechanism consists of:
- disk;
- calipers;
- pad guide;
- two brake pads;
- cylinder;
- guide pin;
- casing.
A special feature of the front disc brake on a car is the disc-to-pad gap adjustment, which is done automatically. There is a floating bracket and an indicator that the pad is worn out. The bracket is formed by a caliper and a cylinder. They are fastened together with bolts. The PTCs are pressed by springs to the pad guide. A sealing ring is installed on the cylinder piston; it is this that maintains the required gap between the rubbing surfaces. Brake pads wear out, so the VAZ 2114 needs to periodically replace the front pads.
Changing the rear braking system
When purchasing a car, you should immediately check the condition of the brake pads.
Just a note! In the case when the size of the brake pads on the car does not reach the permissible size, i.e. their thickness is less than 1.5 mm, do not operate the car under any circumstances until they are completely replaced. The lives of the driver and passengers, as well as other road users, directly depend on this!
Replacing brake pads on a VAZ 2114 is necessary immediately after purchasing the car. It is necessary to regularly monitor the condition of the brake system to ensure your own safety when operating your car.
The rear brake pads on the VAZ 2114 are changed a little differently than the front ones; it is necessary to expend more physical and moral strength. It is more convenient to carry out this kind of work on an overpass.
Possible difficulties during the replacement procedure:
- The brake drum is worn out; its internal diameter is more than 200.5 mm; accordingly, it must be replaced.
- There is a leak in the cylinder, which means it needs to be replaced urgently.
- The drum is stuck, in this case you can use a sledgehammer and a block.
- And etc.
Replacement of Rear Brake Pads VAZ 2114 - 2115.
Adapter for car diagnostics Auto parts here Auto accessories and...
REPLACING REAR PADS ON A VAZ 2115 PART 1
The video showed the removal of the rear
VAZ
trims , so that the video does not turn out to be long and tedious, I decided...
Brake system VAZ 2114, how it works, how it works
The brake system on a VAZ 2114 car includes two main parts:
- Drive is a system that is designed to transmit force from the depressed brake pedal to the wheel mechanisms.
- Wheel mechanisms - directly affect the parts rotating with the wheel and slow down its speed.
The VAZ 2114 has a dual-circuit brake system with a hydraulic drive. What does it mean? And the fact that the force generated by pressing the brake pedal creates fluid pressure (hydraulics) throughout the system. This pressure forces the wheel cylinders to work. The word “double-circuit” indicates that the force from the pedal is transmitted through two lines (circuits) independent of each other to pairs of wheels. These circuits have a diagonal arrangement: the right rear wheel works together with the left front, the left rear - with the right front wheel. In conditions of failure of one of the circuits, this solution makes it possible to maintain vehicle stability when braking, especially when turning and on slippery roads.
The main condition for the operability of the system is its tightness. Therefore, it is very dangerous to operate a vehicle with fluid leakage. Equally dangerous is air getting into the brake system. When compressed, air repeatedly decreases in volume, unlike liquid, which does not actually change volume when compressed. When braking a vehicle with a leaking system, the brake pedal may “sink,” causing the brakes to fail to operate.
Brake pads and their types
The brake pad, or as it is also called, the wheel chock, is an element of the brake system that interacts with the sphere of the brake disc, by pressing which the process of reducing speed occurs.
Pads have come a long way in development. They were first used at the end of the 19th century, for manually driven carriages.
Over time, mechanical engineering developed, and the braking system also evolved. Today, there is a wide range of wheel chocks, each with its own pros and cons, and technical features, which we will discuss further.
The block consists of a durable metal base, resistant to mechanical and other damage, to which a special lining is attached. There are several types of pads:
- resins
- synthetics
- rubber
- ceramics
- Other materials.
It is the composition of the lining that determines its quality; manufacturing companies try to keep the secret of the composition in the strictest confidence, but in any case, the lining must have the following properties:
good wear resistance
the lining must not deform the brake disc
the ability to withstand high temperatures, which is especially important during emergency braking, when parts become red-hot and the temperature inside the system reaches prohibitive levels.
The main task of the stops is to make the braking system more reliable and the braking distance shorter.
To achieve this task, manufacturers create unique technologies, offering the buyer new types of products.
So at the moment the following brands of pads are the most popular:
- Original Equipment Manufacturer OEM. A company operating in this market segment has been offering high-quality friction stops for many years. The products have a one-year warranty, the cost starts from 1,800 rubles, the price varies depending on the type of pads.
- One of the largest manufacturers producing stops is the Wagner company. Most motorists prefer this particular brand, because the Wagner brand itself already speaks of the excellent quality of the products. The price of Wagner products varies from 1,750 to 3,500 rubles. depending on the type of pad.
- Raybestos Raybestos is considered a favorite brand of auto mechanics who prefer practicality, reliability, and durability. The product comes with a 1 year warranty. The advantage of the product of this brand is also its reasonable price, which starts from 1,500 and ends at 3,820 rubles.
- The undisputed leader in the market is the company GENERAL MOTORS, known as a reliable manufacturer of all components for cars. The products here are, of course, excellent, but the price makes you think twice; it starts at 3,500 rubles. and ends with a price of 17,500 rubles.
When do you need to replace the pads and how to determine the degree of their wear?
The service life of the pads on VAZ-2110 cars and its derivative modifications is, on average, 15–20 thousand kilometers for the front ones, and 40–50 thousand for the rear ones. However, their wear directly depends on a number of factors. Thus, during city driving, the degree of wear is higher, as well as when operating on dusty roads, when there is a high risk of mechanical particles getting on the working surfaces.
The main sign of a malfunction is the appearance of a characteristic whistle during braking. This is due to the fact that the pad design contains signal indicator strips, and when the working surface of the pad wears down to a critical minimum, the strips are exposed and create this sound.
Along with this, problems can be expressed in the form of a metallic grinding sound in the event of destruction of the friction layer and exposure of the metal structure of the pad. In this case, during the braking stage, vibrations and knocks may appear, as well as a characteristic creaking sound in the area of the front wheel (or the rear wheel if the rear pads become unusable). In other words, the pads whistle, rattle or knock, indicating a malfunction.
Difference in thickness of old and new pads
When replacement is required
In order not to miss the moment when the pads become completely unusable and may pose a threat to your safety, we recommend periodically checking the rear pads. This way you can check how much time this node has left to “live”.
Some versions of the “fourteenth” model are equipped with a special indicator that determines element wear. When the pads are completely worn out, the metal plate begins to rub against the brake disc, producing a characteristic and unpleasant grinding noise.
How to install brake pads?
We perform the same operation on the other side and tighten the handbrake: How to tighten the handbrake? All that remains is to check the handbrake; to do this, you need to hang the wheel on a jack, spin the wheel manually, and pull the handbrake. The wheel should stop and lock firmly. To be sure, try turning the wheel manually - it should be motionless.
Sources
- https://zarulemvaz.ru/zamena-zadnix-tormoznyx-kolodok-na-vaz-2114-2115/
- https://nadomkrat.ru/tormoznaya-sistema/zamena-zadnix-tormoznyx-kolodok-na-vaz-2114
- https://vaz-2114-lada.ru/2013/02/kak-zamenit-zadnie-tormoznye-kolodki/
Original rear pads: name and price
As mentioned above, some original parts on the VAZ 2115 were borrowed from the main design components of other series of this manufacturer. Therefore, the rear pads will have the following article number: AD 21083502090. An additional article for searching for a product in various catalogs is the name 2108-3502090.
According to reviews from the owners of this car, all factory brake pads when purchasing the car had to be immediately replaced with new ones from another manufacturer. The cost of new original spare parts, consisting of a set of 4 pieces per car, will be equal to 600 rubles. At the same time, the Lada manufacturer recommends contacting only trusted places of sale, confirmed by the manufacturer’s certificate, so as not to run into a fake.
List of necessary spare parts and tools for work
When selecting new parts for replacing the rear brake pads on a VAZ 2114, video instructions for the stage of work are given at the end of the article, you should pay attention to the availability of original part numbers for the following spare parts:
- Set of rear pads (art. 2108 – 3502090 – 55)
- Brake drums (art. 2108 – 3502070) which may be needed in case of severe wear of old parts due to long service life
Replacing parts does not require specialized tools; all work is carried out using the most common kits, namely:
- wheel wrench;
- jack;
- Screwdriver Set;
- 12 mm head and knob;
- pliers;
- rear brake drum puller if available, or you can use a hammer;
- protective gloves.
Having purchased all the necessary new spare parts and tools, carrying out all the repairs yourself will not cause problems and will help you save money, since at the end of 2020, replacing rear brake pads in official Lada car service centers costs from 1,500 to 2,000 rubles, and in private repair shops, this the service will cost approximately 1000-1200 rubles.
How to remove front pads yourself
Due to the frequent interaction of the stops with the disc, the linings are deformed, which leads to failure of the pads. The service life of the pads is approximately 30-50 thousand km, or with a friction lining thickness of 1.5 mm. You can determine that the pads need urgent replacement by the following signs:
- Sharp sound when braking.
- Slow or, conversely, too fast braking process.
- The brake pedal goes down.
If you are convinced of the presence of at least one of the listed symptoms, you need to immediately change the stops. In order to make the replacement, you need to prepare the following tool:
- jack
- knob for 19
- hammer
- pliers
- screwdriver (no more than 70 mm.)
- a little patience and free time.
- First of all, we dismantle the old pads. To remove the stops, we take the car to a perfectly flat area, put stands under the wheels to prevent the possibility of rolling, and put the car on the parking brake.
- Now you need to lift (using a jack) the side from which dismantling is being done. Since the topic of our article is replacing the front pads, we raise the front of the car.
- Loosen the wheel fastenings and remove it. Using pliers, we pull out the cotter pin from the upper rod, and then with a screwdriver we begin to knock the rod itself out.
- Having completed this work, we will begin to remove the clamp, which holds the caliper in a static position. Only by getting rid of the retainer will it be possible to remove the caliper, which is done by rotating the part around the circumference of the second fastening. To keep the part out of the way, it can be moved to the side.
- Now the deformed pads are not difficult to pull out, which is what we do.
How to change brake pads
Responsible drivers manage to change the front and rear brake pads in advance. Those who forget about this operation sooner or later encounter obvious symptoms of a disease called “worn pads.” Their cars have reduced brake efficiency. When braking, the pedal falls down for a long time; the end of the pedal stroke is accompanied by a flashing brake fluid warning light. In addition, the nasty whistling sound from the wheels hits your ears.
In order not to bring your beloved horse to this deplorable state, it is better to shoe it with stocks in advance. We will tell you exactly when you need to do this, and most importantly, how to change the brake pads. But it is better, of course, to present such important information immediately using the example of a specific car. Therefore, we will take for research first the VAZ 2114, and then other popular cars.
To carry out surgical intervention on the brake links of the front suspension, we will need the following tools and devices:
- set of wrenches;
- screwdriver.
Now we will describe step by step how to change the brake pads in this car.
- Loosen the wheel bolts.
- We lift part of the car on a jack, place bricks under the rear wheels, and finally remove the wheel.
- Open the brake fluid reservoir; if its level is above the minimum mark, pump out some of the fluid into a large syringe.
- We have discovered the brake mechanism, we need to carefully clean it from dirt, remove the brake hose from the mount, then use a screwdriver in front to separate the old linings - after all, the new ones are much thicker, the piston of the system must be recessed. This is why we pumped out the fluid from the tank - after pressing the piston, its level will rise. If you can’t move the pads apart, it doesn’t matter, we move on.
- We unscrew the bolt at “13” of the brake caliper, having first bent the locking plate.
- We lift the caliper and take out the old parts. This is where we evaluate the condition of the parts. The thickness of the braking layer (not metal!) should be more than 1.5 - 2 mm. If less, put in a new pair.
Now we have figured out how to change the front pads on Samara. If it was not immediately possible to move the old parts apart, then there is this method - after removing the worn pair, we take one pad from the new pair, install it to the disk, then put the caliper in place, and use a screwdriver to move the piston away from the disk.
Next, we’ll look at how to change the rear pads on this car.
The tools and equipment are the same, except that you will need a hammer and a wooden block. Don't forget to turn off the parking brake. Let's get started.
- We loosen the nut securing the brake cable tensioner; first you will have to remove the interfering muffler from the cushions.
- Next, we also loosen the wheel nuts, jack them up, and then expose the brake disc.
- Having unscrewed the drum guides, we turn the drum about a third of a right angle; you can knock it with a hammer through a wooden block to turn it. Then we screw in the bolts, as a result the drum comes out.
- We remove the upper, then the lower lag spring, as well as the retaining springs plus a couple of old parts. We install new spare parts if the working layer remains less than 1.5 - 2 mm.
That's all, actually. But many will be interested in what are the nuances of these operations on the “ten” or “Prior”. Well, let's turn our attention to these cars.
In theory, what has been described is enough to understand how to change the brake pads on the front and rear of a VAZ 2110. Let’s just try to figure out what the difference is. On the “ten” our replacement parts are equipped with a wear sensor. Having completely repeated the instructions point by point for the front system of the VAZ 2114, before installing a new pair of spare parts, we do this.
- We remove the end of the wire of the old sensor (it can be bitten off from the old block) from the car wiring plug.
- The new sensor is included in the kit; we connect it by first inserting the wire through the rubber rings of the brake hose.
- The sensor must be inserted into the hole in the inner cover.
Now let's look at how to change the rear pads on a VAZ 2110. What you need for this: among other things, you can prepare a rubber hammer to use to remove the drum.
- Initially, we also unscrew the two pins (without loosening the cable), then use a rubber hammer to pull the drum off the hub.
- Remove the cotter pin from the handbrake pin.
- We remove the lower as well as the upper tension springs, then remove the pad fixing springs and remove these old parts.
- We also evaluate wear and install new spare parts if necessary.
If you still don’t fully understand the whole process, you can learn how to change the pads on a VAZ 2110 using a video from the network.
As for the car that came instead of the “ten,” we won’t dwell on it for long. Since the instructions on how to change the pads on a Lada Priora will be identical to the above procedures with the difference that the VAZ 2170 does not have a wear sensor. It’s better to look at another technique for a rear-wheel drive car - how to change the pads on a VAZ 2107. First, let’s start working with the linings in the front part of the car. The following tools will be useful to us:
- screwdrivers;
- pliers;
- hammer.
We also start by lifting the desired part of the car and removing the wheel. The whole mechanism is revealed to us, this is what we do with it.
- We remove the cotter pin from each rod - there are only a couple of them. Then use a screwdriver to press the rods out of the linings.
- We take out the spring clamps, and then take out the pads.
- We insert new spare parts if the thickness of the old ones is less than 2.5 mm, and assemble everything in the reverse order.
Next, we’ll figure out how to change the rear brake pads on a “classic”. Here the technological process is reminiscent of what we have already studied earlier. The structure of the rear drum resembles the filling of the VAZ 2110. Therefore, we act in a similar way, using the same tools, but do not loosen the handbrake cable.
- The drum bolts are also unscrewed, then they are screwed into the technical holes, due to which the drum is dismantled.
- We remove the spring that tightens our linings from below, then uncotter the retaining spring in each lining.
- Before removing the upper tension spring, remove the cotter pins and remove the handbrake lever.
- We remove parts and install new parts.
Assembly is done in reverse. That's all.
Dealing with other brands
Many here will ask the question: how are things going with such an operation on popular foreign cars? How, for example, do you change the pads on a Solaris?
To reinstall the front kit we will need wrenches plus a screwdriver. The operation here is very simple.
- After removing the wheel, unscrew the two caliper guides.
- We remove the brake caliper - it is held on by a hose, then we take out the old linings.
- Before installing a new pair, the piston can be pressed in with two screwdrivers - this is another method of moving the piston inward.
- We reassemble in reverse order.
To reinstall the rear brake pads, you will need keys “14” and “17”.
- With the wheel removed, unscrew the caliper nuts and remove it.
- We take out the old parts and screw in the cylinder clockwise.
- We install new linings and perform assembly.
What if we have another popular car at stake - the Chevrolet Niva? How do we change the pads on a Niva Chevrolet? To reinstall the front kit, it is necessary after removing the wheel.
- Undo the pin of the caliper clamping arm.
- Pull out the axle, pressure lever and two small springs.
- Remove the caliper, push in the piston using one of the methods known to us and replace the required parts.
As for the rear mechanism, the instructions for working on it are identical to the technology for the VAZ 2110.
Well, what about the prices?
So, all the operations considered resemble each other and are simple. However, they are beyond the capabilities of drivers who are generally familiar with technology. It’s easier for them to give the work to the masters. Then we’ll decide how much it costs to change brake pads at a car service center.
We present the data in the form of the following table.
| City | Cost for front and back |
| Moscow | 500 rub. and 800 rub. |
| St. Petersburg | 500 rub. and 700 rub. |
| Samara | 300 rub. and 500 rub. |
| Ekaterinburg | 400 rub. and 500 rub. |
| Novosibirsk | 300 rub. and 500 rub. |
As you can see, the cost of this service is low and can be affordable for many. It’s better to spend more money on a new set of pads, be sure to get it from a well-known one on the Internet!
Return to top
So we have looked at all the nuances related to the question of how to change the pads on your car. We provided comprehensive information. In conclusion, we just note this: after installing new parts, avoid sharp braking for the first thousand km! Let the new horseshoes wear in.
Now watch the video why hydraulic compensators knock and why valves knock.
Rear pads, replacement (step by step instructions)
- To replace the pads, put the vehicle on a jack and remove the rear wheel (if the replacement is not carried out on a lift). If there is no lift, it is advisable to replace the sides one by one - first we do one side completely, then the other.
- We unscrew the 2 “12” bolts that hold the drum and guide the wheel.
- Next, you should remove the rear drum, which is not always easy to remove. Here you may need a sledgehammer or a hammer, a brass drift or a wooden block.
- Remove the springs that tighten the pads. You should start with the side springs, then remove the upper and lower ones. This is where pliers and a screwdriver come in handy. The springs are not so easy to dismantle (especially the upper one); most likely, you will have to tinker with them quite a bit. It is especially difficult to carry out work without skills.
- After removing the springs, the pads can be easily removed. The parking brake cable is the last thing to be released.
- The bracket for the parking brake cable on the new elements is not included in the kit, so it must be replaced with the old ones. The bracket is easily rearranged, you just need to remove the cotter pin and disconnect the bracket, after which we install it on the new block and install the cotter pin.
- Now let's put everything back together. We start the assembly from the top - put on the upper spring, place the pads in the grooves of the brake cylinder and install the spacer on top. It is also necessary that everything from below falls into the grooves. Next, install the side springs, and lastly install the top spring.
- Then we install the drum and wheel, after which we carry out exactly the same work on the other side.
Replacing brake pads VAZ-2115
A special role in the comfort of a car is played by its brakes, this includes control over the car’s handling and acoustic comfort. In addition, the braking distance when using different pads can differ by two times. At fifteen, the service life of the pads from replacement to replacement is 30-60 thousand km, this depends on the driving style, braking intensity and the products used.
Replacing the front brake pads of a VAZ-2115
Changing pads is a little more difficult than changing a wheel, because to change the pads you must first remove the wheel. There is no need to completely remove the caliper, just fold it down from the top side; to do this, unscrew the top bolt. The bolts are locked with a lock washer, which is splashed around the edges of the bolt; you must first loosen this washer, and then unscrew the bolt itself.
It is best to press with a special presser, which is specifically designed for this, but you can use some kind of clamp or even a pry bar.
Replacing brake pads VAZ-2115 video instructions
Replacement of rear brake pads of VAZ-2115
The fifteenth has drum brakes at the rear. They are cheaper to produce, but more difficult to change.
First we need to remove the drum, to do this we unscrew the two bolts that secure it.
Next you can see the pads. They are fastened with springs, this is a little more complicated than in the front, where the pads were simply pressed by the caliper and were not fastened with anything else. Here you need to remove all the springs. We pry it with a screwdriver and they jump out on their own, the main thing is not to lose them.
There is a plate on top between the pads, don’t lose it.
One of the blocks is used by the handbrake; it is inserted into the groove of the handbrake cable.
The new block also needs to be inserted into the groove of the handbrake. Next, install the springs in place and install the drum. The drum is installed without any problems.
Source: https://kakavto.com/?p=1834
Installing new pads
In order to install the stops, it is necessary to place the piston in the area of the brake cylinder.
Here it is important to balance your strength and not overdo it, because this work is hard, requiring not only effort, but also caution, since the part is made of aluminum, which, as is known, is not very strong
The second step is to install the pads in the caliper. The caliper itself is installed in its place and secured with a bolt. Installation of parts is carried out in the reverse order of dismantling.
The job is done, all that remains is to put on the wheel.
For an experienced motorist, replacing pads is not a complicated procedure that takes a little more than fifteen minutes. It is necessary because the pads primarily affect the safety of the car, because they are directly connected to the braking system.
Therefore, you should not neglect this type of repair work; it is better to spend some time in the garage and a certain amount of money on buying new parts than to suffer more serious losses in an accident, which is what worn pads lead to.
We wish you good luck and a bon voyage!
The brake system worked well, but still not perfect. I was especially infuriated by the beating of the pedal when I pressed the brake in the middle, and I wanted to carry out preventative measures: replace the fluid, replace the vacuum seal, bleed it.
I didn’t choose wheels for a long time, I couldn’t financially cope with the transition to R14, so the stock is from Autoreal (cost: 1200 rubles per pair)
The process of replacing discs is generally simple; all difficulties arise from stuck bolts and the discs themselves to the hub. You can change in one helmet, no assistants are required, if only to save you from boredom.
As usual, we place the wheelbarrow on the platform, do not forget to provide a reliable support for the car, so that during the work it does not fall on our heads! We remove the wheel, for easy access to the bolts we turn the caliper towards ourselves. We unscrew the two bolts securing the caliper, move it to the side, securing it or placing it on some kind of support so that it does not hang on the hose.
Then unscrew the caliper bracket from the steering knuckle and remove it, thereby freeing the brake disc.
All that remains is to unscrew the last two studs, and you can begin to knock down the brake disc. This activity is very interesting. Here, depending on your luck, it happens that the discs come off after just a couple of hits, and sometimes you have to suffer because the discs are no longer needed. I hit the work surface, naturally it was all chipped. If the disc is needed, we hit it on the inside of it, using the pointed bit. It is more convenient to perform this procedure from the pit. I cleaned the disk landing area with a metal brush. As you can see in the photo, there is paint and dirt, and WD40 was poured in generously.
Before assembly, I started painting work, I didn’t bother too much, I sanded the discs lightly, but I had to tinker with the calipers and brackets a little longer, I didn’t sand them to perfection. I didn’t want the usual color, I was already pretty tired of red and silver, and since there isn’t much choice in the village, I took the paint: Auto enamel 1K repair, alkyd, Adriatic color 425, I’ve already driven more than 5 thousand km, the paint is spot on))
In order to seat the new disk evenly, I tightened all the wheel mounting bolts and began to gradually tighten it with a cross, the disk sat smoothly, without distortions...
Everything else is in reverse order. And don’t forget to bleed the brakes, this is where you will need an assistant. There are plenty of pumping methods on the Internet and I don’t see the point in describing my own.
The color turned out to be very unusual, some people like it, while others are drawn to red.
And now, after several days of repairs, happy as an elephant, I jump behind the wheel and go to check the brakes, and at the first braking I fell into a stupor! NO BRAKES! (I didn’t brake all the way, but in a smooth, gentle mode, so as not to ruin the disks). At first it seemed to grapple, and then it swam. In shock, I check all connections for leaks - everything is normal. I touched the discs, and they were boiling water, and it was just a couple of smooth stops! I didn't expect this. Go home straight away and let the discs cool. After some time, leaving again - the same thing, but a little better. At this rate I drove 80 kilometers, and each time the brakes grabbed better and got less hot.
https://www.drive2.ru/l/7951803/
https://youtube.com/watch?v=1M8iKMFVM0k