Do-it-yourself painting of plastic car interior parts
The fresh look of an old plastic car interior part is the result of not only painstaking work on applying restoration products. This is, first of all, their correct selection. Look at the pictures of a bad painting experience, when the owner simply applied paint to one of the interior elements, and it immediately crumpled up. And yet, negative experiences should not discourage you from painting yourself. After all, doing this is no more difficult than removing scratches from windshield wipers from a car window with your own hands. The Autostadt.su team offers to get acquainted with all the intricacies of the technology of painting plastic elements, and analyze the main mistakes that beginners encounter.
How to paint car interior plastic
- Sand it.
- Degrease.
- Find out whether it needs to be primed or not.
- Restore texture if necessary.
- Paint it the desired color.
How to sand
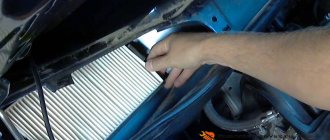
To matt interior plastic under primer, red Scotch-Brite is usually sufficient. It is a felt-based abrasive material, similar to the hard side of a dish sponge. The advantage over fine-grained sandpaper is its softness, which allows this tool to efficiently process various bends and indentations.
How to degrease
Experienced painters advise using only anti-silicone. The fact is that classic solvents in the form of white spirit or solvent can ruin a plastic unit. For example, after using organic matter, stains form that are difficult to hide even with painting. By the way, we have already recommended abandoning white spirit when performing the technology that describes how to remove tar from a car body without damaging the paint.
Do you need primer on plastic or not?
The reason for fresh paint clumping and peeling is that no primer was applied first. This is a composition with a special formula of various additives and plasticizers, which improves the adhesion of paint to the surface. However, not all plastics require primer treatment. To determine whether to prime the interior plastic or not, you need to conduct two experiments:
- Set fire to a piece of the product being processed.
- Immerse the part in water.
If the plastic smokes and sinks, it is not necessary to use primer on the plastic.
When a plastic element burns like a wax candle and floats on water, you cannot do without a primer. It is important to choose the soil wisely. So ordinary automotive compounds are not suitable - the paint peels off instantly. You need a special primer designed specifically for plastic.
When is structural paint needed?
If you have ever touched a black plastic bumper or a dark side mirror housing on an inexpensive car, you probably felt that the tactile surface seemed to be covered with small pimples. The matte rough effect is structural plastic. The paint in question recreates this same effect and is typically used to cover up scuffs and light scratches.
What about the paint itself?
First decide what kind of coverage you want to get. Here are some examples:
- Soft-Touch. Usually used for dashboards. The surface is slightly silky and rubberized. This coating is applied to the panel from the factory.
- Normal, rough. Apply to hard plastic. For example, the side parts of the center console, lower trims on door cards or handles for closing doors.
- Glossy. Used for finishing interior levers intended for opening the door.
Then find out for yourself which shade to choose. If you plan to paint the interior exclusively in a restoration manner, then take the trouble to find a company catalog with the distribution of interior and exterior colors by VIN numbers. The original paint, selected according to the factory catalog (for example, for VW it is ETKA), will preserve the monotony of the overall picture of the interior. This will be because there will be no noticeable difference between the painted and unpainted parts.
For your information. For restoration work, it is better to order original paint and only from the car manufacturer.
If we talk in terms of the examples given, then it is better to purchase the Soft-Touch aerosol can through the official line. To get a regular rough layer, it is enough to use classic paint paired with structural paint. Here are examples for common shades:
- Black. The VAZ black Cosmos (code 665) will do.
- Grey. The VAZ decorative (graphite) intended for bumpers fits perfectly.
However, the color and origin of the paint are purely individual things and are selected solely according to one’s own preferences. Continuing the conversation about rough coatings, it is appropriate to mention the well-known RAPTOR U-POL, a protective coating for the exterior of a car, and its similarity - HB BODY.
Glossy objects are regular paint covered with several layers of varnish. The latter is recommended to be purchased in aerosol cans. There are no strict requirements for this component.
We recommend painting plastic parts of the car interior only with a spray can. When applying enamel with a brush, there is a risk of drips. In addition, such a layer takes much longer to dry, which means that the likelihood of catching dust particles is much higher.
How to paint interior plastic without the paint peeling off
Let's start by analyzing the main mistake: why does the enamel layer peel off? The reason is that the material has nothing to cling to, that is, weak adhesion of the paint layer to the primer or plastic.
The fact is that before applying any type of paintwork on the surface to be treated, it is necessary to create small grooves and scratches, that is, grind. This improves the adhesion of the new coating to the base, making it durable and resistant to peeling. What else is sanding useful for? During treatment with Scotch Brite, stubborn dirt that is difficult to remove with anti-silicone is removed.
Hard plastic painting technology
We have already outlined the main stages of restoration work in the selection of materials. Now let's look at the technical part of each operation.
- Sand it. According to painting terminology, this transition would be correctly called matting. The bottom line is that you need to moisten red Bright tape in anti-silicone and rub it on the plastic part.
- Degrease. Soak a cloth in anti-silicone and walk over the treated surface.
- Prime. Apply 3-4 layers of special primer for plastic and wait until it dries.
- Sand it. Treat the primed surface with Scotch Brite.
- Paint it. Apply 2-3 layers of paint of the desired color. If there is a need to restore the structure, then structural enamel is applied before the main painting. The places where it is sprayed are determined by location: this is either the entire surface of the part, or some of its sections. If the goal is to obtain a varnished surface, then 20-30 minutes after receiving the painted coating, apply varnish in 1-2 layers.
Painting plastic car - types of paints, instructions for work
Painting plastic parts of a car is a responsible procedure that requires careful preparation. What materials will be needed to restore the surface of a plastic element? Will pre-priming be required? What paint is best to use? The nuances of painting plastic car parts will be discussed in this article.
How to paint plastic
The variety of paint and varnish products makes it difficult to choose a specific paint for the plastic of a car. When purchasing, you need to take into account the type of plastic, as well as the location of the part that needs painting. If it is located inside the car, then the requirements for paintwork materials will be the same, if outside - different.
The following options are available on the market:
- acrylic enamels (water-based compositions);
- Soft-touch paints (polyurethane base with the addition of hardener and pigments);
- aerosol paints.
Acrylic enamel is a composition of two components - a coloring element and a hardener. Thanks to the hardener, the surface after painting becomes resistant to atmospheric and mechanical influences, and the applied layer is uniform. Soft-touch paints (read as soft-touch) help to obtain an abrasion-resistant matte finish. Good adhesion to plastic parts and hygiene are advantages of paints. Paintwork materials are used to process elements of the car interior. Aerosol paints have become the most popular because it is convenient to paint plastic car parts from a spray can. Color variety, even spraying and quick drying are the advantages of aerosols for cars.
Instructions for painting plastic in a car
The plastic element of the car that requires painting can be new or dismantled old. We recommend an article about painting a car dashboard. Moreover, the painting procedure will be different depending on whether this element is primed. First, it’s worth presenting the stages of painting a part without a primer layer.
Working with plastic without primer
Before you begin painting, the surface must be prepared. The stages will be as follows:
- Washing. For work you will need: a container of hot water, car shampoo and a brush (an alternative is a sponge, rag). Washing is necessary in order to get rid of the lubricant that is used to separate the finished part from the mold.
- Evaporation. It involves heating the part in a chamber for half an hour at a temperature of 60 °C, followed by degreasing the surface. It is difficult to carry out such a procedure in a garage, so it is better to immediately purchase primed plastic elements of the car. You can skip the evaporation procedure.
- Degreasing. Involves the use of branded products that also provide an antistatic effect. The part with the static charge removed is less likely to adhere to adhesion-reducing dust. White spirit is also used for degreasing.
- Grinding. The abrasive materials used are P300-P400 sandpaper, red or gray Scotch-Brite (for hard and soft plastic, respectively). Plastic can be sanded dry or using water (“wet” sanding). After treatment, the surface must be degreased again.
- Padding. A responsible procedure that solves the adhesion problem. Plastic primer (primer) is used for initial processing of the material. It should be applied in a thin layer, for which it is better to use an aerosol can. An important nuance is that the treated surface retains good adhesion for 15-20 minutes. Therefore, painting should begin without delay.
Technology when working with a primed part
Before painting, it is necessary to evaluate the quality of the primer applied to the plastic. To do this, apply a cloth soaked in solvent to the surface for two minutes. A softened coating is a sign of a poor primer, which must be removed with fine-grained sandpaper or Scotch-Brite before painting. If the coating remains unchanged, then the process looks like this: degreasing, matting, re-degreasing, painting. Damaged primed surfaces are sanded, puttied (putties for plastic are used), sanded again, then primed. The roughness of the abrasive for processing should not exceed P180.
Staining procedure
When the surface is completely prepared for painting, the most critical stage begins. Mistakes will negate all previous steps (paint drips, for example, will not make the part aesthetically pleasing). At home, using a spray gun is not always convenient, so it is better to use spray cans or an ordinary brush. The room in which work is carried out must be ventilated. Paint for plastic is applied in an even, thin layer so that no drips form. The surface needs to be treated with 2-3 layers. The interval does not exceed 25 minutes. When spraying paintwork from a can, the distance to the part should be 20-30 cm. The varnish gives the surface a glossy tint and enhances protection from subsequent exposure. Upon completion of the work, the part is left to dry naturally. When using acrylic paints on plastic for cars, it is important to add a plasticizer to the composition. Without it, the coating will not cope with the bending load and will become covered with cracks. Add a plasticizer in accordance with the manufacturer's instructions. The drying time of paint with additives increases. Adhesion reaches normal levels after a few days. It is better not to pressure wash painted plastic for a month.
Airbrush painting of car interior
So, everything is ready for painting. Now, using an airbrush, you can apply the first layer (developing layer). If pores are suddenly discovered, they can be eliminated with another layer of bigel, applying a textured imprint of the skin. By the way, at this stage it is not too late to color the paint (tint).
Liquid paint is always a little darker than after it dries. You should not strive to ensure that when applying it the tone completely matches the original. If the paint is lightened, then when painting locally, transitions and discrepancies in tones will be visible. You can choose the ideal paint only if you do test paints and compare the color after the surface has completely dried.
The airbrush allows you to adjust the torch by turning the head (installing replaceable heads). The torch angle is selected depending on the scale of the work. To paint a small area, a small angle of up to 30° is required. If the entire chair is being painted, then you can work with a wider torch.
Airbrushes can operate either from a compressor or from a compressed air cylinder. Sometimes I use a car camera as a receiver. There is no fundamental difference, but for stable operation of the airbrush you need to monitor the pressure, which is regulated by the supply valve.
It is also useful to read: Advantages of diesel generators over gasoline ones
Local damage can be painted directly on the spot, that is, without disassembling the car interior. However, it will not be possible to paint the entire chair without dismantling it. This way you can splatter the entire interior with paint, which will then take a long time to clean with solvent.
It is important
Never use spray paint on the inside of car trim. The only exceptions are local repairs, when you need to make several spot blows with an airbrush from a short distance.
Before painting leather with an airbrush, you need to degrease its surface, but do not apply any primers or primers. The leather must absorb the paint, otherwise it will become shiny. Primers also cause paint to run and cause subsequent cracking. Treatment is allowed only with special primers for leather that have high permeability.
The paint used to restore leather upholstery can peel off very quickly. The reason for its poor adhesion lies in insufficient degreasing. Leather care products contain oils and waxes that have a pronounced repellent effect. Therefore, you need to degrease very carefully, using powerful but not skin-corrosive substances, for example, alcohol or anti-silicone.
Painting perforated leather requires a special approach. Do not allow the holes to become clogged with paint. If you paint in the usual way, the paint will certainly fill some of the holes, and the perforation will lose its rhythm. Cleaning each hole with an awl helps, but it is quite labor-intensive and time-consuming.
It is best to paint perforated leather gradually, applying one thin layer after another. This way, the holes will not be filled, and the paint that gets into them will be absorbed through the skin sections inside the perforations. It may take up to ten passes with the airbrush instead of two or three.
Painting a car interior, unlike a full paint job, takes a few hours. If you do this work yourself, you can save a lot and solve similar problems quickly and efficiently in the future.
DIY car plastic painting
DIY car plastic painting
Painting the plastic of a car is a procedure that can be useful in various circumstances, be it routine body work or repairing an inopportunely damaged bumper. One way or another, motorists often have to paint plastic, since it is one of the main materials in every car. Every day, cars are tuned in workshops by painting body kits, bumpers, deflectors, air intake grilles and other plastic parts. But if you decide to paint the plastic of your car yourself, we will try to help with valuable advice.
So, to carry out this procedure, you need to know many subtleties. If we compare two types of painting - plastic and metal, they will differ from each other only in the necessary materials at hand. This is especially true for those elements with which the paint will directly interact. In other words, no one immediately applies paint to plastic, since the surface must be specially prepared for this.
DIY car interior leather repair
Repair of leather interior elements is carried out in several stages.
- To restore leather products in a car, you must first of all degrease and clean the surface that you will be restoring with a special product. It is with these procedures that DIY car interior leather repair begins . This product is sold in any car store. It serves to ensure that there are no streaks before painting, and the paint itself will be easier to apply.
- If any edges or fibers stick out from the hole, you need to get rid of them using scissors or a knife.
- The area to be treated will then need to be sanded with sandpaper.
- After all this has been done, place a reinforcing mesh inside the hole, and then fill it with a composition that imitates genuine leather. The mesh is necessary so that when pouring liquid leather, the composition does not get inside the seat. You should pour a special powder onto the surface of the mesh, then put a Teflon gasket on top and run it with a heat iron several times. The temperature from the heat iron is enough for the poured powder to turn into glue. Next, cooling bags are used to quickly cool the sealing area. Use bags to smooth out uneven areas, and then remove the Teflon gasket.
- The next stage is giving the original shape. To do this, fill the place that has already been glued with liquid bigel, and do what has already been done before, using a Teflon gasket, a heat iron and cooling bags.
- The very last step is to directly paint the car’s leather with your own hands. Painting is done after the surface has completely cooled.
leather interior
DIY materials for painting plastic
Primer for plastic
Painting a plastic car requires at least a special primer and putty for plastic. But if we are painting old surfaces, then it will be enough to matte the surface with sandpaper, and there is no need to apply primer. In practice, the entire procedure is quite simple.
There are two main types of plastic used by the automotive industry today. The first does not require careful preparation and preliminary priming. The second one is the opposite. They are quite easy to recognize and distinguish from each other in practice. There are two simple methods, which involve buoyancy and combustion of the material. When you place a small piece of plastic in water, it will either sink (in which case there is no need to prime) or remain afloat (in which case it is necessary to prime). Plastic also needs to be primed if it burns with a clean flame, but if it smokes, there is no need to prime it.
When painting plastic elements, it is very convenient to use paint in an aerosol can. Please note that a garage or small workshop is not particularly suitable for carrying out such work. The room should be well ventilated, clean and, importantly, free of dust, since it has the nasty property of settling on freshly painted surfaces.
DIY steering wheel painting
As you know, the steering wheel is one of the important parts of the car, with which the driver “contacts” the most. Therefore, the steering wheel rim wears out over time and becomes contaminated with sweat and fat secretions. Most drivers, in order to cope with this problem, buy and put a cover on the steering wheel. But it’s still better to update the appearance of the steering wheel than to hide it under a cover. In this case, painting the steering wheel is used. This way the surface of the steering wheel can be restored to its proper form, making it like new.
If you are interested in painting the steering wheel yourself, you must:
- First you need to remove the steering wheel.
- Then use film and tape to wrap the “untreated” surfaces.
- Before you start painting, make sure there are no cracks or dents on the steering wheel.
- Next, use sandpaper to remove any rough edges. This will ensure better paint adhesion and get rid of the old paint.
- After the bulk of the paint has been removed, go over it again with sandpaper, but with a softer sandpaper.
The paint for a car's steering wheel is selected according to the type of steering wheel. For example, for a steering wheel that has a combined or vegetable tanning, you need to use “soft” paints, but a steering wheel that has a chrome tanning will perform well in “hard” paints.
car steering wheel
If you are going to paint a leather steering wheel, you will first need to degrease it. This can be done with a regular leather cleaner.
You need to apply the paint with a foam roller or a regular brush. Some car paint manufacturers suggest dipping the steering wheel into the paint itself and holding it for 5-12 seconds. But the steering wheel cannot be dipped into a can of paint. Therefore, we recommend using auxiliary materials for painting. You need to paint in several layers. In this case, you should not wait until the paint dries, although the leather on the steering wheel should absorb the paint a little.
As you can see, with the right approach, painting a car interior with your own hands is not such a difficult task and is quite doable.
Remember: painting work must be carried out in a well-ventilated area with ventilation. Follow fire safety rules, because you are dealing with highly flammable items. And always wear a respirator.
And only after all the requirements are met will it be possible to achieve good results. Then, looking at the fruits of your efforts, you will be satisfied with yourself and the new look of your car.
Next article: DIY compressor repair. Previous: Car Scratch Removal Pencil, Marker and Other Products.
How to paint car plastic with your own hands?
Any work with plastic should be carried out in the following sequence:
- degrease the surface, for which we use a solvent (it will remove grease, oil and bitumen stains, and other contaminants);
- we treat the surface with an antistatic agent, which can be found in places where paints and varnishes are sold (this liquid will remove the static stress accumulated during the friction of the plastic; we need an antistatic agent so that our part does not attract dust and small fluff when painting, as this can ruin the whole job );
- if we are dealing with an old part and we need to correct some defects, then we must first apply putty to the plastic (it is more elastic compared to regular polyester);
- Next, you need to rub all the unevenness with moisture-resistant sandpaper (320-400 abrasive), and pay attention to the fact that the rubbing process should take place with water - this will eliminate cracks and cracks;
- thoroughly dry the part and degrease it again;
- we prime the surface in 2-3 thin layers, as drips may appear (the priming procedure promotes better adhesion; in this case, you can choose a two-component or one-component primer, of different colors, and so on);
- as soon as the primer layers have dried, we begin to matte the surface for paint, for which we use abrasive sandpaper (number 400-500);
- Now let’s move on directly to painting, for which we take acrylic paint with the addition of plasticizer; apply the paint in 2-3 layers using a spray gun, taking into account the fact that the layers must have time to dry;
- after a short period of time (20-30 minutes), apply a layer of varnish (if we used metallic paint);
- We apply a wax polishing paste, which removes minor errors made during the process of painting the plastic.
This is approximately how you paint the plastic of a car yourself. Nowadays there are many ways to apply paint, materials, and so on.
The current range of paints will help you choose any color that is suitable for a particular plastic part. It is best if the chosen color for the external parts of the car matches the overall color scheme of the body, unless this is some kind of extravagant tuning. In addition, you can carry out the painting procedure not only with aerosol cans, as advised above, but also with a simple brush.
Applying paint
For better and more durable results, the plastic of the car should be degreased again, only then proceed to painting. It is recommended to use paint for plastic at temperatures of +18…+22°C. At lower temperatures or in a draft, smudges will appear on the painted surface and the drying time will increase.
Important! The paint should be applied horizontally from top to bottom.
-
this way you can achieve the most even coverage.
If the interior is being painted completely, then for convenience, the window and door openings are first treated, and then proceed to painting the main plastic panels and elements. Parts that were removed during disassembly can be painted in any order.
The paint is applied in several layers of varying consistency. The first layer, more liquid, will reveal defects that were not eliminated during the preparatory stages, which can be treated with finishing putty. After this, the surface is covered with a second layer of paint. Most often, manufacturers recommend diluting paint with a solvent in a ratio of 1:4 for the first layer and 1:3 for each subsequent one.
It is recommended to paint small parts with a brush, but it will take longer to dry surfaces painted in this way. It is also important to apply the paint in the thinnest layer and not allow it to dry out during the work process. When painting control buttons, it is important to respect the iconography.
Video: Painting plastic interior
Painting plastic car with a brush
Painting plastic with a brush
Painting car plastic with a brush differs from other types of painting in that the paints and varnishes used for this type of painting usually have a long drying period. This significantly complicates the process, since during this time it is necessary to isolate the part as much as possible from all kinds of dust particles and fluff that are in the air, and this is quite difficult. Therefore, this method is usually used in cases where the part to be painted does not require special attention or will not be visible.
However, despite this, painting the plastic of a car manually with a brush also has its advantages. For example, this method is characterized by simplicity and good adhesion of the material. In addition, this method is simply irreplaceable if high-quality painting of small elements is required - no spray can can do this so easily.
If you decide to paint plastic with a brush, then keep in mind that you need to apply the paint in a thin layer, for which you will have to constantly press the brush. The effect that is as close to ideal as possible can be achieved if you do not immerse the brush completely in the paint, but only a third of the length, and also work quickly, without waiting for the paint to dry on the brush. Do not forget also about the painting angle, which should be the same at all times, and squeezing excess paint onto the edges of the paint can.
Technology for painting plastic car with your own hands at home and video of work processes
Consistency and thorough implementation of the technology for painting plastic elements guarantees the quality and durability of the paintwork. If you wish, you can familiarize yourself with the technique using the available video materials provided by the masters. Briefly, the list of works consists of the following points:
- Degreasing the surface using solvent or white spirit.
- Treat the plastic part with an antistatic agent (for example, Plak or Liqui Moly) so that when painting it does not attract dust to the surface.
- Before painting old plastic on a car, you need to eliminate defects using a special putty, which is more elastic than standard polyester.
- After drying, remove all irregularities using sandpaper P300 - P400 , and the process must be carried out using water.
- Dry the part thoroughly and degrease its surface again.
- Prime the surface in 2-3 layers, avoiding the appearance of drips.
- The dried primer should be cleaned before painting using abrasive paper P400 - P500 .
- 2-3 layers of acrylic paint with plasticizing additives are applied to the cleaned surface, each layer needs to dry for 15-25 minutes.
- After final drying, a layer of varnish is applied.
- Polish the finished paint surface with polishing pastes.
The technique of polishing the body has been worked out for a long time; to perform it, it is advisable to have a grinder and appropriate accessories. But if necessary, small areas can be processed manually.
Using a brush when painting plastic car parts
It happens that painting with a brush looks more convenient and profitable than using a can of aerosol paint. You won’t see this method of painting the standard plastic of a car with your own hands in the video. However, this does not mean that you should not pay attention to it; on the contrary, it guarantees high-quality adhesion and good coverage of small fragments. However, when working, a number of features should be taken into account:
- Paint applied with a brush takes longer to dry, so the drying time should be increased by 15-20 minutes.
- When painting, you should try to ensure a minimum layer thickness. To do this, during the process, the brush should be pressed well to the surface and work quickly.
- Carefully wipe off excess paint on the edge of the can.
- When working, maintain the same painting angle.
Painting plastic car parts
Everything has its own service life, and automotive plastic is no exception.
Sooner or later, you will have to contact a car dealership to get your car in shape: they tint the plastic in the car’s interior, update some external elements, for example, mirrors. But you can do such cosmetic repairs yourself - after all, you don’t need a lot of knowledge. If the technology for painting plastic is followed, and your equipment has high-quality paint, there will be no problems. So, if you decide to paint the plastic inside your car with your own hands, then we will be happy to help you with practical advice and rules. The difference in painting metal elements of the interior or body of a car and plastic ones is only in different paints. On plastic parts, as well as on metal ones, a primer is first applied (if required), and then the elements are polished. In general, plastic parts require the same careful DIY preparation if you want the paint to stay on for a long time.
Painting plastic inside a car
As you know, there are a lot of plastic elements in the car interior. In this regard, a problem arises - how to paint the plastic in the car interior? We'll give you some useful tips.
- To paint plastic in the interior , parts made of this material are removed separately. Then they are washed and dried.
- Afterwards it is necessary to degrease the surfaces.
For those who don’t know how to degrease plastic before painting, we’ll give you a hint: this is done using a special solvent. Popular solutions are acetone and white spirit. But they must be used carefully so as not to damage the surface.
painting the plastic of a car
And it is best, before painting the plastic in the car interior , to degrease it with anti-silicone. It can be found in auto stores.
- If there are any defects on plastic surfaces, they can be eliminated using putty, which is made specifically for plastic.
- Plastic handles and decorative fittings are coated with a gel-like product in one layer. If necessary, apply approximately one or two coats on the first coat, at intervals of 10-15 minutes. Afterwards, the finished plastic parts are left to dry completely in specially prepared places.
Painting plastic in the car interior is completed by applying paint to all plastic elements that matches the color of the plastic products. And after it dries, we begin to apply urethane varnish. In places with which the driver has the most “contact”, more urethane varnish is applied.
We figured out how to paint plastic. But some people are asking another question: how to update the plastic in the car interior and return it to an attractive appearance? Yes, very simple. Today, special auto stores sell many different sprays, creams, as well as polishes for caring for plastic surfaces. What will be best for you is up to you to decide.
Preparation and selection of materials for work
ATTENTION! A completely simple way to reduce fuel consumption has been found! Don't believe me? An auto mechanic with 15 years of experience also didn’t believe it until he tried it. And now he saves 35,000 rubles a year on gasoline! Read more"
Preparing the car involves applying putty and a special primer for automotive plastic. If you are painting a surface on which the paintwork has already faded, then preparation can only be done with sandpaper. In practice, preparation is quite simple. To know how to approach the painting process, you must first determine what type of plastic is in the interior of your car. Determining this is quite simple, but flammable:
Bring the lighter to the most inaccessible place with the plastic of the car - if it burns with a clean flame, then it needs to be primed. Such dances with a tambourine tell us that there is no protective factory layer on it. If the plastic just smokes, then no primer is required. This method is suitable for any car, regardless of model.
The most convenient way to paint the plastic interior of a car is with a spray can; you just need to check that the can has moderate pressure, because you hardly want to scrub the paint off the upholstery of the seats. As usual, spray painting of interior or body parts should be done in a clean and ventilated area. You can also paint the plastic of a car with a standard brush, but using a spray can is much more convenient.
Choosing materials or how to paint plastic on your car and not regret it
If you decide to restore the appearance of plastic products, it is important to first find out the type of material. There are two types of plastics used in the automotive industry. We will not consider their chemical components here; we are only interested in the features of pre-treatment and subsequent application of paintwork.
Any do-it-yourself painting of car plastic looks like a simple operation in the video. In practice, the type of plastic is first determined by the following two criteria:
- Combustion - Take a small piece of the component being repaired and set it on fire, making sure there is no paint residue or contaminants on it. If the flame is accompanied by black smoke and soot, then there is no need for preliminary priming (only treatment with fine abrasive sandpaper). If the plastic burns with a clean flame, then primer for the plastic is necessary.
- Buoyancy - complete immersion of a plastic part indicates that there is no need for priming; if the part remains on the surface of the water, then applying primer is indispensable.
Basic materials
Before you paint the plastic on your car, you need to take care of purchasing consumables, which include:
- Acetone or white spirit.
- Primer for plastic (if necessary).
- Moisture-resistant sandpaper (P300 - P800).
- Paint for plastic products.
- Transparent acrylic varnish.
Practice has already shown that when restoring paintwork on certain areas of the body, it is rational to paint it from a can of aerosol paint. This approach is also rational in our case, because the areas to be treated are small, and purchasing a spray gun and compressor is expensive. In addition, we cannot rule out options when you cannot do without a regular paint brush.
Painting process
Preparations for painting car parts with your own hands are completed - at least let’s imagine it. Any painting of car parts with your own hands should be carried out in the following sequence:
- First of all, we need to degrease the surface before painting. To do this, you can take White Spirit or any other solvent. You can also degrease it with car detergent.
- Before painting the plastic parts, you need to treat the surface with an antistatic agent. You can find this material in a paint store. Before work, this is done in order to remove static stress - the part can attract dust, and this is not at all necessary for painting.
- If you are painting an old part with defects, then first you need to putty it with a special paste for plastic. Polyester putty is too hard for automotive plastic.
- Use sandpaper to smooth out any imperfections before painting. Before this procedure, moisten the sandpaper with water - then cracks and crevices will be removed better. Of course, you need moisture-resistant sandpaper.
- Dry the car part thoroughly, and then degrease the plastic on it.
- Let's move on to the primer with our own hands - 2-3 layers will be enough for this. Do not overdo it, otherwise drips may form. A plastic primer in the interior is required for better adhesion of the material. You can take both two-component and one-component primer. You can also choose colors to suit your taste. Wood-look paint is very popular. Plastic painted to resemble wood makes the interior more expensive, which is why “wood” costs more.
- We wait for the primer to dry completely. Now it's time to start matting the surface that we will paint. To do this, you can use abrasive sandpaper with a number of 400-500.
- We begin to paint the plastic of the car interior. To do this, take the purchased paint and apply several layers using a spray can or spray gun. Before starting the next layer, you need to make sure that the previous one is already dry.
- After 30-40 minutes, you can apply a layer of varnish (this is only necessary for metallic paint or for wood-effect paint on some models).
- The final stage will be the application of a wax polishing paste, which will deal with minor errors. Before doing this, it would be correct to wait for complete drying - a couple of hours.
- Absolutely legal (Article 12.2);
- Hides from photo and video recording;
- Suitable for all cars;
- Works through the cigarette lighter connector;
- Does not cause interference to radios and cell phones.
This is how painting a car interior goes.
As you can see, you can do this yourself, and the whole process does not take long. Regardless of the car model, painting is carried out the same way - do not forget to check the plastic. I am glad that now the range of paints on the market is only growing. You can find paint compositions for different models. There are many painting methods. Forget about fines from cameras! An absolutely legal new product - Traffic Police Camera Jammer, hides your license plates from the cameras that are installed in all cities. More details at the link.
Car interior repair and painting
Often, when a cigarette falls on a leather seat, it burns right through the leather and deforms (tightens) it at the edges. To remove such a deformation, you need to cut out the damaged area of skin with a scalpel. Before this, you can clean the entire seat with any interior cleaner (it will partially wash away the burn mark and make the leather look new). When painting locally, it is highly advisable to wash the seat completely so that the transition boundary is not visible.
On a note
To prevent craters from appearing after painting, it is necessary to cut off burrs from the skin (with a scalpel, pulling off the burr with tweezers). It is advisable to sand the edges of the hole with sandpaper No. 2000. The hole that is formed is filled with a special component that resembles liquid skin.
Reinforcing mesh must be used as a substrate for this component. The mesh will not allow the special compound to seep into the seat. It will also serve as the foundation for the repair composition.
The reinforcing mesh is inserted into the hole using tweezers. A special powder is placed under the edge itself, which when heated turns into glue. For heating you need to use a Teflon iron with a heat regulator.
On a note
For gluing leather, velor or suede, the temperature is selected individually (you can practice on hidden areas). At high temperatures, you can burn the surface, and at low temperatures, the materials will not stick.
To start heating, you need to put a Teflon gasket on the hole and heat treat it with an iron on top for 10 seconds, running it over the entire area. The skin temperature should be approximately 125 degrees Celsius. After warming up, artificial ice is placed to speed up the cooling of the gluing. After a minute, you can remove the gasket, since the glue will have completely set by then.
Next, all that remains is to fill the hole with a “bigel” (you need to apply many layers until it is completely filled). The beagle is liquid, but after heating each layer through a Teflon pad, it takes on the structure of the skin. To make the beagle take on the texture of the skin, you can use a two-component texture composition.
It is also useful to read: Learning how to paint on VAZ (Zhiguli, Lada) cars
How to use it? You need to squeeze both components onto a spatula and mix. Then apply to a similar area of skin. After hardening, peel off the textured patch and place it on the area to be repaired, with the imprint down (on a fresh bead placed flush with the skin). Then heat it through the gasket with an iron for 10-20 seconds (in a circular motion).
Next, you need to choose the appropriate shade for the seat using a color fan. It is more profitable and convenient to order paints from specialized paint selection shops, but you can also purchase several components and mix them yourself to the desired color. A catalog of color formulas and electronic scales will greatly simplify this task. The finished paint composition can be diluted with distilled water (add 10-15%).