Homemade podiums for car speakers
In many domestic cars, there comes a time when the sound quality of the audio system begins to decline.
Vehicle owners are trying in every way to correct the problems that have arisen. However, if you bypass the alteration of the interior, then it is simply impossible to solve this problem. This article shows and tells how to make special podiums with your own hands, with the help of which you can install speakers on the car door. The podium can be made for any speaker and for any car. The creation of these podiums is considered using the example of the VAZ 2106.
Creating a foundation for the future podium.
Before making the base for the podium, you need to decide on its shape. Much depends on the shape of the podium, because this is the basis of the entire device. The podium should not interfere with the handle that opens the door and the window lifter handle. It is also important that the podium does not interfere with closing the doors tightly. First of all, draw the chosen shape for the base on cardboard and cut it out.
Cardboard template for base.
Next, we transfer the cardboard template to the plywood and cut out two parts. The thickness of the plywood should be from six to eight millimeters.
Speaker platform.
The speaker requires a ring-shaped base. Before doing this, you need to measure the dimensions of the speaker itself, as well as its protective mesh. Typically, the inner diameter of the ring seat is equal to the inner diameter of the ring itself, and the outer diameter of the protective mesh is equal to the outer diameter of the ring. It is also worth considering that you need to add five to seven millimeters to the outer ring to obtain a decorative ring in the future. With the help of a decorative ring, the speaker will be slightly deeper, which will give a more beautiful and aesthetic appearance to the structure.
diagram of the speaker ring and decorative ring.
The next step is to cut out the template and transfer it to plywood. The plywood should be the same thickness as for the base, that is, six to eight millimeters. After transferring the template to plywood, you need to cut out two parts. We glue the decorative ring coated with glue tightly to the base; to be on the safe side, you can pin it on small nails.
received blanks
Attaching the ring to the base.
In order to attach the ring to the base, it is necessary to make spacers. Any material is suitable for the manufacture of spacers, the main thing is that it ensures fastening rigidity. In this case, a regular strip of the required length was chosen. All spacers, there are four of them, must be of different sizes. Their size depends on how far the ring is tilted relative to the base and how much it protrudes forward. It is best to point the speaker at the gearshift lever. Self-tapping screws are used to secure the spacers.
diagram of fastening spacers using self-tapping screws.
Shaping the podium using polyurethane foam and a frame. Polyurethane foam is the best option for shaping, because it can be easily processed to create beautiful rounded corners. The foam is applied carefully, in even layers, starting from the ring and ending at the corners. Any pipe of suitable size is inserted into the hole (ring) for the speaker. This is necessary in order not to waste foam, because the ring will still have to be cut out.
Finally, you should check whether the foam is correctly applied to the decorative ring; it should not be lower than it. If it is still below the ring, you should apply some more foam before it dries.
applying foam.
Shape the base or feel like a sculptor.
As soon as the foam has dried, you can begin to cut it and give the desired shape to your future podium. This is a very interesting and unusual activity, during which you can feel like a creator and a great sculptor. Excess foam is removed with a stationery knife; it must be sharp enough. First, the base is cleared of excess, then the top. And only after that you can start drawing out the form.
Once the base of the podium has acquired a clear shape, you need to bring it into the best condition. It is best to sand the base with coarse sandpaper.
almost finished design.
Leveling the surface.
The surface of the podium must be leveled. For this purpose, a mixture of putty and PVA glue is prepared, which is then applied to the surface of the podium. Apply in thin layers, then dry well.
podium with putty applied.
After the structure has completely dried, you can begin processing with sandpaper.
Creating a protective layer using epoxy resin and fiberglass.
Fiberglass fabric must be properly impregnated with epoxy resin in order for it to fully perform its protective functions. Epoxy resin must be applied to the podium, then wrapped in fiberglass. Apply resin again on top of the fiberglass.
After the base of the podium has dried, you can trim off excess pieces of fiberglass and remove any remaining glue using sandpaper.
Reviews
| № | Positive |
| 1. | Victor, 45 years old: the car is in its second year, the shelf is not deformed, fits tightly, does not make noise, does not creak. |
| 2. | Konstantin, 51 years old: a few months ago there was an accident, the impact hit the rear, and the glass was damaged. I thought it moved the shelf, but it turned out to be in vain, it didn’t even deform. Good quality. |
| 3. | Vitaly, 37 years old: I work as a foreman in a service station, I have seen many VAZ models, but in Grant the quality of the rear shelf is good. It’s a pity that Priora cannot “boast” of such things. |
| 4. | Alexander, 39 years old: I’ve been working as a salesman in a store for the second year, I noticed that Granta shelves are bought extremely rarely, unlike previous models. |
| 5. | Maxim, 41 years old: I bought the car since it was released in 2011, during this time I changed a few things, but I didn’t touch the interior, it doesn’t creak or knock. |
| 6. | Valery, 44 years old: plastic inserts are of good quality, I’ve been using the car for three years now, I have no complaints about the interior or inserts. |
| Negative | |
| 1. | Mark, 38 years old: due to the fact that the car was often parked in the sun, the rear parcel shelf was deformed, constantly knocking, and occasionally creaking. I am dissatisfied with the quality, because the plastic should be adapted to temperature changes. |
| 2. | Vyacheslav, 47 years old: after five years of using the car, the plastic inserts in the interior began to knock on uneven surfaces, and a creaking sound formed. In general, the manufacturer saved on quality. |
| 3. | Mikhail, 37 years old: I was dissatisfied with the quality of the standard shelf, I had to replace it with a Mercedes-Benz one, it fits exactly. |
Conclusion Removing the rear shelf on a Lada Granta is not at all difficult, it will take ten minutes of free time and you’re done.
Installing a tuned version of the insert is also not difficult for the average driver. If you don’t have free time, you can always contact a specialist service center. Now the owner knows exactly how to remove the Grant shelf with his own hands.
| № | Positive |
| 1. | Kirill, 33 years old: the standard front speakers are quite enough for me. To add volume to the sound, I installed a couple on the rear shelf. |
| 2. | Vasily, 44 years old: The standard radio on the Lada Granta Liftback is not bad, the sound is good. There are not enough speakers in the back row. I didn’t bother, I set the speakers to “13”. |
| 3. | Vitaly, 33 years old: after purchasing the Lada Granta Liftback, I supplemented the standard audio system with only two rear speakers, that’s enough for me. |
| 4. | Gennady, 41 years old: to increase the volume of sound, he added two speakers to the rear side doors and the rear parcel shelf. The standard radio works, no problems. |
| 5. | Mikhail, 35 years old: I heard a lot of complaints about the standard system, my feedback is positive. Yes, it is not super powerful, but it is enough for the average driver. |
| 6. | Gennady, 29 years old: the standard 2-DIMM radio on the Lada Granta Liftback is quite enough for good sound. Anyone who wants a concert hall should buy it separately. |
| 7. | Vyacheslav, 38 years old: I heard that they install rear speakers on the Grant at “16”, but I didn’t bother. I bought it on “13”, I’m happy, there are no complaints about the sound, it’s not ideal, but it’s enough for me. |
| Negative | |
| 1. | Vasily, 28 years old: I didn’t believe the negative reviews until I bought the Lada Granta Liftback. Weak and terrible. Change the speakers and radio. |
| 2. | Kirill, 33 years old: I took the car with me, it had a standard radio, I replaced it with a new one from Pioneer. It's a completely different matter. |
| 3. | Georgy, 41 years old: when buying Grants, I knew in advance about problems with acoustics. I bought coaxial speakers and a good radio. |
Conclusion In general, the sound quality of the standard speakers on the Lada Granta liftback is good. Lovers of high quality and cleanliness do not like this, so they strive to replace it with expensive models.
It is necessary to start from the fact that the car is in the budget segment, which means there is no point in demanding the best. If desired, install 16 speakers on the rear side doors to enhance the sound quality.
Conclusion In general, the sound quality of the standard speakers on the Lada Granta liftback is good. Lovers of high quality and cleanliness do not like this, so they strive to replace it with expensive models.
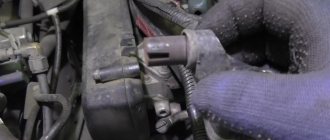
What to make spacers for speakers from
How to properly make spacers in the front doors under the front? I’m interested in what material is better to use, how thick it should be, and if anyone has a drawing, please share. What's the best way to mount them?
ps: I saw that Bloom suggested putting this in the faq on MLC, but no one bothered to do it.
I'll post a small photo report on the spacers
We take plywood (I took 15mm) and outline the outer side according to the standard speaker. Click to view the attached file The inner side is approximately from the template from the box.
Next, take a screwdriver. Drill, whichever one you like. We drill holes in the inner frame. Click to view attached file
I didn’t apply mastic. Didn't impregnate it with anything. Screwed it directly onto the splenium.
Thank you all for your attention.
Titus, thank you. PS, I didn’t bother with epoxylin. I screwed them into triangles. Click to view attached file
I'm happy with the result
But what if..
It turned out beautiful
I hope the audience won’t mind if I post my photos of preparing spacers
I didn't cut it out of plywood right away. I decided to try cardboard on cats. The outer contour was outlined according to the standard column.
The internal contour was successfully outlined along the decorative ring from the new speakers.
I cut out a spacer from cardboard, tried it on the speaker + checked the location of the holes for the screws in the door (everything lined up perfectly)
Now, boldly, without fear in my pants, I did the same thing on plywood. Instead of a knife and scissors - a jigsaw and a drill
cut out
Tried it on
I processed the “rough” areas with a file, and then with a sander. I screwed the speaker to the spacer using 8 self-tapping screws.
More details here
What and what places need to be sealed?
More details here
What and what places need to be sealed?
I sealed the contact areas between the speakers and the wood and the wood itself against the door. This can be done in different ways - even to the point of rolling up the entire piece of wood with a vibrator (tearing off the foil from it), or tearing the resin off the vibrator, rolling up flagella with a diameter of 5 millimeters with your fingers and one flagellum between the piece of wood and the door, with the second “wrap” the speaker at the junction and assemble it all with screws. I did it with flagella
I made some 16mm spacers, but now the trim doesn’t fit into place. Despite the fact that I cut (along with the hand)))) the plastic in a circle from the inside. There is no protruding rib in the front part.
What should I do, thinner spacers or where?
I’m tormented by the question of how to install 8″ “variety” speakers. Does anyone have any experience?
ps I’m wildly sorry that I’m writing in several messages, there’s some kind of character limiter on the PDA)) don’t take it for a flooder or a careerist)))
I made podium spacers for standard mounts. Initially I wanted to make it from 8 mm, but according to the recommendations of Pashka kurd
I found a piece of plywood with a thickness of 16 mm
Well, I rolled rubber from a vibrator (sort of), made such a sausage, glued the sausage onto the podium, screwed the speakers on, voila, it turned out like in the picture.
The result of the assembled door and a new speaker, I cut the card under the podium by 5 mm, on the doors where the speaker is attached are glued with bitoplast (photographed at night with a phone)
mounting screws 5 mm thick 25 mm long
The terminals are crimped + soldered.
I attached the crossovers near the handle, there is a recess in the door card, well, in general, you need to look where there are such free spaces, I adjusted the crossover a little, removed the caps from the card and tried the whole thing on - it fits, it doesn’t fit.
Spacers for speakers on Kalina
The other day I decided to replace the front door speakers on my Kalina. Having removed them, I discovered that they are attached only to the door trim and begin to vibrate under good load. But that's not the point. I read on the Internet that spacers can be installed under the speakers. This way the speakers will be firmly fixed, the sound will be much better.
Spacers can be ordered online and may be found in auto stores. But I didn’t find them in my city. So I decided to make them myself. Spacers for speakers (13 cm) consist of 2 wooden rings. For Kalina, these rings have specific dimensions - towards one edge the thickness of the ring decreases, like a knife blade. this is due to the design of the door.
And so let's get started. I found a piece of unnecessary plywood at home and cut out 4 rings using a jigsaw and a drill. Inner ring diameter - 110.5 mm:
Next, you need to connect them in such a way that the greatest height is +-29mm, and the narrowest is 10mm.
Having established the required height, I fastened everything with wood screws. The exposed part of the screw must be cut off. The resulting void can be blown out with foam to give rigidity to our structure.
After the foam has completely dried, its excess parts will need to be carefully trimmed. As a result, we get an almost finished spacer.
As a final treatment, the resulting spacers for the speakers can be painted to protect them from exposure to moisture, from which they will simply rot.
After the paint has dried, the spacers can be installed. To do this, it is not necessary to completely remove the door trim; it will be enough to simply unscrew the 2 bottom screws and unclip the bottom. We insert the spacer through the bottom and install it in such a way that the door trim fits perfectly on it, there are no unnecessary gaps. If necessary, the spacer can be ground off a little or a sealant can be added.
Having determined the correct location, the spacer can be screwed on. The door must have 4 mounting holes for this purpose. If they are not there, then metal screws will come to the rescue. Install the speaker and screw it on.
Don't pay attention to the speaker, it was just torn a little and I decided not to change them, but just glue them back together. I was pleased with the result.
Review of prices of audio products manufacturers
| Name / characteristics / article number | Price, rub.) |
| Comprehensive budget solution | |
| Radio tape recorder PIONEER MVH-150UBG | from 1500 – 1700 |
| Speakers Pioneer TS-1339 (13cm) | from 2000 |
| Speaker trim | from 450 – 500 |
| Additional noise/vibration insulation of doors | from 1200 |
| Consumables, bolts, screws for vinyl (wood) spacers | from 100 – 150 |
| Car radios | |
| Pioneer SPX-HUD01 | from 10000 |
| Pioneer DVH-345UB | from 12000 |
| Sony XAV-65 | From 15000 |
| Pioneer SPH-DA230DAB | —/— |
| Pioneer SPH-DA120 | from 12000 |
| Pioneer MVH-X585BT | —/— |
| Pioneer MVH-X580BT | —/— |
| Pioneer MVH-S300BT | —/— |
| Auto acoustics coaxial | |
| Two-way coaxial acoustics URAL AK-M | from 7000 |
| URAL AK-74 | —/— |
| Coaxial acoustics URAL AS-C6947 | from 5200 |
| URAL AS-C1647 | —/— |
| URAL AS-C1347 | —/— |
| Four-way acoustics German Maestro AC6511 | from 7500 |
| Focal Performance PC 130 | —/— |
| Dragster DCB 5 | —/—7 |
| Dragster DCA 943 | from 6800 |
| Dragster DC 572.2 | —/— |
| Dragster DC 502.2 | —/— |
| Auto acoustics component | |
| 2-component acoustics Dragster DSB 5 | from 4000 |
| URAL AS-C1627K | —/— |
| URAL AS-C1327k | —/— |
| URAL AK-74.C | —/— |
| URAL AK-47.C | —/— |
| Avatar CBR-6.21L | from 5000 |
| German Maestro MB 4.2 FR | —/— |
| German Maestro 2S 6512 | —/— |
| Dragster DSC 592.2 | —/— |
| Dragster DSA 582 | —/— |
| Dragster DS 532.3 | —/— |
| Alphard Machete MC-6.2A | —/— |
| Amplifiers single / multi-channel | |
| Machete MFC-650.1D | from 10000 |
| Taramps DSP 3000 | —/— |
| Taramps TS2000x4 | —/— |
| Taramps TL500 | —/— |
| Taramps TL1800 | —/— |
| Taramps TL1500 | —/— |
| Taramps DS800x4 | —/— |
| Taramps DS800x2 | —/— |
| Taramps DS440x4 | —/— |
*prices are as of September 20, 2018.
How to make spacer rings for speakers
You will need : plywood, drill, jigsaw, sealant, varnish.
The thickness, width and other dimensions of spacers for columns are calculated individually in each case, so there are no universal sizes of spacers. The diagrams presented above can act as a template, which will be modified locally.
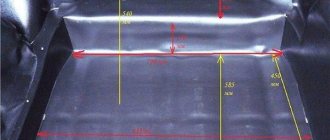
The total thickness of the spacer is determined individually. Approximately, for a speaker mounting depth of 52 cm, spacer rings 16 mm thick should be suitable.
Procedure:
- Determine the outer and inner diameter of the rings (using a sample or speaker).
- Cut out the spacer slides with a jigsaw, having previously drilled holes for installing the jigsaw blade.
- Fasten all parts of the spacer (if they are composite) using glue or self-tapping screws.
- Try on the door spacers and modify them if necessary. Make sure that the spacers fit tightly to the surface, nothing interferes with the correct positioning of the speaker, and the door trim is installed without problems (modify locally).
- Coat the rings with several layers of varnish.
Installation of 16 cm speakers using spacers
A spacer is, in this case, a wooden product that follows the shape of the column. It is made in the form of a ring; the material used is usually fiberboard, MDF board or plywood. But even in this case, you may need to cut the metal of the door, which in my opinion is a little blasphemous in relation to the car.
Spacer made of two rings, MDF material
- The inner diameter of the ring is measured so that the speaker is freely attached to it, and for the best sound, they try to ensure that the speaker fits as tightly as possible to the ring.
- The outer diameter should be such that the column is attached tightly to the ring, and, if possible, fits behind the upholstery so that the metal of the door does not have to be cut.
The video below shows the installation of a 16 cm speaker system in the front doors of a Lada Priora. The principle is the same.
Video
General information about music in Grant
In this section, we will consider general non-professional points about music in the Lada Granta.
Installing music
If you have a VAZ 2190 in the basic configuration (or Norma) with audio preparation, then installing music will entail the following steps:
- Removing the radio cover - on the back side there are ISO connectors for power and speaker wires. You will have to run the wires to the rear speakers yourself if you plan to install an acoustic shelf, since from the factory the wires are routed only to the doors;
- Installation of a 1-DIN radio (for 2-DIN you will have to farm, cutting out a jumper in the panel and looking for a suitable frame);
- Finding and connecting the plug of the pre-installed antenna - often the antenna wire on the roof is lost under the ceiling trim and it turns out to be easier to install the antenna separately than to find the factory cable;
- Pulling wires into the trunk to connect an amplifier, subwoofer and speakers installed in an acoustic shelf.
- To install the amplifier, you will also need a separate power cable from the engine compartment directly from the battery terminal through a fuse.
Removing the jumper in the panel cladding is mandatory when installing a 2-DIN GU.
If your car does not have audio preparation, you will have to separate the power wires for the radio and the speaker wires in the door.
Common budget music option:
- radio tape recorder within 5000 rubles with the ability to adjust the equalizer;
- 16 cm component speakers with tweeters at the front;
- acoustic shelf with speakers 6*9;
- amplifier with subwoofer in trunk.
| Example of a Pioneer device | Average price tag in rubles | |
| Head unit (radio) | DEH-S101UB | 4000 |
| Front 16cm acoustics | TS-G1733i | 2000 |
| Acoustic shelf | 1500 | |
| 6*9 “pancakes” | TS-R6951S | 2200 |
| Amplifier 2-channel | GM-A3702 | 4300 |
| Passive subwoofer in a box | TS-WX305B | 5200 |
| Subwoofer installation kit | 1500 |
As a result, we get budget sound in the region of 20 thousand. If we consider professional head units, premium-segment speakers, installation of custom podiums and other delights, the price tag can easily jump over a hundred thousand, amounting to a third of the cost of the car itself.
The choice of podium depends on the type of windows, budget and number of speakers.
We will not describe the technology for making podiums with our own hands. Next is a selection from various resources for ready-made podiums and manuals for self-production.
Algorithm of actions
- First you need to remove the door trim (details in this article).
- We take measurements and estimate certain dimensions. The most convenient way is to pre-make a layout from cardboard.
- Based on the layout, we figure it out on the spot and see if the column fits into the door niche. We are trying to understand whether the glove compartment can open with this column, since the column may interfere with it.
- We cut out spacers, if necessary; below we will consider options for columns for which it is not necessary to make spacers.
- We cut out a decorative plug for the column on the door trim.
For convenience, you can first drill holes around the perimeter of the cut
We cut the trim with a utility knife.
Install and secure the spacer
Attach the column to the spacer