Cigarette lighter VAZ 2106
For many car enthusiasts, a cigarette lighter is a necessary device, because a cigarette lighter in a car is needed not only as a lighter - in addition to using it for these purposes, it is through the cigarette lighter socket that a portable car refrigerator, compressor, TV, travel razor or coffee maker, and mobile phone charger are connected to the power supply. If the cigarette lighter breaks down, it must be disassembled and repaired. If the cigarette lighter completely fails, it needs to be replaced. Let's talk about how to change the cigarette lighter.
Does not work
screwdrivers;
soldering iron; tweezers; cotton gloves. Repair instructions:
Open the hood and then remove the negative terminal from the battery. This will de-energize the machine and significantly reduce the risk of a short circuit.
Then move the driver's seat as far as possible to gain access to the cigarette lighter, most often located on the center console.
Now take a bright flashlight and inspect the inside of your cigarette lighter. There should not be any foreign debris or objects there. If they are still present, you need to carefully remove them using tweezers with rubberized ends or 2 matches.
Check the fuse responsible for the operation of the cigarette lighter. In the event of a short circuit due to a device connected to the cigarette lighter, the fuse blows and no current is supplied. To restore its supply, you must install a new working fuse. An instruction book should help here, which will tell you which fuse needs to be replaced. In addition, a table of all fuses can be found on the back of the fuse box.
If the above methods are useless and the cigarette lighter does not work, remove it from the socket. To do this, gently pull the metal rim with pliers. Moreover, it is necessary to place a cloth under the teeth of the pliers so that marks do not remain on the rim.
Try to remove the cigarette lighter from its socket. If the body gives in tightly, try pulling on each side in turn. However, do not pull too hard to avoid breaking the wires.
Inspect the removed cigarette lighter. It is worth paying attention to the presence of dark carbon deposits. Also check the reliability of the soldering and the integrity of the wire insulation. A loose wire is often the reason for the lack of current in a car cigarette lighter. Then carefully solder this wire into place.
Install a new cigarette lighter head if there is current and the coil is cold. Due to frequent use, the heating element burns out quite quickly. Always buy a socket designed specifically for your cigarette lighter.
How to change the lock on the door using the link.
How to connect
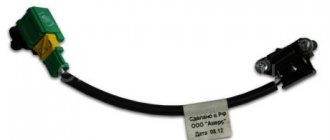
It is best to make 5 V sources independent of the cigarette lighter for each additional device and power them from the ignition circuit (after the ignition switch). Then both the recorder and the navigator will be connected only when the engine is running (for the recorder this is doubly beneficial, it has an automatic on-off function when external power is available)
Connection diagram
There are slight differences depending on which model of center console is installed in the car.
If a replacement has been made and you have a “five console”, the connection diagram is as follows:
The color of the food is blue-red, paired, while the color of the minus “mass” is paired, black and white. The ground is fixed near the ignition relay. One branch powers the light in the glove compartment.
Native console (central) VAZ 2107, the connection principle is as follows:
“Ground” is black, the wires going to the lighting are white, there are two of them. The circuit provides that one wire illuminates the panel.
The power supply wire is blue and red, paired, one part fits and powers the on-board clock.
It is also important to know that in addition to wires, the circuit contains:
A 10 ampere fuse marked F 6, which is located in the mounting block.
Backlight
Replace the light bulb with the engine turned off and the battery disconnected.
Remove the plastic panel located under the dashboard. In addition to the cigarette lighter, the hazard warning button and light and fan switches are attached to it. To do this, pry the console from the side with a screwdriver and carefully press in the latch holding it.
Use a marker to mark the wires that go to the cigarette lighter, or draw a diagram of their connection.
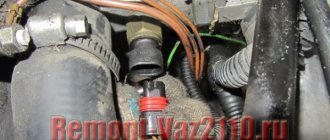
The cigarette lighter body is held in place by a large nut - unscrew it.
Remove the cartridge with socket from the cigarette lighter housing.
The lamp housing is attached to the cigarette lighter body - disconnect it by pressing the latches that hold it.
Use a screwdriver to slightly open the lamp housing.
Remove the socket from it along with the lamp inserted into it.
Replace the lamp and reassemble the cigarette lighter in reverse order
If replacing the lamp and fuse did not help, then in order to restore normal operation of the cigarette lighter, it is necessary to change it completely.
Removing the cigarette lighter
- First, again, as always, without exception, we de-energize the ground, disconnecting the negative terminal from the battery;
- We take pliers and slightly tighten the metal rim on the cigarette lighter, being careful not to damage it.
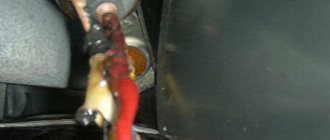
- After this, carefully pull out the cigarette lighter so as not to tear off the wires. If at this stage you notice torn wires, you need to carefully solder them.
Wrote in the first part of this blog
about the fact that the clock and the cigarette lighter were not working, the fuse was ringing on all sides, but there was no contact at the terminals of the clock and the cigarette lighter.
I decided to remove the additional mount. fuses and brains (under the dashboard) and ring the output contact from the mounting block. The permanent plus for the cigarette lighter and clock is in the red-blue wire, the blue chip
is in the mounting block
on the interior side
.
I rang the output terminal - there is no contact. That means a path. A little later, I parked the car near the house and decided to remove the mounting block. What will have to be removed: Glove compartment; Lower storage shelf; Ext. housing fuses - 2 nuts for 8
;
ECU strip - 3 10mm nuts
, one on the glove compartment side (also secures the right air duct), two on the studs of the mounting block;
To remove the mounting block itself, you will need to disconnect the chips from the interior and under the hood (all are marked in their own color, you won’t get lost), unscrew the 4 10 nuts
from the interior side (the two bottom ones are freely accessible, the two top ones will have to work hard) and pull it out from under hood:
Also, at the same time I decided to remove the dashboard so that I could glue it at home, since I was really tired of its creaking:
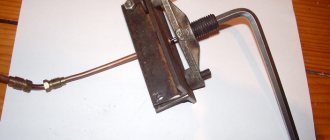
The next day, Father and I disassembled the mounting block, and yes, it was a burnt track:
We soldered the track and, just in case, ran a thin wire directly:
I disassembled and taped the tidy with “soft tape”:
I assembled everything in reverse order and connected it. Everything works as it should!:
And the tidy stopped creaking