Trimmer, CLUTCH SPRING.
4 months ago
How to independently change the clutch spring on a trimmer: Clutch on a trimmer
.
a very important detail, but, unfortunately, it often fails, especially on cheap trimmers. In the event of a breakdown, the clutch on the trimmer will constantly rotate the coil and disk. How to quickly change the clutch spring on a trimmer , more details on my website www.Looktool.Ru
Replacing the cord
When pulled, the cable constantly rubs against the starter housing. To replace, disassemble the block body and carefully lift the ratchet drum so that the return spring does not jump out of its seats. It is better to do this work together: an assistant fixes the spring while the cable is being replaced. After fixing the cable in the handle and in the grooves of the drum, the cable is wound onto a roller and the housing is assembled.
Repair of HOMELITE petrol trimmer. The starter is broken.
The starter cord has finished winding and starting is not possible. DIY repairs.
How to install a spring on a chainsaw starter?
Installing the starter spring into the appropriate groove is difficult even for the most experienced user. First, you should twist the spring to its previous diameter and install it in the cavity of the drum hub. The outer end of the spring is fixed with a limiting protrusion, and the outer end must be placed opposite the hole in the lock using a screwdriver. The loop on the inner end of the spring is aligned with the hole using a screwdriver, after which the disk is lowered. Rotate the disc to check if the ratchet is in place. Next, the ratchet itself is assembled.
After installing the spring, it is necessary to adjust its tension. To do this, a cable is inserted into a groove around the circumference, and a return spring is twisted around it. After eliminating the sagging, it is better to wind the spring a few more turns to ensure the required tension on the part.
Disassembly and repair
Now you need to completely disassemble the Hyundai Accent starter and replace vital components:
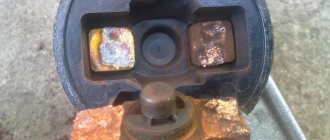
- Brushes - they are worn out when the rotor rotates.
- Bushings - they contain the rotor and also serve as a negative contact for powering its winding.
- If necessary, the solenoid relay must be replaced.
- The Bendix and overrunning clutch are replaced when there is severe wear or failure - the starter does not rotate the engine flywheel.
The procedure for disassembling the starter:
- Disconnect the wire coming from the contact bolt of the traction relay to the stator winding.
- The relay is secured with two bolts - unscrew them with a Phillips screwdriver.
- Carefully remove the anchor, being careful not to lose the spring.
- Proceed to the back cover - unscrew the two bolts that hold the entire body together.
- Using a curved screwdriver, unscrew the brush assembly fastening.
- Remove the back cover and carefully remove the brushes. Assess their condition. In any case, they need to be replaced.
- Remove the spacer washer from the back of the rotor.
- On the front of the starter there is a support and a gear drive lever with an overrunning clutch. Remove them carefully and replace them if necessary.
- Now you can remove the rotor (armature) from the housing.
Be sure to carry out a visual inspection of the rotor - there should be no wear on it. If it is present, then you need to level the surface on a lathe. If the wear is small, you can clean it with fine-grained sandpaper.
Using a multimeter, check whether the rotor windings are shorted to ground. If there is a short circuit, it would be better to replace the rotor or the entire starter. A new one will last 5-10 years with proper use. To remove the overrunning clutch you will need:
- Install the mandrel onto the restrictor ring at the front of the rotor.
- Carefully knock down the ring; there should be a lock underneath it.
- Remove the retaining ring (clamp); you can pry it off with a flat-head screwdriver.
- Remove the restrictor ring and the overrunning clutch with the gear.
This is interesting: How to straighten a dent on a car with your own hands
After removing this unit, you need to check it - the gear should rotate freely in only one direction. If it rotates in both directions, it needs to be replaced. Be sure to conduct a thorough diagnosis and a thorough inspection - the rotor and other elements should not have damage, cracks, bends, or deformations. When assembling the Hyundai Accent starter, there is no need to use additional lubricant for the components. Try not to damage the Hyundai Accent sensors and their power circuit during repairs. And finally, watch the video about repairing and replacing the Hyundai Accent starter:
HOW to assemble the Trimmer starter? The design and principle of operation of a starter on a trimmer
Basically, the gasoline engine is the main part of the brush cutter. Its power lies within the range of 0.5-2.5 hp. The movement from it is transmitted to the shaft, which is located inside the hollow rod, and then through a gearbox consisting of gears, a fishing line or a knife (working body).
READ How to Load Line in Trimmer Video
Also, a gasoline brush has the following elements:
- Protective cover;
- Pen;
- Strap designed for ease of use of the device;
- Starter for starting a gasoline internal combustion engine.
All details of the hedge trimmers are shown in the photo below.
Trimmer starter. it is an integral part that runs the engine. It is shown separately in two photos below.
The starting mechanisms of different models of gas cutters work on a similar principle: when starting a gasoline engine, the protrusions, marked in the photo above with the number 1, engage with pawls 3. When the engine starts working, they return to their original position due to centrifugal force. Wires 2 play a similar role.
The process of returning the mechanism parts to their initial position occurs due to the presence of a spring piled around the axis. Unfolds when the rope is pulled. After releasing the cord, it is retracted and wound by the twisting of the spring. When you start the gasoline engine of a gasoline mower, the starting mechanism rotates the shaft until it starts working (starts).
Today, lawn mowers are equipped with two types of starter mechanisms:
Brovchenko family. Installing a spring in the manual starter of a lawn mower.
How to Install a Spring in a Recoil Starter
for a petrol trimmer? This can be done at home. To me…
2. When the spring returns to the groove, do not rush, hold it with your finger and begin to twist. At the same time, pay close attention to safety, because a broken iron strip may cause injury.
It is difficult to fill the spring the first time; some experience is required, therefore, if the attempt is unsuccessful, it must be repeated more than once.
3. Once the spring is wound, continue assembling the starter. Carefully turn the coil over and insert it so that the coil of the spring fits correctly into a special groove in the body.
4. Place the washer under the screw. Spring and again washer. Then we insert the cup with the antennae and tighten everything with a screw. The starter is assembled. You need to pay attention to such an aspect as installing the washer. It should never be missed. If this happens, the spring will scratch the plastic cup, on which a standard will appear over time, and it will begin to be tightened with a screw and wedge. As a result, it will feel like the spring has fallen off and needs repair. This defect can be easily removed by replacing the spring with a longer one or installing an additional washer. If you don’t have a spring or washer at hand, you can slightly loosen the screw and the starter will start working without jamming. But this is a temporary measure; with prolonged use, the screw will weaken and get lost, which can lead to the spring flying out and failure of the starter as a whole. The next step is to tension the spring. To do this, remove the handle from the starting rope. Next, without winding, insert the rope into the reel groove specially created for it. Pull the spring straight. To do this, rotate the drum counterclockwise. in the direction opposite to the direction of rotation of the drum when winding the rope. The number of turns must correspond to the value indicated on the starter model and the length of the cable. After the required number of turns have been made, we thread the end of the rope through the hole in the starter cover, install the handle and tie it with a knot. It is better to do this together with an assistant so that the end of the cable does not wind inside the starter. If after the repair the spring falls off again and the chainsaw cannot be started, then the repair function will have to be repeated. But with all this, immediately upgrade the starter. You can get rid of the spring flying off using 2 methods.
1st. use an additional metal strip, 2nd. drill the coil (photo) and secure the edge of the spring with wire.
How to repair a starter on a trimmer
Repair of a gasoline starter trimmer may be required at the most inopportune moment. With all this, the problem can be solved in two ways: change the broken part or change the entire unit. The last option is more expensive. Repair the device yourself in most cases
The only tools you need are a screwdriver with a suitable tip.
Repair work will not take much time and will not require special knowledge. It is enough to know the device, the principle of operation, the nuances of assembling and disassembling the starter into a trimmer
, in order to achieve a suitable positive result.
READ How to Repair Carburetor on Trimmer Video
Spring tension
After installing the spring, tighten it. To do this, do the following:
- Remove the handle from the starting cord;
- Then the rope is inserted into the groove of the reel;
- Tension the spring by rotating the coil in a counter-clockwise direction (winding);
- Make the required number of turns indicated in the instructions for use of the trimmer model used and corresponding to the length of the cord used;
- At the very end, the cable is threaded into the hole intended for this purpose, located in the starter cover;
- Put the handle in place, securing it with a knot.
If after repair the spring continues to fly off, you can get rid of it using the following methods:
- Squeeze a piece of a suitable size plate into the groove at the location of the spring hook;
- Drill holes on both sides of the groove in the coil, insert a spring hook into them and secure it with wire.
Why is a gear starter better than a regular starter?
Initially, the entire classic family was equipped with standard type starters, the technology of which was invented almost 50 years ago. At that time, such technology seemed like a significant luxury, while older cars were started using a crooked starter. Currently, during operation, the following malfunctions are observed that do not allow the car engine to start normally:
1. A completely serviceable starter does not start because the solenoid relay does not operate. As is known, the armature circuit is dependent on the traction relay circuit.
2. The solenoid relay operates, but the armature either does not rotate or rotates, but at a very low speed.
3. The starter works, but does not spin the engine crankshaft.
4. The starter does not turn off after the engine has started successfully.
All these troubles always happen suddenly and seriously spoil the driver’s plans. There were only two ways to solve this problem - change the car or change the starting device. The last option was liked most by the owners of the Zhiguli. A more rational solution to this problem was the installation of a gear type starter.
How to replace or replace the starter spring?
If everything is fine with the starter cable, suspicion falls on the coil itself. It is driven by a coiled ribbon spring. To replace a spring you need to take certain steps.
- Remove the starter from the mower.
- Remove the starter coil.
- Unscrew the main bolt securing the pulley to the body.
- Pull out the clamping probes and the spring; the ribbon spring will stretch almost one hundred percent or be folded into rings of larger diameter.
- Keep it ahead of time.
- Check if the spring is intact (there may be rusty stripes, cracks, etc.). If the hooks at its ends are broken, you won’t be able to bend new ones. When you try to bend, high carbon steel breaks. Loose hooks are suitable for easy twisting.
- Make sure the auxiliary (serial) spring and washers are in place. These parts protect the reel body from being punctured by the ends of the main spring. If the washers and spring are broken and new ones are not available, do not tighten the coil bolt tightly, but look at it. it can unscrew and get lost.
- If the main (flat) spring is damaged, insert the same new one. Place the hook on the end of the spring in place and bend it, inserting coil by coil into the place where it should be.
Rewinding the spring takes a minute. Dexterity in this action is acquired rapidly.
How to change or change the starter spring, see below.
Symptoms of a problem
Having become familiar with the structure of the unit, we move on to the characteristic symptoms, by which we can determine what kind of problems we will have to deal with during the repair process. But first let’s make one more small digression. The fact that when you turn the key in the ignition switch on a Lancer 9 the starter does not turn does not mean that the part has failed. Among the possible reasons for this misfortune:
- low battery charge;
- breakdown of the ignition switch contact group;
- Damage to electrical wiring.
As a test, some experts advise using a screwdriver to bridge the wires suitable for the solenoid relay. In theory, everything is simple. You just need to insert a metal rod between the two contacts.
But in fact, even knowing how to close the starter on Lancer 9, you still need to be able to get to the wire connection points. Unless you are Houdini, you won’t be able to do this without first removing the parts blocking access. It is much easier to dismantle the steering column cover and gain access to the ignition switch contact group in order to insert a jumper between the yellow (+12V) and orange (starter) wire.
However, sudden and permanent failure of the starter is extremely rare. Its cause is burnout of the stator or rotor wiring. In this case, replacing the entire assembly is cheaper than repairs. But at first, the car signals the presence of problems with three characteristic symptoms.
- Voltage drop in the on-board network when the key is turned in the ignition switch, accompanied by a decrease in the intensity of the warning lamps on the instrument panel. This is a sure sign of burnt out contacts of the solenoid relay or a short circuit in the electrical wiring.
- A metallic crackling sound coming from under the hood when the engine starts indicates that the faulty bendix and worn bushings should be replaced.
- A characteristic click, after which the starter does not begin to rotate the crankshaft, is a death sentence for the retractor relay or brushes.
If you have certain skills and a set of necessary tools, any of the listed parts can be replaced yourself.
Assembling the brushcutter starter
When servicing and repairing the starter, it is important to assemble
. as if the assembly was carried out by the manufacturer. No matter what incorrectly installed part will not allow you to fully use the trimmer or hedge trimmer.
- After winding the spring, turn the coil over and position it so that the 2nd hook of the spring returns to its place. To control the correct installation of the spring, there are technological windows on the coil itself.
- Install the starter pulley and make sure that one of the spring hooks fits into the groove located on the starter cover.
- Insert the spring and washers along the edges so that the spring does not rub against the plastic compartment in which it is located. If the spring is broken and the other one is wrong, an additional washer is installed in its place.
- Insert the antenna cup into the slots of the coil.
- Place the coil in place, tighten the bolt until it stops, but without fanaticism.
If you do not protect the compartment from the main spring with washers, where it moves when winding and unwinding the starter cord, the coil often gets stuck when trying to start a gasoline trimmer or hedge trimmer. Loosening the coil bolt will cause it to be lost.
How to assemble the trimmer starter motor brush, wind it.
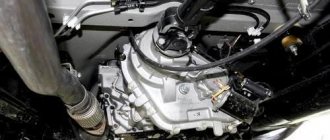
Hyundai Accent starter: do-it-yourself repair and dismantling
- How to remove the starter Hyundai Accent
- Disassembly and repair
How to remove the starter Hyundai Accent
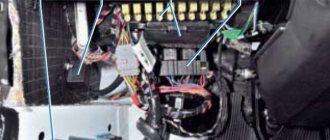
To dismantle the starter, you will need keys and sockets for “12”, “13”, and pliers. All work must be carried out from below the car - preferably on an inspection hole or lift. It is imperative to de-energize the power supply system - a positive wire connects to the starter solenoid relay; it does not have protection in the form of a fuse, so a short circuit may cause a fire. Carrying out dismantling:
- Disconnect the negative cable from the battery.
- Using a socket and ratchet, unscrew the starter mount to the clutch block from the top.
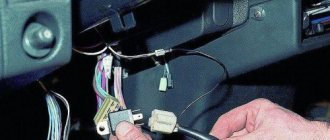
- Disconnect the traction relay control wire (thin).
- Slide off the rubber boot that covers the starter power wire.
- Unscrew the nut securing the wire lug.
- Having removed the wire, you can begin to unscrew all the remaining mounting bolts.
- Using the socket “13”, unscrew the lower fastening bolt.
- That's all, now you can remove the Hyundai starter and begin repairing it.
Installation is carried out in reverse order. It is advisable that all important engine components be replaced before installation.
Disassembly and repair
Now you need to completely disassemble the Hyundai Accent starter and replace vital components:
- Brushes - they are worn out when the rotor rotates.
- Bushings - they contain the rotor and also serve as a negative contact for powering its winding.
- If necessary, the solenoid relay must be replaced.
- The Bendix and overrunning clutch are replaced when there is severe wear or failure - the starter does not rotate the engine flywheel.
The procedure for disassembling the starter:
- Disconnect the wire coming from the contact bolt of the traction relay to the stator winding.
- The relay is secured with two bolts - unscrew them with a Phillips screwdriver.
- Carefully remove the anchor, being careful not to lose the spring.
- Proceed to the back cover - unscrew the two bolts that hold the entire body together.
- Using a curved screwdriver, unscrew the brush assembly fastening.
- Remove the back cover and carefully remove the brushes. Assess their condition. In any case, they need to be replaced.
- Remove the spacer washer from the back of the rotor.
- On the front of the starter there is a support and a gear drive lever with an overrunning clutch. Remove them carefully and replace them if necessary.
- Now you can remove the rotor (armature) from the housing.
Be sure to carry out a visual inspection of the rotor - there should be no wear on it. If it is present, then you need to level the surface on a lathe. If the wear is small, you can clean it with fine-grained sandpaper.
Using a multimeter, check whether the rotor windings are shorted to ground. If there is a short circuit, it would be better to replace the rotor or the entire starter. A new one will last 5-10 years with proper use. To remove the overrunning clutch you will need:
- Install the mandrel onto the restrictor ring at the front of the rotor.
- Carefully knock down the ring; there should be a lock underneath it.
- Remove the retaining ring (clamp); you can pry it off with a flat-head screwdriver.
- Remove the restrictor ring and the overrunning clutch with the gear.
After removing this unit, you need to check it - the gear should rotate freely in only one direction. If it rotates in both directions, it needs to be replaced. Be sure to conduct a thorough diagnosis and a thorough inspection - the rotor and other elements should not have damage, cracks, bends, or deformations. When assembling the Hyundai Accent starter, there is no need to use additional lubricant for the components. Try not to damage the Hyundai Accent sensors and their power circuit during repairs. And finally, watch the video about repairing and replacing the Hyundai Accent starter:
How to assemble a new lawn mower starter?
To assemble the starter, perform the following manipulations.
- Pass one end of the cord through the hole in the spool first and tie it with a knot. The knot should not pass through the hole. Otherwise, you will have to disassemble the starter again.
- Wind the cord around the spool itself.
- Install the spring into the starter housing, hook one end of it into the groove and wind it. For comfortable winding, twist the housing counterclockwise.
- Place the ratchet on the spring.
- Hook the return spring onto the ratchet and attach it to the reel.
- Install the main spring and the housing with the assembled ratchet, connect the starter parts together and tighten everything with the main bolt.
After assembling the starter, pass the free end of the cord through the hole in the housing for the coil. Thread the same end through the hole in the handle where the cord is pulled. Tie a strong knot on the handle. Check the operation of the starter parking brake.
Characteristic symptoms of a starter malfunction
Difficulty starting the engine is the primary symptom. Before sinning on the starting unit, check the charging-starting mechanism chain, since a number of breakdowns are typical for other components. Depending on the type of failure, there are:
The power unit turns slowly, does not turn at all. Checking the electrical circuit and battery:
- The battery is charged;
- the terminals are secured and not oxidized;
- the ground wire going to the starter is well secured and has a rubber protective boot;
- the wires are not damaged, the insulating layer is in place, there are no cracks or defects;
- The ignition switch contact block is tightly seated and works properly.
Pay attention to these points first. It often happens that there are no visible breakdowns or defects. It is definitely necessary to disassemble the starter into its component elements.
Perhaps the commutator is burnt out, the plates are closed, the cheeks are hanging. These are the so-called weak points in the 9th generation Mitsubishi Lancer.
The starter works properly, but the power unit does not start, the crankshaft is motionless. There may be no external signs of damage. Therefore, dismantling and inspection is mandatory. Pay special attention to the overrunning clutch, lever, clutch ring, return spring, flywheel crown.
The weak point of the Mitsubishi Lancer 9 starting system: slipping of the clutch, faulty release lever, worn clutch ring, deformed damper spring. When starting is accompanied by a metallic grinding noise, it is obvious that the teeth on the starter are worn out or broken.
To a lesser extent there is wear on bearing bushings, shaft journals, and armatures. And:
- the fixation of the poles inside is weakened;
- the anchor touches two opposite poles with its body, as a result of which a metallic grinding sound is heard;
- the traction relay has become unusable and burnt out;
- the contacts are soldered in the traction relay;
- the return spring is deformed, the flywheel does not turn, the engine does not start;
- mechanical (technical) damage to the housing.
Note to the driver! ! !
Without systematic maintenance work, the Mitsubishi Lancer 9 starter does not last more than 65,000 km. mileage The average service life is 180 – 200 thousand.
km.
How does the starter of a lawn mower or trimmer work?
Starter. This is usually a single and universal mechanism for gas cutters, trimmers, gasoline and diesel generator sets. Equipping even a car, motorcycle or scooter with them is not a problem if your vehicle has free space for its installation. It is not for nothing that many Soviet cars and trucks were equipped with a starter gun that vaguely resembled a double-bent tire.
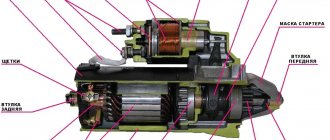
The starter assembly consists of the following parts:
- Ignition spring hook;
- Cord wound on a reel;
- Return spring;
- Ratchet drive and main spring;
- Mechanism housing protecting the ratchet;
- Retaining bolt.
Starters for lawn mowers: design and installation features
- How does a starter for gas cutters or trimmers work?
- Worst case failure scenario
- How to change or replace the starter spring
? - How tight is the spring?
- Brushcutter starter assembly
- How to assemble a new mower starter?
- How to change the starter cord?
Starter
for a gas cutter or gas trimmer is a mechanical unit that includes a pulley attached to a ratchet. The cable is wound around the pulley in its original position. First it pulls out. The pulley is spring loaded. as soon as you let go of the end of the rope, it will roll back. A flat strip rolled into a ring is used as a spring. It resembles the spring in a large mechanical watch that is wound once a day. The starter itself is often located at the rear rather than towards the front end of the mower or trimmer. In order to correctly carry out all manipulations with the starter for gas cutters, you need to know the features of the device and installation.
How to change the starter cord?
It happens that it is not the spring that is to blame for the inability to start the starter, but the cord itself. It may seize or even break. Disassembling a gas cutter, starter or trimmer is universal in its stages.
- Remove the starter block from the trimmer or hedge trimmer.
- Remove the main bolt holding the handbrake.
- Pull out the reel and unwind any remaining frayed cord from it.
- Untie the knot in the handle of the cord and pull the end out.
- Undo the knot at the other end (at the beginning of the spool) and remove the old cord. We untie any knots that are tight using pliers or pliers.
- Tie a knot at one end of the new cord and thread it through the hole at the beginning of the spool (closer to its axis).
- Wind several turns of new cord onto the reel. If it is long, then cut off the excess.
- Load and charge the spring-loaded cord tensioner (if removed) and spring-loaded elements in the correct sequence.
- Replace the coil and thread the free end of the cord through the starter outlet and the handle.
- Install the starting block.
Twist the starter by the cord and start the engine of the gas cutters or trimmers. The larger and more powerful the engine, the more jerks of the cord will be required when starting, the norm is no more than seven times. Result. quick and smooth start of the engine, the unit is ready for work.
Sources:
https://smotri-dtp.ru/obsluzhivanie/kak-sobrat-starter-na-trimmere.html https://stroy-podskazka.ru/trimmery/startery-dlya-benzokosy/
Characteristic symptoms of a starter malfunction
Difficulty starting the engine is the primary symptom. Before sinning on the starting unit, check the charging-starting mechanism chain, since a number of breakdowns are typical for other components. Depending on the type of failure, there are:
The power unit turns slowly, does not turn at all. Checking the electrical circuit and battery:
- The battery is charged,
- the terminals are secured, not oxidized,
- the ground wire going to the starter is well secured and has a rubber protective boot,
- the wires are not damaged, the insulating layer is in place, there are no cracks or defects,
- The ignition switch contact block is tightly seated and works properly.
Pay attention to these points first. It often happens that there are no visible breakdowns or defects. It is definitely necessary to disassemble the starter into its component elements.
Perhaps the commutator is burnt out, the plates are closed, the cheeks are hanging. These are the so-called weak points in the 9th generation Mitsubishi Lancer.
The starter works properly, but the power unit does not start, the crankshaft is motionless. There may be no external signs of damage. Therefore, dismantling and inspection is mandatory. Pay special attention to the overrunning clutch, lever, clutch ring, return spring, flywheel crown.
The weak point of the Mitsubishi Lancer 9 starting system: slipping of the clutch, faulty release lever, worn clutch ring, deformed damper spring. When starting is accompanied by a metallic grinding noise, it is obvious that the teeth on the starter are worn out or broken.
To a lesser extent there is wear on bearing bushings, shaft journals, and armatures. And:
- the fixation of the poles inside is loosened,
- the anchor touches two opposite poles with its body, as a result of which a metallic grinding sound is heard,
- the traction relay has become unusable, burnt out,
- the contacts are soldered in the traction relay,
- the return spring is deformed, the flywheel does not turn, the engine does not start,
- mechanical (technical) damage to the housing.
Note to the driver! ! !
Without systematic maintenance work, the Mitsubishi Lancer 9 starter does not last more than 65,000 km. mileage The average service life is 180 – 200 thousand.
km.