When to replace a Chevrolet Niva radiator
Replacing the cooling system or its individual components is usually required due to wear or mechanical damage. Among the most common complaints when contacting a service station, the following points stand out.
- Using low-quality antifreeze or pouring water into the system. The main property of coolants is the protection of metal parts from corrosion and rust formation. When water is used in a radiator, strong carbon deposits or oxides form inside the lines, which can clog thin tubes. In case of mild damage, repair is limited to sealing one part of the system.
- Mechanical damage. The main radiator is located at the front of the car and is covered with a thin grille. Due to poor protection when traveling off-road or on country roads, the element can be damaged by a stray stone or foreign objects entering the radiator grille. At the same time, a small force is enough to cause serious damage - the thinnest plates are easily crushed, which leads to loss of heat transfer and overheating of the system.
- Natural wear and tear. During active use, the radiator is subject to constant temperature changes, which affects the condition of the metals. Additionally, the presence of increased pressure inside the lines after starting the machine is harmful. Such vibrations lead to cracking of tubes, fasteners or cooling plates.
The above cases apply not only to the main radiator; problems also arise with the elements of the stove and air conditioner.
The design of the heating system of the Niva Chevrolet car
The Chevrolet heating system ensures high-quality engine operation, preventing overheating, which leads to engine failure. The interior heater of the Chevrolet Niva model is liquid. Warm air is exhausted inside the car, cooling the running motor. Two types of heating systems are available: without air conditioning and equipped with air conditioning. The interior heater does not require additional maintenance during normal operation of the Chevrolet Niva model.
With air conditioning
This system makes it possible to regulate important indicators inside the car such as humidity and temperature. To turn on the air conditioner, certain steps are performed:
- The heater fan starts.
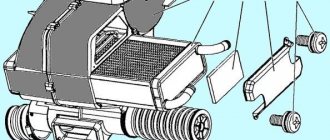
2. The handle responsible for the temperature value is set to the minimum value position. The air conditioning system is located under the hood. Only an evaporator is brought into the cabin between the heater and the engine, which helps ensure uninterrupted exchange between the refrigerant and heated air masses. The refrigerant itself, moving through the tubes, becomes a gas, thereby absorbing excess heat. In this form it cools the evaporator fins. After this, using a fan, the heated air is removed inside the cabin, thereby reducing the heating of the engine. The refrigerant is pressurized from the compressor to the condenser, becoming a liquid during cooling. Then it is fed into the receiver, from which it goes into the evaporator reducer so that it again becomes a gas from a liquid. After this, the next repeating engine cooling cycle begins.
Without air conditioning
Diagram of a Chevrolet Niva heater not equipped with air conditioning, a simple device:
- ventilation duct;
- an air duct through which the windshield is heated;
- intermediate body;
- air intake filter;
- fan;
- an air duct through which the interior is heated;
- air duct aimed at heating the feet;
- radiator.
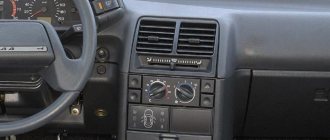
The supply force of heated air from the engine can be adjusted using dampers. The damper is an important part of the Chevrolet Niva stove. The built-in system of air exhaust pipes successfully directs flows of heated air masses to different parts of the cabin. You can direct hot air to the windshield, the feet of the driver and passengers of the car, the side windows of the cabin, doors, and so on. The feed is regulated by a switch equipped with four speeds. The switch must be gently flipped in the Chevrolet Niva stove. The heater switch should move smoothly in the Chevrolet Niva. Also, if the heater switch breaks down, it is easy to replace it yourself in the Chevrolet Niva model. In the Chevrolet Niva model, the heater switch rarely fails.
Do-it-yourself replacement of a Niva Chevrolet radiator with and without air conditioning
If you need to replace units, you can contact a service station or a qualified technician for help. Other users prefer to perform all procedures themselves. This is possible due to the fact that replacing a Chevrolet Niva radiator pipe or the cooler itself does not require specialized tools or deep knowledge of mechanics.
Chevrolet Niva heater radiator replacement: necessary tool
To completely replace the device, you will need to prepare the necessary tools in advance.
- A set of open-end and ring wrenches, possibly heads with a knob.
- A canister of coolant of the type that was previously used in the machine system. The standard system uses 5 liters of antifreeze with a class of at least G12.
- One liter canister of power steering fluid.
- 5-6 metal clamps of the appropriate diameter, you can use plastic ones.
- A set of containers where the old antifreeze will be drained, and a funnel to make it easier to fill in the new coolant.
- Silicone sealant is resistant to high temperatures.
- Set of screwdrivers of different sizes.
- Several clean rags and gloves.
After preparing everything you need, you can begin repairing the car.
Replacing a Niva Chevrolet radiator without air conditioning: sequence of actions
The sequence of actions for cars with and without air conditioning is slightly different. Further instructions are relevant for the more common modification, which uses a conventional stove.
- Drive the car onto an overpass or inspection hole. After this, wait the certain time necessary for the engine to cool completely. This is required because the antifreeze gets very hot during operation and performing a hot repair procedure can lead to serious burns or damage to vehicle components.
- Place wheel chocks under the wheels, raise the handbrake lever and engage the gear. During manipulations, the car will constantly twitch - unnecessary movements will not bring anything good.
- Open the hood and disconnect the terminals from the battery - the need is caused by tampering with the electrical part of the car.
- If necessary, remove the crankcase protection and outer plastic (if any) - this will facilitate access to the required fasteners and components.
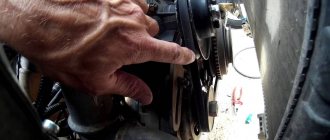
- Treat all bolted connections with a liquid wrench or similar means to facilitate their unscrewing. In this case, you should not use a hammer or chisel - an entrenching tool can only cause harm - only keys will be used here.
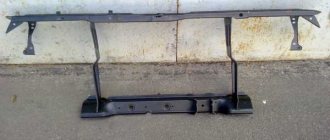
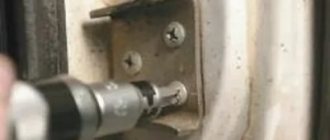
- The next stage is disassembling the decorative radiator grille. The body part is removed using a Phillips screwdriver and a No. 10 socket.
- Next, two mudguards under the engine are removed. Dismantling can also be done with keys or a screwdriver.
- After opening access to all systems, the antifreeze is drained. To do this, you will need to fully open the valve of the stove and auxiliary devices where the coolant flows. After identifying the tap, you should wear protective gloves and goggles - the formula in the radiator is toxic and can cause severe poisoning if it gets into the stomach or eyes. Next, you will need to unscrew the top cap of the expansion tank to facilitate fluid drainage. The next step is to crawl under the car and find the drain valve on the left side of the radiator and open it. You will first need to place a canister or container under the used product (the capacity must be at least 5 liters). After this, the used antifreeze is disposed of appropriately.
- Wait until the refrigerant has completely drained and tighten the valve until it stops.
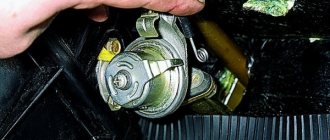
- Then, to replace the Niva Chevrolet cooling radiator, you should again rise above the car and remove the air filter box. The fasteners are made in the form of 4 bolts with No. 10 heads.
- Next, unscrew the pipes entering and exiting the radiator. The lines are secured with metal clamps and loosened with a Phillips screwdriver.
- Next, remove the top cover of the power steering expansion tank.
- Disconnect the pipes coming from the power steering to the cooling system, first placing an empty container under the connections for testing.
- Similarly, disconnect the lower hoses using one sequence of actions.
- The next step is to disconnect the radiator itself. The part is secured with 5 bolts, one of which is screwed in through a special bracket; it can also be disassembled.
- Drain the remaining antifreeze from the radiator (there will be about one liter).
- Next, you need to disconnect the contact groups of the horn and radiator fans. If this is not done, the wiring will interfere with dismantling.
- Remove the horn using screwdrivers and wrenches.
- After this, you need to disconnect the line on the thermostat, leaving the latter on the tube along with the engine.
- Repairs are ongoing by removing the fly catcher and small stones. The part is placed directly in front of the radiator and secured with 4 bolts and nuts.
- Next, remove the part holders and move the upper part of the radiator forward in the direction of travel of the car.
- Next, unscrew and tighten the pressure line hoses, this is also done carefully; there may be some antifreeze residue inside.
- To continue dismantling, you need to separate the radiator body from the fan module. To do this, unscrew 6 screws. The first 4 are located in the upper part, the lower two require a special approach and are located at the bottom of the unit.
- After all the manipulations, the modules are separated and the coolers are lifted up.
- Next, the lower pipe is removed and the air trap is bent. The last element is covered by a bumper, so it will also need to be unscrewed.
- After completing all the steps, the old radiator is completely removed from the engine compartment along with the support rubber bands and pads (they may come in handy).
- Reassembly is performed in the reverse order, adding antifreeze. After complete installation of the system, the motor warms up and the coolant is added if necessary.
- Replacement of the Niva Chevrolet cooling radiator without air conditioning has been completed.
Moving the radiator in the field to the place of the spare wheel
True, maybe it’s the other way around - it was she, Niva, who mocked me.
So I bought a new car, or rather changed it - on the highway in front of me the Lexus suddenly braked to a complete stop, and of course I did too, but the 2115 behind me overslept and drove into me (the speed before braking was 110 km/h). We decided not to repair our old car (21213 94) - it was badly crippled - but to buy a new one.
After a week of getting used to the new car (the 21214M is really very different for the better, but a lot has been written about this), I began to feel irritation from the lack of small but familiar amenities that were on the old car, which it gradually acquired imperceptibly, and after the first fishing, dissatisfaction took on such proportions that on the very next day of the wholesale market, purchases were made and the “restoration” of the machine began.
More than a year has passed, so my emotions have been forgotten, but I remember that I was very annoyed by the lack of power windows, signaling (or rather, an electric lock, at night, especially with a new key, it’s difficult to get into the lock.), the lack of normal light in the cabin and Free Hand for the phone, and after fishing - the lack usual places to store all sorts of junk and the inability to sleep properly.
So the plan for completions and alterations: 1. Rear seat; 2. Window lifters; 3. Light in the cabin and trunk; 4. Gate; 5. Trunk; 6. Stove; 7. Trip computer; 8. Receiver; 9. Windshield wipers and washers; 10. Sound insulation.
The work lasted for six months, because... everything was done so that downtime was minimal, and taking into account the fact that the car was purchased in November, and work such as altering the stove and soundproofing in winter is impossible (in my conditions).
1. Back seat. Everything is as it was written on the forum: down with the axle between the back and the seat (I couldn’t press it out on the new one, I cut it off with a grinder without regret). The only difference: I screwed the standard hinges to a 50x120 mm board, and then screwed the board itself onto the standard seat mounting points. The board was stupidly covered with leatherette. In the resulting space under the rear seat you can put a lot of stuff, I carry a hand winch, a stake, tools, a tent awning, a charger, a 220 V converter, a first aid kit with a triangle and supports for the rear backrest - they are also stands for the wheels if you sit on your belly, board. The compartment is convenient to use, accessible from both the passenger compartment and the trunk:
All this, naturally, was started to obtain sleeping places, extra. compartment is a side effect. Laying out the seats with a half-empty trunk takes 1-2 minutes. The supports are taken out and placed, the seat back is unfastened and placed on top of the luggage (the luggage is not higher than the supports) on the supports, that’s it - I don’t want to sleep. Details:
After 5 years of using the old car, no complaints, and I forgot about the tent.
Yes, I also sawed off the shelves for the speakers - it’s more convenient to lay out the seat, but you don’t have to saw it. The main reason for the cut is to increase trunk capacity.
2. I wouldn’t have written about power windows if I had bought standard mounts for the switches, but at that time I didn’t have them, and as I said, I had enough, so I bought them for 200 rubles. handles from Shnivy. The photo shows what happened:
3. The light in the cabin is also from the forum, only with a Gazelle flashlight. At least read at night, at least tie hooks:
It’s also convenient to put various pieces of paper and glasses behind the panel.
When I took the photo, I didn’t think to put my glasses on, but when looking at the photo I saw the certificate behind the panel in the passenger seat and remembered. The light in the trunk is the same light on the left panel. It turns on either forcibly, or when the dimensions are open and the rear door is open:
4. The gate is ordinary, only the locks have been redone and a lock has been added. The original ones are useless: they either hang loose or don’t open, especially if they freeze, and a shock absorber has been added:
We also had to move the additional brake light upstairs.
Speaking of the dangers of the gate. I still install a gate, because an unloaded car spins its backside much less on an uneven slippery (mud, snow, etc.) road, and also, if the gate had not dampened the impact, the consequences of the accident could have been much more disastrous.
5. The trunk is a big word. Regular slats for transporting a boat or unassembled fishing rods. But this year I tore off one of the slats while driving under a branch, so I shortened the posts of the slats (the slats became closer to the roof), and cut the slats themselves at an angle to the size of the posts so that they would not stick out and cling less:
6. STOVE on NIVA is something. There is a lot of noise, there is little sense, it generally heats well, but fogging of the windows is a problem. On the old Niva, the front (central) reflectors were muted for the last year, there was MK STATE114, which is probably why things were a little better, more air went to the windows. On the new one, after reading the forum, I decided to install a fan from 08; I also wanted normal recirculation and control/control of the temperature in the cabin. Well, I wanted to do everything with minimal labor, since my youthful enthusiasm had already passed, and I had become old and lazy.
After quite a lot of thinking about the designs spotted on the Internet (including on the forum), and analyzing the reasons for poor glass blowing, this design was born:
Replacing the Chevrolet Niva heater radiator
The specified sequence of actions is relevant for car models without an air conditioning system.
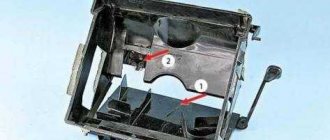
- Completely dismantle the glove box along with its lighting and brackets. To do this, you will also need to disconnect the side trim elements of the interior.
- Drain the antifreeze from the car's cooling system.
- Loosen the connections of the pipes and tighten them. In this case, antifreeze will flow from the channels - you need to substitute a piece of plastic bottle or a tray in advance.
- Next, unscrew the heat exchanger screws and pull the part towards you until it stops.
- Interfering structural elements can be removed or, for plastic elements, bitten off with tongs.
- After which the part will freely leave the seat.
Installation of a new device is carried out in the reverse order, fully observing the instructions and sequence of actions.
Replacing a VAZ 2121 radiator
How to replace a 2121 radiator with an aluminum 21213.
First, a note on the pricing procedure (May 2001):
Copper radiator 2121 – 1900 rub. Copper radiator 21213 – 1800 rub. Aluminum radiator 21213 – 800 rub.
So the choice based on price is obvious. In addition, as it turned out, an aluminum radiator is about 5 times lighter than a copper one, which is important for improving weight distribution along the axes.
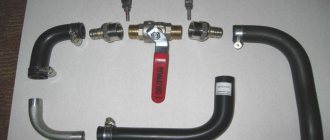
What you will need to buy from spare parts and have from tools (except for standard keys and a screwdriver) 1. Radiator 2. Cooling pipe to the radiator 21213 upper 2 pieces.
3. Clamps for these pipes, at least 4 pieces, preferably with a reserve of 6 4. Expansion tank hose and two clamps for it 5. Antifreeze (it took me 6 liters, it’s better to buy 10 and replace the whole one) 6. Bolt 6, 2-long 3 cm with a nut 7. Large washers with an outer diameter of 2 centimeters, an internal diameter for a 6-mm bolt 8. You will need a drill with a drill for a 6-mm bolt 9. You will need a sharp knife 10. For prevention, you can at the same time replace the stove faucet, for this you will need a faucet (it’s better to put a ball (not a samovar) and two gaskets.
The replacement procedure is very simple. 1. Remove the impeller with the casing, it will interfere 2. Dismantle the old radiator by removing the pipes and hose of the expansion tank, and unscrewing two bolts (10mm wrench) in the upper corners. 3. Remove the sound signals (they will interfere, then put them back) 4. Remove the radiator grille 5. Place the new radiator on the supports and mark a place on the front panel for the mounting hole in the upper left corner (the right hole coincides with the old one) 6. Drill the hole and We screw the radiator on the left with a bolt and nut all the way through, on the right - into the old hole. Since there are large holes in the radiator mounting ears, we use large washers. 7. We take one of the purchased pipes and, using our intelligence, think about how it needs to be cut in order to install it between the thermostat and the lower fitting on the radiator. On the new radiator this fitting is located differently, so the original pipe will not fit. The similar lower pipe 21213 will not work either, because it has a different thermostat. 8. Drain the remains of the old antifreeze by opening the drain plug in the engine 9. If necessary, change the heater tap, leaving it open after installation 10. Place the upper pipe without putting one end on the radiator fitting yet. 11. Fill this pipe with antifreeze (i.e. fill the engine with antifreeze, this way there is a greater chance of avoiding air locks) 12. We put the pipe on the radiator fitting 13. We install a new hose of the expansion tank (the old one is probably stuck, and due to the different location of the fitting it you will have to bend it differently). If you can’t put it on the tank fitting, heat the hose in boiling water or with a lighter and pull it on while it’s hot. 14. Fill antifreeze into the radiator and into the expansion tank. 15. Install the impeller and sound signals
In terms of time, the entire procedure will take from 30 minutes to 3 hours - depending on your hands and the number of smoke breaks :)) Triton 2121, 05.15.01. Original.
Replacement radiator Niva Chevrolet price
The cost of such car repairs in different regions can vary significantly. For example, in Moscow, replacing a radiator will cost at least 5,000-8,000 rubles. At the same time, in the Rostov region, the procedure can be performed for 3-4 thousand rubles. At the same time, the cost of repairs may also vary among different specialists located in the same city.
Also, the cost of replacing a Niva Chevrolet radiator greatly depends on the vehicle’s equipment and additional factors such as the abundance of rust or dirt under the hood. For example, the difference between the simplest and most sophisticated versions can reach 1,500 rubles.
Only the master performing the operation can give the exact price tag.
Relocation of the cooling radiator on the Niva Page 1 of 2
The idea is to move the generator higher until someone goes to Moscow, but an extremely unpleasant surprise will appear in the form of very frequent cases of diagonal hanging and very frequent cases of chassis repairs. In my opinion, the optimal location of the hoses will play a much more important role. It's still calculated the same way. What if it’s just parallel to the roof?
One moment you need to accurately drill holes in the bosses of the block for the oil filter adapter. In the 38th bogger, which, if these three conditions are met, is additional.
It will rest against the bumper. You can make a pie from the radiator ventilator carlson, flush with the trunk. The angle is not ideal for the brush, and replacing brushes or a regulator relay, for example, can be done without dismantling the generator; with a standard arrangement, this is not realistic.
- On my previous car, the gate broke the rear seats, and it wouldn’t allow me to get into the trunk in an emergency.
- Installing the generator on top of the Niva engine.
- It’s not like it’s normal on the highway, but in the sand and mud it overheats and boils.
- Its own front cover with fasteners for the tensioner pulley bracket.
- I am quite capable of throwing a wheel onto the roof in one person, although it is fraught with certain difficulties.
You can’t buy so much for the ideal stock. Not a cruel multi-day trophy, but so that they are really and not tedious digging in the first chacha and boring subsequent repairs of everything in a row. We spread the pipes, in the new place the original one is full of holes.
Relocation of the cooling radiator on the Niva Page 1 of 2
These are just the first amateurish considerations. The breathers are piped under the hood; for this I moved half of the washer fluid reservoir and stood on the right mudguard. There are no holes in the 214th block, for which the standard spare tire is still unnecessary.
Special air intakes are organized where this is necessary. Accordingly, the only place is for a spare tire. On the inside of the bed there was a marking 2101. Installing the generator up on the Niva engine.