Automatic, mechanical, electric headlight range control
How unpleasant it is when, when driving at night, the light from an oncoming car literally hits your eyes, and for some time you cannot see anything ahead. And then for a long time it’s hard to see anything on the road. And this is not happening because someone is deliberately trying to blind you. It just doesn’t work on the oncoming car, or its driver doesn’t use headlight range control.
What is it and how does headlight range control work?
This is a device that maintains the set position of the optical axis of the headlight unchanged when the load and driving conditions of the vehicle change.
The light generated by the vehicle's optics is adjusted when the vehicle is unloaded and is highlighted in yellow in the above figure. However, the luminous flux changes depending on the load of the car, shifting up or down from the correct optical axis, which is shown in red in the figure. To correct such a change, the headlight range control is used.
The principle of operation of the headlight range control and options for its implementation
In its simplest form, the principle or description of the work will be as follows: the car has the ability to adjust the light directly from the passenger compartment. If the loading of the car has changed, for example, additional passengers have sat down, or the trunk is loaded, then the light will be shifted upward, which will lead to blinding oncoming drivers. To avoid this, it is possible to change its direction, which allows, by moving the light beam down or up, to restore normal lighting.
The described principle underlying the work of the proofreader is implemented in various ways. Today, the adjustment can be: forced or automatic, and in two versions, when used:
- static corrector;
- dynamic corrector.
Forced adjustment
With this approach, the light flux is controlled manually, for which a special switch is used in the car interior. Changing its position leads to a change in the position of the lighting fixtures.
Depending on the type of drive used in such a device, there are:
- electromechanical headlight range control;
- mechanical headlight range control;
- hydraulic;
- pneumatic, etc.
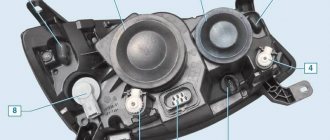
As an example of how any of the devices mentioned works, consider an electric headlight range control unit. It would be more correct to call it not electrical, but electromechanical. It includes:
- position switch;
- electric gear motor located on each headlight;
- connecting wires.
The principle by which such a device works is quite simple. When the position of the switch in the car is changed, an electrical signal (voltage) is supplied to the gearmotor. Its rod, one end of which is located on the headlight reflector, moves. This movement of the rod leads to a change in the position of the associated reflector and, ultimately, in the luminous flux.
Automatic luminous flux correction
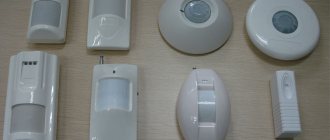
When an automatic headlight leveler is installed on a car, the driver does not need to do anything additional; in this case, the automation works for him. It includes:
- device control unit;
- ride height sensors;
- actuators.
As already mentioned, its operation can occur in static and dynamic mode. In static mode, the automation controls the vehicle's ground clearance, and when it changes, due to additional loading of the vehicle, the control unit sends an electrical signal to the actuators to adjust the position of the lighting fixtures.
However, this mode of operation, with the beginning of the use of xenon lamps, turned out to be insufficient. The light flux they generate is so powerful that even its short-term exposure can blind oncoming drivers. Therefore, to prevent such a phenomenon, a dynamic corrector appeared.
Its main difference is speed. The operation of such a corrector is capable of changing the direction of the light flux in a fraction of a second. This allows you to keep the luminous flux within specified limits when accelerating the car, braking it, cornering and on uneven roads. Thanks to this, when adjusted correctly, even bright headlights do not blind oncoming drivers when making maneuvers.
Headlight range control has become a mandatory element of car design. Its use improves driving safety at night by ensuring constant illumination of the road surface and reducing the possibility of dazzling other drivers.
znanieavto.ru
The headlight hydrocorrector does not work - what should I do? Solutions to the problem
Good afternoon dear friends. When adjusting the headlights yourself, you might encounter the problem of a low-set reflector. It is impossible to raise it with the adjusting bolts, so it is impossible to adjust the light beam correctly; it always shines downwards. This may be caused by a faulty headlight hydraulic corrector that is stuck in the lower position. It is this that prevents the headlight reflector from being raised up.
What to do if the headlight hydraulic corrector on a VAZ breaks down
Today we will analyze this problem, how to deal with it, and consider several options for getting out of the situation.
To solve the problem with the hydraulic corrector, there are several options:
- Replacing it with a new one
- Repair of old
- Make it mechanical using folk methods
- Change to electrified
Let's look at each of the options in more detail, their pros and cons. I will attach a visual video to each solution.
Replacement with a new one
Manufacturers of auto parts assure us that the hydraulic corrector cannot be repaired. Let's believe them for a moment and decide to replace him. The price of a new part starts from 400 rubles.
Minuses:
- Service life from 1 to 3 years. Even if you don’t use it, it will find ways to fail and bring you a lot of “hemorrhoids”
- Replacing the old one is another quest. It is installed differently on different VAZ models, but you will have to lie upside down in the cabin
Now think for yourself, if it will serve you faithfully when new, and you will use it once a month, at best, and it will break in a year, then why would you again pay 400 rubles and stand on your own to replace it? How feasible is this procedure? Based on my experience working at a service station, not many people come to us to replace it. Why? - because after one or two cases of replacement, everyone “forgets” about it and drives as is.
If you still decide to change the VAZ hydraulic corrector, then watch the video:
Repair of old
Yes, we don’t care about the assurances of auto parts manufacturers, we will repair it. We stock up on free time, and you can spend the whole day on this procedure, be patient and let’s get started.
Here is a detailed video on repairing a VAZ hydraulic corrector:
Pros:
- Savings on buying a new one
- Self-esteem that you did it yourself
- Efficient headlight range control
Minuses:
- A sea of wasted time and nerves
- There is no guarantee that it will work for a long time. There were cases that after repair the lifespan was a day, but there were cases - a year, a year and a half, depending on your luck and where your hands grow from
We turn it into a mechanical corrector
You don’t have to bother with repairing it and turn the hydraulic into a mechanical drive. It is enough to screw bolts or screws into the working cylinders that are located on the headlights.
How to do this correctly is shown in the video:
Stub
Yes, you heard right. Some manufacturers have realized that few people want to go through the hassle of constantly repairing or replacing hydraulic correctors in headlights on VAZs. That's why they came up with plastic plugs instead of working cylinders. It is enough to pull out the old ones and insert the plugs in their place. They have the right size, so they will fit into the seats like “native”.
Pros:
- Cheap and cheerful. I bought it once and forgot about the problems with the hydraulic corrector
- Ease of installation
Minuses:
- Lost the ability to remotely adjust the headlight angle when the vehicle is fully loaded
Here is a video of what they are and how to install them in headlights:
Electric corrector
On some domestic models, automakers have begun installing electric headlight range control units. This applies to both VAZ and GAZ models and so on. Some of them fit perfectly under the “stock” mounting points. You will only need to do the wiring and connect correctly.
Headlight range control: principle of operation, device, problems
In order to understand the whole point of the question of whether headlight range control is actually needed in modern road traffic, you just have to look at the statistics, which say that more than 30 percent of all accidents happen in the dark. In the CIS this figure is significantly higher. But it is also worth taking into account that the flow of cars at night is much less than during the day. And often it is because of problems with lighting that many accidents occur. The problem may be not only the absence of light or its insufficiency, but also the absence or breakdown of the headlight range control.
The headlight range control helps to use the light beam as efficiently as possible without disturbing other road users.
If we consider the general concept, the headlight corrector maintains the optical axis of the headlight in the desired plane relative to the road surface. Therefore, even with a significant distortion of the car body, the road will be well lit.
Some historical information
Legislative aspect
Of course, such a useful device should have been installed on all cars as soon as it was invented. However, this was only seriously considered in 1990. And naturally, the Germans were pioneers in many issues in the automotive industry. It was the German government that adopted a decree that the corrector must be installed on every car. And only eight years later this norm comes to European countries. The only exceptions were cars that had active suspension installed.
The process of introducing the corrector into production processes
In fact, correctors for cars initially appeared a little earlier. Since the 50s, most luxury cars have had this mechanical device. Drivers of other cars made do with a manual corrector.
Manual correctors were popularly called static regulators. But they had limited capabilities: the position of the headlights could only be changed immediately before the trip. In other words, if the car was loaded, that is, its rear part sagged, and the front part rose up, it was necessary to change the angle of the headlights.
Since the seventies, static correctors have undergone modernization. A regulator was invented that changes the position of the headlights from the interior.
In their design, the improved correctors had remote drives and their operation process was based on one of the following systems:
- vacuum;
- electric;
- pneumatic;
- hydraulic.
After some changes and modifications, electromechanical mechanisms began to enjoy great demand and popularity. However, they soon became ineffective, since without special instruments it is impossible to determine the angle by which the light source should be deflected.
Using manual headlight range control
Despite many inconveniences and disadvantages, the use of manual headlight range control is still popular today. Basically, this is an ordinary wheel that is installed on the left under the steering wheel in budget cars.
Markings for adjustment can be either digital or graphic. Corrections mainly have to be made when the car is most loaded, when the tilt of the body changes.
When the wheel is turned, the device’s motor receives the corresponding command, causing the light source to rise or fall, depending on the command. In such manipulation, the device performs the function of a worm mechanism, converting the movement of the electric motor into the work of the rod.
The rod itself turns the headlight, which is mounted on hinges. And the rod is fixed using a ball mechanism. The angle of the headlight changes due to its movement forward and backward. Even if the manual corrector has the disadvantage of inaccurate adjustment of the light flux, it is more reliable and has less impact on the cost of the car.
Automatic headlight levelers
All relatively new cars that meet European quality standards are equipped with automatic headlight leveling. Today there are two types of correctors: dynamic and quasi-static.
Quasi-static correctors change the position of the headlights in a situation where the tilt of the car changes under the influence of pressure from a heavy load or due to high speeds. Since passenger cars do not often transport critically heavy loads, an immediate response is not required from the corrector. The design of such elements includes two sensors, each of which is responsible for the axis of the car. Communication is maintained through levers, and control is maintained using an electronic unit. The regulator itself is installed on the dashboard on the left side of the steering wheel.
Dynamic correctors are much more expensive. But this does not reduce their popularity and necessity. Similar devices are installed in cars with xenon headlights. It is precisely because of the large and powerful flow of light that they emit that the likelihood of incorrect adjustment increases. It is the dynamic correctors that make it possible to avoid a situation in which the oncoming driver may be blinded. Xenon, which shines into the eyes even for a short time, negatively affects vision, as a result of which it weakens. And when driving at night, this can lead to instant blinding and loss of orientation of the driver on an oncoming car.
The dynamic mechanism responds several times faster to changes in the position of the car body. Thanks to this, the corrector works literally instantly. This helps to maintain the light beam during the following maneuvers:
- driving on uneven roads;
- sudden braking;
- taking turns.
To increase the reliability of the dynamic mechanism, even today non-contact sensors are being developed that can record the position of the body. So far, most cars with dynamic correctors use potentiometers.
Light adjustment process
The process of adjusting the power of the light flux is as important as correct adjustment of the direction of the light. Here everything needs to be done very subtly, because even a very bright high beam can cause a lot of inconvenience to the driver ahead, even though it seems that he is at a decent distance. To avoid such consequences, there is a special light stand that is used to adjust the power and direction of the light flux. In order to adjust everything, you need a flat screen, which will be installed strictly perpendicular to the floor level. The screen should contain several marks:
- at the place where the center of both headlights should be approximately, there are vertical lines (VV);
- at the height of the center - H;
- horizon lines RR;
- slightly below both R's and to the left of both V's are horizontal lines designated as D.
After all procedures, the broken straight line CC should be clearly visible. It will be taken as the basis for regulating the power of the beam flow.
When adjusting the light flux, it is initially necessary that the same tires are installed on the car. And also the pressure in them should be set to the same. Next, the load on the driver’s seat with a real mass must be simulated.
After all the manipulations, you need to act according to the following principle:
- Place the car's rear axle parallel to the screen.
- Move the regulator to the “zero” position.
- Cover one of the headlights with a special flap.
- Adjust one headlight, and then carry out all the steps with another car light source.
Next, the following actions are performed: the low beam boundary is aligned with the CC line. However, it is not always possible to set this position accurately. The same thing happens with a manual corrector. In addition to boundaries and lines, it is not always possible to correctly and levelly install even a car, and also for correct adjustment you need a long darkened box or some kind of room.
Today, specialists have developed the latest devices that can quickly and efficiently adjust the corrector and level the light flux.
Let's sum it up
Automatic headlight levelers are the fruits of many years of painstaking work by all developers. The original mechanisms, at first glance, had a simple design and low accuracy, but modern devices can boast of high accuracy and smooth operation.
carextra.ru
What you need to adjust your headlights yourself
You can adjust the headlight on new car models without disassembling the optics, using the plastic heads of the adjusting screws located on its rear surface. The screws allow you to move the headlight vertically and rotate the light stream horizontally from the edge to the center and vice versa. To adjust the headlights yourself, you will need a cross-head screwdriver of various lengths or a hex wrench.
On different car models, manufacturers usually discuss its loading, at which the headlights are adjusted. If this is not in the vehicle’s operating instructions, then adjustment work should be performed when it is fully fueled and equipped. First you need to ensure normal and equal load on the front and rear axles.
Also, the car should not have noticeable defects in the suspension system that affect its performance. The absence of defects in the lighting lamps installed in the headlights is of great importance, as they can make it impossible to adjust the direction of the light flux. The adjustment procedure also depends on the type of headlight bulbs installed. They can be separate for low and high beams or combined with two filaments. When installing separate lamps, adjustments should be made separately for each lamp - for low beam and high beam. If there are combined lamps, the headlights are adjusted only for the short distance.
Adjusting screws for headlights VAZ 2110
Basically, on all brands of cars, the direction of the light flux is adjusted using two adjusting screws. Despite the apparent simplicity of the procedure, in practice it is not always so easy to carry out. This is especially true for outdated car models with round headlights. The reason for this is corrosion and deformation of the headlight mounting points. Screws can become stuck and rust over time, and can be very difficult to remove. Drivers of Zhiguli models 2101, 011, 06, and Niva need to periodically lubricate the screws with anti-corrosion lubricants.
It is easier for car owners with block headlights; the screws in them are located at the back and are less susceptible to corrosion, but they should also be moved periodically so that they do not grab tightly. Most often, the bottom of the headlight reflector begins to become covered with rust due to the flow of condensate there, which forms when the temperature changes on the surface of the reflector. To ensure that moisture evaporates in a timely manner, special technological holes in the headlight that provide air ventilation cannot be sealed.
The issue of adjusting the direction of the luminous flux of headlights must be approached with all responsibility, since incorrect installation will lead to headlights shining too close to the car or, conversely, too far away, blinding oncoming drivers, which equally negatively affects traffic safety in the dark. days.
Headlight range control: principle of operation, device, problems
Everyone will agree that it is much more difficult to drive a car at night than during daylight hours. And the problem is not only that due to the lack of daylight on the road, visibility is reduced.
Additionally, oncoming cars whose headlights are not adjusted properly also create problems. It’s good that this problem is typical only for old cars that do not have headlight range control. However, okay, what’s the point here, modern cars can also create problems if their headlight range control is broken, or if the owner uses it incorrectly or doesn’t use it at all (this applies to cars equipped with a manual range control).
Automatic headlight leveling helps direct the headlights in a manner that provides the driver with excellent visibility without dazzling oncoming motorists. Of course, this technology cannot be compared with the matrix headlights of an Audi car, but it is also very effective in application.
Design and principle of operation of the headlight range control
It is worth noting that the operating principle of different types of headlight range control units is approximately the same. At the same time, a distinction is made between automatic and manual settings. In the latter version, the position of the headlights is adjusted using a special regulator installed inside the car, and with the help of its rotation, the driver independently changes the angle of the optics. In the first case, the electronics automatically configure everything itself, depending on the landing of the car.
Manual headlight range control
This headlight range control is installed on many budget cars, so it is familiar to a large number of car enthusiasts. As the name suggests, the corrector is activated directly by the driver. To do this, as a rule, you just need to turn the wheel, or as it is also called, the rotary switch. The electromechanical drive of the headlight range control is most often used, so we will consider it.
The adjustment wheel usually has digital or graphic markings that indicate the position of the headlights. Adjustments are made by the driver as necessary, depending on the vehicle’s load and changes in its tilt in the longitudinal direction relative to the center of gravity.
Simply put, if three people sat in the back seat, and you had to put four bags of potatoes for your mother-in-law in the trunk, then obviously the back of the car will lower and the front will rise, causing the headlights to shine too high and blind oncoming drivers.
To prevent this from happening, you need to turn the wheel so that the beam of light goes down.
Turning the knob gives the corresponding command to the gear motor, which is needed to turn the headlight to a certain angle. In fact, a gear motor is nothing more than a worm gear, which is necessary to convert the rotational movement of the electric motor (located inside the gear motor) into the translational movement of the rod, which directly acts on the headlight, changing its angle.
Structurally, the headlight is hinged at the top, and the rod with a ball end (resting against a spherical latch) holds the lower edge of the headlight. And it is the back and forth movement of the lower part of the headlight, with the upper attachment point remaining unchanged, that gives the necessary change in the angle of inclination.
A manual headlight leveler is very simple, very reliable and, most importantly, a useful device, but it has one very significant drawback: most drivers forget to use it and blind their colleagues, despite the fact that they have the opportunity not to do so.
Automatic headlight leveling system
Automatic headlight leveling is a more advanced technology because it does not require any action from the driver. The cut-off line is adjusted automatically based on sensor readings.
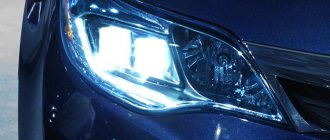
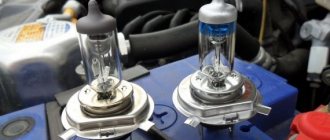
Automatic headlight leveling can be installed on vehicles equipped with either halogen or xenon headlights. For xenon, this is even necessary, since this type of headlight emits light of very high intensity, and in the absence of auto-corrector, it can pose a serious threat to traffic safety.
As for the design of the headlight auto-corrector, the following elements can be distinguished:
- Control block;
- sensors that measure the vehicle's ground clearance at various points;
- device that adjusts the headlights (actuator).
Typically, the system uses two or three sensors that measure ground clearance. Either one sensor or a pair can be installed at the front. And one sensor is located at the back.
Early systems used potentiometric sensors, but they were not reliable enough, so they have now been replaced by non-contact angle sensors.
The operating principle of these sensors is based on the Hall effect. The mechanism of operation of the sensor is quite simple.
Structurally, the sensor consists of a rotor (moving part), with permanent magnets built into it, and a stator (fixed part), which, in fact, is a Hall sensor.
The sensor is attached to the bottom and is connected to the suspension using a rod. The change in suspension travel is transmitted through the rod to the rotor, which rotates, causing a change in the magnetic flux, which is detected by the Hall sensor.
The magnitude of the change in the magnetic flux is subsequently recalculated by the control unit into the required angle of rotation of the headlights, and the corresponding signal is sent to the actuator. In its work, the control unit takes into account not only the angle of inclination of the vehicle, but also the speed, as well as the nature of the vehicle’s movement.
The most common problems with headlight range control
Quite often, various troubles and problems arise with such mechanisms. Let's look at why a car headlight range control may not work.
Sensors are considered the most vulnerable point of any modern electronics. This is also inherent in such a device as a headlight range control. Here the sensor, based on the ground clearance, adjusts the headlight range. Car enthusiasts often complain that the headlight range control malfunction indicator lights up on the car’s dashboard. Typically, this occurs due to a break in the bracket that holds the sensor. As a result, the sensor sends incorrect information, and an error appears in the operation of the corrector itself.
Sometimes the problem may lie in the contact connection. Due to frequent souring of contacts, their conductivity also decreases. As a result, similar troubles appear when the corrector stops working normally.
Another problem may also arise that is directly related to the configuration mechanism itself. But this is not some kind of malfunction, but simply the specifics of its operation on individual cars. For example, Kalina's headlight corrector (the downside of which is considered to be a small adjustment angle) works in such a way that the beam of light from the low-beam headlights is excessively lowered down, and this noticeably reduces the lighting efficiency of conventional lamps.
Correct operation of the headlight range control has a positive effect on your safety and the safety of other road users. Therefore, take all problems with this device very seriously.
Other
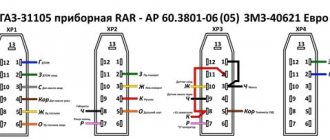
Ewgenp › Blog › Repair and adjustment of electric headlight range control
There was a problem with the electric headlight adjuster, I searched for information for a long time and found it only in one place. I warn you right away that literally all the information was taken from the website “Club Geely and Maple” address geelygroup.com.ua/forum/viewtopic.php f=52&t=711&s >Author oledjan “written April 15, 2008, pay attention to the time 02:10, the man tried.
I couldn’t find a more sensible and understandable explanation. So.
Electric headlight corrector... the corrector on the MK car has 2 levels of adjustment. 1) electric adjustment (from the interior using a regulator) 2) adjustment (directly rotating the gear on the corrector itself) in the SC this is divided, the correctors are located on the headlights, see the figure “location” so to remove it... there are no problems with the left corrector, there is room enough, but the right one is more difficult; they stuck on all sorts of crap. see fig. “remove...” what does it consist of? look at the figure “components” 1. corrector assembly 2. back cover with adjusting bolt (a) and pin (b) 3. corrector with the back cover removed 4. control board a) front view b) rear view (for those who like to dig deeper electronics) 5. pusher 6. screw regulator 7. electric motor
Principle of operation: the principle of operation is that when the headlight lens moves, the height of the beam direction changes. How this is implemented...see fig. “working principle” the lens is suspended on a hinge (if you take out the corrector and carefully insert a screwdriver in its place, you will see the beam and feel how it moves) the pusher “1”, moving by the amount “L”, moves the lens “2”, in turn, if the pusher is in the “MIN” position, then the beam “3” will be at the bottom, if the pusher is in the “MAX” position, then the headlight beam will be at the highest point. Where does the “L” value come from and how is it determined? The value “L” is the distance by which the adjusting bolt “6” moves (Fig. components), and this distance cannot exceed the length of the variable resistor “5” (Fig. principle of operation) as this happens: - when we switch the corrector regulator from the passenger compartment headlights, voltage is supplied to the corrector chip. It sends a signal to the micromotor, rotating the gearbox, the adjusting bolt with the pusher begins to move, this adjusting bolt is fixed to the bracket “4” (Fig. principle of operation), which in turn is fixed to a variable resistor. When rotating, the resistance in the resistor changes and the microcircuit cuts off the voltage from the motor when the programmed value is reached, that is, the pusher moves step by step from the point “MIN to MAX”, the angle of the lens and the height of the beam change accordingly.
What is headlight range control?
Driving a car at night is quite difficult and tiring. Primarily due to the deterioration of the view of the road and surroundings. The eyes are tired of the constant flashes of headlights from oncoming cars, precisely because headlight range control was not installed on older cars. This device helps to optimally illuminate the road, directing the beam of light in the desired direction, without blinding other road users.
How the device works
The system itself and its operating principle are the same in all cars. Naturally, this function is not included as standard, and is only available in combination with bi-xenon or matrix headlights, as well as in cars starting from the middle class.
The adjustment system can be adjusted manually or automatically. If the device requires manual adjustment, this is done using a regulator that is installed in the cabin on the instrument panel. By rotating, the driver can set the radius of illumination and the degree of tilt of the optics. If the adjustment is automatic, then the electronic mechanism independently determines all parameters, depending on the vehicle’s position and the width of the road lane.
The mechanism of operation is very simple: sensors that record the landing of the car, a sensor that monitors road markings and determines the radius of illumination, and the traffic controller himself, who gives a signal about the need for a change.
Frequently encountered problems
Like all systems, this one is no exception and is also not flawless, because quite often various failures and malfunctions occur. Most often, problems arise with sensors, as well as, in principle, with all complex electronics. The sensor contains all vehicle landing parameters. In some cases, a light on the instrument panel lights up, indicating a malfunction in the headlight adjustment. This happens because the sensor mounting bracket simply collapses or moves when the car is jolted or when the wheels hit hard. In this case, it determines the wrong coordinates, and the correction operation is disrupted.
There is also the possibility of damage to contact connections. Due to air humidity and temperature changes, the contacts oxidize and their permeability becomes dull. The most obvious malfunction is rather the specifics of the operation of some cars. In some cars, the adjustment angle is quite small, and the light beam is very low, which greatly dulls the illumination of the standard lights.
What is headlight range control?
www.kakprosto.ru
Types of correctors
Car owners often wonder what a headlight range control is and whether they can install it themselves. Depending on the device, there are several types of systems:
- electromechanical;
- hydromechanical;
- mechanical;
- automatic.
Automatic technology is the most expensive and effective. Such a system reads the body position data and independently adjusts the light beam. Other types are controlled manually using a washer or wheel located in the cabin.
All configurations with gas-discharge lamps are necessarily equipped with a system for automatically adjusting low-beam headlights and high-pressure washer nozzles.
Electromechanical
The electric headlight corrector allows you to adjust the angle of light from the interior. The driver independently selects the position of the washer depending on the load on the car.
The system does not have additional sensors on the vehicle's levers, so if the angle is chosen incorrectly, the light may be adjusted incorrectly. In this case, the low beam lamps will dazzle another vehicle when driving in the dark.
In the electric corrector, the motors change the position of the rod depending on the selected key indication in the cabin.
Components:
- electrical control element;
- tilt angle regulator;
- motors.
Most often, this type of adjustment is used on modern cars with halogen lamps. The system is very reliable and has been working properly for decades.
Hydromechanical
Hydrocorrector headlights are rare nowadays. A handle is installed in the cabin, which is directly connected to lines filled with liquid. When the lever is turned, pressure appears and is transmitted to the hydraulic pistons. Next, the force is transmitted to the rod, and parts of the reflector body are set in motion.
The system is fully controlled by the driver from inside the cabin. In winter, the liquid freezes and becomes noticeably thicker. It takes more effort to control the rod that affects the angle of the light.
The lines are constantly under pressure and eventually fail. The channels begin to leak, and the system does not gain the required traction when turning the knob.
This is interesting: What to do and what the fine is if the license plate light does not light up
If you choose the wrong angle, you may be exposed to light and dazzle other road users.
Mechanical
A mechanical corrector with cables that move the rod to adjust the angle of the reflector in the headlight was installed only on older cars. The system turned out to be unreliable and often failed after water got into the cable jacket. This effect leads to souring of the device.
A manual mechanical corrector should be used at least 2-3 times a month and the system should be periodically lubricated with oil. In winter, the system often soured and did not allow adjusting the headlight beam angle. Full lubrication of the cables helped restore functionality.
The corrector consists of the following components:
- power cables;
- control handle;
- gearbox with rod.
Currently, this type of corrector, which requires constant attention, is not used due to the expensive maintenance of the system.
Auto
Auto-corrector of headlights is most accurate in selecting the angle of light. The option is installed only in cars with xenon lamps and provides the best visibility at night.
There are no additional adjustment keys installed in the cabin; the system does everything independently in automatic mode.
The service life of the option is 10-15 years depending on operating conditions. Only the headlight range control sensor, which is installed on the car's arm and transmits a signal to the unit, may require repair.
Also among the components that require special attention is the chassis position linkage. Load control parts are installed from 1 to 3 depending on the complexity of the chassis. Over time, the moving balls sour and break off under load. To prevent breakdowns, it is necessary to lubricate the ball joints with copper grease every 40-50 thousand kilometers. This is not regulated in the vehicle operating literature, but it will help preserve the corrector components and avoid unpleasant incidents.
Operating principle
The corrector is designed to adjust the level of the cut-off line in low beam headlight mode. For the long-range glow mode, this option is not so important, since only the low beam headlights have a clear cut-off line (the conventional border of the light flux, abruptly turning into a practically unlit area). The low beam of the headlights should illuminate the road well, but not dazzle oncoming drivers.
The level of the cut-off line depends on the shape and vertical angle of the reflector. It is the last parameter that needs constant adjustment, since the angle of the headlights depends on the degree of load and distribution of cargo in the car. The more the rear part is loaded, the more the front of the car will be raised. Accordingly, even now they will blind drivers of oncoming cars.
According to the requirements for cars manufactured in Europe, all cars approved for operation after 1999 must be equipped with a headlight leveler as standard. Such systems are not installed on cars with active suspension.
Enforcement systems
The headlight range control is controlled by changing the position of the switch on the dashboard. The main types of drives used in the design of manual correctors:
Hydrocorrector
This system is well known to domestic car enthusiasts, since manual headlight levelers of this type were installed on VAZ 2107, 2109, 2110, 2114, Niva, and Granta.
Main components of the system:
- 6 – knob for adjusting the light beam;
- 1 – main adjustment mechanism;
- 2 – working cylinders with a rod acting on the headlight reflector.
The operating principle is based on adjusting the position of the corrector rod by moving a special fluid along the lines. The switch is mechanically connected to the piston of the main hydraulic cylinder. When the regulator handle is operated to raise the reflectors, the fluid pressure in the system increases, which drives the working cylinders, thereby extending the rod. Since the system is completely sealed, moving the handle back has the opposite effect.
The archaic system is considered extremely unreliable. Over time, the joints of the tubes and cuffs lose their tightness, which leads to air being sucked into the system and loss of working fluid.
Electromechanical corrector
The electrically driven headlight reflector adjustment system has become the most widespread. The electric drive allows for both forced change in the height of the light beam boundary and automatic adjustment depending on actual driving conditions.
The device of the forced action system:
- switch on the dashboard;
- gear motors;
- Control block;
- power wires.
The switch is usually installed to the left of the steering column and has 3-4 fixed positions to change the angle of the headlight reflector. The servo drive, also known as the gear motor, which is also the headlight range control unit, is an actuator, the movement of the rod of which raises or lowers the reflector, resting on its lower part (the reflector is mounted on hinges at the top).
Principle of operation
Fundamentally, the servo drive device resembles a gear motor used in. Device:
- small DC motor with magnetic excitation;
- worm gearbox, used to convert the rotational movement of the electric motor shaft into reciprocating movement of the rod;
- control circuit;
- sensor of the actual position of the rod of a resistive type.
The ECU regulates the position of the rod by applying control voltage to the servo drive. Let's look at the control logic for headlight range control units with an electromechanical drive using the example of BUK 02-01, which is used on many domestic cars. One of the main components of the control board is a bridge control circuit for the geared motor, which is based on a two-channel operational amplifier. One arm of the bridge circuit is connected to the actual position sensor of the rod, and the second is connected to the input pin of the control board. The influence on the electric drive of the corrector is carried out by changing the control action at the input of the board. When a bridge mismatch error occurs, the control system will supply voltage to the servo drive until the voltage at the position sensor terminals is equal to the control one. The electronic control unit must provide protection against overvoltage of the vehicle's on-board network. When the electromechanical headlight range control switch does not change its position, the electric motor is off.
Typical faults
- Open circuit, appearance of oxides at connectors.
- Wear of electric motor parts.
- Burnout of integrated circuit elements.