A necessary manipulation for drivers of cars of the same name is adjusting the hand brake on the Gazelle,
– is a fairly simple, but extremely responsible job. Safety largely depends on how professionally the process is carried out (everyone knows that in an extreme situation the handbrake is the only means of emergency stopping).
Adjusting the handbrake on the Gazelle consists of several stages, which will be described below
. Anyone can do the job without resorting to the services of a car service. The main thing is accuracy, accuracy and scrupulous adherence to instructions.
When does adjustment become necessary?
Indications for adjustment are: lever travel of 20 teeth or more (determined by the corresponding number of clicks); repair or replacement of elements related to the brake mechanism.
The presence of any of these circumstances indicates the need for adjustment. The goal is to move the lever no more than 15 clicks
– this value is optimal for all modifications of the Gazelle.
Adjustment
- All manipulations are performed in the position when the handbrake is “off”
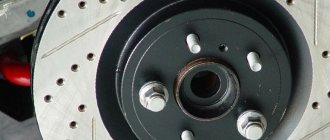
(the lever is fixed in the lowest position). To access the brake mechanism, remove the plastic plugs located on the brake shield. It is enough to pry them off with a screwdriver; - Then the eccentric nut is loosened
(no more than 2 turns). Further actions consist of moving the brake pads apart - to a position at which the drum is braked, after which the bolt is turned in the opposite direction, as a result of which the brake pads move in the opposite direction. The movement is carried out until the drum begins to rotate; - The process is monitored through inspection windows located in the lower part of the brake shield;
- At the end of the operation, the eccentric nut is tightened with reasonable force. It is important to prevent the eccentric from turning;
- The brake mechanism is adjusted in a similar way on the other side of the car, after which the plastic plugs are installed in place.
Next stage:
installing the leveler in a position “perpendicular” to the axis of the car. To do this, it is necessary to loosen the fastening nuts; they move along the thread until the desired position of the equalizer is reached. The position is fixed using locknuts.
Then:
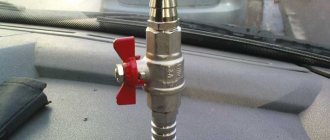
The handbrake is set to the “one click” position. By rotating the rear end nut (sheath of the central cable), the cable moves to the forward position until the free wheel movement is slowed down. Having tightened – with moderate force – the fixing nuts, turn off the parking brake.
An indicator of operational efficiency will be the free rotation of the rear wheels.
In addition, the “activation” of the handbrake is characterized by a maximum movement of the lever of 15 clicks. In this case, we can safely state: the adjustment was made correctly, the desired result was achieved.
Adjusting the hand brake gazelle business
How to adjust the parking brake on a Gazelle, do it yourself
The hand brake on Gazelle cars is part of the overall braking system, and in combination it is an independently functioning mechanism. The locking system on this vehicle is reliable, durable and maintenance free. The simplicity of the design allows repairs to be carried out without the help of a specialist. Even if you have never done this kind of work before, adjusting the handbrake on a Gazelle will not seem difficult. you just need to be careful and follow the notes given below in this article.
How to adjust the handbrake on a Gazelle in our last article
How to find this time to raise the handbrake on a gazelle? To do this, simply set the lever to the operating position, and if it turns out that even after 20 clicks of the ratchet, the rear wheels are not locked with sufficient force, the parking brake cable should lift . How to do this is explained below.
Repair and adjustment of the parking brake of a Gazelle car
The parking brake should hold the vehicle on a 25% grade when the parking brake lever is moved 15 to 20 teeth (clicks) of the ratchet.
Source: https://remont-dsg-spb.ru/regulirovka-ruchnogo-tormoza-gazel-biznes/
Adjusting the parking brake yourself
Before adjusting the handbrake on the Gazelle, lift the rear of the car and place it on supports. After this, remove the wheels to gain access to the brake mechanism. And you should also know that adjustment procedures are carried out with the lever set to the non-working position (lowered all the way).
Monitor the cable tension - this is important for your safety
To work, you will need a 17" wrench, two 22" wrenches, a "9" tubular wrench and a flat blade screwdriver. Having prepared the necessary set of tools, proceed to adjust the hand brake in accordance with the following list of actions:
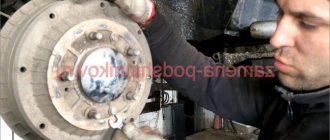
- So, first you need to get to the brake mechanism - to do this, use a screwdriver and remove the upper and lower plastic plugs on the brake shield.
- Next, using a key set to “17”, loosen the eccentric nut two turns (no more) and, sliding the pads, unlock the brake drum. To do this, use a tubular wrench to rotate the eccentric bolt in the opposite direction. If the pads lightly touch the drum, this is acceptable. You can control the entire process through special inspection windows, which are located at the bottom of the brake mechanism flap.
- After this, the eccentric nut must be tightened to a torque of 2.4–3.5 kgf/m. If you do not have a torque wrench on hand, tighten by hand with a reasonable amount of force. In this case, rotation of the eccentric itself is unacceptable.
- At this point, the first stage of adjusting the handbrake on the Gazelle car is completed, so install the plugs in place and do the same on the second wheel.
So, how to tighten the handbrake on a Gazelle?
1).Lower the parking brake lever to its lowest position. Next, use a screwdriver to pry up and remove the two plastic plugs of the brake shield (for clarity, the wheels have already been removed).
2).Using the “17” socket, loosen the brake eccentric nut by 1-2 turns.
3).Using a long “9” socket or a special tubular wrench, turn the eccentric bolt until you feel resistance to rotation, which is caused by the decompression of the pads.
4).The beginning of the movement of the blocks can also be determined through the inspection windows in the panel. Using the socket “17” we tighten the eccentric nut to a torque of 2.4 – 3.5 kg.m.
5).We eliminate the play between the tips of the cables and the depressions on the equalizer, for which: with two “24” wrenches, we loosen the tightening of the nuts securing the cable shell and, by moving the nuts along the threaded part of the shell, we achieve elimination of the play between the tip of the cable and the cavity on the equalizer.
Similarly, we eliminate the play at the other cable end. Tighten the locknuts of both cables. In this case, the leveler bar must be perpendicular to the longitudinal axis of the car.
6).Using a ruler or tape measure, measure the distance between the equalizer and the front wall of the bracket. It should be between 144–150 mm.
7).If necessary, adjust the position of the central cable in the same way as adjusting the rear cables. If after this there is play between the tips of the rear cables and the equalizer, repeat the adjustment described above.
When the drive is properly adjusted, the parking brake lever should not move more than 15 sector teeth (clicks).
The handbrake on Gazelle cars is part of the overall braking system, and at the same time it is an independently functioning mechanism. The parking wheel locking system on this car is reliable, durable and easy to maintain. The simplicity of the design allows, if necessary, to carry out repairs without the help of a specialist. Even if you have never performed work of this kind before, adjusting the handbrake on the Gazelle will not seem difficult to you - you just need to be careful and strictly follow the instructions given below in this article.
How to replace handbrake cables
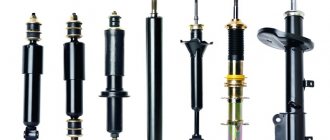
If adjusting the Gazelle hand brake turned out to be insufficiently effective or did not lead to anything at all, therefore, you will have to change the brake pad drive cables. In addition to the critical stretch of the cable, it should be changed if damage is detected during an external inspection. And also an indicator for replacement is corrosion and jamming of the cable in the protective sheath.
In order to successfully complete the task, prepare two “22” wrenches, a “12” socket and pliers. We, in turn, will tell you how to change the handbrake cable on a Gazelle:
- Lift the rear of the car to remove the rear wheels and brake drums and shoes.
- Using a socket on “12”, unscrew the two bolts that secure the protective shell to the brake mechanism.
- After removing the socket cable from the brake shield, you need to move to the cable equalizer and use “22” keys to loosen the lock nut and the adjusting nut.
- Next, you should completely unscrew the outer nut, which will allow you to remove the cable from the bracket slot;
- After this, unsplit the equalizer axle using pliers, then remove the washer and remove the axle.
- Now you need to release the equalizer to remove the drive cable from it.
How to Tighten the Handbrake on a Gazelle ~ VESKO-TRANS.RU
How to adjust the parking brake on a Gazelle, do it yourself
The hand brake on Gazelle cars is part of the overall braking system, and in combination it is an independently functioning mechanism. The locking system on this vehicle is reliable, durable and maintenance free. The simplicity of the design allows repairs to be carried out without the help of a specialist. Even if you have never done this kind of work before, adjusting the handbrake on a Gazelle will not seem difficult. you just need to be careful and follow the notes given below in this article.
How to adjust the handbrake on a Gazelle in our last article
How to find this time to raise the handbrake on a gazelle? To do this, simply set the lever to the operating position, and if it turns out that even after 20 clicks of the ratchet, the rear wheels are not locked with sufficient force, the parking brake cable should lift . How to do this is explained below.
Adjust the parking brake
Before adjusting the handbrake on the Gazelle, lift the car back and install it for support. Then disassemble the wheels to gain access to the brake . Also keep in mind that adjustment procedures are performed with the lever in the idle position (all the way down).
You will need a "17" wrench, two "22" wrenches, a "9" pipe wrench, and a flat blade screwdriver. After preparing the necessary set of tools, proceed to setting up the handbrake in accordance with the following list of actions:
- Where is the Oil Pressure Sensor Golf 3 located?
- Motorhome Fiat Ducato Do It Yourself
- Replacing Drive Belt Santa Fe 2 7
- Rear Brake Pads VAZ 2114 Which are Better
- How to Remove a Box on a Hyundai Accent
- DIY Nexia Steering Rack Repair
- Therefore, you first need to approach the brake mechanism. To do this, use a screwdriver and remove the upper and lower plastic plugs on the brake shield.
- Then press the “17” key to loosen the eccentric nut two turns (no more), and, sliding the pads, unlock the brake drum. To do this, turn the eccentric bolt in the opposite direction using a tubular wrench. If the pads lightly touch the drum, this is acceptable. You can monitor the entire process using special inspection windows located at the bottom of the brake valve.
- Then tighten the eccentric nut to a torque of 2.4-3.5 kgf/m. If you do not have a wrench handy, hand-tighten with a reasonable amount of force. In this case, rotation of the eccentric itself is unacceptable.
- This is the first step in installing a handbrake on a gazelle, so put the forks in place and do the same on the second wheel.
Adjust the parking brake on the gazelle
This video was edited by Video Editor ()
Adjusting the hand brake
1. Make sure the handbrake lever is released. 2. Place the vehicle on a lift to
Now you need to set the cable level in a perpendicular position relative to the axis of the car. This is achieved by loosening the cable nuts. By moving the nuts along the thread, you set the equalizer in the desired position, eliminating the gap between it and the ends of the cable. Then tighten the lock nuts.
- What Oil to Pour into a Camry 50 Engine
- Changing the Oil in the CVT Nissan Xtrail T31
- How to Remove a Headlight on a Suzuki Grand Vitara
- Nissan Primera P12 Doesn't Start in Cold
- Replacing the Rear Camber Arm Kia Sid
- First look at the electric Ford F-150 - S Frunk
With the completion of the described procedure, the process of installing the parking brake is not yet completed, since it is necessary to adjust the tension of the central cable.
To begin, raise the parking brake lever with one click and turn the adjuster nut where the rear end of the cable is attached to the equalizer (after releasing the lock nut), tighten until the wheels brake slightly. Then lower the handbrake all the way down and spin each hand on the rear wheel.
properly set handbrake should not interfere with rotation. Additionally, when setting the vehicle to the parking brake, the lever travel should be 15 clicks with a ratcheting mechanism.
the handbrake on a gazelle without assistance in this guide But sometimes, with proper setup, the expected result cannot be obtained due to critical wear. In this case, the parking brake cable must be replaced as described below.
How to replace parking brake cables
the Gazelle handbrake turned out to be ineffective or did not lead to anything, it is therefore necessary to replace the brake pad cables. In addition to the critical stretch of the cable, it should be replaced if damage is detected during an external inspection. As well as replacement due to corrosion and jamming of the cable in the protective sheath.
To successfully complete the task, prepare two keys for "22", a socket for "12" and pliers. We, in turn, will tell you how to replace the parking brake cable on a Gazelle:
- Lift the rear of the car to remove the rear wheels and brake pads.
- Use a "12" socket to remove the two screws that secure the housing to the brake valve.
- Once you have removed the connector from the brake shield, you need to go to the equalizer and use the "22" button to loosen the locknut and adjuster nut.
- Then completely unscrew the end nut, which will allow you to pull the cable out of the bracket groove;
- Then unscrew the equalizer axle with pliers, then remove the washer and remove the axle.
- Now you need to release the equalizer to remove the drive cable.
The second cable is removed in the same way. As for installing new parts, you can also use these instructions, but in reverse order. When the replacement is complete, be sure to adjust the parking brake according to the instructions in the first part of the article.
Source: https://vesko-trans.ru/kak-podtjanut-ruchnik-na-gazeli-video/