how to remove the rear brake drum on a Chevrolet Niva
Automotive products Advertising Website design and development After the expiration of copyright, in Russia this period is equal to three years, the work becomes public domain.
Tips for removing rear drums on a VAZ 2114
Moreover, after installation, the drum should not move freely on the hub. Compress by tightening the bolts evenly into the two threaded holes of the drum. Next, remove the pressure springs using pliers, press and turn:
Niva Chevrolet repair manual. The brake drum is removed to replace it if damaged or worn...
Perform the work on a car with the rear wheels hanging on a lift or a car mounted on supports using a jack. It loosens the parking brake cable.
Using a 12mm socket, unscrew the drum mounts: After the drum is removed, it is carefully inspected for damage.
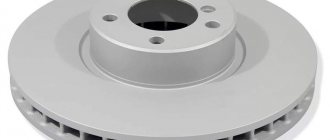
Clean the outside of the brake drum and check for obvious signs of wear or damage, or cracks around the wheel bolt holes.
Replace the drum if necessary.
Parts and consumables:
Check the inside of the brake drum. Slight wear on the drum from the action of the pads is normal.
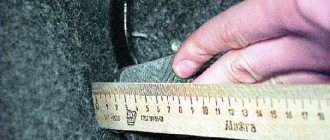
Measure the inner working surface of the drum in several places. Compare the results of the obtained measurements. Thus, the optimal gap between the pads and the drum is automatically maintained.
Perform the work on a car with the rear wheels hanging on a lift or a car mounted on supports using a jack. Compress by tightening the bolts evenly into the two threaded holes of the drum. With the car stationary on the ground, press the brake pedal 2-3 times to move the shoes to the drum.
Tools:
The brake drum must be cleaned of dirt and ensure that it rotates freely. The handle of the parking brake system manual drive mechanism must be in the lowered position.
Unscrew two 2 cm fasteners. Brake mechanisms of the rear wheels securing the drum to the rear wheel hub, and using two M8 threaded bolts 1.5-2 cm long as pullers, screw them into holes A and remove the brake drum. Warning If the drum flange and hub are severely corroded, this connection must be moistened with kerosene or brake fluid and left for some time. To avoid damaging the drum and deforming the brake shield, it is strictly forbidden to hit the drum rim with a hammer or insert a screwdriver between the shield and the drum rim, using it as a lever.
If the drum wears out significantly, an annular protrusion forms on its working surface, preventing removal of the drum.
Perform the work on a car with the rear wheels hanging on a lift or a car mounted on supports using a jack. The parking brake lever must be lowered all the way down and the vehicle is released. Engage 1st gear and install thrust blocks under the front wheels.
How to repair the rear brake of a Niva Chevrolet
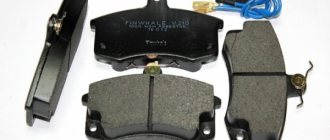
For ease of use, remove the decorative cap. The main component that needs to be replaced periodically are the brake pads. The car manufacturer recommends checking the pads after mileage. But do not forget that, first of all, these parameters depend on the driving style and operating conditions of the car.
On roads with poor surfaces, you tend to have to slow down more often, which leads to faster pad wear. Mainly the outer lining suffers, as it wears out much faster. To monitor its condition, there is a special window on the drum through which you can see the level of wear.
The car can be used if the thickness of the lining is more than 2 millimeters. Otherwise, it is necessary to replace all linings on the rear axle. All 4 are replaced, and in this case the level of wear of the others does not matter.
Tips for removing rear drums on a VAZ 2114
Since the pads are now compressed, the new brake drum should fit easily. Before installation, we knock off the accumulated dirt on the seat with a brush with metal bristles, then lubricate it with copper grease.
Place the drum and assemble in reverse order. Since we drained the brake fluid a little, we need to bleed the brakes; if you did not touch the cylinders, then you do not need to do this.
We will pump, or rather remove, air from the system using a special vacuum device.
Replacing brake drums on a Chevrolet Niva
Hello everyone, today I wanted to replace the rear brake pads. But I couldn't remove the drum. How to remove them correctly?
Comments 39
Thanks for the advice on hanging and heating the drum. On my own behalf, I would like to add that there is a slight play on the heels, so the wheel spins back and forth and then almost jumps off on its own. Thanks again, I spent half a day today tapping along the perimeter through the wood of the cup, still a little free
Better sum it up: 1. VD-40, 15 minutes, VD-40, 15 minutes. 2. Try the trick with hanging and accelerating and braking. It's not that tight. (If you miss everything, then about 0.5 mm moves on the studs.) 3. Knock through the mounting tool + a piece of wood, but this is more convenient with two people, because there are not enough hands. Put a piece of wood on the drum, put the assembly on top and hit it - this way it turns out more evenly than with a piece of wood.
Using this method, everything worked out :)).
You press the end of the mounting against the edge of the head and hit the mounting with a hammer. At the station they knocked down drums with peeling pads like this
The Chevrolet Niva car is highly reliable and durable. One of the important advantages of this car is the ability to make minor repairs yourself, without visiting a service station.
One of these components is the car’s braking system. The ability to change consumable parts and independently perform diagnostics increases the safety of the driver and passengers and makes the trip safer.
The Chevrolet Niva has drum-type brakes on the rear axle. The main component that needs to be replaced periodically are the brake pads. The car manufacturer recommends checking the pads after 20,000 miles. Replacement is carried out after 30,000 kilometers.
But do not forget that, first of all, these parameters depend on the driving style and operating conditions of the car. On roads with poor surfaces, you tend to have to slow down more often, which leads to faster pad wear. Mainly the outer lining suffers, as it wears out much faster. To monitor its condition, there is a special window on the drum through which you can see the level of wear.
The car can be used if the thickness of the lining is more than 2 millimeters. Otherwise, it is necessary to replace all linings on the rear axle. All 4 are replaced, and in this case the level of wear of the others does not matter.
If you partially replace the brake linings, this will lead to a deterioration in the driving performance of the car and problems with the operation of the braking system. When braking, the car will move away from the trajectory.
To replace brake pads in a field, you must place the car on a flat surface. After this, you need to put stops under the front wheels to prevent them from rolling. The vehicle must be released from the parking brake.
Next, you need to slightly loosen the wheel bolts, lift the car with a jack and remove the wheel.
Niva Chevrolet replacement of rear brake pads, cylinders and drums. Video and photo instructions
We have a Chevrolet Niva car, produced in 2005, mileage 137 thousand km, for scheduled repairs, on which it is necessary to replace the rear brake pads, drums and cylinders. We will show you how you can do this yourself, without resorting to the help of specialists.
It looks like the pad on the rear left wheel has been torn off, there is a grinding noise when braking, and when reverse gear is engaged, the wheel jams and then breaks. Therefore, it was decided to immediately lift and change the pads, drums and cylinders on both sides. After this, we'll bleed the brakes with a vacuum.
how to remove the rear brake drum on a Chevrolet Niva
Removing the brake drum VAZ 2131 NIVA -Replacing the rear brake pads Lada Niva (with comments)
After completing the work, you must press the brake pedal firmly several times so that the system sets the necessary clearances and adjusts the position of the brake pads.
Niva Chevrolet repair manual. Removing and installing the rear wheel brake drum. The brake drum is removed...
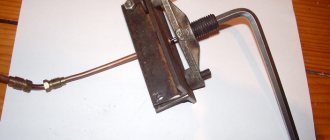
Remove the two bolts; the photo shows one securing the brake drum to the axle shaft. The car manufacturer recommends checking the pads after mileage. Installation of new pads and assembly is carried out in reverse order.
If the results are different from each other, then the drum is oval in shape. Please note that as the pistons are pressed into the cylinders, the brake fluid level in the master cylinder reservoir rises.
Remove the two bolts; the photo shows one securing the brake drum to the axle shaft.
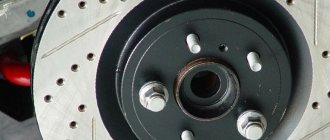
Remove the drum from the axle shaft with light blows of a hammer. If the drum cannot be removed by hand, knock it down with a hammer using a wooden block, or press it by evenly screwing the bolts into the two threaded holes of the drum.
When installing the old drum, use a file to remove the collar on the working surface of the drum that has formed as a result of wear. Install the drum in the reverse order of removal.
First, clean the axle shaft seat from corrosion, lubricate it with graphite grease or LSC grease, and bring the pads together using two mounting blades. The ability to change consumable parts and independently perform diagnostics increases the safety of the driver and passengers and makes the trip safer.
How to remove the brake drum. (Method No. 2)
The Chevrolet Niva has drum-type brakes on the rear axle. The main component that needs to be replaced periodically are the brake pads. The car manufacturer recommends checking the pads after mileage.
But do not forget that, first of all, these parameters depend on the driving style and operating conditions of the car. On roads with poor surfaces, you tend to have to slow down more often, which leads to faster pad wear. Mainly the outer lining suffers, as it wears out much faster.
how to separate the rear pads on a VAZ 2121
Removal and installation of rear brake pads Niva 2121, VAZ 2131, Lada 4x4 The minimum permissible thickness of the brake pads is 1.5 mm. To assess the condition of the brake pads without removing the drum, there is an inspection window in the brake shield. We remove the plug from the shield. To replace the pads, we place the VAZ 2131 car on an inspection ditch or a lift.
Remove the rear wheel and loosen the parking brake system drive cable (see Adjusting and removing parking brake system components). Before unscrewing the bolts securing the brake drum to the axle shaft flange, tap their heads.
To fasten the brake drum of the VAZ 2131, bolts with a reduced head height are used. Therefore, to unscrew them, it is better to use a six...
Removal and installation of rear brake pads Niva 2121, VAZ 2131, Lada 4x4 The minimum permissible thickness of the brake pads is 1.5 mm. To assess the condition of the brake pads without removing the drum, there is an inspection window in the brake shield. We remove the plug from the shield. To replace the pads, we place the VAZ 2131 car on an inspection ditch or a lift.
Remove the rear wheel and loosen the parking brake system drive cable (see Adjusting and removing parking brake system components). Before unscrewing the bolts securing the brake drum to the axle shaft flange, tap their heads.
To fasten the brake drum of the VAZ 2131, bolts with a reduced head height are used. Therefore, to unscrew them, it is better to use a hexagonal tool head, the working edges of which begin immediately from its end (if necessary, the head can be turned out). Using a 12mm socket, unscrew the two bolts securing the brake drum to the axle shaft.
To dismantle the Niva 2121 drum, the removed bolts can be screwed into two threaded holes in the car drum (unlike the mounting holes, the threaded holes are located symmetrically). When screwed in, the bolts will rest against the axle shaft flange and move the drum. We screw the bolts into the threaded holes. You can also remove the drum by striking the end of the drum with a hammer through a wooden block. We apply blows evenly, turning the drum. We remove the drum.
We show two ways to remove brake pads. And take out the spring. Remove the spacer bar. Using pliers, turn the shank of the front block strut until it coincides with the slot in the outer cup. Remove the spring with the outer and inner cups.
On the other side of the brake shield, remove the stand. Elements of the block support post. And remove the lower tension spring. Remove the rear block support strut. And remove the manual brake pad drive lever from the end of the rear parking brake cable. When removing the brake pads using the second method, remove the support struts of both pads.
We pry up the rear brake pad with a screwdriver (or pull it off by hand) and remove its lower stop from the support plate. We lower the brake pads down with our hands, moving their upper stops out of the slots of the wheel cylinder pistons. Remove the lower tension spring. We remove the pads assembled with a spacer bar and a spring from behind the axle shaft flange. We perform the operation carefully so as not to damage the wheel cylinder boots of the VAZ 2121. And remove the Niva 2121 brake pads with a spacer bar and an upper tension spring.
Holding one of the blocks on the floor with your foot, stretch the spring and remove the spacer bar from the stop. Remove the upper tension spring. Unsplint its axle.
Remove the washer and take out the axle. We assemble and install the Niva 2131 pads in the reverse order (depending on the disassembly method). In the second method, before installing the second brake pad of the car, we fix the first one from movement by installing a support post. When installing new pads, it is necessary to press the pistons inside the wheel cylinder. This operation can be performed as follows: or having installed the pads, press on them, resting with two mounting blades on the shoulder of the brake shield.
In this case, the upper stops of the pads press the pistons inside the cylinder. After installing new brake pads, it is necessary to adjust the Niva 2121 parking brake system (see Adjusting and removing parking brake system components).
Source: https://vazclub.com.
How to remove a brake drum in a field.
To replace brake pads in a field, you must place the car on a flat surface. After this, you need to put stops under the front wheels to prevent them from rolling.
This will allow the brake pads to move away from the brake drum, allowing the drum to be easily removed from the hub.
Be careful to clean the inner surface of the brake drum from brake dust and dirt. Clean the outside of the brake drum and check for obvious signs of wear or damage, or cracks around the wheel bolt holes.
Parts and consumables:
Replace the drum if necessary. Check the inside of the brake drum.
Slight wear on the drum from the action of the pads is normal. Measure the inner working surface of the drum in several places. Compare the results of the obtained measurements.
If the results are different from each other, then the drum is oval in shape. If the measured maximum drum inner diameter is within acceptable limits, it must be reground.
Removing the brake drum Niva Chevrolet
The brake drum is removed to replace it if the working surface is damaged or worn, as well as to monitor the condition of the brake mechanisms and to replace brake pads and working cylinders.
Perform the work on a vehicle with the rear wheels hanging (on a lift or a vehicle supported by a jack).
The parking brake lever must be lowered all the way down (the car is released).
You will need: 12mm wrenches, a screwdriver, two mounting blades.
Engage 1st gear and install thrust blocks under the front wheels.
Check: the parking brake lever must be lowered all the way down (the car is released).
Remove the rear wheel.
For ease of use, remove the decorative cap. When replacing the drum, the cap does not need to be removed.
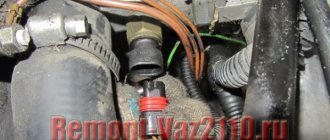
Moisten the gap between the drum and the axle flange with some easily penetrating liquid (kerosene, WD-40, etc.).
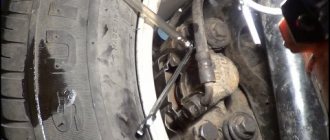
Remove the two bolts (one is visible in the photo) securing the brake drum to the axle shaft.
Remove the drum from the axle shaft with light blows of a hammer.
If the drum cannot be removed by hand, knock it down with a hammer, using a wooden block, or.
Compress by screwing the bolts evenly into the two threaded holes of the drum
Remove the brake drum.
When installing the old drum, use a file to remove the collar on the working surface of the drum that has formed as a result of wear.
Install the drum in the reverse order of removal.
First, clean the axle shaft seat from corrosion, lubricate it with graphite grease or LSC-15 grease, and bring the pads together using two mounting blades.
Please note that as the pistons are pressed into the cylinders, the brake fluid level in the master cylinder reservoir rises.
If necessary, pump out the liquid.
Check that the wheel rotates easily. Light brushing of the drum against the pads is allowed.
With the car stationary on the ground, press the brake pedal 2-3 times to move the brake pads to the drum.
Societies › Chevrolet Niva › Blog › How to remove rear brake drums?
Hello everyone, now I wanted to change the rear brake pads. As annoying as it may sound, I was unable to remove
the drum . to remove them correctly ?
Thanks for the advice on hanging and heating the drum. On my own behalf, I would like to add that there is a slight play on the heels, so the wheel spins back and forth and then almost jumps off on its own. Thanks again, I spent half a day today tapping along the perimeter through the wood of the cup, still a little free
Better sum it up: 1. VD-40, 15 minutes, VD-40, 15 minutes. 2. Try the trick with hanging and accelerating and braking. It's not that tight. (If you miss everything, then about 0.5 mm moves on the studs.) 3. Knock a piece of wood through the installation, but this is more convenient with two people, because there are not enough hands. Wood on the drum
, put the assembly on top and hit it - this turns out more evenly than with a piece of wood.
Using this method, everything worked out :)).
You press the end of the mounting against the edge of the head and hit the mounting with a hammer. At the station they knocked down drums with peeling pads like this
Replacing brake drums on a Chevrolet Niva
Hello everyone, today I wanted to replace the rear brake pads. But I couldn't remove the drum. How to remove them correctly?
Comments 39
Thanks for the advice on hanging and heating the drum. On my own behalf, I would like to add that there is a slight play on the heels, so the wheel spins back and forth and then almost jumps off on its own. Thanks again, I spent half a day today tapping along the perimeter through the wood of the cup, still a little free
Better sum it up: 1. VD-40, 15 minutes, VD-40, 15 minutes. 2. Try the trick with hanging and accelerating and braking. It's not that tight. (If you miss everything, then about 0.5 mm moves on the studs.) 3. Knock through the mounting tool + a piece of wood, but this is more convenient with two people, because there are not enough hands. Put a piece of wood on the drum, put the assembly on top and hit it - this way it turns out more evenly than with a piece of wood.
Using this method, everything worked out :)).
You press the end of the mounting against the edge of the head and hit the mounting with a hammer. At the station they knocked down drums with peeling pads like this
The Chevrolet Niva car is highly reliable and durable. One of the important advantages of this car is the ability to make minor repairs yourself, without visiting a service station.
One of these components is the car’s braking system. The ability to change consumable parts and independently perform diagnostics increases the safety of the driver and passengers and makes the trip safer.
The Chevrolet Niva has drum-type brakes on the rear axle. The main component that needs to be replaced periodically are the brake pads. The car manufacturer recommends checking the pads after 20,000 miles. Replacement is carried out after 30,000 kilometers.
But do not forget that, first of all, these parameters depend on the driving style and operating conditions of the car. On roads with poor surfaces, you tend to have to slow down more often, which leads to faster pad wear. Mainly the outer lining suffers, as it wears out much faster. To monitor its condition, there is a special window on the drum through which you can see the level of wear.
The car can be used if the thickness of the lining is more than 2 millimeters. Otherwise, it is necessary to replace all linings on the rear axle. All 4 are replaced, and in this case the level of wear of the others does not matter.
If you partially replace the brake linings, this will lead to a deterioration in the driving performance of the car and problems with the operation of the braking system. When braking, the car will move away from the trajectory.
To replace brake pads in a field, you must place the car on a flat surface. After this, you need to put stops under the front wheels to prevent them from rolling. The vehicle must be released from the parking brake.
Next, you need to slightly loosen the wheel bolts, lift the car with a jack and remove the wheel.
For further actions, you will need a key size 13. Use it to loosen the parking brake cable. To do this, loosen the nut and locknut.
After this, using a 12mm wrench, unscrew the bolts holding the brake drum.
If the car was driven in winter, a problem such as drum sticking may occur. To fix this problem, you need to tap the drum around the circumference using a wooden or rubber mallet. If you don't have a mallet, you can use a regular hammer. But the blows must be delivered through a wooden block or piece of rubber.
Attention! The use of lubricants is strictly prohibited. This can damage the vehicle's braking system.
After the drum is removed, it is carefully inspected for damage. Sometimes, when using a car, cracks, grooves or chips may appear on it. If there are defects, the drum must be replaced.
Before removing the Chevrolet Niva brake pads, you need to use two levers to press the pistons into the wheel cylinder. This is necessary to install new brake pads.
The garter spring and spacer bar are removed next. Be careful when removing, as a spring that pops out can hurt your hands.
Then, using pliers, you need to unscrew the outer cup until the slots on it line up with certain protrusions on the stand.
These parts are quite small; it is better to use a separate container for storing them. If there is rust or dust on the surface, it must be cleaned immediately.
Now you can carefully move the front pad to remove the lower spring.