When a part needs to be replaced
If you hear a noise, hum or howl from the rear that increases significantly when cornering, this indicates that it is time to check the rear hubs. Modern verification methods are quite simple:
- Having stopped the wheel diagonally - opposite to the jacking point, you need to hang the two rear wheels alternately.
Note! Why each one separately? Mistakes are often made in identifying the side of the noise; in addition, it often becomes necessary to replace two bearings at once.
- The raised wheel needs to be spun as much as possible. If you hear extraneous sounds similar to a hum, in any case you cannot do without replacing the part;
- if you still have some doubts, you can look at the lateral play. You need to take the wheel by the edges and roll it away from you - towards you. If the bearing is bad, you will feel the movement of the wheel on its axle.
Today, stores sell individual bearings and assembled hubs. In fact, there is no point in buying an assembled unit (except in individual cases), since replacing the bearing is not as difficult as it immediately seems.
Detailed instructions for replacing the rear wheel bearing
So:
- The car stops at the front.
- Wheel bolts break off.
- The nut in the center of the hub breaks off, and you must first remove the cap.
- The required side is jacked up and the trestles are positioned.
- The wheel is removed.
- The installation site is filled with WD-40 or other special liquids.
Note! In this situation, you can use diesel fuel or any brake fluid.
- The guide bolts are unscrewed, which it is recommended to first tap with a hammer.
- Carefully remove the brake drum. If removal is difficult, you need to screw special bolts into the threads on this drum, tighten it and lightly tap it with a hammer. Usually such measures produce positive results.
Note! You can buy specialized drum pullers, but this is the last option when you can’t do anything on your own.
- The central nut is completely unscrewed. Of course, you can unscrew it immediately and remove the hub, wheel and drum together, but in this case there will be a high risk of damage.
- The hub tightens. If one of the bearing races remains on the axis, you need to move it out of place using a puller or sharpened chisels.
- The axle is inspected for the presence of marks from bearing rotation; if such marks are present, the assembled hub will need to be replaced.
- The brake cylinder is assessed for leakage, and the pads are assessed for wear.
- The retaining ring is removed from the hub using pliers or screwdrivers.
- The edge must be cleaned of rust, after which it must be moistened with WD-40 or a similar liquid that is at hand.
- There are three ways to press out a bearing: using a special press, a puller or a heavy hammer (sledgehammer). The third method may seem aggressive, but it is preferred by most service station technicians, so let’s look at it in more detail.
- The hub is securely installed on a hard surface, and the bearing is dislodged from its place through the mandrel with several blows of a hammer or sledgehammer. After this, the hub is installed on a vice.
Note! There must be a stop for the part and a place for the bearing to bounce off.
- A couple more blows are made, after which the bearing comes out.
- The bearing seating surface must be carefully inspected, any existing rust should be sanded off and lubricated with plain motor oil.
- The purchased bearing must be screwed using a selected bolt through a washer, which must be selected in accordance with the internal races. Since the bearings are double row, they will have to be disassembled during installation.
- The hub is installed on a hard surface.
- A twisted bearing is installed on top, but first you need to lubricate its installed plane with oil.
- Use a one-kilogram hammer to slightly level the element in a plane.
- Take a suitable mandrel, for example, a pry bar, which is used to hit the part to press the bearing.
Note! The main thing is not to apply strong blows, since the pressing will be uneven.
- When the bearing is about halfway through, you can hit harder.
- When reaching the cut part of the hub, you need to use the old clip as a mandrel.
Note! Do not apply strong blows, as this is a high-carbon metal that can burst.
- You need to push it all the way, after which the stopper is installed; if it is not possible to install the last element normally, then most likely the bearing was not finished completely.
Note! The stopper should spring back into the groove without difficulty.
Bearing assembly procedure
So:
- Now it's time for assembly, the hub is put on the axle, and you need to remove the bolt used to tighten the cage.
- The central nut is tightened and tightened as much as possible. In this case, it means installing a new nut. We also install a thrust washer.
- The previously removed brake drum and wheel are put on and screwed on.
- The rotation is evaluated, if there is no noise, then all actions were performed correctly. The car is removed from the jack.
- The wheel with the central nut is tightened.
- The hub nuts are closed and the wheels are tightened securely.
Any car experiences considerable loads when driving. The resistance of the road surface, its unevenness and slopes, wind and driving style - there are many reasons for the loads, they are all different, and each of them must be balanced so that the people in the cabin do not experience discomfort. One of the elements that ensures the desired condition is wheel bearings.
Wheel bearings are devices needed to support the supporting parts of a vehicle. A wheel bearing allows the part it supports to roll or rotate freely. In addition, this element ensures load distribution and its transfer to other components of the car.
Both the front and rear wheel bearings experience heavy loads, so their initial safety margin is quite high. This is natural: bearings have to experience extreme pressure when there is a sharp change in speed (braking or acceleration).
The purpose of wheel bearings sounds quite simple - they ensure smooth rotation of the wheels around their axes. The design of the front and rear bearings differs, and this article will focus specifically on the rear wheel bearing.
Step-by-step procedure for replacing the rear bearing on a VAZ-2112
Before starting work, it is necessary to ensure that the car is parked on a flat surface, make sure that the handbrake is off, place wheel chocks under the front wheels, and lock the gearbox shift lever in position “1”.
- First of all, we tear off the bolts on the wheel where the bearing is faulty, or on two wheels, and also tear off the wheel hub fixing nut.
With some force, the bolt will give way.
Of course, you can buy special pullers for drums in stores, but we think that this is a waste of money.
- Once the drum is removed, there is no need to remove the brakes, so be careful when working around them.
Without brake drum
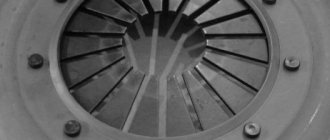
The hub nut is removed, the bearing is visible
Inspection and diagnosis of the hub
Please note that with this method of dismantling the hub, all brake elements are removed
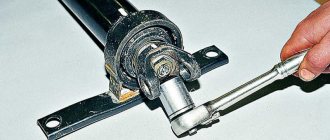
Removing the rear hub using a puller
Two developments
Then two types of developments are possible:
- Everything went well, the hub came off easily, and there was no inner bearing ring left on the axle. In this case, we proceed to dismantling the bearing from the hub and press it back.
The bearing was removed successfully.
The stuck bearing is simply disassembled
The process of removing the bearing from the hub
- Before proceeding with dismantling the bearing, remove the retaining ring using pliers or pliers.
The retaining ring whiskers are marked with a marker.
There are three ways to remove the bearing:
- Using a press.
- Using a puller.
- And with the help of a heavy hammer.
If in the first two cases everything is clear enough, then let’s look at the last one in more detail.
- We fix the hub in a vice or on a hard surface, clamp it and ensure that it remains stationary.
- Applying gentle blows to the mandrel attached to the bearing, we displace it from the place of fixation.
This type of hammer is quite suitable
Installing the bearing into the hub
- When the new bearing is ready for installation, we try it on in a new place, lubricate the housing with oil and apply a suitable mandrel.
You can heat up the hub body, the metal expands and you can try to install the bearing by hand
Please note that you should not apply strong blows, since they can simply break the bearing housing, and the pressing itself may become uneven.
- When the bearing has reached the very end, install the old or new retaining ring. At the same time, it should fit into the grooves without any difficulty.
When to change the rear wheel bearing of a VAZ 2110?
Wheel bearing failure is not something out of the ordinary.
, but this phenomenon is quite unpleasant, not only for the driver, but also for those around him: the sound of a faulty bearing can hardly be called melodic.
Among the main reasons are the following:
- Errors made when installing the bearing, for example, incorrectly adjusted clearance. An increased or decreased gap is an extremely unpleasant moment, and can only be noticed during a visual inspection. It is impossible to diagnose this problem while driving, and significant problems arise from it.
- Damage or deformation of system elements. In this case, the bearing will make a characteristic hum, and this sound is a sure sign that it is time to change the wheel bearing.
- Lack of lubricant due to damage to the bearing seal. This problem is not easy to notice right away, and the only solution to the problem is to replace the part. To avoid this problem, it is worth checking the bearing for the presence of grease at every maintenance.
In any case, if there is a suspicion that a bearing is faulty, it must first be checked, and only then, based on the diagnostic results, a decision must be made. The test is very simple: a wheel with a supposedly faulty bearing is hung out and rotated.
Such a check will indicate the absence of problems by the complete silence of the wheel rotation. If the bearing is faulty, the wheel will immediately make an unpleasant noise. The presence of this noise most likely indicates that the rear wheel bearing needs to be replaced.
Replacing the wheel bearing on a VAZ 2110 with your own hands
Replacing the wheel bearing of a VAZ 2110 is done with your own hands. In this case, you should first study the instructions. The work is not a simple operation, so it must be approached with full responsibility. The procedure is carried out after the car has driven from 50-60 thousand km. The reasons are poor-quality road surfaces, lack of lubrication or natural wear of the bearing.
Causes of failure
Despite the fact that the product is made of high-quality steel, replacing the VAZ 2110 wheel bearing is required for the following reasons:
Symptoms of malfunction
Replacing the VAZ 2110 wheel bearing is necessary when the following symptoms appear:
- The rolling round elements gradually destroy the clip. After this, their arrangement becomes disordered. This is accompanied by a strong crunch, which is clearly audible in the cabin.
- After a long run of the car, gaps form between the bearing parts. This manifests itself in the form of vibration. It extends to the steering column and body.
- The car begins to pull to the side. This also happens when the elements are faulty.
Troubleshooting
Driving with a faulty bearing is extremely dangerous. This is due to the fact that this element can jam at any time. As a result, the car is at risk of getting into an accident. To prevent this from happening, you need to check regularly.
It is carried out in the following order:
- A flat area is found for the car.
- The simplest check is possible without lifting the wheel. To do this, swing it with your hands at the highest point. The hub play is clearly audible.
- For greater confidence, the wheel is hung on a jack and rotated by hand. The malfunction manifests itself in an audible crunching sound.
- If possible, you can hang the front wheels, start the engine and engage the gear. As the wheels rotate, noise can be heard. Whichever side it goes from, that’s where the breakdown is present.
Part selection
Knowing the dimensions of the bearing, its selection is carried out. In addition to the VAZ 2110, it is used in brands 2108, 2109, 2111 and 2112.
Its parameters are as follows:
- internal diameter size – 34 mm;
- external – 64 mm;
- height - 37 mm.
You can select the product from domestic manufacturers:
- Saratov plant. Available with the “SPZ” marking. The products are considered one of the best in the country.
- Samara plant. Produces low quality products. Their mileage does not exceed 20 thousand km. Hub parts have a low price. Often purchased to save money.
- Vologda enterprise. The plant's products have a low price. At the same time, it is reliable. Details are difficult to fake.
If you want to buy a reliable product, you should pay attention to imported manufacturers. It will cost more, but with quality guarantees.
These include the following companies:
| German, which produces the LGR-4703 series |
| Italian Marel: 2108-3103020M |
| Sachs products |
| Japan - SNR (R172.03) |
To identify a fake, you should use a needle file. The outer ring is highly hardened. The file does not leave scratches on its surface. If they appear, it means it is not a high-quality fake.
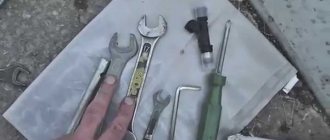
Preparing the work site and tools
Replacing the front wheel bearing on a VAZ 2110 requires preparation of the work site. A prerequisite is the presence of an inspection hole. This area should be well lit.
In addition, the following tools are prepared:
- puller for removing the bearing;
- mandrel for knocking out the hub;
- knob with 30mm head;
- a set of spanners, including sizes 17 and 19.
New bearings are being prepared in advance.
Part replacement
At the first stage, the car is placed on the inspection hole, gear 1 is engaged and stops or simple bricks are placed under the wheels.
In accordance with the instructions, which say how to replace the front wheel bearing of a VAZ 2110, work begins:
- After removing the cap from the wheel, using a spanner, unscrew the wheel nuts, which then need to be removed. To unscrew the bearing nut from the VAZ 2110 hub, use a 30mm wrench. First, using a chisel, you need to straighten the collar on the nut. To loosen the nut, the presence of an assistant is required to press the brake pedal.
- Using a screwdriver, the caliper is dismantled.
- Then the caliper is turned away from the steering knuckle. To prevent it from remaining hanging on the brake hose, it is necessary to tie it up in a timely manner.
- The brake discs are unscrewed from the hub.
Replacing a VAZ 2110 wheel bearing is carried out in 3 ways.
First replacement method
To replace the wheel bearing, follow these steps:
- The process of removing the hub element is carried out using a puller. Its legs are inserted into special grooves made in the hub, and the retaining ring is removed. It doesn't always work out right away. Sometimes a screwdriver is used to pry it off.
- As soon as the part is removed, it must be replaced with a new element. This is also done using a puller. Work with such a device is carried out much better. Less time is spent. However, with such a device, you need to have certain operating skills.
- All reverse actions are performed in the same order.
In this case, dismantling the steering knuckle is not required. During the work, the camber is not affected and after the procedure is completed it does not have to be adjusted.
The disadvantage of this option is the inconvenience of operation, since the removal and pressing of the new product is carried out directly on the car.
Second replacement method
Replacing a VAZ 2110 wheel bearing with your own hands without a puller consists of the following steps:
- In this case, after dismantling the steering knuckle, the hub is removed and taken to the workbench.
- Here the old bearing is replaced with a new product.
- Installation is carried out in reverse order.
In the process of unscrewing the steering knuckle, it is necessary to fix the marks. There are 2 of them:
- the first one on the rack shows the position of the adjusting bolt;
- the second indicates the previous position of the fist.
Tags will be required during assembly. Only after this the bolts of the knuckle and lower ball joint are knocked out. After removing the bearing from the hub and dismantling the retaining ring, it is pressed out using a vice.
This method is used when planning the repair of the entire chassis. After its completion, it is necessary to adjust the wheel alignment.
Replacement materials and tools
To work you will need a certain set of tools and parts:
- Socket wrench 30 (or any equivalent of the same diameter). Needed to unscrew the rear hub.
- Thin chisel. This tool is necessary to bend the edge of the nut.
- Three-legged and two-legged puller. Both tools are not included in the list of required tools, but they make the job much easier: the first allows you to remove the hubs from the wheel axle, and the second allows you to remove the bearing ring.
- Puller-pliers. Required for dismantling and reassembling the retaining ring.
- A set of keys of different sizes.
- Hammer.
- Jack.
- Bearing. The best option would be bearing 256706 - it is of good quality and low cost. However, you can always choose a domestic or foreign analogue, although this is not particularly necessary.
Replacing the rear wheel bearing
Replacing the rear wheel bearing of a VAZ 2110 yourself is not difficult, but you will still have to spend time on it.
It is best to carry out repairs in a pit with good lighting - this will be much more convenient and reliable.
The work algorithm looks like this:
- First, the car is placed in gear and secured with stops. After loosening the wheel bolts, the car is jacked up, after which the wheel can be removed.
- Now the guides are unscrewed and the brake drum is dismantled. Sometimes the latter cannot be removed without effort, in which case it is worth knocking it down with a hammer and a wooden block.
- Using a 30 mm socket, the hub nut is unscrewed, after which the hub is knocked off the axle using a puller. Without a puller it will be a little harder: you will have to remove the hub using a wheel screwed to it.
Here we need to make a small digression. In about half of the cases, the hub is dismantled without any problems, after which there is nothing superfluous on the axle. The problem is that there is also the opposite situation - the inner ring of the bearing remains on the journal.
In the first case, you can simply continue working on the algorithm. If the ring does not want to be removed from the axle, then you will have to remove the brake pads and tear off the ring using a chisel and a puller.
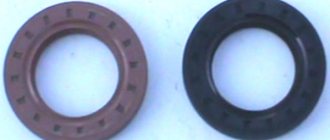
- The retaining ring is removed with pliers, and after this a “fork” of actions arises again: the metal boot needs to be knocked down only if the bearing is pressed out. If the decision was made to knock out the rear wheel bearing, then the boot can be left.
- The bearing itself is pressed out or knocked out. You should not expect additional problems at this stage.
- Having knocked out the old bearing, you can begin installing the new one. To do this, the hub is lubricated, after which the bearing is pressed into it. Pressing can be done in several ways: it will be most convenient to use a puller, and if you don’t have one, a vice and an old bearing will do.
- Next, assembly proceeds in reverse order. The retaining ring and boot are mounted, the hub is pressed onto the axle and the bearing ring is tapped.
- Having installed all the structural elements, you need to tighten the nut and jam its side.
- When all the internal parts are in place, the wheel is mounted and its bolts are tightened. This completes the replacement of the rear wheel bearing of the VAZ 2110.
A rear wheel bearing malfunction is one of those cases where even the smallest flaw can lead to serious consequences. Just make a small mistake when installing this element, and its service life will immediately be reduced several times. Increased wear will cause a terrible howl coming from under a moving car - and you still need to get to the garage to carry out repairs.
VAZ 2110 rear wheel bearing: when to change and the complete replacement process
Replacing the rear wheel bearing on a VAZ 2110 is not as difficult as it might seem at first glance. This process is not required very often. The service life of an element is usually about 100 thousand kilometers, which is the minimum.
Alas, our roads do not allow us to count on such a long bearing life, so the actual terms turn out to be lower than those stated by the manufacturer.
When Replacement May Be Required
If you hear a noise, a characteristic noise or a certain hum in the rear of your car, which only intensifies when entering a turn, this indicates an urgent need to replace the rear wheel bearing on your VAZ 2110.
Hub device
There are several ways to check the state of an element:
- Lock the wheel in a diagonal plane. Raise the rear wheels one at a time using a jack.
- It is recommended to lift them one at a time in order to correctly determine the source of the noise. It is not always necessary to replace two bearings at once. But if you take on one, replace the second one immediately. Fewer problems will arise in the future.
- Spin the wheel raised on the jack by hand, as hard as you can. The higher the speed, the better. If extraneous noise or humming noises are detected when the wheel spins, the part will definitely have to be replaced.
- If there is any doubt about the integrity of the rear wheel bearing, use the lateral play method. Grab the wheel by its edges and pull it towards you and away from you. If the bearing actually fails, the wheel will move along the axle. The movement may not be strong, but even slight fluctuations indicate the need to replace the element.
Replacement procedure
Lubricate
So, we have determined that there is no way around this, and the car really needs to replace the bearing. Therefore, we adhere to a clear procedure and begin work.
- Remove the brake drum. There should be no problems with this, since it is fixed quite simply on the rear wheel.
- Pry up the hub cap using a flathead screwdriver and remove it.
- Now, using a narrow chisel, straighten the collar of the nut, which was jammed in two places at once. Don’t be afraid, it wasn’t you who did something, such a jam is provided at production so that the element does not fly out of its rightful place.
- Use a 30mm socket to unscrew the fastening nut.
- Remove the unscrewed nut and also dismantle the thrust washer.
- Arm yourself with a three-legged or two-legged puller, which will allow you to remove the hub from its place.
- If you don't have a three-jaw tool, press out the hub using two bolts or screws. As the practice of craftsmen has shown, bolts for fastening the head of a power unit are excellent for these purposes.
- Screw the screws into the opposite holes for fastening the wheel and rest their ends against the heads of the bolts securing the hub axle to the rear suspension beam of your car.
- Try to tighten the screws evenly to allow the hub to press out. There is no need to remove the pads.
- As a rule, the inner race of the bearing should remain on the hub axis.
- Secure the ring using a puller, then remove it.
- If you don’t have a puller, you will have to additionally dismantle the brake pads and use a chisel to mix the ring to the axle.
- Next, the ring moves. Two mounting blades will help you with this.
- Do not be afraid that after processing with a chisel, some kind of defects or nicks will form on the hub axis. This is not terrible, but it is highly recommended to process them with a needle file.
- Arm yourself with pliers, thanks to which you can carefully remove the retaining ring.
- Using a piece of suitable pipe, also carefully knock out the bearing, leaning on the inner ring.
- Another option is to press it out using a wheel bearing puller.
- Clean and effectively lubricate the hub into which the new rear wheel bearing is pressed with a puller or vice. The pressing force must be applied to the outer ring. It will be most convenient for you to do this using the outer ring from an old bearing.
- Install the new retaining ring in its proper place.
- Using light blows on the inner ring, press the bearing onto the axle. Drive until deep enough to fit the nut.
- Full pressing is carried out with the nut already on.
- Be sure to use only the specified torque to tighten the fastener.
- Press the collar of the nut into the two grooves of your hub axle to restore the element to its original appearance.
This procedure cannot be called incredibly complicated, but you will have to “tinker” in your garage. But this is better and more cost-effective than going to a service station and entrusting your car to unknown specialists.
The good thing about the VAZ 2110 is that you can easily repair it yourself. A number of works are carried out on the basis of the operation and repair manual. But if you do not have experience, or the breakdown is too serious, contact the professionals. It may cost more than doing the repairs yourself, but the quality of the work is above all. This is a guarantee of the safety of your car and your own safety on the road. No Comments Yet! You can be first to comment this post! Close Window
Loading, Please Wait!
This may take a second or two.
luxvaz.ru
How to determine the need for replacement?
Strong noise, humming of the rear hub bearing of VAZ 2109, 2110, “howling” from the rear, which intensifies when turning, clearly indicates the need to check the condition of the rear hubs. The verification methods are quite simple:
- Be sure to stop the wheel diagonally opposite from the jacking side, and then jack up each rear wheel one by one. (Why each? The fact is that very often there are errors in determining the side of the hum, and even more often there is a need to replace both bearings).
- When the wheel is raised, you need to try to spin it as much as possible. If at the same time you hear extraneous sounds similar to a hum, you don’t have to check further - replacement is necessary.
- If in doubt, you can also check the lateral play of the bearing by grasping the edges of the wheel and rocking it towards you - away from you. If you feel the wheel moving on the axle, the bearing needs to be replaced.
Automotive stores can offer you both a separate bearing and a hub assembly. We see no point in purchasing an assembled unit (except for the cases described below), where replacing the bearing is not at all a difficult matter.
Checking whether the rear wheel hub bearing needs to be replaced
First of all, the cause of such breakdowns is poor, uneven roads, especially since in some cases our road surface can hardly be called a road at all. The second reason why a bearing may become unusable is the poor quality of the material from which it was made. Refitting the rear wheel is not a very complicated process, so it can be done quite easily on your own at home.
However, before proceeding directly to action, you should find out whether this is really the case. To do this, you need to hang out the wheel from which the hum is heard, and, rocking it with your hands, check the play. If, when carrying out these actions, play is detected, and dull knocks occur, then you cannot delay replacement. A bearing that falls apart along the way will cause damage to other parts of the hub system.
The key to fast and high-quality work is a properly selected tool and high-quality materials, in this case a bearing. Therefore, do not try to save on it, purchase options only from good manufacturers, because the service life largely depends on this.
Step-by-step method for replacing the rear wheel bearing on a VAZ 2109, 2110
- stop the car from the front;
- tear off the wheel bolts;
- tear off the central nut (7) of the hub, having first removed the cap (9);
- jack up the side and set the trestles;
- remove the wheel;
- fill the brake drum mounting area with WD-40 or other special liquids (you can use diesel fuel or brake fluid);
- unscrew the guide bolts (it is advisable to tap lightly with a hammer);
- we try to carefully remove the brake drum (if it doesn’t work, we screw the appropriate bolts into a special thread on the brake drum, apply tension and very lightly try to knock it out with a hammer. In most cases, the result will be positive. There are special drum pullers on sale, just for that case , if all else fails);
- unscrew the central nut completely (of course, it is possible to unscrew it immediately, and even remove the hub along with the wheel and drum, but then there is a high probability of damage to the brake pads);
- we tighten the hub (if one of the inner races of the bearing remains on the axle, you need to use a puller or just a sharpened chisel to try to move it from its place);
- inspect the axle for signs of bearing rotation (if there are any, we replace it, it is advisable to replace the hub assembly);
- inspect the brake cylinder for leaks and pads for wear;
- remove the retaining ring from the hub using pliers and/or screwdrivers.
- Be sure to clean the edge from rust, moisten it with WD-40 or whatever you have on hand.
There are three options for pressing out the bearing:
- A special press (not everyone has one).
- A puller (not expensive, can be purchased, will be useful for the future).
- Using a heavy hammer (at least 2 kg) or a sledgehammer. AT first glance, the method may seem a little aggressive, but it is practiced by an overwhelming number of masters and service stations, and we will consider it.
- The hub must be firmly installed on a hard surface, and with several sharp blows through the mandrel, the bearing must be moved from its place. When this happens, you need to install the hub, for example, on a yew tree (so that there is a stop for the hub and free space for the bearing to exit)
- a few more blows and the bearing will come out (don’t rush to throw it away);
- We inspect the seating plane under the bearing, clean off the rust with sandpaper, lubricate it with regular engine oil (you can polish it off);
- the new bearing must be screwed with any suitable bolt through washers (washers must be selected according to the inner races, the bearing is double-row and during installation there is a high probability of its disassembly);
- install the hub on a hard surface.
— we place a twisted bearing on top, and lightly lubricate its mounting plane with oil (a new good bearing usually does not need to be lubricated inside, but if you have doubts and a little experience in assembling and disassembling, you can use Litol -24 lubricant)
- using an ordinary 500-gram hammer, very lightly, we try to align the bearing in the plane;
— we take a suitable mandrel (for example, a pry bar), and try to press the bearing in with gentle blows.
The basic rule is no strong blows; if it doesn’t work, it means it’s crooked.
- after the bearing has passed halfway, you can no longer apply much force, since it can no longer warp.
When we reach the cut of the hub, it is necessary to use the old clip as a mandrel (no strong impacts, the metal is high-carbon, and with a strong impact it can burst and cause very serious injury)
— we push it all the way and install the stopper (if there are problems with installing the stopper, then most likely you did not finish it all the way) the stopper should easily spring into the groove;
How to install a bearing, step-by-step instructions
- We clean and lubricate the inside of the hub.
- We press a new bearing into the hub.
- Install the retaining ring.
- Install the hub onto the axle with the bearing inserted.
- We put on the hub washer and nut.
- Press the hub all the way in, tightening the nut.
- We put the brake drum in place.
- Install the wheel.
- Tighten the hub nut completely.
Assembly
— that’s it, we begin the process of assembling the rear hub bearing on the VAZ 2109, 2110. To do this, we put the hub on the axle (by removing the bolt with which we tightened the cages);
— tighten and tighten the central nut (be sure to install a new one), not forgetting to put the thrust washer;
— put on and screw on the brake drum and wheel;
— check the rotation (there should be no extraneous noise);
— if all is well, lower the car from the jack;
— tighten the wheel and the central nut (the tightening torque of the hub is approximately 20 kg/m, this is quite a strong tightening, if you don’t have a torque wrench, you need to use a lever of at least a meter to tighten the nut with a force twice the tightening force of the wheels);
— tighten the hub nut, tighten the wheels.
The name “support bearings” speaks for itself. These elements serve as supports for each pendant. The bearing is the part that has to be changed almost more often than oil filters. Replacing the front wheel bearing of a VAZ 2110 may be necessary if this element fails. It is quite simple to determine the malfunction of the support mechanism: while driving, a hum appears coming from under the front of the car. The problem can also arise in the rear suspension, but the front one suffers more often, because the VAZ 2110 is a front-wheel drive car.
Hub installation
We get rid of the tightening device from a bolt and two washers. Now you can return the hub to its place. Be sure to install a new central nut, having previously lubricated the threads with “lithol” or other lubricant.
We install the brake drum on the fasteners. We install the wheel and secure it with mounting bolts. We turn the wheel “by hand” and listen to extraneous noise. The absence of a hum or grinding noise, as well as free rotation, indicates correct assembly.
We lower the wheel with a jack, and only after that we carry out the final tightening of the central nut. It is recommended to use a torque wrench for this operation. The tension value should be close to 20 kg/m. This value is quite large, so without a special key you will need to increase the length of the key. Now you can tighten the hook and tighten the mounting bolts on the wheel to the required torque.
Replacing the rear wheel bearing on a VAZ-2114 is quite difficult, but you can do it yourself. So, a motorist needs to know the design features of the car, as well as have some experience in suspension repair, but even a novice car enthusiast will be able to understand the process by reading this material. The article will tell you about all the features of the operation, and also show step by step how the procedure is done.
Features of parts assembly
Before installing a new part, we need to thoroughly lubricate and clean the hole in the supporting steering knuckle. After this, the new support element can be pressed in. The procedure is carried out with a puller: the large washer of the tool must rest in such a way as not to deform the rings. It is better to press the new part through the gasket so as not to damage the coating. With the retaining ring installed, the brake part can be assembled and the replacement can be completed.
As you know, the wheel hub is the most important part where ball bearings with double-sided seals are used. On a VAZ 2110, replacing the rear hub is a complex and responsible matter. Although, replacing the rear hub of a VAZ 2110 can be done easily with your own hands, which is what will be discussed in this article.