Why do you need an expander?
To cool the engine, a special liquid based on propylene glycol or ethylene glycol (antifreeze or antifreeze) is used. These types of coolant have large thermal expansions. When the internal combustion engine operates, the coolant heats up and expands. If the cooling system did not use an expansion tank, then due to thermal expansion the radiators or pipes would fail due to excess pressure.
The liquid in the expansion tank increases when heated and decreases when cooled. To prevent excessive pressure or vacuum from forming in the tank due to constant changes in coolant level, its lid is equipped with special valves that release or, on the contrary, allow air into the system in order to compensate for the load on the tank and maintain normal operating pressure.
Tank location
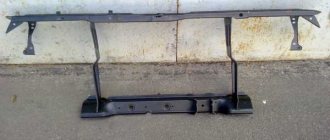
In Priora, the expansion tank is located under the hood on the left side in the direction of travel of the car, between the side member and the windshield. It has a rectangular shape with three or two fittings for SOD pipes.
- With two fittings it is used in Prioras with climate control (air conditioning).
- With three fittings in Priors without air conditioning.
Inside there are several partitions to strengthen the structure, which can withstand heavy loads.
The coolant level must be indicated on the tank, which should always be between the MIN and MAX marks.
About the cover
Special attention should be paid to the expander cover. At first glance, the lid does not have anything special, but if you look closely, you will notice that it has an unusual bottom. It contains two valves that operate under specific conditions. As described above, one of the valves releases excess pressure when the engine is hot, and the second, on the contrary, lets air in when the engine cools down.
The serviceability of the cap is the key to the correct operation of the SOD and the integrity of the expansion tank.
Tank failures and their causes
The main damage to the expander is cracks or abrasions. Quite often, cracks in the tank form near the fittings, and abrasions appear on the lower part. This occurs due to engine vibrations in the engine compartment due to uneven roads.
Sometimes it happens that the expander bursts due to excess pressure in the system; this will be caused by a faulty cap, or rather its valve, which did not release the pressure at the right time.
If one of these problems is detected, the expansion tank must be replaced.
Replacement
To carry out the work, you do not need any special knowledge of automotive mechanics; after reading our instructions, you will easily carry out this work. For faster and trouble-free dismantling and installation of the tank, you need to prepare the necessary tools. It is also recommended to replace the cap along with the tank.
Tool for work:
- Crosshead screwdriver;
- Sealant;
- Container for draining the coolant (a two-liter bottle with the neck cut off will do);
Work procedure
It is necessary to allow the engine to cool down to avoid burns during operation.
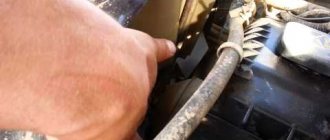
- Unscrew the clamp of the lower fitting and drain the coolant into a prepared container. It is necessary to drain the liquid only from the expander. Then we fix the removed pipe in a vertical position so that the remaining coolant does not leak out.
- We unscrew the clamps of the remaining pipes and remove them, also fixing them in a vertical position.
- We remove the tank by pressing on the right side and pulling the left up, it should look like in the picture.
- Install the new one in the reverse order of removal. It is recommended to apply a small amount of sealant to the fittings for better tightness of the system.
- We add the remaining coolant, start the engine and warm it up to 90°C, after which we check the tightness of the system.
The process of replacing the expansion tank on the Lada Priora has been completed, as you can see there is nothing complicated about it.
Why do you need an expansion tank?
The task of the expansion device installed in the Lada Priora is to compensate for the coolant, the volume of which increases or decreases in accordance with temperature changes. The design of the product consists of the following functional parts:
- There are marks on the body that regulate the level of antifreeze - minimum value and maximum.
- The lid is located at the very top, which allows you to completely close the neck.
- Sealing is achieved with a plastic plug; valves are equipped, making up one block responsible for inlet and outlet.
The release mechanism comes into action when the pressure reaches 110 kPa. The valve opens, the temperature of the antifreeze rises, thereby preventing strong vaporization. As the coolant cools, its quantity decreases in direct proportion, which means that a certain vacuum in the system is formed, after which air enters the expansion device.
Repair work is carried out when the housing becomes leaky. You also need to constantly monitor the condition and functioning of the thermostat and valves. If the valves are leaky, it is unlikely that it will be possible to avoid emergency optimization of the temperature in the system, which can cause damage to the hoses and radiator device.
FEATURES OF THE EXPANSION TANK
This device has two main parts:
- The case is plastic.
- Cover with pressure valve.
The quality of the plastic used to make the case plays a special role. Maintaining the pressure required by the system depends 50% on its plasticity.
EXPANDER CONFIGURATION
It has four holes. The lower, large outlet is the pipe for the coolant to enter the line. Small tubes are used to return tasol from the area of the heater radiator and thermostat pipe. Well, and the main neck, which is closed with a special lid. But the remaining 50% is ensured by the correct operation of the valve in the expansion tank cap.
HOW THE EXPANSION RESERVOIR COVER WORKS
The principle of its operation is relatively simple. It is based on a soldier valve system. That is, in the system, pressure rises from heating and expansion of the coolant. The spring in the cover is adjusted in such a way that when the optimal value is reached, the valve opens and releases excess air in the cooling system. In this case, air should flow freely in the opposite direction. This allows the components to be preserved during cooling. For example, when the engine is turned off.
WHERE IS THE ANTIFREEZE EXPANSION TANK LOCATED?
In the engine compartment. Right behind the battery. Above the right side member of the Priora there is a plastic housing for this part. The three pipes listed above are suitable for it. One below, on the left. And two small ones at the top left. On the wide side facing the engine compartment.
Step-by-step guide to replacing the expansion tank in Lada Priora
To remove and install the expansion tank in the Lada Priora, follow the step-by-step instructions:
- You will need a Phillips head screwdriver. First remove the reservoir cap. To make the lid easy to manipulate, turn the drain plug located at the bottom of the radiator tank on the right. Next, drain all the liquid.
- Remember the important rule for draining antifreeze - it is unacceptable to mix different coolants with each other.
- Turn the drain plug a little. Please note that when draining antifreeze from the radiator unit, liquid will also come out of the tank.
- Loosen the clamp securing the steam exhaust hose of the heater radiator, and then remove the hose from the fitting.
- Remove the steam exhaust hose from the radiator of the engine cooling system.
- To remove the reservoir, move it upward and slide the rear panel away from the recess of the engine shield trim.
- Drain off any remaining antifreeze.
- Install the new unit using the reverse sequence.
The expansion tank is an important element of the engine cooling system. It has an extremely simple design and rarely fails. Nevertheless, every car owner should know the procedure to follow if damage to the tank is detected.
Purpose of the expansion tank
The purpose of the expansion tank is to compensate for the volume of coolant that changes depending on its temperature. Briefly, the device of the expansion tank can be described as follows. The material of the expansion tank is transparent plastic. There are special marks on its walls that help control the coolant level - minimum and maximum. So, the expansion tank cap on the Lada Priora is located in the neck located on top. A plastic stopper seals the neck. The plug itself also contains two valves assembled into a single block - inlet and outlet. The release valve is activated when the pressure in the expansion tank reaches 110 kPa. Opening the exhaust valve increases the boiling point of the coolant, thereby preventing intense vaporization. When the coolant cools, its volume decreases, thereby creating a vacuum in the system. The inlet valve is activated when a certain vacuum level is reached and allows air into the expansion tank.
Often, the expansion tank is repaired only if it is found to be leaking. However, it is important to monitor the proper operation of both the thermostat and valves. For example, if the coolant boils, it is imperative to check the functionality of the valves. In particular, leakage of the exhaust valve will lead to a decrease in the boiling point of the coolant, and jamming of the same valve in the closed state will lead to a problem such as an emergency increase in pressure in the system. This, in turn, can cause damage to the hoses and radiator.
Replacing the expansion tank
In particular, replacing the expansion tank on a Priora is done as follows:
- A Phillips screwdriver should be used as the main tool. First of all, remove the expansion tank plug. To do this, you need to unscrew the drain plug at the bottom of the radiator tank on the right side and drain the liquid from it. By the way, replacing the coolant must be carried out according to all the rules - for example, you cannot mix different coolants. After draining is completed, the drain plug should be tightened. It should be noted that if you drain the liquid not from the tank, but from the radiator (during its repair), then all the liquid from the tank will also flow out,
- it is necessary to loosen the clamp securing the steam exhaust hose of the heater radiator and remove the hose from the expansion tank fitting,
- in the same way, it is necessary to remove the steam exhaust hose of the radiator of the cooling system (also from the expansion tank fitting),
- After loosening the clamp of the charging hose, this part can be easily disconnected,
- expansion tank, to remove it you need to move it up and at the same time remove its rear edge from the recess of the engine shield trim. This way it can be easily removed from the car.
- It is necessary to drain the remaining coolant from the reservoir.
The expansion tank is installed back in the opposite order of removal. The cooling system should be filled with liquid, taking into account all the standard requirements for this procedure. Then you need to tighten the cap of the expansion tank, start the engine, after which you should check that there are no coolant leaks at the junction of the tank hoses. The engine needs to be warmed up to operating temperature at idle speed - this will allow air pockets to be removed from the system.
Location of the expansion tank on the Lada Priore car
The main function of the expansion tank is to compensate for evaporated antifreeze in the engine cooling system. In the Lada Priora car, the tank is located under the hood on the driver's side.
The expansion tank is located under the hood on the left (in the direction of travel) side
It is simply impossible not to notice the coolant reservoir: it is closest to the windshield of all other elements.
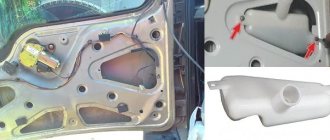
Removing the expansion tank
We remove the expansion tank for replacement. If there is coolant in the expansion tank, pump it out with a rubber bulb and hose.
Using a Phillips screwdriver, loosen the clamps securing the steam exhaust hoses of the cooling system radiator and the heater radiator.
Remove the hoses from the tank pipes.
Use a Phillips screwdriver to loosen the clamp securing the inlet hose...
...and remove the hose from the tank pipe. Remove the rubber seal from the edge of the front panel in the tank area. Overcoming the resistance of the front panel upholstery, we pull the tank towards the fender and up...
...and remove the expansion tank from the holder. When installing the tank, do not damage its pipes. Pour coolant into the cooling system (see “Replacing Coolant”).
Why the Priora expansion tank? Compared to the tens tank, it has thicker walls, which increases the service life of the tank. Its catalog number: 2170-1300060, price 300 rubles, and it comes in two types:
- for a Priora without air conditioning (with two upper fittings and one lower), that’s what we need.
- for Priora with air conditioning (with one upper and one lower).
You can buy a tank in online stores (section “Spare parts”)
Expansion tank device
The manufacturer installs expansion tanks produced by Plastik LLC on the Lada Priora car. They are made of translucent white plastic. A scale showing the coolant level must be applied to the front wall of the tank.
The Max and Min marks show the level of antifreeze in the tank
The tank is closed with a lid, which simultaneously measures the antifreeze pressure in the cooling system. The lid is located on the neck at the top of the tank. It is made of plastic and, for its part, reliably seals the cooling system.
Few people know, but a pair of valves are built into the tank lid. Each of them operates under certain conditions, which allows you to compensate for the amount of coolant at the moment it boils or cools.
Expansion tanks made in Russia are distinguished by their strength and durability. Their cost depends on the design features of the case (from 300 rubles and above).
Lada Priora cars are equipped with the simplest domestic coolant tanks
replacing the expansion tank on a LADA Priora: how to remove and replace, how much does a new one cost?
The expansion tank is an important element of the engine cooling system. It has an extremely simple design and rarely fails. Nevertheless, every car owner should know the procedure to follow if damage to the tank is detected.
Expansion tank device
The manufacturer installs expansion tanks produced by Plastik LLC on the Lada Priora car. They are made of translucent white plastic. A scale showing the coolant level must be applied to the front wall of the tank.
The Max and Min marks show the level of antifreeze in the tank
The tank is closed with a lid, which simultaneously measures the antifreeze pressure in the cooling system. The lid is located on the neck at the top of the tank. It is made of plastic and, for its part, reliably seals the cooling system.
Few people know, but a pair of valves are built into the tank lid. Each of them operates under certain conditions, which allows you to compensate for the amount of coolant at the moment it boils or cools.
Expansion tanks made in Russia are distinguished by their strength and durability. Their cost depends on the design features of the case (from 300 rubles and above).
Lada Priora cars are equipped with the simplest domestic coolant tanks
Replacing the expansion tank
Tightness is the main condition for the operation of the expansion tank. Therefore, the only reason for replacing it can be a hole or crack in the housing.
Replacing the expansion tank
Tightness is the main condition for the operation of the expansion tank. Therefore, the only reason for replacing it can be a hole or crack in the housing.
Required Tools
To replace the expansion tank, you will need a Phillips screwdriver and a container to drain the coolant.
To remove the expansion tank you will need a small Phillips screwdriver
Operating procedure
Removing the expansion tank should only be done on a cold engine. After the trip, the car must stand for several hours so that the antifreeze cools completely.
The replacement procedure is as follows.
Remove the plug located at the bottom of the tank on the right side.
Drain the entire volume of coolant from the resulting hole into a previously placed container.
After draining the coolant, replace the plug.
Use a Phillips screwdriver to loosen the clamp on the steam outlet pipe.
Remove the pipe from the tank fitting.
Use a Phillips screwdriver to loosen the clamp on the filling hose.
Remove the hose from the second tank fitting.
Remove the expansion tank. To do this, pull it up while simultaneously pulling the rear edge of the tank out of the recess in the lining.
Install a new tank.
Connect the coolant supply hose first, then the steam exhaust hose. Secure the hoses with new clamps.
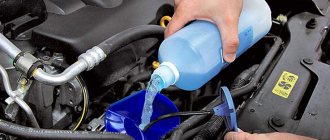
Pour antifreeze into the new expansion tank.
Video: replacing the expansion tank
When changing the expansion tank, do not change the coolant arbitrarily. It is necessary to fill in the same antifreeze (or antifreeze) that is already in the system.
After replacing the tank, you need to start the engine and warm it up to operating temperature at idle speed. This is necessary to check the tightness of the new clamp connections and remove air pockets in the cooling system.
If, when heated to 90 o C, no coolant leakage is detected at the hose connections to the reservoir, the cooling system is completely sealed.
If a coolant leak in the tank hoses is not detected when heated to 90 degrees, then the tightness of the cooling system is not compromised
The process of replacing the expansion tank on a Lada Priora car is extremely simple even for a novice car enthusiast. Usually the whole job takes no more than 15 minutes.
| The engine cooling system (ECS) is one of the main systems of a car. Is the heater on your LADA Priora not working well or is the engine overheating? Then the inspection should begin with this system. In this article you will find all the information on the operation of the Lada Priora cooling system. |
Replacing the expansion tank
This simple operation is accessible to every self-respecting car enthusiast. To carry it out, it is enough to have the following devices on hand:
- Container for draining coolant.
- A rag or rag.
- Screwdrivers.
Attention! Work may be difficult if the spacer bars of the Priora struts are installed. But this is a separate question. Just remove the fasteners for this arc on the right side.
Work must be carried out on a cooled engine. This is necessary to avoid burns. First you need to drain the liquid from the tank. To do this, place the Priora on a flat surface. On the main radiator on the right side, along the direction of the car, there is a special lamb in the lower part. This is the drain hole. Place a container under it and unscrew the screw. After this, unscrew the cap from the tank. Only after unscrewing the plug, not before. This will simply allow you to regulate the pressure and maintain cleanliness. Well, it will reduce the loss of tasol.
Repair of the cooling system, checking the thermostat of the Lada 2170, procedure for removing and installing the radiator of the Lada 2171, instructions for replacing the coolant pump of the Lada Priora. Replacing the expansion tank Cooling system design Lada Priora, Lada Priora, repair
Design features of the LADA Priora engine cooling system
The LADA Priora engine cooling system is liquid, closed type, with forced circulation. Consists of an engine cooling jacket, a radiator with an electric fan, a thermostat, a pump, an expansion tank and connecting hoses.
Priora cooling system
Cooling system : 1 — expansion tank; 2 — radiator outlet hose; 3 - inlet hose; 4 - radiator; 5 — steam exhaust hose; b — radiator supply hose; 7 — electric fan; 8 — electric fan casing; 9 — coolant temperature sensor; 10 — coolant temperature indicator sensor; 11 — throttle assembly; 12 — bracket for the coolant pump pipe; 13 — coolant pump; 14 — coolant pump pipe; 15 — heater radiator supply hose; 16 — heater radiator outlet hose; 17 — exhaust pipe; 18 — coolant pump pipe hose; 19 — thermostat housing
| Expansion tank . Coolant is poured into the system through the expansion tank. It is made of translucent plastic, which allows you to visually monitor the liquid level. To do this, the marks “MAX” and “MIN” are marked on the wall of the tank. In the upper part of the tank there are two pipes for connecting the steam removal hoses of the cooling system radiator and the heater radiator, in the lower part there is a pipe for connecting the cooling system inlet hose |
| Coolant pump - circulates coolant. It is bladed, centrifugal type, driven from the crankshaft pulley by a timing belt. It consists of a housing, a bearing assembly with a seal, an impeller and a toothed pulley. There is a control hole in the pump housing to detect fluid leakage when the pump seal fails. The pump should be replaced as an assembly. |
Comment
| Jamming of the pump pulley due to failure of its bearing assembly or due to freezing of highly diluted coolant will lead to breakage of the timing belt and, as a result, to expensive engine repairs. |
The liquid enters the pump through a supply pipe located on the rear wall of the cylinder block under the catenary collector. From the pump, liquid under pressure is supplied to the engine cooling jacket, and from there to the thermostat housing.
The cooling system consists of two so-called circulation circles:
- The small circle does not include the engine radiator, and the fluid washes only the cylinder block and cylinder head, and also flows through the throttle body channel and the heater core.
- When moving in a large circle, the coolant passes through the engine radiator, where it is cooled by the incoming air flow. The thermostat controls the direction of fluid flow in the engine cooling system.
Thermostat . Two thermostat valves - main and bypass - redistribute fluid flows in the cooling system. You will find the thermostat opening and closing temperatures below.
The heater radiator is built into the engine cooling system and is designed to heat the passenger compartment by circulating hot coolant through it.
| The radiator consists of two vertical plastic tanks (the left one with a baffle) and two horizontal rows of round aluminum tubes passing through the cooling plates. The bases of the tubes are connected to the tanks through rubber gaskets. The liquid is supplied through the upper pipe and discharged through the lower. Above the inlet pipe there is a thin pipe for the steam removal hose. There is a drain plug at the bottom of the right tank. A plastic casing with an electric fan is attached to the radiator. |
| The fan maintains the thermal operating mode of the engine and is switched on via a relay based on a signal from the engine control system controller. To monitor the coolant temperature, a temperature gauge sensor is screwed into the engine cylinder head in the instrument cluster. |
Second place
The radiator fan is rightfully located here. It's quite easy to check. The fact is that if the temperature sensor fails, the ECU turns on the fan relay in emergency mode, before diagnostics. And turns on “Check”. Therefore, it is enough, without starting the engine, but simply turning on the ignition, to remove the connector from the coolant temperature sensor. A clear click of the relay will be heard. The working fan will start. If not, you need to check the fuse in the block. If it is also working, the cooling fan needs to be replaced. But it is also better to entrust this to an experienced mechanic, since such an operation, like replacing the pump, deserves a separate article. In third place will be the expansion tank cap valve. Well, the rest of the faults already fall under the competence of service stations.
The video shows the replacement of the thermostat of the Priora cooling system with some tricks.
In a Lada Priora car, a device such as air conditioning plays an important role in terms of comfort for the driver and passengers. Is it possible to install such a climate control device in your car yourself? How installation is carried out, how to refuel the air conditioning system - read about it below.
LADA Priora engine cooling system diagram
Engine cooling system : 1 — heater radiator; 2 — coolant drain hose from the heater radiator; 3 — coolant supply hose to the heater radiator; 4 — coolant pump hose; 5 — expansion tank hose; 6 — steam removal hose of the heater radiator*; 7 — expansion tank cap; 8 — expansion tank; 9 — thermostat; 10 — coolant drain hose from the engine radiator; 11 — hose for supplying fluid to the throttle assembly; 12 — steam exhaust hose of the engine radiator; 13 — hose for supplying fluid to the engine radiator; 14 — engine radiator; 15 — radiator drain plug*; 16 — electric engine radiator fan; 17 — coolant pump; 18 — supply pipe of the coolant pump; 19 — coolant drain hose from the throttle body. *Not available on vehicles with air conditioning.
Help us evaluate the usefulness of this post. You found what you were looking for?
Thank you!