Gas level indicator in a VAZ-2107 cylinder
I installed an LPG on my VAZ a long time ago, and all this time I monitored the gas level “using the odometer.” Sometimes I had to open the trunk and look at the arrow. But I wanted everything to be humane. My car has a carburetor, and the LPG is of the second generation. There are many different gas level indicators on the market, made in the form of a series of LEDs. A friend has one like this. It seemed uninformative to me, and I decided to assemble an adapter that would allow me to synchronously display the gas level on a gasoline fuel level indicator.
- Read more about Gas level indicator in a VAZ-2107 cylinder
- Login to leave comments
Classic bedroom style
Apartment renovation in a classic style (pictured above) is perfect for decorating not only the living room, but also the bedroom. The central accent in such a room will be a large bed with a decorative headboard, combined with bedside tables or a dressing table, a laconic chest of drawers or a banquette.
When choosing fabrics for interior design and creating decorative elements, preference should be given to high-quality and textured textiles. In such a bedroom there is absolutely no room for ultra-modern trends and bold experiments, so renovation of apartments in Noginsk in a classic style involves exclusively natural materials for finishing the floor and ceiling stucco.
Particular attention should be paid to lighting, which can be represented by a chandelier as the main source of light, as well as sconces or table lamps as local lighting devices, made in a simple style, devoid of pretentious originality.
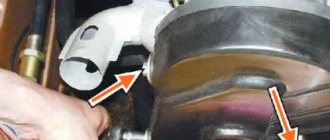
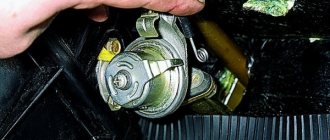
Installing an auto-dimming interior mirror
And so, the topic is for those whose cars, for any reason, do not have tinted rear windows and who experience discomfort when driving at night on highways and in the city due to the illumination of the headlights of cars behind. Enough tolerating this! There are several solutions to this problem: you can simply tint the rear window or tint the mirror itself. I think that there is no need to explain all the shortcomings of this method. It so happens that I have no tint and the mirror does not have a day/night mode switch. Therefore, it was decided to install a rear-view mirror from a foreign car with automatic dimming.
- Read more about Installing an auto-dimming interior mirror
- Login to leave comments
Improvement of the standard operation of the EPCH on the VAZ-2104, VAZ-2105, VAZ-2107, VAZ-2121
To begin with, I propose to consider the principle of operation of the usual standard forced idle economizer system on a VAZ-2107 with an OZONE carburetor and a standard EPHH control unit. To understand why we need this system and whether we need it at all, since many simply cancel this block by connecting directly +12 volts from the ignition to the solenoid valve and hello, that there is a valve, that there is not. So, we quote Murzilka:
- Read more about Refinement of the standard operation of the EPH on VAZ-2104, VAZ-2105, VAZ-2107, VAZ-2121
- Login to leave comments
Bottom repair - patching holes, making sound insulation
Contents
Bottom repair - patching holes, making sound insulation
Selecting replacement parts
UNDERBODY REPAIR
Do-it-yourself: Processing the bottom of the outside of a VAZ-2107
Hi all! Last year, I accidentally discovered wet noise and cracked vibration insulation under the front seats; winter was coming, so there was only enough time to replace the wet felt. This year I decided to completely inspect the bottom, and at the same time replace the standard Shumka with vibration and add noise to the engine shield, which should have been done when purchasing the car. Since I had already noticed one rotten area in one place on the bottom, I bought in advance at the car market a sheet of metal for patches, 1.4 mm thick, according to the seller. There was also standard 0.8 mm metal, but it seemed a little thin, and the difference in price was small. The sheet was immediately degreased, matted with P280 sandpaper, primed with epoxy primer, then insulated with regular primer and finally coated with 3in1 rust-resistant enamel.
To get to the Shumka, you need to dismantle the front seats and the sofa, remove the shelf under the glove compartment, the console, the sill panels and the seat belt bobbins with locks.
The new felt also turned out to be soaked through, it’s unclear where the water came from again?
The factory Shumka at the rear was also partially wet and had already begun to rot.
The vibration is cracked and peeling in places, especially at the front, there is water and rust underneath.
I scraped it off with a dull chisel and a sharpened spatula, since it had already hardened, so it came off quite well, and I finished it in a couple of hours. The floor underneath appeared to be primed, unlike the doors where it was molded onto bare metal, and was in good condition, especially at the rear, with only a little surface rust in places.
When checking the bottom with an awl, as it turned out, not everything was good. It has rotted over both underbody reinforcements and the jack on the right front, there is sand and rust inside, although the amplifiers are still intact.
At the rear, the floor above the jacks also rotted, and on the left, the threshold was specifically grabbed, in the place where rot was initially discovered on the bottom. The threshold amplifier is completely rotten.
I cut out the rotten metal with a grinder, cleaned out the cavities and coated the inside with heated pushsal, since it couldn’t really be treated afterwards.
Then, I cut out templates from wrapping paper, calculating the overlap on the healthy metal, and then cut out patches from painted sheets using them. Before welding, I removed the controller and battery so as not to burn anything.
First, I grabbed a patch around the perimeter, and then, tapping with a hammer, I welded the seam and, after beating off the slag and cleaning it, covered it with seam sealant, which I used in the anti-corrosion test. Although, of course, it would be better to paint it first.
Read, it may come in handy: What kind of torpedo can be installed on a VAZ 2107
I used a 2 mm electrode, since I couldn’t find a smaller one on sale. In principle, it cooks normally, there were burns only in those places where the metal was rotten and was a bit thin. I tried the 3rd one - it’s already burning through.
At the rear left we had to install two patches from the inside and outside; the threshold amplifier, one might say, was absent there, but I think the patches will serve as something of an amplifier.
Then, I completely removed the remaining vibrations with white spirit, cleaned the rusty areas with a flap wheel, etched the rust with a converter and painted it with 3in1 paint with a roller in two layers with intermediate drying.
Just wait until it all dries well.
What kind of gearboxes are there on the VAZ classic?
Not everyone is aware that there are at least three types of gearboxes on the VAZ classic. And 4 types of rear axle gearboxes. And they all differ in their traction and speed characteristics. And by combining these components and assemblies, you can turn a classic into a traction horse, a high-speed car, a drift car, or a universal car for all occasions. In this article we will tell you what types of gearboxes are found, how they differ, and what can be achieved with one or another combination of them.