I spent a long time on Drive and Google and found several posts about connecting buttons. Of course, there was no option for me, so I had to figure it out myself.
here is the radio pinout sent by a kind Chinese
we are interested in the key1 and key2 wires
Depending on the type of buttons, the connection varies. in the case of an outback, it is connected like this: key1 and key2 are twisted together. further in the standard wiring we look for this connector
There are two wires responsible for the buttons: lilac/white and orange/white. Since the buttons are resistive (each button has its own resistance), we connect one of the wires to ground (I connected it to the negative wire of the radio), and the second wire to key1 and key2 twisted together. we isolate everything well and enjoy))) the buttons are configured in the “buttons on the steering wheel” program, using it you can assign two functions to one button (short press and long press)
Adapter for connecting multifunction steering wheel
In order for the buttons on the steering wheel to start working on the Android radio, you need to make a special adapter and connect it according to the following diagram:
- The dotted line highlights the part that is added to replace the standard MMC.
- The dotted line on the outside is the standard layout, which remains unchanged.
We connect the Android radio through the adapter we made. All that remains is to train the buttons on the steering wheel in the radio settings.
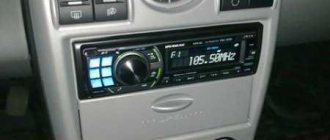
Characteristics and connection of the Pioneer Mosfet 50wx4 radio
The radio tape recorder meets all modern technological standards, both visually and in terms of technical equipment. It is equipped with a touchscreen, thanks to which all operations on it have become even faster and easier - with just a few taps on the touch screen. At the same time, the design of the radio is not devoid of classic “decoration” in the form of buttons responsible for accessing the main functions. It must be said that externally Mosfet 50wx4 is in no way inferior to factory devices even from the most famous automakers, and therefore is suitable as an alternative for any car, even for some representatives of the business class.
Connection diagram
general characteristics
In terms of functionality, the new Pioneer is also not inferior to its competitors. With its help, you can listen to all radio stations available in the region where the car is located, music from various external media, from classic CDs/DVDs to SD and flash cards, and watch videos. Thanks to the large diagonal size and fairly high resolution of the display, the user can enjoy the startup screen and colorful menu design instead of the small monochrome backlight typical of most car radios.
Technical features
Thanks to the combination of qualities such as compactness and technical equipment, the new Pioneer Mosfet 50wx4 boasts excellent information content. It’s not difficult to understand the functionality; it’s enough to understand the meaning of each key, with the help of which the adjustment is carried out. The inscriptions on the buttons and the device menu itself are not Russified, so they will have to be read in English.
Buy a radio on Yandex Market
However, there should be no difficulties:
- The “Audio” button allows you to switch from the radio station drying mode to music recorded in the device’s memory or on external media;
- “Func” is responsible for accessing the function menu;
- The “Repeat” key, when pressed, replays the song that was played last in the queue;
- The volume button has the classic appearance of a rotating joystick; with its help, the playing track can be made quieter or louder by systematically rotating it down or up, respectively;
- The number keys “1”, “2”, “3”, “4”, “5”, “6” are responsible for switching radio frequencies - for each frequency, thanks to the large amount of internal memory of the device, there can be up to six radio stations, and among them Supported formats include both FM and AM. Using these buttons, switching occurs as quickly as possible, without the need to search and configure again;
Pioneer Mosfet 50wx4 is equipped with a built-in headset, so you can talk on your mobile phone even while driving, without holding it in your hands. In addition, all SMS/MMS notifications received on the phone when the “hand's free” mode is turned on are instantly duplicated on the radio screen, where they can also be opened and read.
Of course, there are connectors for all modern media. It is possible to connect headphones and enjoy the music alone - this will be useful when it is extremely important for the driver to concentrate on the road, and the front passenger prefers to ignore these worries.
The integrated tuner is responsible for searching for frequencies. The range can be selected by the user independently, through a manual search, or this process can be automated. In most countries of the world, the tuner works very well - it regularly picks up all existing radio stations that are available for listening. The exception is US frequencies.
Other nuances
Installation of the Pioneer Mosfet 50wx4 radio tape recorder occurs in accordance with all standards for connecting such devices; as a rule, it comes with instructions in which this process is described step by step. More details about the installation of this model can be found in the video:
All malfunctions, as a rule, can be resolved either by rebooting the radio, or by returning it to factory settings through several manipulations through the menu. It should be remembered that the settings must be partially or completely reset after disconnecting the entire electrical network of the car from the power source - i.e., after disconnecting the battery.
To prevent breakdowns and malfunctions, you should prevent various liquids and mixtures from coming into contact with the surface of the radio, do not connect devices to it that have computer viruses that can disrupt normal operation, and use it as carefully and carefully as possible.
How to install and connect
In many cars, the car radio is installed in the center console. Installation of the device does not cause any difficulties. The standard location corresponds to 1 or 2 DIN standard size of the receiver. If the previously used head unit was connected via an ISO connector, then you simply need to connect it to the block on the back of the radio. Otherwise, you need to buy a chip suitable for this model and resolder the wires.
To prevent the receiver from consuming energy when the ignition is turned off, a button is installed in the gap in the supply wire to break the circuit. Most often, power to the device is taken from the on-board consumer connected after the ignition switch.
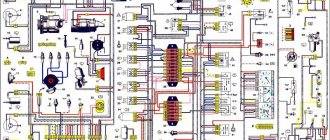
Car radio pinout
Today, as a rule, identical ISO connectors are installed. Therefore, replacing it will not be difficult: you just need to rearrange the plug. If a plug gets lost or broken, remember or label each wire to connect the device. The pinout is shown in detail in the schematic drawings. If you follow the instructions, you can easily do everything yourself, and then enjoy music on the road at any time.
Dimensions and connectors
This can be a single-block or double-block (1 and 2 din) device. The 2 din version is twice as high as 1 din, so it is worth calculating the size of the niche in advance. The connector found in the car may differ from the one installed in the radio. If it is missing, install an adapter. This method of connecting a new Pioneer car radio is very simple. We provide you with a complete list of recommendations to make things easier for you.
1 din connection
To carry out the work, you will need a screwdriver and plastic clamps.
If you use a standard pioneer car radio connection diagram with the appropriate ISO connectors, then there will be no difficulties.
If you don’t have them inside your car, connect the wires this way:
- dismantle the panel;
- remove the plugs from the wires, connect the wires as shown in the picture;
- insulate all wiring connections;
- secure the clamps.
2 din connection
It is better to connect a Pioneer brand car radio so that the power comes from the batteries.
This way the device can be turned on at full power. This will significantly reduce interference. Note:
- If your car does not have battery wiring, use stranded copper wire. Those sold together with a Pioneer brand car radio are not suitable. It is important that the wire is long enough to reach from the niche to the battery. Install a fuse (20 A) at a distance of half a meter from the battery.
- Do not twist the wiring from the 2 din device due to possible interference and low power.
- Insulate each wire.
How to connect a rear view camera
The standard multimedia system, when reverse gear is engaged, supplies a camera supply voltage of 6.2 V to pin C7 (mini-ISO connector). And the Mekede radio on Android only receives 12 volts to pin 6 (section K) and does not supply the power supply voltage for the camera. To connect a 6V camera, you will have to make a voltage level converter using a 7805C stabilizer and two 1N4148 diodes. As a result, a voltage of 6.6 V is formed at the output of the converter. You can also get by with one 6 V stabilizer 7806 (KR142EN5B) without using two additional diodes.
Connecting an amplifier to a Chinese radio | Auto Bryansk
To expand the capabilities of automotive acoustic equipment, additional devices are installed that enhance sound while simultaneously removing noise and interference. The devices are installed in service centers or independently. Before starting work, the owner needs to figure out how to connect the amplifier to the radio and how to eliminate possible malfunctions during operation.
Why do you need an amplifier?
Multimedia head units have a built-in amplifier, which is not suitable for all car owners. Installing additional equipment allows you to clear the signal of interference and install additional speakers that improve the reproduction of low or high frequencies. When using an additional amplifier, the power of the generator and the capacity of the battery should be taken into account; to reduce the likelihood of voltage failure, electrolytic capacitors (storage) are used.
How to calculate power and choose
To select the equipment yourself, you need to calculate the power of the loudspeakers installed in the circuit of each channel. Based on the obtained values, an external signal amplification device is selected. It is recommended to purchase a more powerful device (10-15%) to reduce the load on the equipment and allow you to subsequently replace the acoustics. You should also take into account the resistance of the coils in the speakers and the frequency range for which the products are designed.
The choice of type of amplification machine installation depends on the configuration of the future speaker system. If you plan to connect a subwoofer to an amplifier, a device with 2 channels that are connected via a bridge circuit is sufficient. If the reason for the modification is the desire to get rid of noise in the speakers and increase the sound volume, you need to purchase a 4-channel unit. To use 4 speakers and a subwoofer at the same time, you will need to install a 5-channel amplifier or use 2 separate devices.
To connect the car amplifier to the radio, “tulip” or RCA connectors are used, located on the rear wall of the head unit housing. Before purchasing an external device, it is recommended to check the type of outputs used on the player. If there are no connectors, it is possible to switch the amplifier unit to standard acoustic outputs through a signal amplitude reduction module (attenuator).
Preparation
At the preliminary preparation stage, the car owner develops a connection diagram for the amplifier, taking into account the location of standard equipment. If additional loudspeakers (for example, a subwoofer or tweeters) are installed in the vehicle structure, it is necessary to consider the method of installing the devices. Based on the data obtained, the car owner purchases power cables, interconnect cords with tulips, additional decorative elements and other parts necessary when installing amplification equipment.
Wires
To connect the amplifier to the vehicle's on-board network, you need a special cable designed for the current consumed by the additional equipment. The cord is selected based on the power of the installed components, taking into account additional heat losses (up to 30%). For example, when switching a 2-channel amplifier with a nominal power of 200 W, the thermal load must be taken into account, which is approximately 60 W. The resulting power value requires the use of a cable rated at 21.6 A (it is recommended to make a safety margin of another 10-15%).
To calculate the wire cross-section, there are special tables that display the dependence of the cable diameter on the transmitted current. For installation, you should use a cord with a copper core that does not collapse under vibration loads. When purchasing a cable, you should pay attention to the thickness and characteristics of the insulation, since low-quality materials spontaneously crack when the temperature drops to -15°C.
Fuse
It is necessary to install a fuse in the power supply circuit of the amplifier in the car to prevent the product from igniting in the event of a short circuit (for example, due to destruction of the insulation of the power cables). The design of the equipment includes standard protection elements; an additional insert is located near the battery terminal. To properly connect a car amplifier, you must use fuses with a rating of no more than 50 A.
Interconnect cable
The mounted amplifier must be connected to the head unit using a special interconnect cable equipped with metal mesh protection. The screen reduces the likelihood of interference occurring during the operation of the ignition system and electronic components of the vehicle. It is not recommended to lay patch cords near standard control units and electric motors installed in the vehicle's air conditioning system.
Where and how to install
Installing the amplifier in the car determines the length of the speaker cables required for connection and the length of the line to connect to the battery. For example, when placing the device in the luggage compartment, connecting each loudspeaker will require a cord 3-4 m long (taking into account bends and laying under the trim). The product is installed in a horizontal position on a special podium. On some cars, a second amplifier is used, intended for front acoustics, which is carried into the cabin.
It is allowed to place the equipment in a special niche under the rear parcel shelf (used on cars with sedan or coupe bodies). If you need to install a car amplifier under the passenger seat, you must take into account the placement of the air ducts of the air conditioning system and the presence of electrical wiring harnesses for heating the seats and controlling the side airbags. With such a scheme, the length of the cable running from the radio to the amplifier is shortened, which improves the quality of the transmitted signal.
Additional sound amplification devices installed in the car generate heat, which must be removed by ventilation. For normal ventilation, it is not recommended to install the case vertically, or cover it with plastic or fabric covers. To improve air circulation, additional fans are installed, which turn on together with the car's acoustic system.
Source: https://autobryansk.info/podkljuchenie-usilitelja-k-kitajskoj-magnitole.html
Do-it-yourself installation of a 1 din radio
The necessary tools are a screwdriver and a set of plastic clamps.
If you work according to the standard scheme with ISO connectors, then no problems will arise - you just need to follow the rules described above and connect the connectors to the mating parts.
Connector 10487
If your car does not have the ability to use the conventional option, you will have to resort to a more complex wiring procedure. It works as follows.
- Using a screwdriver, remove the decorative panel from the mounting location.
- We remove the plugs from the wires and connect the wires with the mating ones in the right places, according to the color scheme.
- We insulate each connection point as carefully as possible to prevent short circuit damage.
- To increase reliability, it is recommended to connect the wires with clamps.
- If your radio comes with steel plates with eyelets, place them on the sides of the head unit. This will make it possible to easily remove the equipment from its seat.
Article on the topic: How deep are puddles scary for cars?
Steering wheel radio control panel HoXiao
Price: from 1304.83 rub. (check price and discount)
Seller's reliability: excellent!
Delivery within Russia: free!
Customer reviews:
Review #1: The buttons are clear, they work to the last penny. For those with glitches, place the antenna wire of their receiver away from the other wires and closer to the steering wheel. The supplied bolts can be shorter; if they are tightened all the way, they will cling to the fingers, so either replace them (bolts and not fingers), or do not tighten them completely and press them with braid. Among the shortcomings: it seemed to me that both sets of buttons are for the left hand, or I’m somehow wrong, in general, it would be possible to swap the designations of the keys, because they need to be tied to the balalaika.
Review No. 2: From the moment of order to receipt is 20 days, but this is due to our mail. According to tracking and upon arrival in the city, three days passed before the electronic notification, and if I had waited for the notification, it would have been at least a week. The buttons look flimsy, but everything is fine until I installed them. I recommend the seller and the product.
Review #3: Everything corresponds to the description. Thanks to the seller. I recommend. I connected it in 15 minutes, taught it, everything works... the impression of use is excellent.