Payment for goods and downloading of the book in electronic form (PDF format) is made on the website.
To do this, you need to find the book you are interested in and click on the “Buy” button. The price of the book is indicated on the button.
For convenience, the price on the website for residents of Russia, Belarus and Kazakhstan is presented in rubles.
For residents of Ukraine in hryvnias, and for all other countries - dollars.
After clicking on the “BUY” button, a payment window will open where you can select a payment system with which you can pay for the selected book using any bank card (Visa, MasterCard, MIR, etc.)
When you click on the “Pay by bank card” button, the Portmone payment system will open, which is the easiest way to make a payment.
In addition, the website offers four payment systems for payment:
- Yandex (payment from any bank cards, Yandex Money account, QIWI Wallet, terminals, etc.);
- Portmone (payment from any bank cards, Portmone account);
- PayPal (payment from any bank cards, PayPal account);
- WebMoney (payment from any bank cards, payment from WebMoney wallets).
Payment via Yandex Cashier
After selecting payment via Yandex, the Yandex Cashier payment system will launch, where you need to select a convenient payment method (bank card, QIWI, Yandex Money account, etc.)
After specifying payment details and confirming payment, payment for the goods will occur.
If you have a bank card in a currency other than the ruble, then the money will be debited from the card at the rate of the Central Bank of Russia at the time of the purchase.
This payment method is optimal for residents of Russia, Kazakhstan and Belarus.
Official website of the Yandex Kassa payment system https://kassa.yandex.ru
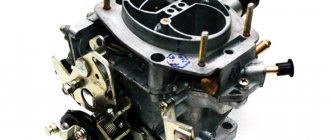
Removing and replacing the intake manifold
In case of damage, it is necessary to remove the VAZ 2106 intake manifold and replace it with a new product. For this purpose it is necessary:
Installation of the intake manifold is carried out in the reverse order of removing the product, taking into account the following features:
- When dismantling the carburetor device, the product is installed with a new gasket.
- When removing the mounting of the generator electric machine, the mounting of the fasteners is carried out before installing the intake manifold of the “six”.
- Its installation is carried out on a cylinder head with an updated seal, and fastening is carried out with a torque wrench with a fixed torque.
- Check the correctness of all connections.
- We fill in the coolant, install and adjust the throttle cable, and if the carburetor settings are violated, adjust the idle speed and carbon monoxide concentration.
- We connect the intake manifold cooling outlet hose from the system.
The necessary modifications to the intake manifold are carried out to ensure a more uniform flow of the gasoline-oxygen mixture through the cylinders of the power plant. The mixture of fuel and air “pulsates” in the cylinders due to incorrect placement of the carburetor valves above the intake manifold of the “six”. If some of the partitions on neighboring highways are removed, then the result is the elimination of design errors in standardizing the linear dimensions of highways. In addition, a volumetric space is formed under the carburetor device, where the diffusion of the fuel-air mixture occurs before distribution along the highways.
Another way to modify the intake manifold is to completely coaxially combine the carburetor windows, holes and cylinder head. Obstacles in the form of steps at the joints of the products create strong air flows that prevent the correct flow of fuel aerosol into the engine cylinders, and the vehicle loses its aerodynamic properties. It is necessary to remove these internal elevations and polish the internal planes of the cylinder head and intake manifold, which will make it possible to increase the value of the torsional moment and the maximum dynamics of the car. At higher engine speeds the result will be more noticeable.
avtovx.ru
Payment via Portmone
After selecting payment through Portmone, the payment system will launch, where you need to select the payment method: bank card or Portmone account.
The price in the Portmone payment system is converted into dollars at the exchange rate of the Central Bank of the country where you are located.
If you have a bank card in a currency other than the dollar, then the money will be debited from the card at the rate of the Central Bank of your country at the time of the purchase.
After specifying payment details and confirming payment, payment for the goods will occur.
Official website of the Portmone payment system https://www.portmone.com
Payment via PayPal
After selecting payment via PayPal, the PayPal payment system will launch, where you need to select the payment method: bank card or PayPal account.
If you already have a PayPal account, then you need to log into it and make a payment.
If you do not have a PayPal account and you want to pay using a bank card via PayPal, you need to click on the “Create an Account” button - shown with an arrow in the picture.
PayPal will then prompt you to select your country and provide your credit card information.
After specifying the information required to make the payment, you must click on the “Pay Now” button.
Official website of the PayPal payment system https://www.paypal.com
Payment via WebMoney
After selecting payment via WebMoney, the payment system will launch, where you need to select the payment method: bank card or WebMoney wallet.
If you already have a WebMoney wallet, then you need to log into it and make a payment.
If you do not have a WebMoney wallet and you want to pay in another way, you need to select any of the methods that WebMoney offers and make the payment
After specifying payment details and confirming payment, payment for the goods will occur.
Official website of the WebMoney payment system https://www.webmoney.ru/
Downloading a book
After successfully completing the payment (by any method) and returning to the KrutilVertel store from the payment system website, you will be taken to the successful payment page:
On this page you need to indicate your e-mail, where access to download the book will be sent.
If you are already registered on our website, then simply follow the link to your personal account.
The book you purchased will be in your personal account, from where you can always download it.
Please note that after making the payment, you need to return back from the payment system website to the KrutilVertel website.
If for some reason you did not return back to the site and closed the payment system tab with a message about the successful completion of the payment, please let us know - we will send you a letter indicating access to download the book.
Removing and installing the intake manifold
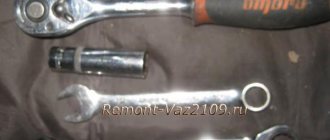
The VAZ 2106 intake manifold itself is not difficult to remove, but before doing this, you will first have to perform the following procedures:
- Pliers
- head 13, regular and deep
- crank and ratchet handle
- extension cords
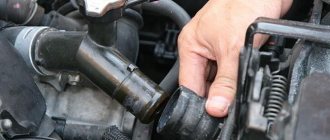
Now the only thing left to do is to pull the collector body with a certain amount of force and remove it from the studs. This operation is clearly demonstrated below:
vaz2106-remont.ru
Problems when paying with bank cards
Sometimes difficulties may arise when paying with Visa/MasterCard bank cards. The most common of them:
- There is a restriction on the card for paying for online purchases
- A plastic card is not intended for making payments online.
- The plastic card is not activated for making payments online.
- There are not enough funds on the plastic card.
In order to solve these problems, you need to call or write to the technical support of the bank where you are served. Bank specialists will help you resolve them and make payments.
That's basically it. The entire process of paying for a book in PDF format on car repair on our website takes 1-2 minutes.
If you still have any questions, you can ask them using the feedback form, or write us an email at [email protected]
Intake manifold VAZ 2106
Badboy
Group: Zhigulyonok Messages: 206 Registration: 21.3.2007 From: Moscow, VAO User No.: 10 Car: VAZ 21065 Color: White Year of Issue: 1998 Thanks said: 0 times
This work is performed to reduce the number of revolutions at which maximum torque is achieved and increase power at high speeds.
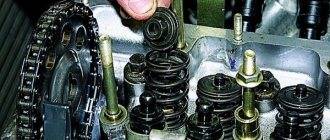
The most important thing is to mate the manifold (applies to both intake and exhaust) with the cylinder head. To do this, you need to paint the mating plane of the head with slow-drying paint (Kuzbaslak, for example) and lean the collector against it. Next, use a round file to select all the bright areas around the air channels on the manifold. Then wash off the paint from the head and commutator and repeat the procedure in reverse (paint the commutator, sharpen the head). You can limit yourself to one such cycle, but you can repeat it again for accuracy. An accuracy check can be done by painting both the manifold and the head and holding tracing paper between them. By holding the print to the light you can see all the inaccuracies.
The gasket is more difficult to deal with. You can't finish it with a file. You should use a drill or a round file clamped in a drill. The gasket is modified locally. The metal inserts in the gasket around the exhaust channels should not be touched.
Next is polishing. It makes sense to do it when overhauling the engine. To do this, the valves, rocker arm axle, rocker arms themselves, and camshaft are removed from the dismantled head. Then remove the manifold, take out the gasket and screw them back on.
Now there are two options:
The first is to take a cable 2-3 mm thick and apply a layer of coarse abrasive paste (such as GOI) on it and perform translational and rotational movements inside one of the channels (this is very long, hard and boring). Then, after visually checking the quality of the rough processing, a tarpaulin is tightly wrapped around the cable and lubricated with GOI paste. The procedure is repeated. This method does not guarantee maximum quality over the entire inner surface of the channel, but it does ensure that the most critical parts of the channel are treated.
The second method, which I have not tried but is very promising, is a sandblasting machine. Everything here is the same as in the first method, but instead of a cable, a jet of compressed air with abrasive particles is used
vaz-2106.ru
The standard intake manifold of the VAZ 2106 is designed to direct the air-gasoline mixture into the engine cylinders. Additionally, with the help of this important component in the vehicle system, fuel supply is heated, because When the flammable mixture is discharged, a reaction occurs with the release of cold.
The uniform distribution of the air-fuel mixture across the cylinders largely depends on the intake manifold. Many people believe that internal polishing of the manifold reduces intake losses. But this operation in itself is a torn page from a big book and cannot radically change anything. The uneven distribution of the mixture among the cylinders is primarily due to design errors in the design of manifolds. Different lengths of the intake tract lead to uneven filling of the cylinders, and the power balance among the cylinders changes depending on which carburetor damper is open. Quite primitive (for the intake manifold of a rear-wheel drive VAZ) It looks like this: when throttling on chamber 1, as well as when the carburetor is idling, cylinders 1 and 4 operate on a richer mixture than cylinders 2 and 3. When throttling at 2 in the th chamber (max load mode), a more enriched mixture enters 2 - 3 cylinders; and 1 and 4 experience air “hunger” for fuel. The reason for this pulsation of the mixture through the cylinders is the poor placement of the carburetor flaps above the intake manifold. By removing part of the partitions between adjacent channels, we kill 2 birds with one stone:
1. Align the length of the channels.
2. A cavity appears under the carburetor, in which the mixture is mixed before entering the intake channels, regardless of which chamber the throttling occurs on.
The matching of the carburetor windows and the intake manifold is also of great importance; intake manifold and head. The mixture moves in the channels at high speed and the steps at the junctions form powerful vortex flows, increasing aerodynamic losses and preventing the mixture from entering the cylinders. By removing the steps at the interface between the carburetor and the intake manifold; intake manifold and head, as well as polishing the manifold and the internal cavities of the head to a mirror shine - we expand the range of torque and maximum power, and the higher the speed, the more pronounced the result.
The step between the textolite gasket and the intake manifold, characteristic of most factory manifolds, creates additional resistance to flow in the intake tract.
Another way to optimize mixture formation on a stock manifold is to twist the air-fuel mixture in the large diffusers of the carburetor, and then continue this twist in the intake manifold channels. Various primitive devices periodically appear on the market, for example homogenizers (in the jargon “turbines”), which are mounted under the carburetor and supposedly improve the mixture formation process. The mixture is indeed slightly twisted, but the homogenizer itself blocks the cross-section of the inlet channel and is a significant obstacle to the flow. So there is more harm from such twisting. It is technically much more difficult to twist the mixture without blocking, and in some cases even increasing the cross-section of the inlet channels, but it is actually feasible. This is our “secret weapon” and a topic for another conversation.
On sports cars, until injection became firmly established on them, a different scheme was used - installing several carburetors. It gives a significant increase in torque and stretches it across the entire range - from low to maximum speed, and also increases maximum power. But the general laws of working with collectors outlined above also apply here. And with the complex application of all techniques, the results are brilliant.
Replacing the gasket
The work is performed on a cold engine.
Drain the coolant.
Loosen the fastening clamp and remove the coolant drain hose from the intake manifold,...
...remove the vacuum brake booster hose.
Using a 13mm wrench, unscrew the four copper-plated nuts securing the exhaust pipe to the exhaust manifold.
Using a 13mm wrench, unscrew the bolt securing the exhaust pipe to the gearbox and lower the exhaust pipe until it stops (see Replacing exhaust system parts).
Use a 13mm socket to unscrew the nut...
...and remove the negative wire and the eye from the stud.
Having previously removed the hose from the warm air intake, use the “13” key to unscrew the bottom...
...and the upper air intake nut.
Remove the coolant drain hose from the heater radiator from the outlet pipe.
Using a 13mm wrench, unscrew the second upper fastening nut...
...and use a 10mm wrench to secure the lower fastening bolt of the starter heat shield, and remove it (see Replacing the starter).
Using a 10mm wrench, unscrew the two nuts securing the pipe to the coolant pump...
...and remove it. A sealing gasket is installed between the pipe and the pump.
Using a 13mm socket, unscrew the seven nuts securing the manifold...
...and remove the intake...
...and exhaust manifolds.
Remove two gaskets from the studs.
We install the manifolds in the reverse order, replacing the gaskets with new ones and lubricating the threads of the studs with graphite lubricant. We attach the exhaust pipe of the muffler to the manifold with new brass nuts.
How to change
To perform this repair you will need the following tools:
Pliers head 13, regular and deep wrench and ratchet handle extensions
After the air filter, its housing and carburetor are removed from the car, you can proceed directly to the intake manifold. The first step is to remove the two hoses, which are shown in the picture below:
Now we unscrew the fastening of the air intake housing, which is screwed to the manifold on the left side:
Now you can unscrew the nuts securing the manifold to the cylinder head of the VAZ 2106. First, unscrew the two upper ones, which are located at the edges:
The most convenient way to do this is with a ratchet with a head:
And then unscrew the three nuts securing the intake manifold from below. Two are visible in the photo, and the third is in the center, but it is not visible.
Here you will need a long extension cord with a ratchet handle, otherwise you will have to suffer for a long time:
Then we finally remove it from the studs and remove it from the engine compartment:
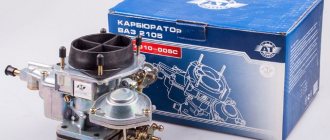
If necessary, we replace this part. The price of a new manifold for the VAZ 2106 and other Zhiguli models of the classic family is around 1,500 rubles.
Installation proceeds in reverse order.
vz06-up.ru