DIY radiator frame replacement
The photo shows the inside of the radiator frame. At the final stage of all work, you need to thoroughly treat the bottom of the TV with anti-gravel in several layers. When the TV rots, it can burst as a result of a sharp blow and the motor sags. We received a VAZ car for body repair, the car is more than 10 years old. In this case, it is necessary to change both parts.
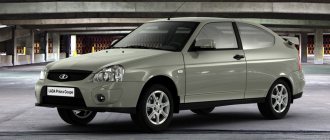
2110. Replacing the radiator frame. 1 part
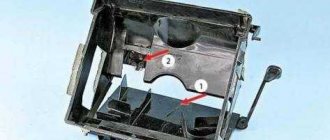
The photo shows the outer part of the radiator frame. The problem was the following: the radiator frame at the bottom was cracked, causing the engine to sag. The arrow under number 1 shows the lower beam. Otherwise, after installing the unpainted frame on the car, we will not have the opportunity to paint the engine compartment side. We drill out the spot weld and cut it off with a chisel.
Before this, the lower beam of the radiator frame was boiled and overcooked more than once. We attach the areas for attaching the daisies by welding, because factory welding does not inspire confidence. In this case, it is necessary to change both parts. Cars of the tenth family, Kalina, Priora, do not have this drawback; they have a slightly different design of the front body panel.
The arrow under number 1 shows the lower beam. When the TV rots, it can burst as a result of a sharp blow and the motor sags. Do-it-yourself car repair VAZ
Black aerosol anti-gravel Body is well suited for this type of work. Liked: The photo shows the inside of the radiator frame. We attach the areas for attaching the daisies by welding, because factory welding does not inspire confidence. We remove the shipping soil from the new radiator frame. When the TV rots, it can burst as a result of a sharp blow and the motor sags. The problem was the following: the radiator frame at the bottom was cracked, causing the engine to sag.
Cars of the tenth family, Kalina, Priora, do not have this drawback; they have a slightly different design of the front body panel.
The outer part of the radiator frame is attached to the side members and to the inner part of the frame using spot welding. The arrow under number 2 shows the front engine mount mounting bracket. The car arrived to us in this condition.
When the TV rots, it can burst as a result of a sharp blow and the motor sags. The radiator frame on the nine consists of two parts - outer and inner. The arrow under number 2 shows the front engine mount mounting bracket.
We drill out the spot weld and cut it off with a chisel. The outer part of the radiator frame is attached to the side members and to the inner part of the frame using spot welding.
We prime and paint from the inside, that is, from the engine compartment. We try on the new frame on the car, weld it, and clean the weld spots with a grinder. The photo shows the outer part of the radiator frame. Next, you need to putty the welded areas, prepare for painting and paint the radiator frame from the outside. The arrow under number 2 shows the front engine mount mounting bracket. Cars of the tenth family, Kalina, Priora, do not have this drawback; they have a slightly different design of the front body panel.
We drill out the spot weld and cut it off with a chisel.
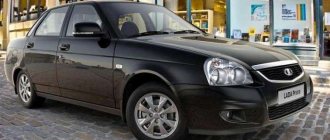
Standard radiator grille for Priora - article number and price
The standard part is divided into two parts - upper and inner. The air flow is distributed in two ways: one at a time, it goes up to pass through the air filters. The second flow comes from below to go along the bottom of the engine and cool it.
For the 2170 car, this element was updated compared to its predecessor, the “ten”. The front became unrecognizable. The upper part of the Priora 1 air heat exchanger received catalog number 2170-02803056-00, the cost is about 700 rubles.
Radiator grille on Priora 2 - restyling
The restyled Priora received several changes in appearance, but the usual configuration did not affect the bumper detail.
Only the “Premium Class” version of the car received an update - the SE radiator grille with catalog number 21704-2803056-00, costs about 700 rubles.
Lower grille: article number, price
The cost of the lower part for the bumper is about 400 rubles, and the article number under which the part is sold is 2170-02803057-00.
Replacing the radiator frame of a VAZ 2110 with your own hands
Dear visitors of the website “Your Car”! We will be very grateful for your comments on the video clip “Replacing the VAZ 2110 radiator frame with your own hands”; registration is not required for this. We also ask you to let us know if you have any problems playing the video.
Vital, in order to reduce the duration of the pulse, replace the 3.6 KOhm resistor on the autostart board with 1.5 KOhm in the diagram it is designated R9; variable resistors are soldered to one side of it, setting the duration of the welding pulse.
25.11.2015 — 19:41 TheSupergazon
steel to steel do not weld the tip from non-ferrous metal must be
11/16/2015 — 12:22 Artem Golovkin
How's the floor doing?
10.31.2015 — 23:22 Dmitry Volzhsky
Non-ferrous metal is not welded to iron. The easiest way to reduce power is to insert an iron plate between the terminal on the wire and the puller, just as the power is adjusted on a welder with a nichrome spring. Well, or as has already been suggested, reduce the pulse time.
10.28.2015 — 04:54 Vasilevs Ch
experience is the son of difficult mistakes good luck in work - we are watching you
10/18/2015 — 21:03 Alexander Klyotskin
Vitaly, in my opinion, you are tired of cars. I hear more and more often I don’t want to, I won’t, it’s not mine. Go on vacation, relax and go back into battle, delight us with new episodes of your series, good luck in your work
11.10.2015 — 23:26 mikhael xsamder
Hello When it comes to working with plastic, you are great at everything, and even if it doesn’t look like it came from the factory, the main thing is functionality. ask 2-3 times more, and if a person needs it, he will pay, if not, he will buy a new one. Don't give up on this, just ask for more money.
07.10.2015 — 13:57 Dik282
you're a cool dude, say hi to Dimon Krivoy Rog, good luck to you.
09.22.2015 — 14:50 András Drakensang
that shit doesn’t want to be sculpted onto the tundra
09.16.2015 — 09:16 András Drakensang
the intake is under the stove
09.09.2015 — 16:36 Evgeniy AvtoPokraska
Hi Vitalyan, with such creases, the scribe pulls hard on your tits, tears holes, but sometimes they just don’t work. Sometimes I think, well, why the hell did I pierce for two days?
08/12/2015 — 05:49 MegaXanderA
Voo balon: Thank you Vitalya: Yeah, a calf with an appetite: In principle, there is still a lot of space left in the trunk.
07/31/2015 — 09:38 András Drakensang
that they haven’t seen the tundra0
07/29/2015 — 08:35 András Drakensang
fucked up the tundra
07/16/2015 — 17:54 Alexey Pervomaisky
Vital, where did you get the coral circle for 3 Baku? on the market or not?
Replacement: how to remove the radiator grille on a Priora
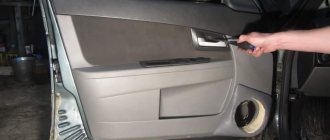
To remove and change a spare part on a Priora, you need to disassemble the front bumper of the car; it will have to be completely removed. This work must begin by removing the bumper:
- Pull the handbrake and raise the hood.
- Remove the engine splash guard.
- Remove the fender liners, first unscrewing the fastening screws.
- Unscrew the screws securing the bumper to the fender.
- Next, unscrew the screws securing the plastic cover above the headlight. Pull the cover towards you.
- In the middle, unscrew the two fastening screws that hold the bumper relative to the upper frame.
- Disconnect the wires from the fog lamp by pressing the fastening lock.
- Lightly pull the flange on the side of the bumper toward you to disengage it from the fender.
- Do the same on the other side. After this, unscrew four more mounting screws from the top. Place the bumper on a soft cloth.
- Next, to dismantle the air heat exchanger element, unclip the 11 plastic fasteners (for SE these are screws), pull the plastic part towards you. It is not recommended to dismantle without removing the bumper, because there is a fairly serious risk of damaging the element and its fasteners.
Replacing the lower grille
In order to remove the lower part of the part, you also need to remove the bumper. After this, the fastening washers are unscrewed, and the grille comes out of engagement; it can be easily removed.
Design features of the front bumper of Lada Priora Lux
The Priora front body kit is made of durable polypropylene, which allows you to reliably protect the car body in collisions with hard objects. The Lada Priora Lux 2020 body kit is an individual design consisting of a plastic base to which the lower bumper grille and cooler grille with additional decorative elements are attached.
The upper part of the body kit contains elements for fixing the hood of the car, presented in the form of holes for the hood lifting handle. The protection itself is attached to the car body through special mounting holes.
Bumper of the updated Lada Priora
An important functional part is the upper frame of the radiator, which allows the flow of air from the external environment to the internal mechanisms of the car, being part of the air cooling of the engine. In addition, the upper grille also serves to protect the car’s cooling system from mechanical damage caused by foreign objects. In addition, this part of the bumper is one of the main elements of the exterior design of a luxury car, as it is located in the place of greatest visibility.
Installing a mesh in the Priora bumper
To protect the lower part of the radiator from fluff, insects and stones, it is proposed to install a grille at the bottom of the bumper. You will need to buy an aluminum mesh at the car market (commonly called a bumper protection mesh). Next, remove the Priora bumper. We apply the mesh and make folds along the entire perimeter. We cut off pieces of mesh of the required size with ordinary scissors.
Install the bumper and grilles in reverse order.
Installing a new radiator grille on Lada Priora 2020
Installing a new radiator protection without removing the bumper takes no more than 30 minutes and is done in the reverse order of dismantling the factory version. The procedure is as follows:
- 1. Immediately after removing the old radiator grille, a new part is placed in the freed place and screwed with self-tapping screws in the same fastening places;
- 2. The bumper is installed in the desired position;
- 3. The protection is fixed to the body at ten points indicated earlier;
- 4. A visual assessment of the quality of work is carried out in order to avoid possible distortions of the body kit relative to the body of the Priora Lux.
How are radiator grilles installed on Priora se?
Installation of a radiator grille
It will be very simple if you use branded copies. They fit into the required niche very easily, and can be securely secured with fasteners. The installation process is relatively simple and fast. You just need to determine a place on top of the bumper and seal it with sealant. Next, you need to attach the radiator grill itself, and at this stage the installation can be considered complete.
Why is it worth installing a new radiator grille on the Priora se and making an exclusive tuning of the front part of your car? A new part is required to improve the appearance of the car and give it shine. And there are times when replacing it is simply necessary. This need arises if a stone flying off from under the wheels of some other car, for example, hit the car and the front part was damaged; a large crack was discovered in the grille or a piece broke off altogether. Lattice
The radiator on the Priora has a number of positive qualities, in addition to improving the appearance. It is resistant to large temperature changes; the latest versions have fastenings identical to the standard model. Exclusive design gives the Priora se individuality among similar cars and helps make the car brighter and more noticeable.
Tips for choosing and installing a new radiator grille for Lada 2020
Before you begin replacing the radiator protective frame, you should study the recommendations and experiences of those who have encountered this issue:
- 1. When selecting a new radiator grille for Priora Lux, you need to pay attention not only to the external design, but also to the quality and practicality of this product. This will ensure a long service life and reliable protection of the radiator from external factors;
- 2. Grilles with saber-shaped horizontal stripes have the property of accurately directing the air flow to the heat exchanger, unlike conventional factory grilles Lada 2015;
- 3. Protective mesh in the bumper design allows you to reliably protect the car’s radiator from external factors that can damage parts of the engine cooling system.
In winter, experts recommend using special covers on the radiator grille, which allow you to save fuel when warming up the car in the cold season.
How to replace the radiator grille on a VAZ 2170-VAZ 2172?
Note! Before you get started, you will need to explain a few things, namely that the grille can be removed in only two ways, this is after completely removing the bumper from the car (it will be very easy to reach it after removing the bumper and therefore such a replacement will be faster, but due to the fact that you will remove the bumper, the time will increase and as a result you will work longer, but in this case it will be easier to get to the radiator grille), the second method is when you do not remove the entire bumper but only unscrew the top screws that secure it and after unscrewing these screws you will need to bend the top edge of the bumper and thereby crawl under the washers that secure the grille itself (This method is faster, but due to the fact that you will bend the top edge of the bumper, you can deform, so you will need to work more carefully here)!
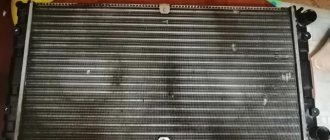
Removing the radiator
We remove the radiator to check it for leaks (if a leak is suspected) or replace it if damaged. Remove the radiator fan (see “Removing the radiator fan”). We disconnect the bracket for fastening the sound signal from the security alarm of the upper cross member of the radiator frame (see “Removing the sound signal of the security alarm”) and remove the sound signal from the radiator.
Using the “8” socket, we loosen the clamp securing the radiator supply hose...
...and remove the supply hose from the radiator pipe.
Using an “8” socket with an extension, we loosen the clamp securing the radiator outlet hose.
Remove the outlet hose from the radiator pipe.
Using a 10mm socket, unscrew the two nuts securing the radiator to the upper cross member of the radiator frame.
Radiator attachment points to the top cross member of the radiator frame (shown with engine removed for clarity).
Tilt the radiator towards the engine...
... use a screwdriver to loosen the ribbon clamp securing the steam exhaust hose... Remove the steam exhaust hose from the radiator pipe.
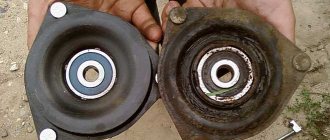
We take out the radiator, removing the pins of its lower mounting from the rubber pads. If it is necessary to replace the rubber bushings of the upper radiator mounting...
...remove the metal spacer sleeve...
...and a rubber bushing from the radiator bracket. Install the radiator in reverse order. If the rubber cushions came out with the radiator, then when installing it, first insert the cushions into the holes in the lower cross member of the radiator frame. Cushions that are torn or have lost their elasticity should be replaced with new ones. We replace the ribbon clamp of the steam exhaust hose with a worm clamp. We pour coolant into the cooling system and bring the liquid level in the tank to normal (see “Replacing the coolant”).
Improvement of the Priora radiator grille
Installing a mesh in the upper radiator grille will protect the top of the radiator. We adjust the mesh to the size of the grille and fasten it with self-tapping screws.