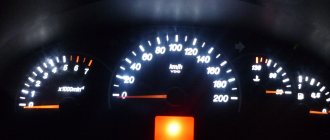
Icons on the factory dashboard
All indicators should light up like a Christmas tree for three seconds when the engine starts. If some icon remains, it means the system is signaling a breakdown. To make it easier to understand all the indicators, here is a schematic picture:
1,5,9,10 are already known scales that display the main parameters that can change. 19 – on-board computer display. Further:
- 2 – Icon indicating the operation of the braking system.
- 3 – Battery condition. If the light remains on, the battery is discharged or the charge level is too low.
- 4.7 – Doublers for direction indicators (“turn signals”).
- 6 – Oil level (indicates low level).
- 8 – Handbrake. Lights yellow when the lever is tightened.
- 11 – “Gasoline light bulb.” Lights up when there are only 10 liters left.
- 12 – Button for switching on-board computer modes.
- 13 – “Emergency”.
- 14 – Electric power steering (indicates a breakdown).
- 15 – High beam on.
- 16 – Side lights/low beam.
- 17 – Airbag condition (malfunction).
- 18 – Immobilizer (if you hear a beep and the icon itself blinks, the immobilizer is faulty).
- 20 – Seat belts not fastened.
- 21 – Unsatisfactory condition of the service brake system.
- 22 – Disabling the airbag.
- 23 – ABS malfunction.
- 24 – “Check”, “Check Engine” - engine failure.
What brake fluid should I use?
The system responsible for braking the Priora can contain up to one liter of working reagent. The brake fluid should be clear with some yellowish tint. When the color of the liquid changes to dark, topping up is impossible. In this case, the substance must be replaced.
It must be said that the brake fluid in the Lada Priora system is replaced approximately every three years. This time period is considered the most optimal, since during this time the liquid will change under the influence of temperature heating. Brake fluid includes: main components up to 98% and additives. Depending on the content of the base, TJ is classified into three types:
| Type of working fluid | Compound |
| Mineral | Contains alcohol and castor oil. |
| Glycolic | Contains polyglycols and their esters. |
| Silicone | Includes organosilicon polymer products. |
In addition to these compositions, brake fluid is divided according to the degree of thickening and the temperature at which it can boil.
The Lada Priora uses DOT-4 brake fluid based on glycol. Its volume must be at least one liter. If the working fluid needs to be replaced along with the flushing procedure, then it will require more fluid - about one and a half liters.
To correctly decide which brake fluid to use, you need to carefully study whether the fluid meets the necessary requirements and GOST standards. The main ones include:
- The temperature at which heating occurs to boiling.
- Volume of least corrosive activity;
- Possibilities for lubrication.
- Stable viscosity.
On the labels issued by manufacturers, everything is described colorfully and attractively, but this is not always true. After analyzing consumer reviews and practical experience, the following conclusions were made.
Foreign liquids that received positive ratings include: Castrol React DOT-4, Motul DOT 5.1, Liqui Moly Bremsenflussigkeit DOT-4.
Russian-made brake fluids that can be used include: Ros DOT-4 and Sintec Super DOT-4.
Other brands may be considered questionable and may cause harm to the car owner and other road users.
Before deciding on the brand of brake fluid for Lada Priora, you need to understand the specifications that are established for this car. Thus, the Priora brake system must be filled with glycol fuel fluid (FMVSS 116 not lower than DOT-3).
How to bleed brakes without an assistant
How to pump the brakes with a partner has already been described above. What to do if there is no such thing nearby, but you need to bleed the brakes? You can get out of this situation in several ways:
- You can bleed the brakes alone if you have a gas stop . The meaning is the same as when pumping with an assistant, only instead of him the gas stop will press on the pedal. Therefore, you need to press the pedal several times, keep it pressed, set the stop and begin to bleed the brake fluid. When the fluid begins to flow, the stop will begin to push the pedal to the floor to the limit.
- bleeding the brakes with a syringe . You need to hermetically embed the syringe into exactly the same lid as on the tank. Then, having first filled the syringe with brake fluid, replace the regular cap with this device, unscrew the fitting, place a container and apply pressure with the syringe.
- another method with a modified lid . You need to insert a car nipple into a cap similar to the one installed on the tank. Then put the lid with the nipple on the tank, then put one end of the hose with a connection clamp on the lid, and the other on the spare chamber, inflated to no more than 1 atmosphere. Open the fitting and bleed out the liquid with air bubbles.
Replacing brake fluid and bleeding brakes
Welcome! The brake system is sealed, but if the seal is broken (for example, the brake hose is torn), then air will immediately enter the system, which will leave your entire car without brakes; it can only be removed by restoring the seal again (for example, the brake hose is torn, install a new one and the brake system will be sealed again) and bleed the brake system of the car after that, otherwise, as we said earlier, the car will not really brake, and the brake pedal will be pressed easily and without any effort (This indicates that the system is airy and requires bleeding), if all the symptoms are present in your car, then first look to see if brake fluid is leaking anywhere, and after inspection, you can start pumping the brakes, due to which the car will again brake as before.
Note! To bleed the brakes, the following tools are needed, namely: A wrench size “8”, a small long transparent hose that can be put on the bleeder fitting, as well as a container with a little new brake fluid poured into it and be sure to stock up on a rag, brake fluid nevertheless, it has a negative impact on human skin and paintwork, and if you get it on something listed above, be sure to wipe the area of contact with a cloth, otherwise problems may arise in the future!
Summary:
When should you bleed your brakes? Again, we repeat, the brakes are pumped only when the system gets depressurized, and it gets it mainly because of the brake hoses, even if it is not torn, you change the caliper, for example, the hose will still need to be disconnected and after disconnecting it into the brake system air flies in, due to which the brakes disappear and become, as people say, weak, but the signs that the brakes need to be pumped are as follows: When pressed for the first time, the pedal easily rests on the floor (increased pedal travel), with repeated pedal travel, the pedal travel decreases and eventually it becomes hard, after a while this symptom, if it repeats again, then this indicates that there is air in the brake system and it needs bleeding.
Note! By the way, air can still get into the system when all the brake fluid leaves the reservoir (less than the MIN mark, even if it leaves, then we can assume that air has already entered the brake system a little), so always monitor its level and do not bring the brake reservoir to complete devastation!
ABS brake bleeding process
In order to efficiently complete the task, it is advisable to carry out bleeding with an assistant, starting with pumping the brake system from the front wheels, then the rear wheels (right and left).
Pressure is released by discharging the pressure accumulator. To do this, turn off the ignition and press the brake pedal about 20 times. And then to proceed to the next stage of bleeding the brakes, disconnect the connectors on the brake fluid reservoir.
General principle of how to bleed ABS brakes
- We find and remove the fuse in the block responsible for the operation of the ABS;
- We unscrew the wheel and find the RTC fitting for bleeding the brake;
- We begin to pump the brakes with abs with the pedal depressed;
- We turn on the hydraulic pump (turning on the ignition, the ABS light on the dashboard will light up) and wait until all the air comes out;
- We tighten the fitting and release the brake pedal; if the ABS light no longer lights up, everything is done correctly and the air has completely escaped.
Sequence of removing air from the vehicle
We start pumping the brakes from the front right, and then the left. The procedure takes place with the ignition turned off (position at “0”) and the terminal on the TJ tank removed.
- We put the hose, with the bottle, on the fitting and open it (with an open-end wrench). It is necessary to push the transparent hose so that air bubbles can be seen, and the other end of the hose must be completely placed in the liquid.
- We fully depress the pedal and hold it until all the air comes out.
- Tighten the fitting and release the pedal until liquid flows out without air.
The rear wheels are pumped with the ignition on in key position “2”.
- As when bleeding the front wheels, we put a hose on the bleeding fitting on the caliper.
- Having fully depressed the pedal, turn the ignition key (to start the hydraulic pump). We observe the air coming out and control the level of brake fluid in the reservoir (top up periodically).
To properly bleed the ABS brakes on the rear left wheel, the sequence of actions needs to be slightly changed.
- As in previous cases, we first put the hose on the fitting and do not unscrew it completely, but only 1 turn, and the pedal does not need to be depressed.
- Turn the ignition key to start the hydraulic pump.
- As soon as the air comes out, depress the brake pedal halfway and tighten the bleeder fitting.
- Then we release the brake and wait for the pump to stop.
- Turn off the ignition and connect the removed connector from the tank.
If you need to pump the brakes together with the ABS modulator, then information on this procedure can be found here.
It is imperative that after bleeding the brakes, before driving off, you need to check the tightness of the system and the absence of leaks. Check the brake fluid level.
How to properly bleed ABS brakes
To achieve a good result, you will need an assistant, with whom you first need to bleed the brake system of the front wheels, then the rear ones.
Important! There can be high pressure in the brake system, up to 180 atmospheres, so you must first relieve the pressure.
You can bleed, that is, reduce the pressure by discharging the pressure accumulator. To discharge the pressure accumulator, you need to turn off the ignition and press the brake pedal many times (about 20 times).
After this, you need to disconnect the connectors on the brake fluid reservoir. If suddenly, while driving, in a front-wheel drive car, bad sounds begin in the area of the front wheels: grinding, crunching sounds, then these are most likely signs of a CV joint malfunction.
The brakes are bled when it is necessary to remove air from the brake system. This often happens when replacing brake fluid, which is done approximately every 50-60 thousand km. mileage or once every 2 years.
It is also necessary to bleed the brakes after repairing the brake system: replacing the master cylinder or vacuum brake booster. The need for bleeding also arises when depressurization occurs due to damage to the hoses, or when the liquid in the expansion tank drops below the minimum mark.
The pedal will indicate that you need to bleed the brakes - it will become soft and begin to sink. And the brakes themselves will become more sluggish. However, this could also indicate a more serious problem with the brake rotor or pads. So, if bleeding does not help, perhaps you should still contact a specialist - brakes are no joke!
Which brake fluid to choose for Priora
The manufacturer fills it with DOT 4. The most popular brake fluids among buyers are ROSDOT 4 and NEVA-M. The first option is more expensive, the second is cheaper. For cars with and without ABS, it is recommended to use different types of fluids.
- DOT-4 plus - for cars without ABS
- DOT-4 class 6 - designed for modern braking systems (ABS, ESP, VSA)
Depending on the capacity, the cost of the brake fluid indicated above is from 50 to 150 rubles.
You can also add DOT 5.1 fluid. It has a lower viscosity than the above samples, as well as a higher boiling point and, according to manufacturers, changes once every five years.
Differences between ABS brakes
The main difficulty lies in ignorance of the nuances of operation and the main differences from the same procedure on conventional brakes.
Bleeding brakes with ABS has three main differences from conventional ones:
- the pipeline system in the presence of ABS is under increased pressure;
- During the procedure, constant monitoring of the brake fluid level will be required;
- the pump runs for no more than 10 minutes.
If you do not control the brake fluid level in the system, it will reach a critical minimum and the drive pump will begin to pump air.
If the pump runs longer than the set 10 minutes, turn off the ignition and allow the unit to cool for 10-15 minutes.
Bleeding brakes with ABS
There is no need to talk about the role the braking system of a car plays - the safety of all road users without exception depends on it. Today, most cars are equipped with an anti-lock braking system - ABS. We have already talked on our car portal for car enthusiasts Vodi.su about the structure and operating principle of ABS, and we also touched on how the presence of ABS affects the length of the braking distance.
In this article I would like to talk about how to bleed brakes with ABS.
Why do you need to bleed your brakes?
The principle of operation of the brake system is quite simple:
- when you press the pedal, the load is transferred to the vacuum booster;
- then the increased load is transferred to the main brake cylinder;
- from the brake cylinder, the brake fluid diverges along contours (pipelines) to the working wheel cylinders;
- The pistons in these cylinders are driven and cause the brake pads to act on the brake disc or drum.
Accordingly, at the moment when the driver removes his foot from the brake, the force ceases to be transmitted to the main brake cylinder (MBC), the pressure in the system decreases and the brake pads open.
That is, we see that for the entire system to operate effectively, a certain pressure must be maintained in it. If air enters the brake system, the pressure decreases because air, unlike liquid, can be compressed.
This leads to a variety of consequences:
- you have to put more effort when pressing the pedal;
- the pedal may completely fall to the floor;
- braking distance increases;
- The brakes disappear completely and you have to brake with the engine.
We also talked about how to brake with an engine on our website Vodi.su, but this method can hardly be considered effective in emergency situations.
In this way, the system is pumped in order to completely get rid of air bubbles.
This operation must be performed in the following cases:
- when replacing cylinders - GTZ or working ones;
- when replacing tubes and hoses through which brake fluid moves;
- when replacing expansion tanks;
- and finally when changing the brake fluid.
The fluid level must be constantly monitored, and a complete replacement must be carried out at least after 30-40 thousand kilometers, or every two years. Please note that the absence or presence of ABS does not in any way affect the replacement frequency.
You can often hear from service station workers who installed brake pads for clients that after this operation the brakes also need to be pumped. In reality, this is a simple “money scam” - if they did not get into the system, but simply removed the old ones and attached new pads, then air will not be able to get into the liquid.
How to bleed brakes with ABS?
Before you begin this operation, you must make sure that you have a sufficient understanding of the system itself on your specific vehicle. Unlike cars without ABS - domestic or old - the device here is much more complex.
In modern cars, a four-channel ABS system is most often installed, that is, the braking process of each wheel is controlled. In this case, you need to look at how the system is designed: if all the components are in one block, then pumping is carried out in the same way as without ABS. The only difference is that you need to turn off the ABS control module itself. To do this, you simply need to disconnect the fuse from the electrical network.
Pumping is done in the following sequence:
- rear right wheel;
- front left
- rear left;
- front left.
It would be best if you have an assistant, his job is to press the brake pedal to relieve pressure in the system. And then he simply presses the pedal, holds it and releases it at your command. The ignition must be turned off.
At this time, check the fluid level in the tank and add if necessary. Then find the bleeder fitting in the rear brake mechanism, remove the cap and turn the fitting one turn. Then you need to put a hose on the fitting and ask your partner to depress the brake pedal - the brake fluid will flow out along with the air.
Then, depending on the system:
- your partner presses the pedal 5-6 times at intervals of several seconds and locks the pedal on the last press, and you watch until the flow of airy mixture stops;
- tighten the fitting completely, ask your partner to press the pedal up to 15 times until it becomes tight, then open the fitting and the airy mixture flows out. You only need to close the fitting when there are no bubbles in the liquid.
After performing this operation with each wheel, you need to add fluid to the tank to the desired mark - between MIN and MAX.
The editors of the Vodi.su portal strongly recommend that you carefully read the instructions before pumping. So, on some car models it is not at all necessary to pump the brakes with the ignition off. That is, you need to turn it off in order to disconnect the ABS fuse, and then you need to depress the brake pedal, start the car, and unscrew the brake mechanism fitting. The fluid will flow out due to the operating brake pump.
Please pay attention to this point - if the ABS components are not located in one unit, but are separated into separate units, disabling the ABS may lead to a reset. Therefore, it is not recommended to start such work in your garage; it is better to pay at a service station, but there they will do everything clearly and according to the instructions.
Do-it-yourself replacement of brake fluid on a Lada Priora
To replace you will need:
- The brake fluid itself
- To remove old fluid syringe
- dry rag
- container for old liquid
- rubber hose, the diameter of which should be suitable for the bleed fittings on the wheels
- Special brake wrench 8 by 10 mm
Now fill the new brake fluid into the reservoir to the max level.
Now you need to completely remove the old fluid from the system by pumping it and filling it with new fluid.
Sequence of pumping brakes on Priora
- Rear right caliper
- Rear left caliper
- Front right caliper
- Front left caliper
This is the order in which you should bleed the brake system.
Brake fluid for Lada Priora
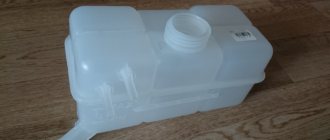
In order for the brake system in a Lada Priora to function correctly, it must contain the working fluid at the proper level. What volume is required for the correct functioning of the brake system can be found in the service book attached to the machine.
If the volume of brake fluid is insufficient, this will be signaled by a specially created device and a button located in the cabin on the control panel. As soon as the red icon lights up, which shows the bends, you need to immediately add liquid.
At the same time, you should inspect the entire system responsible for the brakes, since if the brake fluid leaks, this may indicate problems or the need to replace the master cylinder gasket.
Basic malfunctions of the ABS system
Any driver who has ever had an ABS light come on in a Priora will tell you about the sensor. But it could be worse - if the ABS in Priora does not work. There are several options in which to look for the source of the problem:
- wiring damage;
- mechanical damage to the brake fluid pressure valve block;
- failure of speed sensors.
The first thing you need to do when you see the light (ABS lights up) is to read the error symbols using a special diagnostic scanner. Each item in the ECU is indicated by a corresponding code:
- C0040 – the speed sensor (DSC) of the right front wheel is faulty;
- C0035 – DSC of the left front wheel is faulty;
- C0050 – DSC of the rear right wheel is faulty;
- C0045 – DSC of the rear left wheel is faulty;
- C0065 – front left valve (intake);
- C0060 – front left valve (exhaust);
- C0075 – front right valve (intake);
- C0070 – front right valve (exhaust);
- C0085 – rear left valve (intake);
- C0080 – rear left valve (exhaust);
- C0095 – rear right valve (intake);
- C0090 – rear right valve (exhaust);
- C0161 – the braking signal does not turn off;
- C0121 – power to the valves does not turn on;
- C0110 – electric return pump.
- C0550 – error in the “brains” - ECU;
- C0245 – error in receiving data from sensors;
- C0800 – power surges.
The solution may be simpler: an ABS sensor is installed under the fender liner. Dirt often gets into this area; an unprotected piece of wiring near the DSC connector can be damaged. Replacing it will help.
practical guide
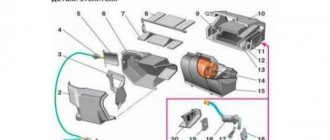
Working brake system of a Lada Priora with ABS:
1 — brake mechanism of the front left wheel; 2, 5, 13, 18 — brake hoses; 3, 8, 12, 19 — brake pipes; 4 — main brake cylinder; 6 — brake mechanism of the front right wheel; 7 — front right wheel speed sensor; 9 — reservoir of the main brake cylinder; 10 - vacuum booster; 11 — brake pedal; 14 — rear right wheel rotation sensor; 15 — brake mechanism of the rear right wheel; 16 — master disk of the rear left wheel speed sensor; 17 — brake mechanism of the rear left wheel; 20 - ABS hydraulic modulator
Note: The left brake mechanisms are also equipped with wheel speed sensors, which are not visible in the figure. On a vehicle not equipped with an anti-lock braking system, a fluid pressure regulator is built into the hydraulic rear brake actuator.
The car is equipped with two braking systems - working and parking.
The service braking system is designed to reduce the speed of the vehicle until it comes to a complete stop and briefly hold the vehicle stationary.
The service brake system is dual-circuit, diagonal, hydraulically driven, and consists of a master cylinder with a vacuum booster, four wheel brakes and a fluid pressure regulator in the rear brakes. The front wheel brakes are disc, non-ventilated, the rear wheels are drum.
Each of the car’s circuits includes brake mechanisms of two wheels (one front and one rear), located diagonally on the car. One circuit includes the brake mechanisms of the front right and rear left wheels, and the second circuit includes the brake mechanisms of the front left and rear right wheels. If one of the circuits fails, the second circuit, although with less efficiency, will ensure that the car stops.
The fluid pressure regulator limits the flow of fluid to the rear brake mechanisms when there is insufficient load on the rear axle, thereby preventing the rear wheels from locking and the rear axle of the vehicle from skidding during sudden braking. The regulator body has a control hole closed with a plastic plug. Liquid leakage from this hole indicates leakage of the regulator rings.
VAZ 2170 | Removing, checking installation of ABS wheel sensors
Removing, checking installation of ABS wheel sensors
Front wheel sensors
Removal
|
Examination
|
- Measure the resistance of the sensor - the measurement result should not fall outside the range of 1385 ± 110 Ohms
.
Installation
|
Rear wheel sensor
Removal
| The rear sensor is mounted on the rear axle gear housing and monitors the speed of the driven gear of the main drive - the sensor rotor is mounted on the cross-axle differential box. |
Examination
|
|
- Measure the length of the sensor element (B).
- By subtracting the result of the second measurement from the result of the first (A - B), determine the size of the working gap - the required value lies within the range of 0.5 ÷ 1.0 mm
. - If the calculation result is less than 0.55 mm
, select an adjusting washer of appropriate thickness. - If the gap is excessive, the sensor should be replaced.
- Measure the resistance of the sensor - the measurement result should not fall outside the range of 1000 ± 50 Ohms
.
Installation
|
Alternative solution to the issue
- remove the used liquid from the container and fill it with new one;
- bleed all four brake cylinders using the classical method according to the scheme specified by the manufacturer;
- install a special adapter for the compressor or a home-made installation instead of the “brake reservoir” cap;
- connect a hose to the drain fitting of the anti-blocking module and unscrew it 1 turn;
- create a pressure of about 1 BAR;
- identify the end of the release of old liquid and bubbles;
- relieve pressure.
When replacing used brake fluid with new brake fluid in an ABS system, the following notes should be taken into account:
- constant monitoring of the liquid level in the tank is necessary: a decrease below the minimum mark (MIN, Low) is not allowed;
- The permissible operating time of the hydraulic pump is 2 minutes; if it is exceeded, turn off the ignition and allow the unit to cool for 5-10 minutes.
- before draining the fluid, it is necessary to “discharge” the system by pressing the brake pedal at least 20 times;
- It is strictly prohibited to pour used liquid or a composition that has stood for a long time in an open container;
- When you turn on the ignition and the drain plug is open, you should be prepared for a sudden release of liquid.
Bleeding brakes on Lada Priora
After servicing or repairing the brake system of a Lada Priora, it is necessary to bleed the hydraulic brakes to remove excess air. I don’t think it’s worth talking about what the consequences may be if you ignore this procedure.
Signs of air getting into the brake system hydraulic drive:
– when you press the pedal once – increased pedal travel, its “softness”;
– with repeated pressing of the pedal - a gradual decrease in the pedal stroke with a simultaneous increase in its “hardness”.
Preparing to replace the brake fluid of a car with ABS: conditions and necessary tools
When servicing a vehicle's deceleration system, free access to the working cylinders of each wheel is necessary. Therefore, the most suitable place for work is an inspection ditch or overpass.
When performing the procedure, you will need an assistant and a set of equipment:
- set of open-end wrenches;
- a large-volume medical syringe and a hose about 10-15 cm long corresponding to the diameter of the tip (an alternative is a pear);
- container for extracted brake fluid;
- tube 20-30 cm long; diameter – slightly smaller than the diameter of the fitting on the brake cylinders (to ensure tension).
FAQ
One of the most common problems among motorists is the lack of effect from pumping the brakes. After the procedure, the pedal remains sluggish, and no improvements in the operation of the system are observed.
Two factors lead to this situation:
- lack of tightness of the system or any individual element;
- incorrect replacement of the master cylinder.
If all the air has not been removed from the cylinder during installation, it will subsequently be quite difficult to squeeze it out through the fitting.
Drivers are also interested in how much it is possible to bleed the brakes on their own, without the assistance of an assistant. To do this, purchase a special device that will make the procedure of bleeding the brakes easy and convenient without outside help.
You can bleed brakes with an ABS system at home without taking the car to a service station. The main thing is to follow all the basic rules of the procedure to prevent system breakdown.
Issues relating to motorists' rights are often more important than they appear at first glance. A driver may lose his license or suffer other severe penalties due to ignorance or misinterpretation of laws and regulations. Do not be lazy to dive deeply into the essence of the issue being studied, do not hesitate to ask advice from professionals.
Bleeding ABS brakes
Bleeding ABS brakes is essential for safe vehicle operation. After replacing the brake fluid, remove any remaining air from the system. The procedure for bleeding brakes with ABS confuses many drivers, since the process differs from that on cars where this system is not provided.
It is no more difficult to bleed a brake system with ABS than a conventional one. The main difference lies in the accumulator and valves, from which it is not so easy to remove air. However, if you have certain knowledge and skills, it is quite possible to bleed ABS brakes yourself, without the help of specialists from a service station.
Analysis of types of existing systems
At first glance, replacing ABS brake fluid is a trivial procedure. However, the modern auto industry forces one to take into account trends in the field of safety: in almost all cars, the anti-lock braking system is combined with the EBD brake force distribution system and the ASC traction control algorithm. However, these units are often controlled by ESP - the exchange rate stability system.
With such high-tech packages available, the procedure should be carried out exclusively in authorized service centers. The reason is the need to connect a diagnostic scanner to the computer. For the same reason, it is impossible to carry out the replacement yourself on cars where the pump with a hydraulic accumulator and the valve system are designed as separate assembly units.
It is possible to service the system on your own only on a car with this configuration: the hydraulic accumulator and the valve block are connected in one unit.
How to disable ABS on a Lada Priora with your own hands: video instructions
Let’s immediately make a reservation that, as experienced car owners note, including incorrectly disabling ABS on the Lada Priora, this can lead to operational problems, as well as unnecessary questions in service centers. Moreover, if the car is under warranty, the fact that the ABS is turned off may even lead to warranty service being denied.
Disconnection procedure
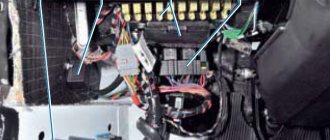
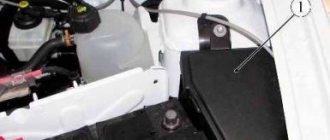
- first of all, you should open the mounting block, which is located near the battery;
- Turn on the ignition for a short time, while the ABS and brake indicator lights should not go out. A beep will also be heard;
- turn off the ignition;
- Unscrew the mounting block and remove its bottom cover;
- find the wire leading to the previously removed fuse, cut it lengthwise and strip the bare ends by 1.5-2 centimeters.
First you need to purchase a simple relay with five contacts. It is also recommended to carefully study the contact diagram. After all of the above steps have been completed, you have to find contacts numbered 85 and 86, which go to the winding.
To summarize, it is worth noting that the process of disabling ABS on the Lada Priora, as well as on other brands of cars, is not complicated, and theoretically, any owner can disable it independently. At the same time, I would like to remind you once again that disabling ABS independently carries certain risks, in particular, an increase in braking distance in bad weather conditions, as well as difficulties in the process of repairing and servicing the car, including if it is in warranty period.
Bleeding the brakes on a Priora
Welcome! The brake system is sealed, but if the seal is broken (for example, the brake hose is torn), then air will immediately enter the system, which will leave your entire car without brakes; it can only be removed by restoring the seal again (for example, the brake hose is torn, install a new one and the brake system will be sealed again) and bleed the brake system of the car after that, otherwise, as we said earlier, the car will not really brake, and the brake pedal will be pressed easily and without any effort (This indicates that the system is airy and requires bleeding), if all the symptoms are present in your car, then first look to see if brake fluid is leaking anywhere, and after inspection, you can start pumping the brakes, due to which the car will again brake as before.
Note! To bleed the brakes, the following tools are needed, namely: A wrench size “8”, a small long transparent hose that can be put on the bleeder fitting, as well as a container with a little new brake fluid poured into it and be sure to stock up on a rag, brake fluid nevertheless, it has a negative impact on human skin and paintwork, and if you get it on something listed above, be sure to wipe the area of contact with a cloth, otherwise problems may arise in the future!
Summary:
When should you bleed your brakes? Again, we repeat, the brakes are pumped only when the system gets depressurized, and it gets it mainly because of the brake hoses, even if it is not torn, you change the caliper, for example, the hose will still need to be disconnected and after disconnecting it into the brake system air flies in, due to which the brakes disappear and become, as people say, weak, but the signs that the brakes need to be pumped are as follows: When pressed for the first time, the pedal easily rests on the floor (increased pedal travel), with repeated pedal travel, the pedal travel decreases and eventually it becomes hard, after a while this symptom, if it repeats again, then this indicates that there is air in the brake system and it needs bleeding.
Note! By the way, air can still get into the system when all the brake fluid leaves the reservoir (less than the MIN mark, even if it leaves, then we can assume that air has already entered the brake system a little), so always monitor its level and do not bring the brake reservoir to complete devastation!