↑ bluetooth and handsfree
Thanks to such a convenient function as Bluetooth, the standard tape recorder can operate in telephone mode, which allows the driver to answer calls without being distracted by a mobile phone.
If you press the key with the green handset, the phone mode turns on and finds nearby phones with Bluetooth functionality. Next, a password is displayed on the radio screen, which you must enter on your mobile phone. And in order for this mode to be disabled, just press the button with the red tube.
Installing a multifunction steering wheel on Lada Vesta Lux without Multimedia
The manufacturer installs a multifunction steering wheel (multi-steering wheel) on Vesta only on two trim levels (Comfort and Luxe) with the Multimedia option package. Let's look at the features of installing a steering wheel with buttons yourself on other versions of the sedan, including those with a push-button radio.
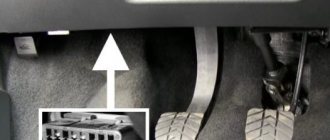
We check that the steering column switch (volatile) has a connector for connecting the block with wires (photo No. 2 below), as well as the presence of a gray bundle of wires going into the steering wheel (photo No. 3 below). To do this, you need to remove the upper part of the plastic steering wheel cover (photo No. 1 below) by removing the two Torx screws from the bottom. And then, looking for gray wires, look between the steering wheel and the casing (or remove the airbag):
- If there are gray wires for the buttons on the steering wheel (they should be on the “Lux” configuration), then modification will not be difficult (more on this later in the article).
- If there are no wires (they were not found on the “Classic” and “Comfort” versions), then the modification will be a little more complicated (instructions here).
↑ problems and their elimination, as well as how to remove the radio from the Lada Vesta
If the driver presses several options at once, or during a sudden temperature change, the radio may freeze. In this case, you will have to first press RESET and then reboot the radio. If even after this the radio does not start working, you will have to contact a service center.
The radio is removed only for repairs or subsequent dismantling. Before doing this, you need to disconnect the wire terminals from the car battery.
First you need to remove the central trim. In this case, the console is held on by clamps and can be easily snapped off. Disconnect the wires from the emergency lights and remove the plastic cover.
Next, the screws and air ducts are turned out, for which a screwdriver and a T20 nozzle are used. Using the same tools, the screws are unscrewed and the radio is removed from the socket. At the last stage, all that remains is to pull the tape recorder towards you and disconnect the connectors with wires.
New Lada: Galvanizing and painting the Lada Vesta body
Installing a multifunction steering wheel on Lada Vesta classic and comfort
The multi-steering wheel on Vesta is only available in the Multimedia option package of the Comfort and Luxe trim levels.
Owners of luxury cars are luckier, because... on these versions of cars there is partial preparation for connecting steering wheel buttons. Let's look at the instructions for installing the multifunction steering wheel on Vesta in more affordable trim levels (Classic and Comfort). We check that the steering column switch (volatile) has a connector for connecting the block with wires (photo No. 2 below), as well as the presence of a gray bundle of wires going into the steering wheel (photo No. 3 below). To do this, you need to remove the upper part of the plastic steering wheel cover (photo No. 1 below) by removing the two Torx screws from the bottom. And then, looking for gray wires, look between the steering wheel and the casing (or remove the airbag):
- If there are gray wires for the buttons on the steering wheel (they should be on the “Lux” version), then modification will not be difficult (instructions are here).
- If there are no wires (they were not found on the “Classic” and “Comfort” versions), then the modification will be a little more difficult (more on this later in the article).
How does the “Lux” version of Vesta differ from “Classic” and “Comfort”:
- A steering column switch (snail) with wires for the buttons on the steering wheel is installed;
- There is wiring from the snail to the ECU to control the cruise control and speed limiter;
- The instrument panel has a different firmware version (there is an indication of the operation of the cruise control and speed limiter).
Before starting work, disconnect the negative terminal of the battery.
How to connect your phone via bluetooth to your car: 2 comments
Good afternoon Please tell me why the radio is connected to the phone only for calls, but cannot play music!
Hello, Oksana! There are different problems, most often you need to delve into the phone settings. For example, in Android there is an item in the Bluetooth settings A2DP.
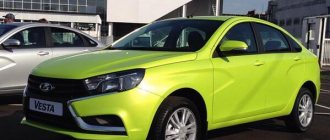
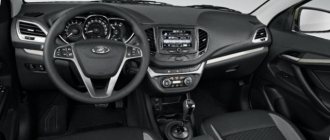
Compared to the multimedia system installed on a luxury vehicle, the Lada Vesta’s standard radio looks modest, but its functionality allows you to enjoy your trips to no lesser extent.
Installing Multifunction steering wheel on Vesta.
In the simple configuration, the Vesta does not come with buttons on the steering wheel, with which you can use Cruise Control (CC), Speed Limiter (OS), as well as control the volume of the radio and change channels.
Additional buttons on the steering wheel of the Lada Vesta make it possible to control the music system and cruise control. The music on the steering wheel is controlled by buttons located to the left and right of the horn button. On the left there is a cruise control unit that allows you to perform the following actions:
- Enable – disable cruise control.
- Speed limit - on and off.
- Increase or decrease cruise control speed.
- Suspension of cruise control, speed limit.
- Setting the stored speed.
Audio system functionality
The Lada Vesta car radio works together with four factory speakers installed inside the car. The device menu pleases with a solid number of settings. In addition to several equalizer modes, you can choose how to play tracks: in order, scattered within one folder or all folders, repeat track, repeat folder.
The SD memory card size must not exceed 16 GB, otherwise the audio system will not read it. The number of folders on the card should be no more than 256, and files – no more than 1024.
New Lada: Comparison of Kia Serato and Lada Vesta, what is the difference?
Connecting a steering wheel with buttons
So, a block with wires is already connected to the steering wheel, so maintaining a given speed and the limiter will work immediately after installing the multi-steering wheel ( left button panel ).
To activate control of the radio or multimedia system ( right button panel ), you will have to modify the design. We add 5 wires to the block (which already has wires for cruise control), and put a miniISO block on the other end and insert it into the radio (how to remove it).
Wiring diagrams for the Vesta multifunction steering wheel (radio control):
As a result, using the buttons on Vesta’s steering wheel, it will be possible to control the radio, cruise control and speed limiter, and the button backlight will also work.
The only difference from the standard implementation is that there will be no indication of cruise control operation on the instrument cluster. To do this you need to flash it. By the way, during the panel test, pay attention to the cruise control indicators (icons in the speedometer well at about 140 and 160 km/h); if they are on, then the firmware is correct.
Here is the cruise control indication on Vesta, which has a multifunction steering wheel from the factory:
Let us remind you that the “Multimedia” option package includes not only a multifunction steering wheel, but also a rear view camera. We looked at how to connect a camera to a multimedia system earlier. By the way, another way to modify Vesta is to install fog lights.
I have been using the cruise for the third month now - the perfect smoothness of the ride and precise adherence to the speed limit (108 km/h highway, 128 Ring Road) delight me, my passengers and my wallet.
I wanted to install cruise even before buying the car) At that time, the Comfort-Multimedia package was not on sale, and the toad animal did not allow me to overpay for 16-wheel drive, heated windows and other features I didn’t need. It whispered in my ear - “it’s a shame that no one has set up a cruise yet, this is probably a one-two task, set a couple of buttons and go!” It turned out, not really... So, how it was: I started with these reports. www.drive2.ru/l/10378423/ Everything seems to be fine, only a case is described when the equipment is luxury. And there really is a freebie) Here is a description for comfort and classics: xn--80aal0a.xn--80asehdb/…a-klassik-i-komfort.html# Everything would be fine, but there are not enough details. I will try to supplement it myself and outline the missed subtleties that I had to solve during the process. Well, here people are also actively discussing the process, some useful thoughts came from there, but there are also a lot of useless ones - www.lada-vesta.net/showthread.php?t=813
Preparation step by step: 1. Buy a multifunction steering wheel 8450006832, 5000 RUR. 2. Buy a steering column switch - 8450006924, 8000 rub. Moreover, from there you will only need to take a penny snail, which fundamentally differs from ours in several wires! Scheise! 3. Buy wires - I used a 6x0.22 mm2 network cable. To the radio you need 5 wires less than a meter long, to the ECU you need 3 - I ran all 6, two of them. This is not the best choice - it is better to take 3 slightly thicker wires (up to 1mm). 4. Buy any compact connector with 10-12 contacts (You’re unlikely to find the original 1379662 TE, so here’s lifehack where to get it) 5. BLS contacts for the ECU, like these: sklep.avt.pl/media/produc…big_BLT. jpg?lm=1450095426 6. Mini-ISO C3 connector blue 7. Electrical tape, heat shrink tube, soldering iron (optional) 8. Warm season or garage. I did it at 0 degrees outside – BRRRRRR!
Price of touch radio
Having compared two types of standard car radios on the Lada Vesta, the question arises: how much does a normal radio tape recorder cost? The initial price of a car radio is 20 thousand rubles, and may increase depending on the installed additional programs and applications. A high-quality device should be purchased from trusted company websites.
At the moment, two types of Lada Vesta radios are installed in VAZ cars. This is the standard Vesta radio, which is included in the starting configurations, and the MMC, which is typical for the TOP models. And although the standard model looks very modest in appearance, thanks to its functions it also allows you to fully enjoy musical works.
How to remove the new glove compartment on a Lada Vesta SW Cross
I needed to run the power wire from the cigarette lighter socket to the DVR in the car, and it turned out that in order to lay the wire unnoticed, it is better to run it over the glove compartment, and for this, the glove compartment must be removed. I know how to remove the old-style glove compartment on the Lada Vesta SW Cross, but on the modernized Vesta 2020, the glove compartment has a different design and is attached slightly differently.
So, let's arm ourselves with a Torx 20 screwdriver and get started.
The glove compartment (or glove box) on the Lada Vesta SW Cross is now attached to only three screws. Moreover, two of them are completely identical, and the third has a slightly larger diameter and comes with a washer.
First, remove the door seal on the right side at the level of the glove compartment; to do this, simply pull it towards you:
Removing the door seal
Then we remove the side panel trim, there is no need to remove the airbag switch, the panel is held only by latches and the first time you need to apply quite a lot of force to remove it, you practically need to press with all your might. It is not advisable to use a screwdriver, otherwise you may scratch the panel. We rest our thumb on the end of the panel and forcefully move it to the right:
Removing the Side Panel
Simply move the panel to the side:
Removing the Side Panel
After this, you need to lower the glove compartment lid and unscrew the three screws that secure the glove compartment, by the way, the glove compartment lid has a fixed position at the bottom, to do this, just lightly press down on the lid when it is completely open and they will drop about another centimeter down and lock.
Unscrew the first screw (remember that it is slightly larger than the others and has a washer):
Unscrew the first screw
Then the second one:
Unscrew the second screw
All that remains is to unscrew the third screw. Here you need a screwdriver; you can’t get to it with an L-shaped wrench; it’s recessed too deeply. The screwdriver should not be long, otherwise you won’t be able to unscrew it either - the glove compartment lid will get in the way.
Unscrew the third screw
After this, close the glove compartment lid and pull it towards you. Under no circumstances should you lower it down, otherwise, firstly, you can tear off the wires that go to the connectors of the glove compartment lighting lamp and the LED “atmospheric” illumination of the front passenger’s feet and the wires to the limit switch for turning off the glove compartment lighting lamp. And secondly, you can break the guides of the air duct that blows on the front legs of the passenger.
That is, we pulled the glove compartment towards us a little, and, holding it suspended with our left hand, disconnected three connectors with our right:
Disabling the glove compartment connectors Lada Vesta SW Cross
Now you can completely remove the glove box:
Glove box Lada Vesta SW Cross bottom view
It is clear that in order to lay the wire to the recorder, you do not need to completely remove the glove compartment and disconnect the connectors; it is enough to lay the wire into the gap that is formed after unscrewing all the screws (the wire should be additionally insulated):
Laying the wire to the DVR on Lada Vesta SW Cross
And screw the screws back in.
Reinstalling the glove compartment has a couple of points to pay attention to.
After connecting all the connectors, the glove box must be installed strictly horizontally until it stops in order to fit into the guides. There are two of them, one on top and clearly visible:
Upper glove box guide
When installing the glove box, it should go into this mating part, under the dashboard:
Mating part of the glove box guide
And the bottom one:
Bottom of glove compartment guide
It should go into this response part:
Mate for bottom guide
And, if the upper guide gets into the mating part itself, then you need to be careful with the lower guide so as not to tear the seal or break the mating part itself, since it is made of thin plastic. For example, if, when removing the glove compartment, you simply lower it down, the lower guide will simply burst (not to mention the broken wires):
Damaged lower glove compartment guide (consequences of a car service)
If, after unscrewing the screws, you immediately lower the glove compartment down, this guide will be damaged.
In general, the work of removing and installing the glove box is not difficult, if you take into account some of the nuances. And I also want to note that when screwing the third self-tapping screw down, the clip into which it is screwed may fall out, it doesn’t stay in place very well, you can remove it, tighten it with pliers and put it in place:
Clip
After installing the glove compartment in place, you need to check that the seal of the glove box cooling duct, which is glued to the air duct:
Glove box cooling duct
Didn't wrap up and didn't block the hole in the glove compartment:
Cooling hole for glove compartment
That's all, if you suddenly have questions or suggestions, you can write them in the comments.
Comments (0)
No comments posted here yet
Leave your comment
- Post a comment as Guest. Register or Login to your account.