Replacement
Replacing the part yourself is not difficult. To do this, you need to arm yourself with the following set of tools:
- screwdriver;
- keys 10, 13;
- 5 - with a cubic syringe or bulb;
- brake fluid;
- clamps.
If during disassembly you find that the old rubber hoses have become hard, it is recommended to replace them with new ones.
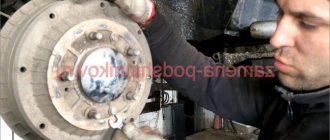
- Remove the belt from the expansion tank and put it aside.
- Using a ten key, unscrew the fastenings of the brake fluid reservoir and open the lid.
- Drain the brake fluid into a container.
- To prevent brake fluid from entering the engine compartment, it is necessary to place a piece of dense material under the cylinder.
- Loosen the clamps on the hoses extending from the tank and remove them.
- Disconnect the three brake pipes and move them a little.
- We unscrew the two nuts securing the cylinder to the amplifier, using a 13mm wrench.
- Remove the brake master cylinder.
- We clean the seat of the spare part from dirt and brake fluid residues.
- Let's move on to a new element. We remove the protective seal and install the oil seal there.
- We insert the new cylinder into place and tighten the nuts.
- We remove the plugs and use a syringe to inject brake fluid into the cylinder cavity until it is completely filled.
- We assemble the remaining elements.
The final stage of repair work will be bleeding the car's brake system.
Where and how to order the service?
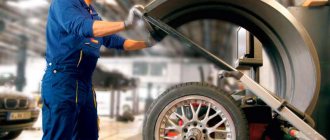
If the car owner does not have a device for foot or manual tire inflation, then you should contact a tire service station. There are many such organizations today. It is important to choose qualified and experienced professionals.
Overinflating wheels can result in the following:
- Reducing the smoothness of the car.
- Deterioration of adhesion to the road surface.
- Increasing the level of background noise from the highway.
- Increased load on the chassis.
- Quickly erase the cover protector.
Under-inflation of tires leads to the following consequences:
- An accident due to poor road grip and poor vehicle control.
- Increased fuel consumption.
- Quickly erase tires.
To order a tire inflation service, you must do the following:
- Find a tire shop.
- Contact a representative of the auto service organization by phone. Describe the problem, find out the cost, deadlines, terms of cooperation.
- If everything suits you, then you need to agree on a time to visit a tire shop to inflate the wheels. If the tires are very flat, you can call a technician to the location of the car.
- Give the car to a mechanic for work.
- Accept the job, complete the payment.
Power unit
The engine installed on the modern model of the Niva 21213 (214) car was inherited from its Soviet progenitor - the VAZ 2121, and in terms of fluid volumes they are almost identical:
- Liquid cooling system. Filled with antifreeze in an amount of 10.7 liters with a freezing point not higher than -40 ° C. The capacity of the interior heating radiator is also included in this volume.
- Crankcase. Motor oils are poured here, the brand of which depends on the operating conditions. Capacity: 3.75 liters, including oil filter filling.
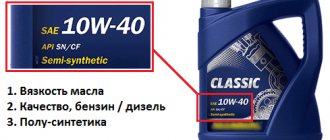
The viscosity of the oil poured into the Niva engine must correspond to the outdoor temperature at which the car is operated. Possible modes and suitable oil brands are shown in the table:
| Lower limit of ambient temperature, °C | -20 | -25 | -25 | -30 | -30 | -15 | -35 | -30 |
| Upper limit of ambient temperature, °C | +45 | +35 | +45 | +35 | +45 | +45 | +25 | 30 |
| SAE lubricant viscosity grade | 15W-40 | 10W-30 | 10W-40 | 5W-30 | 5W-40 | 20W-40 | 0W-30 | 0W-40 |
When flushing the power unit during the process of replacing liquid lubricant, the same amount of flushing oil (3.75 l) is used, taking into account the size of the filter. Replacement is carried out after 8-12 thousand kilometers, depending on the quality of the oil. Flushing is usually performed after 3 engine lubricant changes.
During operation, it is important to monitor the oil level in the engine crankcase using a special dipstick. If the level drops below the Min mark, you urgently need to add lubricant to the engine of the same viscosity as was previously filled
Antifreeze needs to be updated at least once every 3 years or according to the degree of wear of the fluid. It is not recommended to dilute antifreeze with distilled water, either in winter or summer. In winter, the diluted liquid may freeze, and during the summer heat it may boil ahead of time, which will lead to overheating of the engine.
How much does it cost to inflate tires at a tire shop?
Low tire pressure is not uncommon. To keep your wheels in good shape, you need to periodically visit a tire shop. In Russia, inflating tires will cost from 25 to 200 rubles and more .
Wheel inflation is a service during which a tire specialist uses special equipment to increase the pressure inside the wheel product. Special auto compressors and other types of equipment are used to inflate tires.
A decrease in tire pressure can be caused by the following reasons:
- Sudden change in temperature.
- Hitting a nail or other sharp object.
- Tires punctured by ill-wishers.
Paging is an important and necessary procedure. If the pressure inside the car wheel is insufficient, this can lead to the following:
- Reduced vehicle stability on the road.
- Increased fuel consumption.
- Difficulty driving the car.
- Rapid tire wear.
Inflating the wheels takes several minutes. This is a fairly simple procedure.
Signs of brake fluid loss of quality
- Increasing the length of the path to a complete stop of the car;
- Pressing the brake pedal requires force;
- The pillbox in the expansion tank changed color from light to dark;
- At the place where the tank is installed, traces of lubricant leakage are visible, the level is below normal;
- The yellow indicator light is on on the dashboard.
If one or more signs are detected, stop the car, turn off the engine, and inspect the brake circuit and master cylinder. If traces of depressurization of the circuit are visible, then call a tow truck to deliver the car to a service center. Subsequent operation of the technical device is unsafe.
Brake fluid Niva Chevrolet, choice
Let's take the following fact as an axiom - almost NONE of the leading manufacturers of pads or brake components make their own brake fluid. It is made either by chemical concerns or manufacturers of auto chemicals and oils. Example. Everything that is in jars of the TRW, BMW, ATE brands is made by manufacturers ROWE, BASF, Pentosin, ELF-TOTAL. Therefore, when I selected suppliers, I was guided by the following thought. A well-known company that deals with brake systems simply will not disgrace itself and sell a low-quality product in its own name. That's why I settled on Bosch, TRW, Brembo products. To fully pump the system of our car, 1 liter of product is enough. There is still some left for refilling.
Question answer.
Why don’t you use and recommend using Russian brake fluids?
I have already spoken about the lack of GOSTs. Another important fact. There are industries in which we are not very far behind others, and I am completely on the side of our manufacturers. But as far as chemistry is concerned, and this includes oils, lubricants, cuffs, rubber, the lag is very serious. I don’t want to fill in the “semblance” of brake fluid and put my reputation and the client’s LIFE on the line. Bad brake fluid is not the same thing as windshield washer with a bad smell. Once again, let me remind you of a well-known phrase from the world of sports: car tuning begins with the brakes.
The brake system on a VAZ 2121 and Niva 2131 is bled when air appears in the system, which usually occurs in the event of depressurization of the latter due to temporary wear and damage, as well as after replacing various elements of the system. To carry out repair work, you will need an empty plastic bottle, a silicone hose (the internal diameter of the hose must be equal to the diameter of the brake cylinder fittings), brake fluid and a standard set of tools, you will also need the help of an assistant, since this work is quite difficult to do alone at home.
If you have everything you need, do the following:
Having driven the car onto a viewing hole or overpass, we loosen the fittings on all brake mechanisms, having first removed the rubber caps. If some of the fittings do not have caps, then upon completion of the work they must be installed to prevent clogging with dirt.
We put an assistant behind the wheel and, pressing intensely on the brake pedal, create pressure in the system, that is, you need to pump until the pedal is blocked and without releasing, but continuing to press on it, you thereby put a hose on the fitting, and its other end Place it in a bottle that has been previously filled with brake fluid. Loosen the fitting and release the pressure in the system. If there is air in it, the liquid will come out with characteristic air bubbles. Then tighten the fitting and repeat the operation.
We pump until only liquid without air comes out of the system.
Similarly, we pump each wheel of the front and rear circuit. During the work process, do not forget to add liquid to the tank.
Upon completion, tighten the fittings on all cylinders and put rubber protective caps on them.
At this point, the repair work on bleeding the brake system on the VAZ 2121 and Niva 2131 has been completed.
We bleed the hydraulic clutch on a Niva 2121 and 2131 when there is air in the system, which is accompanied by deterioration of the clutch, provided that the remaining elements of the system are in good condition. To carry out repair work, the car must be driven into an inspection pit, overpass or lifts, then prepare a standard set of tools and perform the following sequence of actions:
- Check the brake fluid level in the clutch hydraulic reservoir and add if necessary.
- Prepare an empty plastic bottle into which you need to fill the brake fluid; you will also need a silicone tube with an internal diameter that should match the diameter of the clutch slave cylinder fitting.
- Next, remove the protective cap from the working cylinder fitting. If it is not installed, then it is necessary to clean the hole in the fitting and, upon completion of the work, be sure to install a new one so that it does not become clogged.
- We put one end of the tube onto the fitting, the other end of which is lowered into a container with brake fluid.
- Using an eight key, loosen the tightening of the fitting.
- Now the assistant should press the clutch pedal sharply and release it smoothly. At this moment, brake fluid with air bubbles will come out of the hose. We repeat this operation until the air in the system runs out.
- We tighten the cylinder fitting with the clutch pedal depressed.
- During the pumping process, do not forget to monitor the fluid level in the tank and add it if necessary.
At this point, the repair work on bleeding the hydraulic clutch on the Niva 2121 and 2131 has been completed.
Sources
- https://niva-fr.ru/tormoza-obshhaya-statya/tormoznaya-zhidkost/
- https://remladavaz.ru/kak-prokachat-tormoznuyu-sistemu-vaz-2121-niva-2131
- https://remont-vaz2106.ru/niva-2121-2131-prokachka-gidroprivoda-scepleniya
Alternative way
This method is suitable when it is not possible to use the help of a partner. To do this, you will need to create excess pressure in the system using a simple bladder or spare tire. You'll have to be Kulibin a little to make an adapter between the chamber fittings and on the expansion tank cap (you need to use a spare cap).
The essence of the procedure is the same as in the first option. You should unscrew the bleeder fittings one by one to get rid of excess air. Experts recommend carefully monitoring the fluid level in the tank and, if necessary, adding it to the required volume.
Reg.: 11/13/2011 Messages: 38 From: Russia, Sverdlovsk region, Serov Age: 37 Car: Niva 21213 2000.
Reg.: 03/30/2008 Threads / Messages: 9 / 2346 From: Surgut Age: 33 Car: VAZ 21310i 2012 October
Reg.: 11/13/2011 Messages: 38 From: Russia, Sverdlovsk region, Serov Age: 37 Car: Niva 21213 2000.
Reg.: 03/30/2008 Threads / Messages: 9 / 2346 From: Surgut Age: 33 Car: VAZ 21310i 2012 October
Reg.: 12/26/2011 Topics / Messages: 1 / 634 From: Ryazan region Age: 44 Car: VAZ-2131 2011, Bosch ME 17.9.7, Multitronics TC 50UPL, 27.135 MHz.
yonnex001 wrote: What is the procedure for bleeding the brakes on new Nivas with a diagonal brake pattern?
— rear right wheel; — front left wheel, upper fitting; — front left wheel, lower fitting; — rear left wheel; — front right wheel, upper fitting; — front right wheel, lower fitting.
Ask yourself, I answered myself. Maybe it will be useful to someone! _________________
Reg.: 10.15.2006 Threads / Messages: 5 / 5013 From: kolomna Age: 44 Car: 21213 98. 1875cm3 48mm split gear megasolex zero filter prosport automatic octane corrector ASTRO-PENZA
| 105 posts on previous pages |
Volume of fluid in the brake system
Basically, the brake system holds from 0.55 to 1.0 liters of fluid, this depends both on whether the car has an ABS system and on the size of the car. The period for replacing brake fluid in most cars is 2-3 years of use, or 40-60 thousand mileage. To determine a more specific interval, you need to look at a specific fluid standard and driving characteristics. For example, in sports cars the TZ is changed every 5-10 thousand.
But since the question of the required volume of brake fluid in the system and its standard is asked only by owners of ordinary cars, and not premium or business class ones, we will give specific examples for cars popular in the CIS countries.
What and how much brake fluid is in some cars
| Table of the volume of brake fluid required for replacement | ||
| car model | DOT class | Required amount of fuel fluid, l |
| Ford Focus 2 | DOT4 | 1 |
| Ford Focus 3 | DOT4 | 1 |
| Ford Kuga | DOT4 | 1 |
| Chevrolet Niva | DOT4 | 1 |
| Chevrolet Cruze | DOT4 | 1 |
| Chevrolet Lacetti | DOT 4 | 0.5 a with ABS and ESP 1.0 |
| Kia Sid | DOT4 | 1 |
| Kia Rio 3 | DOT4 | 1 |
| Kia Rio 2 | DOT 4 | with ABS - 1-1.5 l without - 1 l |
| Kia Sorento | DOT 5.1 | 1 |
| Kia Spectra | DOT3, DOT4 | 1 |
| Renault Logan | DOT 4 | with ABS – 1-1.5 l without – 0.7 l |
| Renault Duster | DOT4 | 1 |
| Renault Fluence | DOT4 | 0,5-1 |
| Renault Sandero | DOT4 | 1 |
| Renault Megane 2 | DOT4 | 1 |
| VAZ 2107, 2109 | DOT 3 | 0,55 |
| VAZ 2114, VAZ 2115 | DOT 4 | 1 |
| VAZ 2108, 2110, 2112 | DOT 4 | 1 |
| Lada Kalina | DOT 4 | 1 |
| Lada Priora (VAZ 2170) | DOT 4 | 1 |
| Lada Granta | DOT 4 | 1 |
| Lada Largus | DOT 4+ | 1 |
| Daewoo Matiz | DOT 4 | 1 |
| Mitsubishi Pajero 4 | DOT 4 | 1 |
| Mitsubishi Lancer IX | DOT 3, DOT 4 | 1 |
| Mitsubishi Lancer 10 | DOT 4 | 1 |
| Mazda Demio | DOT 3, DOT 4 | 1 |
| Mazda 3 | DOT 5.1 | 1 |
| Mazda cx 5 | DOT 4 | 1 |
| Skoda Superb II | with ABS DOT 4 | 1 |
| SKODA Octavia A5 | DOT 4 | 1 |
| Toyota RAV4 | DOT 3, DOT 4 | 0,5 |
| Toyota Corolla | DOT 4 | 1 |
| Toyota Prado 150 | DOT 4, DOT 5.1 | 1,5-1,6 |
| Volkswagen Polo sedan | DOT 4 | 1 |
| Daewoo Nexia | DOT 4, DOT 5.1 | 1 |
| Hyundai Solaris | DOT 4 | 1 |
| Hyundai Accent | DOT 5.1 | 1-1,5 |
| Volvo XC70 | DOT 4+ | 1 |
| Nissan Tiida | DOT 4 | 1 |
| Nissan Qashqai | DOT 4 | 1 |
| Nissan X Trail | DOT 3, DOT 4 | 1 |
How much brake fluid is in the VAZ system
As you can see in the TZ volume table, VAZ cars are filled with brake fluid of the DOT-4 standard, but its amount in the brake system can be from 550 ml in classics (VAZ 2107), to 1.0 liters in more modern domestic cars, such as VAZ 2110 or Kalina. But if you replace the TJ with flushing, then you should take 1.5 liters, and since there is no such packaging, you will have to buy two liter bottles.
However, remember that when opened, the shelf life of brake fluid is limited to two years.
How often to change brake fluid
Useful recommendations on how often to change the brake fluid in a car. Regulations on the frequency of changing brake fluid. Read more
How to bleed the brakes
To properly bleed the brakes, you need to know the bleeding procedure specified by the car manufacturer. At the same time, such mistakes should not be made...More
Bleeding the brakes without an assistant
Bleeding your brakes can be a challenging task at times. But there is a simple way to do it without an assistant. See instructions for bleeding your car's brakes yourself. Read more
Parking brake system
The parking brake system acts on the rear wheels of the car and is driven from the lever by the force of the driver's hand.
The parking brake system includes rear brake mechanisms and a mechanical drive.
The mechanical drive (Fig. 51) includes: manual lever 3, front cable 2, guide 9, rear cable 14, release levers 13 and spacer bars 12.
Rice. 51. Mechanical drive of the parking brake system:
1 — cover; 2 — front cable; 3 — manual lever; 4 — button; 5 - spring; 6 - traction; 7 — bracket; 8 — lever; 9 — rear cable guide; 10 — spacer sleeve; 11 — tension spring; 12 — spacer bar; 13 — expansion lever; 14 - rear cable.
Lever 3 is hinged to bracket 7, which is installed on the floor of the car body. When the lever moves upward, the force from it is transmitted through lever 8, front cable 2, guide 9 and rear cable 14 to the release levers 13 and spacer bars 12 and from them to the brake pads of the rear brake mechanisms. Lever 3 is fixed in a given position by a latch, which is constantly pressed to the gear sector by spring 5 through rod 6. The latch is released by pressing button 4. Spring 11 ensures that the front and rear cables return to their original position when lever 3 of the parking brake system is released.
Flushing fluids for the engine lubrication system
Table 4
Table 5
Table 10
Table 12
| Material grade | Manufacturer | Regulatory document |
| PENTOSIN CHF11S | Pentiosin Werke AG, Germany | TTM 1.97.0964-2004 |
List of products containing precious metals in LADA 4x4 cars
| Product number | product name | Location of precious metals | Weight in grams | ||
| gold | silver | palladium | |||
| 2115-3801010 | Instrument cluster | In semiconductors | 0,000263 | 0,016414 | |
| 2105-3747010-03 | Turn signal and hazard warning light switch | Gold in semiconductors, silver in contacts | 0,0180561 | 0,0208012 | 0,103 |
| 2105-3709310/-01 | Three lever switch | Coating | 0,1664 | ||
| 2101-3704010-11 | Ignition switch | In contacts | 0,14078 | ||
| 2105-3710010-03/-04 | Hazard switch | In contacts | 0,107 | ||
| 21213-3709607 | Heated rear window switch | In contacts | 0,11517 | ||
| 2113-3709609-10 | Rear fog lamp switch | In contacts | 0,115169 | ||
| 2104-3709612 | Rear window wiper and washer switch | In contacts | 0,403093 | ||
| 2107-3709608-01 | Heater switch | In contacts | 0,265997 | ||
| 21045-3709280 | Fuel heating switch | In contacts | 0,170288 | ||
| 2108-3720010-10/-11/-12 | Brake light switch | In contacts | 0,1681 | ||
| Generator voltage regulator | In semiconductors | 0,0534 | |||
| 2106-3828110 | Water temperature indicator sensor | In contacts | 0,0161637 | ||
| 2105-3747010-02/03 | Relay-breaker for direction indicators and hazard warning lights | Gold in semiconductors, silver in contacts | 0,00021 | 0,0731 | |
| 2105-3747210-12 | High beam relay | In contacts | 0,055 | ||
| 2105-37470-1010-12 | Low beam relay | In contacts | 0,055 | ||
| 2105-3747210-02 | Headlight wiper relay | In contacts | 0,137 | ||
| 2114-3747610 | Rear fog light relay | Gold in semiconductors, silver in contacts | 0,000998 | 0,034935 |
Brake system diagram
1 – rear brake wheel cylinder; 2 – rear parking brake cable; 3 – rear cable guide; 4 – front parking brake cable; 5 – parking brake lever; 6 – brake pedal; 7 – vacuum booster; 8 – secondary circuit pipeline; 9 – primary circuit pipeline; 10 – main cylinder; 11 – front brake wheel cylinder block; 12 – master cylinder reservoir; 13 – pressure regulator; 14 – pressure regulator drive lever Monitoring and adjusting the brakes 6.2.1. Inspection of pipelines and connections General Information To prevent sudden failure of the brake system, thoroughly measure the position of all pipelines:
– metal pipelines should not have dents, cracks and should be located away from sharp edges that could damage them; – brake pipelines should not have through cracks on the outer shell and should not border on mineral oils and greases that dissolve rubber; by pressing the brake pedal firmly, check to see if any swelling appears on the hoses, indicating a malfunction; – all brake lines must be properly secured; loosening of the fastening leads to vibration, causing breakdowns; – loss of liquid through pipeline fastenings is not allowed; if necessary, tighten the fittings until they fail without subjecting the pipelines to deformation.
Replace the parts with new ones, let’s say there is the slightest doubt about their suitability. Replace with new ones after 100,000 km or after 5 years of vehicle operation to prevent sudden ruptures due to aging. Control and adjustment of brakes 6.2.1. Inspection of pipelines and connections General Information To prevent sudden failure of the brake system, thoroughly measure the position of all pipelines:
– metal pipelines should not have dents, cracks and should be located away from sharp edges that could damage them; – brake pipelines should not have through cracks on the outer shell and should not border on mineral oils and greases that dissolve rubber; by pressing the brake pedal firmly, check to see if any swelling appears on the hoses, indicating a malfunction; – all brake lines must be properly secured; loosening of the fastening leads to vibration, causing breakdowns; – loss of liquid through pipeline fastenings is not allowed; if necessary, tighten the fittings until they fail without subjecting the pipelines to deformation.
Replace the parts with new ones, let’s say there is the slightest doubt about their suitability. replace with new ones after 100,000 km or after 5 years of vehicle operation to prevent sudden ruptures due to aging. After five years of operation, it is recommended to replace the brake fluid with new one.
Next page""""""
- 10. 11. 12. 13. 14. 15. 16. 17. 18. 19. 20. 21. 22. 23. 24. 25. 26. 27. 28. 29. 30. 31. 32. 33. 34. 35. 36. 37. 38. 39. 40. 41. 42. 43. 44. 45. 46. 47. 48. 49. 50. 51. 52. 53. 54. 55. 56. 57. 58. 59.60. 61. 62. 63. 64. 65. 66. 67. 68. 69. 70. 71. 72. 73. 74. 75. 76. 77. 78. 79. 80. 81. 82. 83. 84. 85. 86. 87. 88. 89. 90. 91. 92. 93.
coming
Brake fluid Niva Chevrolet, gourmet
In 2020, I began to work very closely with the trendsetter in brakes, the Italian concern Brembo. I was sent a dealer catalog and in the service section I found brake fluid. The jar contains the company logo, the inscription “made in Italy”, and product characteristics. A technician confirmed that this product is made in-house. The price is a little more expensive than competitors, but it's worth it. Kinematic viscosity (pumpability) at minus 40 is 1400 cCt (DOT-4 – 1800), which allows it to be classified as DOT-4+ and used in cold climates.
Recommendations for servicing the brake circuit of the VAZ 2114
- Conduct scheduled technical inspections of the vehicle in a timely manner;
- When purchasing, carefully check the catalog numbers with the data specified in the instruction manual;
- Use the services of certified points of sale.
Service station experts recommend purchasing DOT-4 on semi-synthetic and synthetic bases. It is “synthetics” that meets many modern requirements and quality standards.
Mineral-based lubricants are not always effective for high speed conditions and systematic loads. If you have any difficulties choosing a technical vehicle for a VAZ 2114, contact service station specialists and auto store managers for help.
Manufacturer's choice.
When choosing a manufacturer, I was guided by two considerations. The first option: the company should be engaged in the production of brake components, that is, produce discs, pads, and drums. The second option is to be a large chemical concern that produces a wide range of oils, lubricants and auto chemicals. Of those manufacturers that are available to me on the Scandinavian market, I chose Bosch and TRW based on the first option, and Elf from the second option. The price for these options is approximately the same, so I complete orders with what was available in warehouses at the moment. For Niva and Shniva, a liter container is enough to fill and completely bleed the system, with a little left over.
Types and properties of fuel fluid
Any brake fluid has 93-98% of the main composition and from 2 to 7% of additives, which, in fact, are the key component for imparting the declared characteristics. In general, if you look at it this way, the properties of brake fluid depend on the combination of its components. Depending on the composition of the base, TJ is divided into 3 groups.
Types of brake fluids:
- Mineral (mineral oil LHM). They consist of alcohol and castor oil.
- Glycolic. Developed on the basis of polyglycols and their esters.
- Silicone. Manufactured from silicon-organic polymer products.
Regardless of the type and composition, all brake fluids are divided into two classifications.
TJ classification:
- By viscosity.
- By boiling point:
- for “dry” liquid (without water);
- “wet”, which contains 3.5% water.
If the boiling point exceeds the permissible norm, then there is a risk of a vapor lock forming in the system (as a result of moisture evaporation), which can lead to breakdown and failure of the brake pedal.
Bleeding the brake system and replacing brake fluid on a Chevrolet Niva
Brake fluid is the main working fluid of a car's braking system. Experts recommend replacing brake fluid on a Chevrolet Niva every 50 thousand km, but at least once every two years.
In addition, if the car reacts poorly to pressing the brake pedal, this means that there is air or water in the brake system, and it is necessary to bleed the system and completely replace the brake fluid. They appear there due to the natural chemical decomposition of some components of the brake fluid, as well as due to the high temperatures that arise during the braking process.
It is necessary to change the brake fluid and bleed the brakes on the Niva as follows.
To work, you will need an assistant, since you cannot be inside the car and near the caliper at the same time. In addition, you will need a transparent container for draining (preferably glass, since brake fluid is chemically active), a hose of the appropriate length and diameter - it should fit tightly onto the caliper bleeding valve (located on the inside of the wheel, on the end side of the caliper) and reach almost to the bottom vessel.
The car must be placed on a flat, horizontal surface and put in first or reverse gear. It is best to support the wheels with boots or any available means - bricks, boards and the like.
Next, check the brake fluid level in the master cylinder reservoir - it is located under the hood, between the air filter housing and the windshield. Pump out the old fluid from the reservoir (using a syringe) and add new brake fluid to the upper mark on the reservoir. Now let's get to work.
First of all, we put the hose on the bleeder valve, having first removed the boot cap from it. We lower the free end of the hose into a container and add brake fluid into it so that the hose is immersed in it by 5-10 mm.
The assistant should sit in the driver's seat and press the brake pedal several times (until he feels quite strong pedal resistance). This builds up pressure in the brake system. Then you need to unscrew the bleeder valve one full turn and carefully observe the brake fluid coming out. If there is air in the system, you will notice bubbles coming out of the hose.
Under no circumstances should you release the brake pedal - when it reaches the end and hits the floor, you need to tighten the valve and add brake fluid. At the same time, keep in mind that it is quite difficult to determine by eye when the brake fluid on the Niva has been completely replaced, so you need to build on the following volumes - if the car is with ABS, then you need to use 500 ml for each caliper, if the car is without ABS, then that’s enough 400 ml.
These figures are given with a small margin; this was done to ensure that the replacement was carried out efficiently and the conditions for the next brake fluid change were standard - the same as at the beginning of the article.
Rear brake pressure regulator for VAZ Niva, Chevrolet Niva
Dear customers, in order to avoid errors when sending the VAZ 2121 rear brake pressure regulator, please indicate your car model and year of manufacture in the “Comment” line.
On some NIVA 4x4 vehicles, a pressure regulator can be installed in the hydraulic drive system, which adjusts the pressure in the hydraulic drive of the rear wheel brakes depending on the position of the body relative to the rear axle beam, i.e. depending on the load on the rear axle of the vehicle. It acts as a restriction valve that automatically cuts off the flow of brake fluid to the rear brakes and reduces the likelihood of rear wheel skidding when braking. The brake pressure regulator is included in both circuits of the brake system, and through the brake pressure regulator, brake fluid is supplied to both rear brake mechanisms.
1,2 — regulator fastening bolts; 3 - piston; 4 — pressure regulator drive lever; 5 — protective cover; 6 - axis; 7 - traction; 8 — pressure regulator 2121-3512010; 9 — support sleeve bracket; X -150-155 nm
The rear brake pressure regulator 2121-3512010 is mounted on the body bracket and connected to the rear axle beam through torsion lever 4 and rod 7. The other end of the torsion lever acts on piston 3.
The difference between the pressure regulator 2121-3512010 of the VAZ-2121 and 21213 cars and the pressure regulators of other cars that are similar in appearance is that there is a groove on the bottom of the piston.
1 — rear brake pressure regulator 2121-3512010; 2 — axis of the regulator drive lever; 3 — dirt-proof cover; 4 — locking plate; 5 - bolt with spring washer; 6 — rear axle beam; 7 — rod connecting the pressure regulator drive lever to the rear axle bracket; 8 — washer; 9 — plastic bushing; 10 — spacer sleeve; 11 — rod fastening bolt; 12 — pressure regulator drive lever; 13 — support sleeve of the drive lever; 14 — support sleeve bracket; 15 — washer; 16 — spring washer; 17 - nut; 18 — support sleeve cage; 19 — bolt securing the holder to the bracket
Rear brake pressure regulator VAZ 2121-3512010 in non-working position
A – normal pressure cavity; B – cavity of regulated pressure; P – force transmitted by lever 4 of the regulator drive; 1 – regulator body; 2 – spacer sleeve; 3 – sealing ring; 4 – regulator drive lever; 5 – gasket; 6 – plug; 7 – seal; 8 – spring plate; 9 – piston spring; 10 – piston.
Removal and installation of the rear brake pressure regulator VAZ 2121-3512010
- Disconnect the lever 12 from the rod 7, and then the clip 18 from the bracket 14 and the brackets for fastening the pipelines going to the pressure regulator.
- Disconnect the muffler suspension parts from the body and move the pipeline with the mufflers to the side.
- After unscrewing the bolts securing the regulator to the bracket and the bracket to the body, remove the regulator bracket, and then, lowering the regulator down, disconnect the pipelines from it.
- Remove the regulator and disconnect the drive lever from it. Plug the inlets and outlets of the pressure regulator and pipelines.
- Install the rear brake pressure regulator VAZ 2121-3512010 in the reverse order of removal. Before tightening the regulator fastening bolts, install tool 67.7820.9519 at the end of the regulator drive lever. Direct the rod of the device upward until it stops in the body. This sets the distance (150±5) mm.
- Lift the protective cap 3 and, turning the regulator on the mounting bolts, ensure that the end of the lever is in light contact with the regulator piston.
- Holding the regulator in this position, tighten its fastening bolts as far as possible, then coat axle 2 and the protruding part of the piston with a layer of DT-1 or Ditor lubricant. Replace rubber cap 3 with 5–6 g of the same lubricant.
- Remove the device marked 67.7820.9519 and connect the end of the lever to rod 7, having previously coated the bushings of the articulated connection of the rod with the lever with DT-1 or Ditor grease.
- Attach the exhaust system pipes to the body.
- Bleed the brakes to remove air from the rear brake actuator.
Disassembly and assembly of the rear brake pressure regulator VAZ 2121-3512010
- Using wrench A.56124, unscrew the plug, remove gasket 5, remove piston 10, spacer sleeve 2, seal 7, plate 8, spring 9 and thrust washer with sealing ring 3.
- Wash the parts with isopropyl alcohol or brake fluid and inspect. The surfaces of the parts should not have marks or roughness.
- Check the condition and elasticity of the spring, the length of which in the free state should be 17.8 mm, and under a load of 76.44–64.68 N (7.8–6.6 kgf) – 9 mm.
- Replace damaged parts, as well as the seal and O-ring.
- When reassembling, which is carried out in reverse order, lubricate all parts with brake fluid.
Check the brake fluid level in the reservoir, especially before a long trip. Use only brake fluid. Wash away dust or wash the cylinders only with special cleaning liquids or, for example, methyl alcohol, but in no case with gasoline or oil.
The hydraulic system uses only brake fluid of type DOT-3, 4, which has deep penetrating ability and does not corrode rubber O-rings.
Other article numbers of the product and its analogues in catalogues: 21210351201000.
NIVA 4x4, VAZ 2121, VAZ 21213, VAZ 21214, VAZ LADA 4x4, VAZ LADA 4x4 M, VAZ 2123.
Any breakdown is not the end of the world, but a completely solvable problem!
How to independently replace the rear brake pressure regulator of a VAZ 2121 on a car of the NIVA family.
With the AvtoAzbuka online store, repair costs will be minimal.
Just COMPARE and BE SURE!!!
Don't forget to share the information you find with your friends and acquaintances, because they may also need it - just click one of the social networking buttons located above.
Replacement frequency, how much and what kind of fluid is needed
In addition to the recommended coolant change intervals, there are other reasons why it is necessary to change the fluid in a car's cooling system:
- loss of coolant properties. You can check the quality of the antifreeze used using a test strip, which is sold in the same places where the liquid itself is sold. Place the strip in the expansion tank, then pull it out. The strip comes with a color scale, according to which you can understand how much longer the car can be used before replacing the coolant;
- change in color of the coolant to tan or red. This means that rust has appeared in it;
- the appearance of sediments, flakes and dense formations in the liquid.
In all cases, it is necessary not only to replace, but also to check the entire engine cooling system for serviceability.
The coolant for the VAZ 21214 Niva injector should have a freezing point no higher than -40 degrees. Typically, the manufacturer fills in TOSOL TS-40 (manufacturer in Dzerzhinsk). When replacing antifreeze, it can be replaced with antifreeze with G12 approval; it is safer for the entire cooling system. You can also use original Lada G12 antifreeze, which is suitable for all cars of this manufacturer.
Rules for inflating wheels at a gas station
In general, the inflation rules do not differ from those at car repair shops, tire shops, and garages. It is advisable to comply with all the same requirements. The only thing you need to do is turn off the engine. This is a safety requirement for gas stations.
The pumping device is a compressor with additional settings and a built-in pressure gauge. Set the required pressure and turn on pumping. Then the automation will do everything on its own.
Let's take a closer look at how to pump up a tire.
- We drive up to the compressor, usually located at the end of the gas station building. We park the car so that the hose can freely reach all wheels.
- Unscrew the cap protecting the wheel valve from the inflated wheel. Place it near the car, but so as not to lose it.
- We take the hose and put the nozzle on the nipple. It must be worn as straight as possible. Bleeding of air is not allowed.
- We set the required pressure on the compressor control panel. If you don’t know what parameter is required for your car, find a plate with recommendations, it is located on the front pillar, gas tank flap.
- Turn on paging. The operation of the compressor is indicated by a flashing yellow or red lamp. As soon as the tire is inflated, a sound signal will sound (sometimes there is no signal), and the green lamp will light up.
Go around all the wheels in a circle, be sure to equalize the pressure in all tires.
Brake fluid Niva Chevrolet, climatic conditions
If we are talking about a hot climate, on the Niva family, the use of DOT-3 is quite possible. This liquid has a very gentle relationship with factory rubber bands and seals. If we are talking about Yamal or Krasnoyarsk, then it is best to use DOT-5.1. The viscosity characteristics of this liquid at low temperatures are almost twice as good as those of DOT-4. But do not forget to look at the rubber bands and seals for leaks. Better yet, replace them with branded ones before changing the fluid. Now about DOT-4. My hometown is St. Petersburg, with an air humidity of 90%. Over the course of a year, the volume of “glycol” absorbs approximately 2-3% of water. The critical percentage that German manufacturers talk about is 4.5%. Once this ratio is reached, the characteristics of the brake fluid drop like an avalanche. In the summer there were complaints that the pedal became weak. In winter, the brake pedal can barely be pressed. The reason is simple - there is water in the system. The solution is to change the fluid every two years.
Carrying out work on rear mechanisms on VAZ classic models
First, let's look at how to properly bleed the brakes.
on "Classic". To perform the operation correctly, it is necessary to take into account that on the VAZ-2106 or any other model, the brakes are dual-circuit. That is, the entire system is divided into two independent parts. This was done so that if one of the circuits depressurizes, the second remains operational and the car can stop. But it is important to understand that the separation into circuits occurs on the master cylinder, and if air enters the system due to lack of fluid, it will be in both components.
For all classic models, including the VAZ-2107 brakes, the circuits separate the front and rear wheel drives. This must be taken into account when it is necessary to bleed the brakes of a 2101 or another model.
By the way, if only one circuit is aired, then it is not necessary to bleed the second one, although it would not be superfluous to treat all mechanisms, both front and rear.
So, everything is prepared, and you can get started.
The sequence of actions is as follows:
- It is better to drive the car into a pit to make it easier to get to the fittings. At the same time, he is immobilized using a handbrake or wheel chocks;
- Remove the cap from the brake fluid reservoir, check the level, and if necessary, bring it to the maximum level;
How to Bleed the Brakes Alone in the Field. All methods of bleeding brakes. Possible problems Part 1
How to bleed the brakes
alone without an assistant and with an assistant. Procedure for bleeding the brakes of VAZ 2121, Chevrolet Niva.
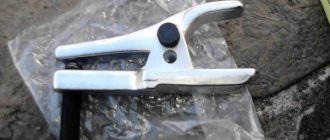
We change the main brake cylinder and bleed the brakes on a Niva 2131
Replacing the main brake
cylinder and pump
the brakes on NIVA
2131.
- First, we bleed the rear brakes of the VAZ, since the entire operation is done from the brake mechanism, which is as far as possible from the master cylinder, that is, from the right rear wheel;
- We put the assistant in the driver's seat. We climb under the car ourselves, put the key on the fitting, and then put the prepared tube on it, the second end of which should be lowered into a container with a small amount of liquid poured into it. It is advisable to immediately tear the fitting out of place and immediately screw it back, even before pumping. This is done so that there is no hitch in the process due to a non-unscrewing fitting;
- We ask the assistant to press the brake pedal 5-6 times. At the same time, with each press the failure will be less and less - the drive is pumped with liquid, while air moves to the mechanisms. After downloading the system, the assistant should hold down the pedal - press and hold it;
- Unscrew the fitting half a turn, working fluid will begin to flow out of it. If a transparent tube is used, air bubbles will be clearly visible in it, and the pedal being held will begin to move down until it hits the floor. In this position, the assistant must hold it, at this time the fitting must be screwed back;
- This sequence of actions should be carried out for one mechanism 4-5 times to completely remove air;
- On the “classic”, the left rear wheel is pumped next (since they are combined into one circuit
). But before that, you need to check the level of the tank and bring it to the maximum level. The sequence of actions is the same: pump the brakes and hold the pedal - release the fitting to drain the fluid with air (the pedal goes down) - tighten the fitting - pump again. And so 4-5 times;
Note that this sequence of actions is identical for all cars. The difference lies only in some design features of the system itself.