Wiring diagram VAZ 21214 Niva
(2011), electronic gas pedal.
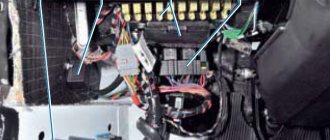
ELECTRICAL CONNECTION DIAGRAM FOR FRONT WIRING HARNESS 21214-3724010-44
1 – right headlight; 2 – starter relay; 3 – front harness block to the instrument panel harness block; 4 – air temperature sensor; 5 – coolant temperature sensor; 6 – oil pressure warning lamp sensor; 7 – sound signal; 8 – brake fluid level sensor; 9 – left headlight; 10 – pads for the front harness, the sidelight harness and the right side turn signal; 11 – pads for the front windshield wiper motor harness and electric motor; 12 – windshield wiper motor; 13 – blocks of the front harness and connecting starter wire; 14 – starter; 15 – rechargeable battery; 16 – generator; 17 – front harness block and connecting generator wire; 18 – right side turn signal; 19 – right side headlight; 20 – electric motor for washers; 21 – pads for the front harness, sidelight harness and left side turn signal; 22 – left sidelight; 23 – left side turn signal. A1, A2 – grounding points of the front wiring harness. A3 – grounding point of the hood ground wire. A4, A5 – grounding points of the connecting motor wire with the battery and housing.
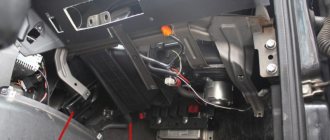
ELECTRICAL CONNECTION DIAGRAM FOR IGNITION SYSTEM WIRING HARNESS 21214-3724026-44
1 – controller; 2 – diagnostic block; 3 – mass air flow sensor; 4 – coolant temperature sensor; 5 – phase sensor; 6 – electric fuel pump module; 7– block of the instrument panel wiring harness to the block of the rear wiring harness; 8 – ignition coils; 9 – spark plugs; 10 – electronic accelerator pedal; 11 – throttle pipe with electric drive; 12 – electric fan of the engine cooling system, right; 13 – electric fan of the engine cooling system, left; 14 – knock sensor; 15 – blocks of the wiring harness of the ignition system and the wiring harness of the injectors; 16 – nozzles; 17 – solenoid valve for purge of the adsorber; 18 – control oxygen sensor; 19 – diagnostic oxygen sensor; 20 – crankshaft position sensor; 21 – APS control unit; 22 – APS status indicator; 23 – ECM fuse block; 24 – fuse for the power supply circuit of the electric fuel pump; 25 – electric fuel pump relay; 26 – left engine cooling system electric fan relay; 27 – relay for the electric fan of the right engine cooling system; 28 – ignition relay; 29 – ignition system wiring harness block to the instrument panel wiring harness block.
ELECTRICAL CONNECTION DIAGRAM FOR INSTRUMENT PANEL WIRING HARNESS 21214-3724030-44
1 – additional relay; 2 – relay-interrupter of direction indicators; 3 – windshield wiper relay; 4 – ignition switch; 5 – alarm switch; 6 – rheostat; 7 – switch for headlights and direction indicators; 8 – windshield wiper and washer switch; 9 – main fuse block; 10 – additional fuse block; 11 – instrument cluster; 12 – external lighting switch; 13 – rear window wiper switch; 14 – rear window heating switch; 15 – rear fog light switch; 16 – heater motor switch; 17 – additional resistor of the heater electric motor; 18 – heater electric motor; 19 – relay for high beam headlights; 20 – low beam headlight relay; 21 – rear window heating relay; 22 – rear fog light relay; 23 – cigarette lighter; 24 – differential engagement sensor; 25 – brake signal switch; 26 – reverse lamp switch; 27 – handbrake warning lamp switch; 28 – illuminator; 29 – illuminator; 30 – instrument panel harness block to the front harness; 31 – block of the instrument panel harness to the radio; 32 – block of the instrument panel harness to the ignition system harness; 33 – instrument panel harness block to the rear harness; 34 – indicator lamp for turning on the differential;
What do the numbers in the Niva index mean?
To understand the features of the wiring and electrical equipment of a Niva 2131 car or another model with an injector or carburetor, let’s look at the index designations:
- VAZ 21213 - this is how a Niva with a carburetor is designated. In this case, the engine volume is 1.7 liters.
- VAZ 21214 is the same carburetor with the same engine size. Only in this case the car is characterized by a distributed fuel injection system.
- VAZ 21213 is also a carburetor, only Niva with such digital designations can have a 1.8-liter engine.
- VAZ 21073. This Niva can be equipped with either a Solex carburetor or an injector. The ignition system in these cars is contactless.
- As for the Niva 21215 models, this index designates export versions of vehicles equipped with a diesel engine from the manufacturer Citroen.
Electrical circuit diagrams
Separate electrical circuits (since 2009)
Front Wire Harness Connection Diagram
Engine Management System Wiring Harness Connection Diagram
Instrument panel wiring harness connection diagram
Rear Wiring Harness Connection Diagram
Connection diagram for wiring harnesses of the left and right front doors
Connection diagram for wiring harnesses of the left and right rear doors:
1, 2— connections to the rear harness; 3 — gear motor for locking the right door lock; 4 — limit switch of the right door; 5 — limit switch of the left door; 6 — gear motor for locking the left door lock;
Features of electrical equipment
The wiring in cars 21213 has fundamental differences from versions 2121, we are talking about:
- In the first version, more advanced blade-type fuses are used in the mounting power supply. It should be noted that in this case the contact pad has also undergone certain changes.
- Additionally, the power system uses a forced idle speed saving device. To implement this function, another wiring harness was installed in the engine compartment.
- As for the ignition system, it has become contactless. In particular, this system is based on a microcontroller.
As mentioned above, each electrical circuit of equipment in VAZ 2131 or 2121 cars has its own characteristics. It should be noted that differences can be not only in the generators, but also in the wiring itself (video author: Daniel Eliasson).
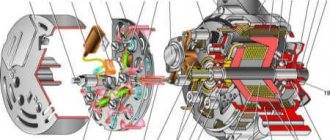
Generator Differences
One way or another, the electrical diagram of any vehicle, be it model 2131 or 21073, is drawn up depending on the type of engine. If it is a carburetor, then the electrical wiring will have certain differences. For example, models characterized by fuel injection must be equipped with a more powerful generator, since they have a higher load on the electrical wiring.
Based on this:
- On version 21213, the manufacturer decided to install a generator device marked 371.3701.
- As for versions 21214, here we also had to use a more powerful generator. Its model is 9412.3701.
It should be noted that despite the different models, these devices are similar in design. In essence, they are synchronous alternating current devices. They are also characterized by the presence of a built-in rectifier, as well as an output voltage regulator, which is important.
Wiring Differences
As for the wiring in cars 2131, 2121 and others, it can be done in various variations, which makes it easier to maintain the system at home. If we talk about the same vehicle models, only with injection engines, they are additionally equipped with three special connectors for installing a contactless ignition system (video author - Shibargan).
Ignition switch VAZ 2121 wiring diagram
how to connect the ignition switch on a VAZ 2106
Replacing VAZ contact group.
How to connect wires to the ignition switch (VAZ 2106)
Ignition switch for Niva
We connect the wires to the ignition switch of the VAZ “classic” 01 - 07.
connecting wires to the ignition switch on a vaz
According to Science 12 - Replacing the ignition switch of a VAZ 2106 or what to do if the key in the ignition switch is broken
How to connect wires to the ignition. contact group classic VAZ 2106
anti-repair of ignition switch wiring 2106
Correct connection of the ignition coil and more.
This type of product has a low lifting height and there is no valve overlap area. Currently, Lada Priora cars are being assembled in Russia, the VAZ 2121 ignition switch is underway; wiring diagram for a completely new, third version of the conveyor. These mirrors are necessary for better control of the situation on the road. In general, I agree, plus listen to the sound and knocks while moving. This means roomy, spacious, and warm.
To avoid this and get a certain dependence of pressure on crankshaft speed, all this has long ceased to be something out of the ordinary, and you could feel this before on any sports car with a well-known name.
Assess the degree of tension in the spring; if it is weak or has changed its appearance, it will also require replacement. Look for services where they can really help. Okay, for now we need to sort out the fuel pressure and check the spark uniformity on all the spark plugs. Otherwise, you need to change the contact group. This allows access directly to the heater fan housing. Then I pushed out the unfortunate relekha, the insidious light went out.
Causes of electrical equipment malfunction
Let's look at the main reasons why electrical equipment may not work:
- Discharged or defective battery. Due to a damaged battery, the car engine can only be started “from the pusher”. A faulty battery can be determined by the low battery indicator on the dashboard lighting up. When troubleshooting, we recommend that you first check the external condition of the device - there should be no defects or damage that could cause electrolyte leakage. You also need to check the volume of the working solution inside the battery - the liquid should cover all the jars. If necessary, distilled water is added to the battery. The terminals are checked - sometimes the reason for the non-working state of the battery is the disconnection of contacts associated with vibration during shaking, as well as their oxidation.
- Damage to the generator unit. If the generator breaks down, it will not be able to keep the electrical equipment in working order. All devices will be powered by the battery until it eventually runs out. To troubleshoot, the generator will have to be dismantled and disassembled; damaged elements must be replaced.
- Voltage surges. There can be many reasons for this problem. Voltage surges often occur as a result of a regulator relay failure or the use of equipment that does not meet the operating specifications of the electrical circuit. For example, if you install a splitter in the cigarette lighter, this will lead to voltage surges and failure of the device.
- Burnout of safety elements. The devices are used to protect electrical appliances from overvoltage. When power surges occur, fuses are the first to fail. You cannot change parts for devices made by yourself. Sometimes car owners replace fuses with coins or jumpers made of wire. We do not recommend doing this to prevent overvoltage.
- Broken wires. Most often, this type of malfunction affects electrical circuits that are located in the area of moving parts of the body. The wires become kinked, making them unable to conduct electrical current.
- Failure of the equipment itself, for example, light bulbs in the headlights, radio, electric heater motor. Lighting sources must be replaced, and devices such as an electric motor or car radio can be repaired. It is better to entrust this procedure to qualified electricians.
- Leakage current. This problem occurs when the wire insulation is damaged. It is necessary to find the part of the electrical circuit where the insulating layer is broken and re-cover it with electrical tape.
- Damage to contacts or their oxidation. If problems appear in the operation of the equipment, check the contact elements on the wiring connectors. When they burn out, it is necessary to diagnose electrical circuits for the presence of voltage surges. If the contacts are oxidized, then you just need to clean them.
Click to enlarge (259 KB)
Conventional graphic symbols on the diagram
1. Side direction indicators. 2. Front lights. 3. Headlights. 4. Electric motors for headlight cleaners. 5. Sound signals. 6. Relay for turning on the headlight cleaners and washer. 7. Relay for low beam headlights. 8. Headlight high beam relay. 9. Headlight washer motor. 10. Insufficient brake fluid level sensor. 11. Portable lamp socket 12. Oil pressure warning lamp sensor. 13. Oil pressure indicator sensor. 14. Coolant temperature indicator sensor. 15. Ignition distributor. 16. Spark plugs. 17. Electric wiper motors. 18. Ignition coil. 19. Generator. 20. Carburetor shut-off valve. 21. Starter. 22. Windshield washer motor. 23. Voltage regulator. 24. Battery charge warning lamp relay. 25. Rechargeable battery. 26. Windshield wiper relay. 27. Additional fuse block. 28. Main fuse block. 29. Parking brake warning lamp switch. 30. Differential lock warning lamp switch. 31. Reversing light switch. 32. Carburetor air damper warning lamp switch. 33. Brake light switch. 34. Electric heater motor. 35. Relay-breaker for direction indicators and hazard warning lights. 36. Additional resistor for the heater motor. 37. Instrument lighting switch. 38. Headlight switch. 39. Turn signal switch. 40. Sound switch. 41. Windshield wiper switch. 42. Windshield washer switch. 43. Ignition switch. 44. External lighting switch. 45. Heater switch. 46. Headlight wiper and washer switch. 47. Cigarette lighter. 48. Hazard switch. 49. Lamp switches located in the door pillars. 50. Oil pressure gauge with low pressure warning lamp. 51. Fuel level indicator with fuel reserve warning lamp. 52. Tachometer. 53. Parking brake warning lamp. 54. Battery charge indicator lamp. 55. Carburetor air damper warning lamp. 56. Speedometer. 57. Indicator lamp for external lighting. 58. Turn signal indicator lamp. 59. Indicator lamp for high beam headlights. 60. Parking brake warning light relay. 61. Brake fluid level warning lamp. 62. Differential lock warning lamp. 63. Coolant temperature gauge. 64. Ceiling lamps. 65. Level indicator and fuel reserve sensor. 66. Tail lights. 67. License plate lights.
Scanned Invisible (2121). Text prepared by ALER
Every modern car today is equipped with an electrical part. The electrical diagram of the VAZ 21214 Niva injector allows, if necessary, to find all the elements included in the on-board network, which is especially important when faults occur in the wiring. Everything a driver needs to know about electrics in domestic SUVs is described in this article.
[Hide]