How to understand: the problem is in the hydraulic tensioner or the hydraulic compensators are faulty?
If, after the simple analysis described above, it becomes clear to the car owner that the problem is with the hydraulic tensioner, then he will then need to carry out a series of actions.
The first thing you need to pay attention to is the engine. The first thing you need to do is check its oil level. It is also a good idea to check the serviceability of the tensioner and damper shoes. If they are normal, auto mechanics advise replacing the defective part with an automatic chain tensioner. The VAZ 2121 is regularly used off-road, and it is possible that the bottom of the engine touches the ground. This is an extreme situation that can lead to a hole. Also, when the pallet hits the ground, the landing plane can be deformed. Due to such damage, the gasket that ensures the seal often breaks.
Crankcase deformation due to overheating. If the size of the damage exceeds the thickness of the gasket, oil begins to leak out of the engine. Excessive tightening of the mounting bolts leads to destruction of the gasket. The other side of the coin is insufficient tightening torque. If a leak is detected, tighten the fastening bolts. Banal damage from old age or poor quality of the factory part. If broaching does not help, a simple replacement process awaits.
How to change the pan gasket yourself
The only condition is the presence of a hole in the garage, or an overpass. Despite the high ground clearance, replacement at ground level is not possible. Drain the used oil. To do this, the machine warms up, then you need to wait up to 10 minutes until the liquid collects at the bottom of the pan.
Important! Take precautions against hot liquids coming into contact with your body. After unscrewing the drain plug, a strong stream sprays oil in all directions. To change the gasket, you will have to raise the power unit by 15-30 centimeters. Loosen the fastenings of both rubber engine mounts and unscrew the gearbox from the fastenings of the front axle and engine.
And also interesting: Do-it-yourself tuning of the Niva 2121 interior: video instructions
We install a jack under the engine and raise it to the height of the travel of the bolts of the support cushions. We install restrictive spacers in the resulting gap - wooden blocks will do. This is done for safety - the jack may suddenly fold, and then replacing the gasket will result in injury. Unscrew the bolts securing the pallet.
Using a gentle downward and forward motion, remove the part from under the engine compartment. There may be oil at the bottom, do not spill it on your clothes. Attention! An oil receiver with a filter mesh descends from the crankcase cavity. Do not damage this unit during dismantling. We take this opportunity to inspect and troubleshoot the internal cavity of the crankcase.
Clean visible parts with a lint-free cloth dampened with oil. Scrape off the remnants of the old gasket from the crankcase mating plane. Rinse the pan with kerosene and check the geometry on the fastening side. To do this, lay the case upside down on a flat surface - for example, glass. If there is deformation, the spare part will have to be replaced.
Small chips and damage are sanded off. Install a new gasket, after wetting the surface with engine oil. The use of sealants is undesirable; the rags will eventually fall into the crankcase cavity. Carefully place the pan (without damaging the oil receiver) under the crankcase, and secure it with four bolts crosswise.
Tighten all the bolts, observing the tightening torque specified in the instructions for the car. Raise the engine again, remove the spacers, and lower it onto the cushions. Tighten the support bolts. Secure the gearbox. This completes the gasket replacement procedure. All that remains is to tighten the drain plug and add fresh oil. Perform a test drive and check for leaks from the crankcase.
Tips for choosing sealants, 4 types that everyone should have
Hi all. I don't even know where to start! One small breakdown brought everything together at once! I’ll probably make a 3-part post! The 3rd will probably be the most interesting! I got stuck, I’ll tell you right away)) So before the story, how it all started, I was driving to work when the oil pressure light came on! Oops, they arrived (((. I stopped near a car shop, took out the dipstick and it was all dry! I bought 4 liters of new oil and poured it all into the engine! I spilled a little damn)) I looked under the car, it’s not leaking! Well, I think I need to go to work, to one side 10 km. back 10 km and at work 5 km only 25! I drove. Then I went to the garage to figure out what could have happened? Taking out the dipstick again, it was dry! Thinking that it was the crankshaft oil seal? but I was wrong! and because of this you can make as many as 3 -and parts)))) Part 2. let's go)) After I washed the gearbox and transfer case in the first part, part 1 Having removed the flywheel and its protection, we see a pronounced oil stain on the crankshaft oil seal (main) on the left side, there It almost flowed like a stream! What the heck is this? Either the crankshaft oil seal was leaking, the gasket under the cover, or the cover itself burst! After removing the cover, I replaced the oil seal with a new one. After washing everything, I checked the lid, it looked intact! That means it's most likely a seal! I thought it was a standard procedure, )))) I began to install everything in place. I installed the gearbox, I had an idea to start it without a transfer case and check! Is it leaking? but my confidence that it was the oil seal convinced me and I threw on the transfer case! I was already getting ready to go home))) I start it up - the oil is leaking! just like it flowed! Well, why the hell did I think something like that? The oil seal is new, the cover is intact! ? what could it be? Of course, there was no desire to remove the checkpoint again))))) I wanted to get away with the minimum)) I began to think about what? The thought came to mind: maybe the crankcase gasket is cracked? and oil oozes from there? Because I have long wanted to try to remove the crankcase on the car)) this stupid thought came to mind!
Having decided to replace the crankcase gasket without removing the front axle! I’ll tell you right away that it’s real, but it’s not worth it!))))) it’s tough))))
Read also: VAZ windshield washer does not work
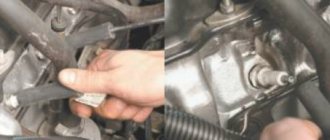
So we unscrew the bridge from the internal combustion engine and lower it onto the beam. it's very simple and fast). It is not easy to remove the bridge because you need to drain the oil, unscrew the drive, etc. I didn't have time for this. Next we need to unscrew all 18 x 10 screws that hold the crankcase itself. Unscrewing 14 screws is no problem! at all. but 4 re is a little inconvenient. To do this, we need to jack up the combustion engine itself! to the top to the maximum. To do this, unscrew the nuts on the pillow max! but don’t remove them leaving 2 turns each! AS INSURANCE! Let's jack the engine up. and put some kind of block under the pillow, for insurance. And we get to these 4 screws. Now drain the oil before that)))) we unstick the crankcase from the gasket and try to PULL it OUT! BUT THERE WAS THERE!
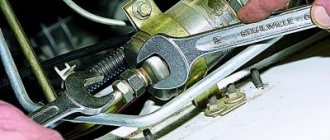
Carter runs into 2 things! 1- Oil level pipe! 2- The oil pump itself! Because my goal was to remove the crankcase for fun without removing the bridge! Then I went further at my own risk))) First, we unscrew the oil dipstick tube; using a 10 key, this will not be a problem!)))) The problem will be putting it back.))) Next, you need to remove the tube! We go to the top and unscrew the exhaust gas housing. The pin is 13. Then we see a long pin on it and at the bottom there is a nut for 13 that holds this pin! There are 2 options for how to unscrew it! either we buy an extended tubular wrench in advance, which I didn’t do)))) or take 2-3 nuts and screw them onto our stud from the top, and then try to unscrew the stud; I was lucky, I unscrewed it the 5th time!)))) (then I bought key) And remove the dipstick tube. Let's go into the pit. We move the crankcase towards us and try to remove it. But alas, it won’t work out for nothing because the oil pump is in the way! Damn (((It’s possible if you just replace the gasket without removing the pump, this is possible by putting the gasket in the sump itself, but our bridge is in the way! And the hand has trouble getting into the sump!((there’s a problem with this! Now in order for us to take out the crankcase itself! We you need to remove the oil pump!
Think carefully about whether you need this?!)))))
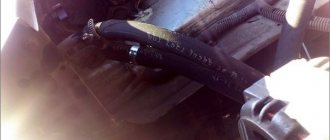
And if you have weighed everything, then proceed to the most hemorrhoidal part of the corps de ballet! This is to unscrew the oil PUMP! wow action))) awaits you)) So, in order to remove the crankcase, we just have to unscrew the 2 long screws that hold the oil pump! in general, it can be at least a little difficult to get to with a spanner wrench!)))) The problem is that the oil pump is located slightly lower than the crankcase, that is, in the crankcase itself! and you need to get there! Another problem is that the screws are very long! but you will understand when you put it back)))) I was just yelling. ! So with a 10 mm spanner we unscrew the 2 long screws of the oil pump! you can climb up). But when you unscrew the first screw and it falls into the crankcase! Straight to the bottom, here a frost runs through your skin!)) But how the hell can you get it? the hand won’t fit through) well, okay, let’s remove the crankcase and get this screw))). The problem will be putting them in place))). So we managed to unscrew the pump, we lower the pump into the pan and remove the crankcase! Then the idea came to my mind to paint the crankcase!))) or buy a new one!)))
Read also: ECU VAZ 21099 injector where is it located
Having gone to the store, who knows why I bought a crankcase from a VAZ 2101! For 600 rubles a penny! and a gasket for it for 100 rubles) I came to the garage, began to compare the pallets and realized that I had made a mistake! when I bought a pallet from a VAZ 2101! because they are so different, it turns out))) Such a thought never even occurred to me))) I don’t know that there is a bridge in the field, but there are none on the kopecks. But for some reason it seemed to me that AvtoVAZ wouldn’t bother about this))) well, oh well))) I got lost))), I come to change the crankcase at Nivovsky and they tell me you’re still charging 1000 rubles! ? what am I for? seller - a crankcase for a field costs 1600 rubles! and for a VAZ 2101 -600 rubles. Yes, you're crazy, I thought))) should I give 1600 for this piece of shit? I’d better fix mine))) and leave)))
The original crankcase tapped out and began to install))).Oh, well, I was in trouble)))but at least I won) my interest. Let's start the assembly process! We take a new gasket and, to make it convenient, we throw it into the crankcase)) because there is no point in exposing it; you will understand why when you screw on the oil pump)) now the most important thing is to screw on the metal plate from the dipstick! with a 10 screw. but not all the way, so that there is room for the tube, then we insert the probe tube into this plate and try to get into the hole. We do not insert the tube all the way, but behind the face, because if the tube is inserted all the way, you will no longer be able to put the crankcase in place)))). Then the dancing with a tambourine begins)))) We take the crankcase, our oil pump lies in it. And don’t forget to put a new gasket on the pump! And we try to screw our oil pump on! The problem is that the screws are long and need to be inserted from the bottom to the top! still manage to get into the hole and at least screw it 1-2 turns. This is where the problem comes because you need to hold the pump with one hand, and insert the long screw from the bottom to the top with the other hand! and the screw is trying to fall back into the crankcase! and with the third hand you need to manage to tighten the screw with a wrench)))) because let me remind you that your access is limited, your hand can’t get through as we need! ((within about 40 minutes you manage to tighten the screws of the oil pump! and then you can exhale) )) I admit that I was already starting to freak out and get nervous))) when tightening these 2 screws of the oil pump))) I already wanted to remove the bridge or take out the internal combustion engine)) but I won))) Next, we put everything back together.
Having collected everything joyfully, I start the car))) but my joy did not last long (((the little bitch is running again in the same place where it was flowing! I’m already in the stopper! Because there are only 2 options left: remove the gearbox again, and because everything is there I washed it, then it will be clear where the leak is coming from! There are 2 options left! 1- the crankshaft oil seal cover is cracked after all. 2- there is a crack in the block, etc. But that will be in the next part))) in the 3rd)) final one, thank you, good luck to everyone on the roads
Features of self-removal of the defect that has arisen
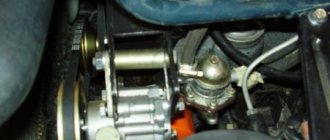
When replacing the hydraulic chain tensioner and installing a mechanical tensioner on a Chevrolet, the valve cover must be removed.
Next, after pulling out the pin, you need to use a ratchet wrench to make one full revolution of the crankshaft. It is important to pay attention to whether the sagging chain on the Niva has come out of the grooves of the shoe
. If this point is ignored and the defect is not eliminated, then the consequences can be sad (but this only applies to a single-row chain).
And also interesting: Chevrolet Niva fuses with a description of the block diagrams. Niva cigarette lighter fuse.
Also, as a result of the first revolution, the primary slack of the chain on the Niva is selected and, as a rule, the rod immediately comes out one or two more clicks, relative to the first shooting. After self-replacement, subsequently no extraneous sounds will be observed during startup on the Chevrolet Niva. The engine will always run smoothly.
When the hydraulic tensioner is replaced, nothing will rattle when you start the engine. Since it is always only the faulty element that rattles. The instructions for replacing this unit yourself prove that the procedure is not at all complicated, and in addition, the price of the issue is no more than 2,000 rubles. But there is one “but” - if the Niva Chevrolet car is relatively new and was under warranty, it will automatically be canceled.
Similar products from other companies
- Ignition module 35995 2111-3705010-02 for VAZ 2110 engine 1.6L 8-valve 0
b - Camshaft phase sensor slotted Pegasus /21.3847/ 2112-3706040-04 for VAZ 2110-12, 2170 LADA Priora (Lada Priora) engine 16-valve 0 b
- Canister purge valve Utes 21103-1164200-02 for VAZ 2110 Euro-3 0 b
- Rear spring 2110-2912712 for VAZ 2110-12, 2170 LADA Priora 0 b
- Speed sensor 6-pulse 493.3843 without wire, new model for VAZ 2110-15 0 b
- Right side mirror 2110-8201050 for VAZ 2110 0 b
- Front strut support polymer 2110-2902820 for VAZ 2110 0 b
- Right side mirror color blue-green 2110-8201050 for VAZ 2110 0 b
- Small spherical mirror 30 b
- Left side mirror color blue-green 2110-8201051/13 for VAZ 2110 0 b
- Upper radiator pipe 2110-1303025 for VAZ 2110 0 b
- Lower radiator pipe 2110-1303010 for VAZ 2110 0 b
- Muffler 2110-1201005 for VAZ 2110 0 b
- Front left fender 2110-8403015 for VAZ 2110, 12 0 b
- Front suspension beam 21120-2904400-00 for VAZ 2110-12, 2170 LADA Priora 0 b
- Front right fender 2110-8403014 for VAZ 2110, 12 0 b
- Left side mirror 2110-8201051 for VAZ 2110 0 b
- Front ventilated brake disc R13 (35994) 2110-3501070-1 for VAZ 2110 0 b
- Gearbox (gearbox) synchronizer ring blocking 2110-1701164 for VAZ 2110, 1118 LADA Kalina (Lada Kalina), 2170 LADA Priora (Lada Priora) 0 b
- Clutch fork 21100-1601200-00 for VAZ 2110, 2170 LADA Priora, 1118 LADA Kalina 0 b
The description and image of goods on the website are for informational purposes only and may differ from the actual description, technical documentation from the manufacturer and the actual appearance of the goods. We recommend checking the availability of the desired functions and characteristics of the goods with the seller.
If you did not find what you were looking for on the page or want to find additional information on your request, try using the search form or follow the links to the following sections:
- Spare parts for passenger cars, auto parts
- Oil pans and components for them for passenger cars