Pumping brakes on a VAZ car 2106
After repairing the brake complex of accounting programs on the “classic”, air is certainly removed from the hydraulic circuits. Bleeding the brakes of the VAZ 2106 should ensure effective braking of the car on all 4 wheels. The de-airing function should be carried out after each intervention in the brake mechanisms, which resulted in the depressurization of the accounting system and the entry of air into it. The work is carried out according to a certain method, changing which may disrupt the functions of the accounting software (software).
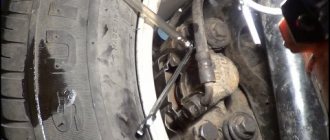
1 – hose for bleeding brakes
; 2.4 – vessel for brake water.
When is brake bleeding required?
There are strict requirements that indicate the need to remove air from the brake lines. Typically, pumping is certainly carried out in the following cases:
- repair and replacement of brake cylinders;
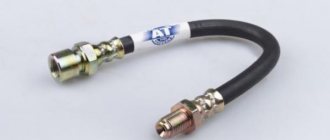
- changing VAZ brake hoses;
- change of highways;
- repairs associated with a violation of the density of the contours, or in other words, the water tank;
- after incomplete removal of air upon completion of the previous deaeration.
List of works that do not require future brake bleeding :
- changing brake pads ,
- repair of drums, in other words, turning of discs;
- adjusting the hand brake or repairing it.
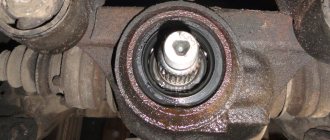
Changing VAZ pads does not involve interfering with the hydraulic drive itself. The VAZ master brake cylinder (GTC) may be a prerequisite for unsatisfactory brake performance. During repairs or replacement, it will be necessary to disconnect it from the main pipes, which will lead to air entering the circuits, therefore, after assembling the gas turbine engine and installing it, the system is de-aired.
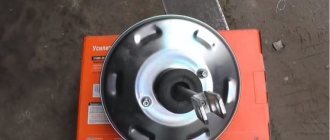
Malfunctions of the brake complex of the VAZ 2106 accounting programs associated with the vacuum brake booster, there are variations that require bleeding, because to remove the unit you will have to disconnect the GTZ from the lines. Sometimes there is an option to remove the cylinder from the studs together with the fittings fitted to this address. Hydraulic pumping will be required during a planned replacement of working water to allow accounting (software). In this case, it is important not only to change the fluid, but also to wash the system, controlling the color of the water discharged from the venting fittings.
Bleeding the brakes on a VAZ 2106
After repairing the brake system on a “classic”, air must be removed from the hydraulic circuits.
Bleeding the brakes of the VAZ 2106 should ensure effective braking of the car on all four wheels. The de-airing procedure should be carried out after each intervention in the brake mechanisms, resulting in depressurization of the system and the entry of air into it. The work is carried out according to a specific algorithm, changing which may disrupt the functions of the system. 1 – hose for bleeding the brakes; 2 – container for brake fluid.
Recommendations for performing work
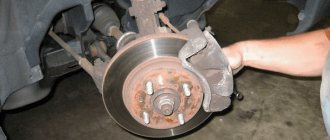
The brake bleeding procedure usually involves inspecting the brake pads , discs and hoses. Brake pads must have the required small margin, and the presence of microcracks on the hoses is not allowed. In the rear drums, the brake pads must be adjusted (for an effective braking process).
A correctly pumped hydraulic system provides uniform forces on each side of the vehicle when braking. If the car tends to change its line of movement, this indicates the presence of air in one of the sides.
Pushing to the right means there is air in the brake mechanisms on the left (and vice versa). The smaller the braking forces, the greater the forces that tend to turn the car in the other direction. List of tools needed at work:
Features of work on the VAZ-2121 Niva
As for the VAZ-21213 Niva, this car has its own characteristics. And although the system on this car is dual-circuit, it is different from other VAZ cars.
On this SUV, one circuit combines all 4 brake mechanisms, and the second - only the front wheels. To ensure that the circuits are independent, the Niva uses a block caliper in front, to which two brake hoses fit; accordingly, there are two fittings for bleeding.
Bleeding the brakes on a Niva is done in the following sequence: first, air is expelled from the rear right mechanism, then from the rear left one. Next, the general circuit on the front brakes is pumped - first the right, then the left (the principle of the distance of the wheel from the master cylinder)
In this case, it is important not to confuse the fittings - the upper one is responsible for the general contour, and it is this that should be used
Only then is the front brake circuit pumped, for which the lower fitting is used. Here the pumping sequence does not matter; you can start with both the left and the right mechanism.
But the Chevrolet-Niva does not use such a brake design. A conventional diagonal dual-circuit system is installed there, so the pumping sequence is identical to the process on VAZ-2108 and higher cars.
Bleeding the brakes video
Subscribe to my channel My Dosugg, where I post various videos
about your own life and even more.
- wheel wrench and jack;
- 8 key for fitting;
- rubber tube and jar;
- rags, WD fluid, pliers.
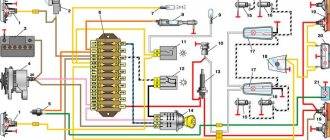
/ 1. Brake disc. 3.2. Front brake brake pad. 3. Piston O-ring. 4. Wheel cylinder piston. 5. Front brake wheel cylinder. 6. Brake hose of the front brake drive circuit. 7. Brake pad . 8. Piston stroke limit screw. 9. O-ring. 10. Stubborn cup. 11. Brake system . 12. O-ring spring. 13. Bushing. 14. Head cylinder body. 15. Front brake drive piston. 16. Seal. 17. Rod. 18. Vacuum valve. 19. Valve body return spring. 20. Valve body. 21. Diaphragm. 22. Vacuum valve body. 23. Vacuum booster housing cover. 24. Rod buffer. 25. Stubborn piston plate. 26. Piston. 27. Vacuum booster valve. 28. Valve spring. 29. Valve return spring. 30. Air filter. 31. Valve pusher. 32. Pedal release spring. 33. Stop light switch tip. 34. Brake light switch. Pressure regulator housing plug . 36. Pressure regulator . 37. Housing bushing. 38. Piston head seal. 39. Spring plate. 40. Piston spring. 41. O-ring of the pressure regulator piston. Pressure regulator drive lever
. 43. Rear brake pad. 44. Pad tension spring. 45. Rear brake wheel cylinder piston. 46. Piston spacer spring. 47. Wheel cylinder piston seals. 48. Brake pedal. 49. A. Vacuum cavity. 50. B. Channel connecting the vacuum cavity with the internal cavity of the valve. 51. C. Channel connecting the internal cavity of the valve with the atmospheric cavity. 52. D. Atmospheric cavity. 53. K. Hose. connecting the vacuum booster to the engine intake pipe. 54. I. The pedal is not pressed. 55. II. Braking. 56.III. The pedal is paused. 57. IV. Disinhibition.
Removing air from the hydraulic drive
Bleeding the VAZ 2106 brakes should begin as follows: first, bleed the front circuit, and then the rear circuit. Partial bleeding is done only along the axles of the car, but not along the wheels. Removal and installation of the head brake cylinder is completed by complete removal of air along all axes. When bleeding the brakes, it is recommended to work together with an assistant, because it is very difficult to do it alone.
You will immediately need to press the brake pedal and relax the caliper fittings. To ventilate the front axle, the car is lifted and the wheels are removed. Subsequently, the water level in the GTZ tank is inspected and a rubber or silicone tube of suitable diameter is placed on the caliper air fitting.
Its other end is placed in a glass container, into which a little working water is poured so that the end of the tube is immersed there. Beforehand, you need to slightly loosen the fitting with an 8 key; if this does not work, then use WD fluid to clean the threads.
After preliminary work, you should press the hydraulic pedal 4-5 times, then keep it pressed, and in this case, release the fitting on the caliper. As a result, water will be released together with air into the jar. Then, with the fitting released, you need to press the pedal sharply until the air bubbles completely disappear from the tube.
To guarantee, you usually press twice after the last bubbles appear. The pedal is kept pressed again, the fitting is tightened, after which a control pressure is applied and the wheel is moved to the next wheel. After pumping the front axle, work on the rear axle begins.
It is more convenient to do the manipulations on a lift, or in an inspection hole; in this case, it is possible to do without removing the wheel. The operating method is similar to the procedure on the frontal axis. It is important to keep the water level in the tank under control, because with saturated circulation you will get air into the GTZ.
Then the work will have to be repeated from the beginning. There is a method of pumping when you press the pedal 4-5 times with the fitting closed, and then squeeze it out and unscrew the fitting. Later, it is tightened again and the pedal is pressed another 4-5 times. Several cycles are carried out in this manner.
It is recommended to pump the VAZ 2106 system using the first method, because here a larger volume of water passes through the circuit and air is guaranteed to be removed.
And so let’s begin our short article, but I think it’s useful, about how to bleed the brakes alone.
GIVEN: Bleed the brakes. ASSISTANT - absolutely not needed. WHAT YOU NEED - buy a washer check valve for the VAZ and a tube for it. Price is about 70 rubles. Reusable (hereinafter referred to as stray). Tubes 2 pieces, thin 10 rubles thick 30 rubles Don’t forget about the brake fluid and the right tools.
1 - 5 - a picture of how and why the stray was made. 6 — Under the hood, open the brake fluid reservoir and evaluate its appearance. It makes sense to suck out the top portion with a syringe and add new liquid to the top. During the pumping process, we monitor the level and, if necessary, top up to the maximum. 7 - 8 We put a thin tube on the fitting, lower the long one into the jar. Unscrew the fitting a quarter turn. Everything is ready for pumping. We pump the pedal to the floor ten times, after which we go to look at the level in the tank. If necessary, repeat the process again and again. Here's what the process looks like. We tighten the fitting, remove the tube, wipe it dry, press the pedal hard several times to control the drips. 9 — The horror that drove me out of there