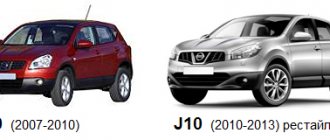
Lada 2112 ᵀᴴᴱ ᴼᴿᴵᴳᴵᴺᴬᴸ › Logbook › Repairing the stove on a VAZ 2112
The cold season is already upon us and it’s time to check all the components of the stove so that problems do not arise in winter.
Having bought a VAZ 2112 car, the stove did not work in the summer, but for the winter it was necessary to do something. I set about doing my own diagnostics and repairs. In order to determine for yourself why the VAZ 2112 stove does not heat up, you need to at least have a little idea of how it works and works.
Diagnostics
Why the VAZ 2112 heater does not work
Problems with the heater may be due to the lack of coolant in the Engine Cooling System (ECS): You need to check the level of antifreeze/antifreeze in the expansion tank.
Check that this system is not clogged and is functioning properly. If the heater is not working well, then the reason may be in the heater radiator: You need to make sure that the heater radiator is hot. Perhaps the reason is an air lock; to eliminate it, you need to drive the front wheels onto a hill and let the engine run at medium speed for a couple of minutes.
Check the heater radiator for leaks and replace it if necessary.
If the heater on a VAZ 2112 is blowing weakly, then most likely you just need to replace the cabin filter.
And in order for the cabin filter to last longer, you can install protection on the air intake. Replace the part with a working one The easiest way to find out the reason for the malfunction of the stove is to replace the part with a working one and check its functionality.
Replacing an automatic control system unit or a ceiling sensor is not a problem and will take you no more than 5 minutes, but with a micromotor gearbox you cannot do without removing the frill and soundproofing of the motor shield. Therefore, you can leave it until the last moment and start by replacing the first 2 components of the automatic control system. In fact, it is not necessary to buy a new part. I was able to come to an agreement with the seller, left a deposit and replaced my SAUO unit with a unit from the display case within 5 minutes and determined the reason.
You can also borrow a working SAUO controller or a ceiling sensor from a neighbor.
Problems with the VAZ 2110 heater damper In general, the stove has 2 dampers (upper and lower): The upper one controls the flow of cold air, and the lower one controls the flow of hot air from the stove.
1. The old-style damper is plastic with foam rubber seals.
2. The damper is a new type - metal with a rubber seal.
Sometimes it happens when you can hear the heater damper moving and the heater radiator is hot, but still cold air is blowing from the heater, then the damper or its drive may be broken. The damper can be glued with dichloroethane, because it is made of ABS material, but for this you will have to disassemble the heater.
If, when the ACS controller set point is set to “MIN”, it blows cold, and nothing blows when set to “MAX”, and at the same time the upper damper rises as high as possible and closes the access of cold air, and there is no hot/warm flow, then there may be problems with the 2nd lower damper, which opens hot air from the stove.
If there is no sound of the damper moving, then it may be jammed.
Sometimes the valve becomes warped or gets stuck due to rust. You can try to move the damper from the interior side with your hand without disassembling the heater; to do this, you need to remove the central deflector, unscrew the plastic air guides and try to crawl up to it with a thin hand. If it blows cold/warm into the windshield, and hot into the sides/legs/face, then the possible reason is that the damper does not completely block the air from the street. This happens with a plastic damper; it warps over time due to exposure to heat. We change it to metal and check that it closes as far upward as possible.
It happens when the heater damper moves frantically back and forth in one place.
This is the cause of a faulty micromotor gearbox shaft position sensor. Bottom line. Depending on the reasons for the heater not working properly, solving the problem can take from several minutes (for example, by turning off the interior sensor on the ceiling) to several days (when you have to disassemble the trim and trim of the wind window and change the micromotor gearbox). To identify the cause of a stove malfunction, you should start with simple solutions (for example, replace the ACS unit with a working one), and leave long-term solutions for last. like)))) and share with friends)))
The VAZ 2112 stove does not work (reasons and repairs)
For any owner of a VAZ 2112, as well as any other car, the most unpleasant problem in winter is the failure of the stove. In this article, we will look at why the VAZ 2112 stove does not work (reasons and repairs). At the same time, you need to understand that we cannot cover all possible options in one publication, so we will present the most common breakdowns and ways to solve them.
What to do if only cold air is supplied from the dampers?
One of the most common signs that a car's heating system is not working properly is that only cold air is blown into the cabin. There are two reasons
reasons why this could happen:
1. Interior temperature sensor faulty
. There is a temperature sensor in the interior lighting, which tells the control unit how well the temperature in the cabin corresponds to the one set by the driver. If the sensor breaks, it may supply incorrect data to the control unit - it is too hot in the cabin, which is why the stove will start trying to “cool” the cabin. In this case, there is only one solution: unscrew the lampshade and replace the sensor with a working one. The main thing is that when connecting a new temperature sensor, do not reverse the polarity.
2. Gear motor faulty
. If, after checking the interior temperature sensor, it turns out that it is working properly, and the question of why the stove does not work is still relevant, then you should turn your attention to the gearmotor. As with the temperature sensor, it cannot be repaired, so this unit will have to be completely replaced.
The procedure for replacing it is somewhat more complicated than replacing a temperature sensor, so we will describe it in more detail:
1. Remove the wipers, unscrew the frill fastening and move it to the side, thereby gaining access to the gearmotor.
2. Using a small Phillips screwdriver, unscrew the gear motor mount.
3. Disconnect all wires from the gearmotor and completely dismantle it.
4. Install a new gear motor and reassemble the structure in reverse order. It is important to note here that when installing a new gearmotor, it is important to ensure that the cut of the unit fits exactly into the damper.
Coolant leaking into the cabin
If your stove has completely stopped working, an unpleasant smell has appeared in the interior, and you notice traces of antifreeze on the carpet, then the repair work described above will not help you. In this case, most often the problem is related to a radiator leak.
, although in some cases the stove tap is to blame. The principle of replacing them is similar, so we will only describe the procedure for replacing the radiator, and based on this work you can independently understand how to replace the heater tap.
But, before we begin describing the replacement procedure, I would like to say a few words about what kind of radiator you should buy and which stove taps you should pay attention to. So, if we talk about radiators, then you have to choose between copper and aluminum. Copper radiators
They can be repaired (the leak can be soldered), but are somewhat more expensive than aluminum ones.
In turn aluminum radiators
cannot be repaired, but are 20-30 percent cheaper than copper models.
In general, there is no fundamental difference in which radiator you choose, the main thing is not to buy painted models
, they lose a lot in their thermal conductivity.
If we talk about stove taps, then here you will also have a choice between two main options. First
- VAZ stove taps, they are relatively inexpensive, but not very durable.
If the stove is actively used, they will have to be changed every 2-3 seasons. The second option
is ceramic stove taps from. These heater taps cost 30-40 percent more, but are normally used for at least 5 seasons.
Remember, it is very important to understand why the VAZ 2112 stove does not work and where exactly the antifreeze is leaking from, since both the radiator and the faucet cost more than 1,000 rubles. After you do this, and also decide which part you will install, you can proceed directly to the replacement procedure.
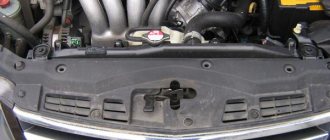
1. Remove the engine boot.
2. Move under the car, unscrew the engine block cover and drain the antifreeze into a plastic container. The container must be large enough, since the system contains about 6 liters of coolant.
3. Next you need to remove the frill. To do this, dismantle the rubber seal and also unscrew several screws: near the main brake cylinder and near the upper fastening of the frill.
4. Disconnect the wires from the heater fan.
5. Remove the windshield trim. To do this you will need to unscrew 5 screws and 2 nuts. Use a wrench with a diameter of 10 millimeters to dismantle them.
6. Disconnect the hose that supplies water from the windshield washer barrel.
7. Now you need to release the heater housing and electric fan. To do this, you must disconnect their latches and also unscrew the screws that are located on their front part, as well as on the cabin filter.
8. Next, remove the front part of the fan, followed by the back part.
9. Remove all hoses that go to the heater. Do this carefully, as they may contain antifreeze residues.
10. Replace the old radiator with a new one, and reassemble the structure in the reverse order.
If none of the reasons described above are your case, and you are still tormented by the question of why the stove of your “twelfth” does not work, then you should familiarize yourself with other materials on our website, which will tell you in detail about less common cases of failure stoves, and will also help fix your problem.
In the article, the stove does not heat well. Heater repair describes in detail all possible causes of stove failure. You can identify and eliminate them - go in and read how - very useful material.
Why does the VAZ-2112 16 valve stove heat poorly and how to fix it
The level of comfort with which you will drive during the cold season directly depends on the correct operation of the stove in your car.
After a problem with the heater in the car was noticed, many car owners begin to deal with it only when the first frost is approaching. Prudent car owners deal with similar problems at the end of summer. All problems with the stove on the VAZ-2112 occur due to the poor quality of assembly of this system at the factory. For this reason, the reliability of the heater suffers greatly.
In this case, even if you are sure that everything is in order with the stove, it is advisable to check the critical components and, if necessary, repair the faults.
The VAZ-2112 stove is significantly different from those systems that are installed on other models of the brand. “Our” heating system is separate.
The heater is the first unit that is responsible for heating the supplied air. Through the channels conducting air flows, the air flows onto the windows, into the cabin and onto the legs of the front passenger, as well as the driver. The distributor is responsible for this branching. In other words, this is a regulation block.
The stove also has an evaporator, which is not available on other models.
Absolutely any component of the system can fail, which will lead to poor performance of the heating system.
Components and processes of the VAZ-2112 heater
The heater circuit consists of the following elements:
- electro-pneumatic valve;
- housing with the air intake of the heating system, consisting of front and rear parts;
- water-reflective air intake flap;
- valve for controlling the recirculation damper;
- recirculation damper on the air intake;
- damper on the stove channel;
- stove control damper;
- radiator and its casing;
- fittings on the steam exhaust and supply hoses;
- stove electric motor in the housing and fan;
- support platform for the lever from the heater control damper drive and the lever itself;
- micromotor gearbox with damper drive;
- resistor;
- cover from the stove casing.
The radiator is located horizontally under the instrument panel. It is housed in a plastic casing. The radiator design includes two plastic tanks and a pair of aluminum tubes with pressed plates on them. There is a steam outlet fitting on the left tank. The passage of intake air through the radiator depends on the position in which the dampers are located. If the dampers are in their extreme position, then the entire air flow may pass through the radiator or not at all.
Lack of tap - plus or minus?
If older VAZ models have a tap that can be used to shut off the flow of antifreeze to the radiator, the VAZ-2112 is not equipped with such an element. If the engine is running, the radiator will heat up regardless of the time of year. This design feature of the stove makes it possible to achieve a slight inertia, which is inherent in the system during start-up. In other words, the required temperature will be reached in a shorter time. In addition, the user will not encounter leaks that arise as a result of a leak in the faucet. The electronic control unit, which generates the necessary commands, is responsible for the ability to conveniently control the operation of the stove.
As we already know, the VAZ heater circuit does not provide for a heater tap. An air damper is provided to control the temperature inside the cabin. This mechanism is responsible for regulating the flow of heated air. In the VAZ-2112, antifreeze is supplied to the heating system year-round, which does not suit all drivers. Therefore, some owners of VAZ-2112, 21124 and other models belonging to the tenth family additionally install a tap that allows you to control the supply of antifreeze.
The control of the VAZ-2112 stove is automatic, and the temperature error does not exceed 2 degrees. The presence of an air damper in practice turns out to be more preferable, since the valve has a tendency to sour and jam. In short, with an air damper, heating is less problematic and more reliable.
Ventilation principle
In VAZ cars of the tenth series, the supply and exhaust system is responsible for interior ventilation. The principle of its operation is to supply air inside the cabin through special holes, which are located in the trim on the wind window. This process can be carried out independently while the machine is moving or forcefully due to the operation of the fan. There are also special openings for air to escape, which can be found between the upholstery and the inner door panels. Then the air flow follows through the holes that are located at the ends of the doors. Through these holes, air can only escape, but not enter the car, which is prevented by the valves. With such a ventilation system, we get better thermal insulation and slower cooling of the interior.
Recirculation system
To ensure that the interior warms up faster and cold air does not come in from the street, which is especially important when driving on dusty roads, the car is equipped with a recirculation system. There is a recirculation button on the instrument panel; when pressed, the electro-pneumatic valve is activated. Due to the vacuum, the recirculation system flap, which is located inside the intake manifold, blocks the flow of outside air into the car. The recirculation system can only be activated when the engine is running. When the fan is turned on, air circulation throughout the cabin will continue, and the air ducts of the heating system will be activated.
Fan and motor
The fan can operate in three modes:
- low speed;
- average speed;
- auto mode.
The electric motor on the fan is installed as a commutator type, with permanent magnets and direct current. If the rotation speed is maximum, then the current consumption will be 14 A.
The electric motor can operate from the on-board network or through an additional resistor. The first option involves maximum speed. The design of the additional resistor has two spirals with different resistances of 0.23 and 0.82 Ohms. When two spirals are connected to the circuit at once, the fan rotates at low speed. The inclusion of one spiral with a resistance of 0.23 Ohm allows the fan to operate at medium speed.
The fan wheel must not be pressed from the motor shaft, as such actions may disrupt the balancing. If repair of the electric motor is required, it may only consist of cleaning the collector; if all other problems arise, it is necessary to replace not only the electric motor, but also the fan wheel.
Manual and automatic operation of the stove
To set the required air temperature there is a controller handle or temperature sensor. The driver simply turns the knob and stops at the required division. The scale starts at 16 and ends at 30 degrees.
There is a temperature sensor on the ceiling of the cabin, which transmits information to the unit. When the difference between the set and actual temperature levels reaches a certain value, the unit activates the micromotor, which controls the dampers. There is a sensor on the micromotor that displays the position of the damper, it is called a ring resistor. Data from this sensor is transmitted to the control unit, which stops the micromotor at the necessary moment.
When the automatic mode is activated (position “A”), regulation of the speed at which the heater fan rotates is added to the existing operation of the control unit.
In the event of a breakdown of the control unit, microfan and temperature sensor, micromotor and sensor that displays the position of the heater damper, the possibility of repair should not even be considered. Each of these parts will need replacing.
This is exactly what the diagram of the VAZ-2112 stove looks like, which will no longer seem like a “dark forest” to you. To delve into its structure is a matter of time and desire.
Temperature does not change
In this case, you fail to adjust the internal climate, and the result is sometimes both unbearable heat and cold. The reason for this may be the following:
- The control unit does not receive information from the temperature sensor. This measuring device is installed in the ceiling next to the lampshade. To check its functionality, turn the adjustment knob to its extreme position (several times). If there is no reaction or it appears in the extreme position, it is necessary to change the sensor.
- Damper failure. It is quite possible that the damper is simply jammed and is now unable to turn. The reason for this is oxidation of the mechanism fastenings. It is possible to get to the damper only from the engine compartment. Initially, you need to remove the deflectors, bend the antennae, and only then try to move the element.
The flap may be deformed. There is a plastic part on the VAZ-2112. Therefore, if you change an element, it is better to install an aluminum one. Such a damper will last longer and will retain heat better.
In addition, the damper may not work correctly due to failure of the drive motor. To check, you need to remove the insulation and frill. This engine cannot be repaired, it can only be replaced with a new one.
Some drivers ignore the need to replace the motor and leave the throttle open. In this case, it will not be possible to regulate the temperature in the cabin, and hot air will constantly flow.
Weak warm air supply
The air flow is warm enough, but the pressure is insufficient. In such a situation, the following malfunctions are possible:
- The cabin filter is dirty. In this case, you need to clean it from dust with a vacuum cleaner. If this cannot be done, then it is better to replace it.
- The stove radiator is clogged. In addition to dust, both insects and leaves create plugs. Small particles can be blown out using compressed air. To remove large dirt, you need to remove the grill and wash it.
Insufficient air pressure may be due to a leaking radiator. This problem is determined very simply - if you constantly add antifreeze or antifreeze, then pay attention to the condition of this unit in the car. To eliminate this malfunction, you will need to gain access to the radiator and remove it along with the heater.
The practice of soldering the heatsink is unreliable. It is better to install a new part so as not to disassemble half of the front end later.
The stove blows cold air
If the antifreeze is at operating temperature, the tap is open and the system as a whole is operational, then the reason for the supply of cold air can only be the formation of an air lock in the radiator. This problem is solved as follows:
- The car is placed on any hill so that the front part is higher than the rear axle.
- Open the tap on the radiator.
- Start the engine and let it run for 5 minutes. During this time, periodically press the gas pedal.
- Now we slide down the hill, close the tap and check the heating system.
The stove doesn't work at all
In this case, some node of the system has broken down.
All components of the structure must be checked. But, as practice shows, the fan is to blame. If everything is fine, next check the thermostat. After checking all components and determining the malfunction, consider carrying out a major overhaul of the stove. Having repaired the system once, you will be able to drive comfortably for a long time without all sorts of surprises.
If the cost of a major repair is equal to the price of a new heater. Then the best way out of the situation would be to purchase and install a new unit. In this case, you will travel approximately 15 thousand kilometers without any problems.
To summarize the article, we note that we examined the main malfunctions that can lead to poor operation of the stove on the VAZ-2112. Now you know how to find and repair a heater failure. If you do not have experience in carrying out this type of work, the best solution would be to contact a service station.
Problems with the VAZ 2112 stove and its repair
The design of the VAZ 2112 stove heater differs from the previous VAZ-2108, 2109 family. When the engine is running, the radiator temperature should correspond to the general temperature of the cooling system. This means that the damper is always open and the supply of antifreeze (antifreeze) does not stop. The control system is electrical; processes are controlled by electronic sensors and controllers.
The center console has two control levers and one regulator. The driver, as necessary, sets the air temperature in the cabin, activates the desired mode (speed) of the fan, and directs the air flow to heat the glass and legs. A special electric thermometer installed in the ceiling controls the temperature. As soon as the temperature drops, the controller transmits a signal to the micromotor reducer, the heater is activated, and a flow of warm air enters the cabin. A malfunction of one or more units causes a breakdown, the VAZ 2112 stove does not heat well, and prompt repairs are required.
How to change the gear motor of a VAZ-2112 stove with your own hands
The main malfunction that completely paralyzes the operation of the heater in VAZ-2112 cars is the failure of the heater gear motor. The purpose of this element in the system is to control the heater damper, that is, the gearmotor (MR) is responsible for opening and closing it. The movement of the damper can be monitored using appropriate signals from the control module of the machine's stove. It is worth noting that in the VAZ-2112 the temperature in the cabin can be maintained automatically, that is, the air is either heated or cooled if necessary.
If the heater gearmotor fails, before purchasing and replacing it, you need to pay attention to one important point: there are two types of gearmotors (old model and new), which are fundamentally different in their design. In view of this, it is very important to know what type of element is installed on the car, so as not to waste your time and not make unnecessary purchases.
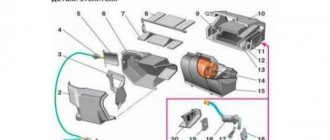
The device of the VAZ 2112 stove
Heater parts
- electro-pneumatic valve;
- front housing;
- water deflector;
- control valve;
- back of the case;
- radiator;
- radiator casing;
- lid;
- resistor;
- Electrical engine.
Heater ducts and controls
- Rear heating ducts.
- Plastic lining of the tunnel.
- Foot heating channels.
- Ventilation nozzles of the central part.
- Side nozzles.
- Heated front doors.
- Mechanical heating lever.
- Distributor housing.
- Damper for heating feet, windshield.
- Heater.
It is important to know. Differences in the design of the old and new VAZ 2112 in the shape of the heater radiator, the SAUO controller, and the micro-gearbox. Conventionally divided before 2004 and after. When purchasing, be careful not to hand over unnecessary parts.
Characteristic symptoms of malfunctions
In practice, there are five most common signs:
- The VAZ 2112 heater does not work, it constantly rotates at one stable speed;
- Temperature is not adjustable;
- The air flow control flaps are fixed and cannot be adjusted;
- Sensor - regulator on the ceiling is in a faulty state;
- Unstable operation of the ACS controller (automatic heater control system)
- Antifreeze leaking from under the radiator.
The list is not exhaustive, but only indicates the main malfunctions of the VAZ 2112 stove. Prevention will require a visit to a service station followed by diagnostics.
Causes of breakdowns
- violation of the terms of scheduled technical inspection;
- installation of non-original parts, components, consumables;
- filling the cooling system with antifreeze (antifreeze) of low quality or with chemical impurities, the quantitative composition of which exceeds permissible standards;
- mechanical damage to the fluid supply line, accident, collision, impact, violation of installation technology;
- short circuit in the network, electrical circuit, which contributed to the failure of the controller, sensors, resistors;
- damage to the damper control lever, malfunction of the dampers;
- poor terminal contact;
- damage to electrical wiring and cable sections.
Trouble-shooting
Checking the cabin air temperature sensor
You can check the serviceability yourself; special skills are not required. Carefully remove the sensor from its original place. We find the contacts on the back side. Using a multimeter, apply a voltage of 1.2V. We set the regulators of the automatic heater control system to the “Min”, “Max” positions. The motor should not be activated.
The second method is to turn off the cabin air sensor. Check fan speed settings. The first speed (“A”) should be inactive.
Video: Heater VAZ 2110, 11, 12. Design and principle of operation.
Checking the proper operation of the automatic control system
The proper operation is checked with a multimeter. The voltage at the terminals of the pink and brown wires is measured, the ignition is activated. Smoothly turn the temperature regulator; the arrow on the multimeter display should show an increase in voltage.
On old-style heaters, at maximum voltage, the controller value remains unchanged. Take this into account so as not to make hasty conclusions about the malfunction of a particular unit.
The cause of controller malfunction may also be deformed dampers. To verify this and eliminate the breakdown, we disassemble the heater.
Prevention of the damper of the heating system of VAZ 2112
To be precise, two dampers are subject to inspection; this is the number of them present in the VAZ 2112. The cold air intake is regulated in the upper part. In the lower part, warm (hot) air is supplied to the car interior. Due to wear on the drive mechanism, the damper opens halfway or partially, the air flow is reduced, and the interior is not heated sufficiently.
Reasons for failure:
- biting, jamming during operation, due to the lack of a sufficient amount of lubricant;
- a lot of debris, moisture, sand, dirt, which contributed to jamming;
- failure of the gear motor damper cable;
- numerous layers, rust, corrosion.
The old and new dampers differ only in the type of sealing ring. In the old ones it is plastic with foam rubber, in the new ones it is a metal seal with rubber. If you can’t hear the movement of the “curtain”, move it, set it in motion, after first removing the deflectors from the central part of the dashboard with a flat-tip screwdriver. Be careful, as the plastic casing of the console is damaged.
Metal ones are better and more practical, but they are afraid of moisture, rust, and deposits. Plastic ones, on the contrary, are deformed from heat and elevated temperatures.
The second way to check the performance of the damper: if the windshield heats hot air, but the sides or legs are warm, there is a malfunction. There is no air flow - the microdetector has failed. This is the drive mechanism.
Defective damper micro-reducer
Diagnostics is permissible if you have a special device - an ohmmeter. It is designed to measure resistance in an electrical circuit. In old-style controllers, the indicators are in the range of 750 - 1250 Ohms, in new ones - 3400 - 5100 Ohms.
Troubleshooting occurs as follows: we start the power unit, set the temperature to o, wait 15 - 20 seconds, turn it off. We disconnect the controllers, measure the resistance with the ignition on between contacts X1.4 and X1.1.
At maximum temperature, the ohmmeter shows up to 5.0 Ohms on the new one or 1.6 Ohms on the old one. The absence of resistance indicates a malfunction: failure of the micro-gear sensor. More often, the tracks wear out, the wiring becomes damaged, and the fuse blows. To replace the micro-reducer, the stove is disassembled.
Fan runs at one speed
If the motor rotates only in the first two speed modes, then look for the reason in the resistor. It's faulty. Activation only at the third speed indicates “direct” operation, bypassing resistors. The reason is worn tracks on the switch, temperature controller.
Diagnosis of resistance resistor
The resistor design contains two spirals: the first with a resistance of 0.23 Ohms, the second with 0.82 Ohms. When both spirals are activated, the fan operates at the first speed; when one is activated, the motor operates at the second speed. When starting directly without a resistor, third gear is activated.
The most common causes of breakdowns of the VAZ 2112 stove are low levels of antifreeze, air in the system, malfunctions of the thermostat and pump.
VAZ 2112 stove faucet where is it located
Installing a heater tap in a VAZ 2110
This modification will allow you to warm up the engine faster in winter, and get rid of the heat from the stove in summer.
We will look at how this can be done in this article. The idea and implementation belong to zufa_66 The meaning of the idea is as follows: In winter, you warm up the engine without one and a half liters of antifreeze from the stove, thereby increasing the heating rate of the internal combustion engine and the engine life. In summer, hot air does not leak through the cracks in the stove flaps and does not heat up the already heated interior. You will need: The faucet of the VAZ 2108 stove. The suction cable from the VAZ 2108. The faucet with a sawn-off non-closing pipe is secured with two clamps on any stove hose. The faucet is controlled by a cable that passes into the cabin through the hole for the clutch cable (indicated by the arrow). The interior part of the drive is mounted on the dashboard at the bottom. Attached to torpedo with a plate cut to these dimensions. Here is another way from SAO How to control this - I think with the ESP button Set the position signal LEDs - you need to change the solenoid to a 5-wire blue - “cold” closed position red - “hot” - open. xn--2111-43da1a8c.xn--p1ai
Manual control of the stove (heater) damper
If you are tired of understanding the problems of the VAZ 2110 heater, which are associated with algorithms for determining the position of the heater damper, then you can adjust the damper manually. Now it will be possible to install the heater damper in the desired position yourself without an SAUO controller.
Controlling the heater damper of the VAZ 2110 using a cable
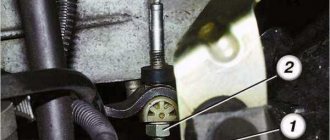
An alternative to an unreliable micromotor-reducer is manual control of the heater damper. Install the valve from the VAZ 2108 into the heater pipe. The air damper of the VAZ 2110 heater must be secured in the “hot” position. (using a long screwdriver through the central deflector from the passenger compartment). 1 – shaft from the gearmotor; 2 – lever; 3 – clamp; 4 – cable sheath; 5 – panel; 6 – “torpedo”. We remove the “frill” and the faulty MMR. We saw off a square shaft from the MMR and make a lever from metal, and a clamp from an M8 bolt. We drill a panel in the cabin and fasten a cable adjusted to the length (for example, a cable for controlling the air damper of a Zhiguli carburetor). We cut the cable sheath so that it serves as a limiter for turning the lever. Insert a piece of the square shaft of the gearmotor into the axis of the heater damper, put a lever and clamp on it, insert the cable into the hole in the clamp, turn the damper to the “warm” position (the cable is recessed) and fix it. Now The manually controlled heater damper will serve you forever! The work takes only 15 minutes (without removing the frill).
Controlling the heater damper using the ESP (power window) button
In addition to mechanical control, there is also control of the heater damper from the VAZ 2110 window lifter button. Using this scheme, you can bypass the SAUO controller and control the temperature manually using the window lifter button. The price of the window lifter button is 140 rubles (you must agree, not 1300 rubles, like the price of the MMR) We take out the heater controller and disconnect it from it 6-terminal and 13-terminal blocks. You need to connect the ESP button according to the diagram (the pins are indicated on the back of the button): pin 2 to “+” from the ignition switch (via a 10 A fuse) pins 3.6 to “-” (5 can be also twist here to illuminate the ESP button) pins 7.1 to the MMR dampers, pin 4 to + from the clock backlight (to illuminate the ESP button) After assembling the circuit into the SAUO controller, we hook back only the 6-pin connector (responsible for controlling the fan), and We leave the 13-pin connector unconnected. All ! Now you can control the heater damper using the ESP button, bypassing the smart algorithms of the SAUO block. In the photo, the ESP button has not yet been installed in the panel. Because The 13-pin connector is not connected to the SAUO unit, it will not be illuminated. To illuminate the automatic control system, you can throw a “plus” from the clock illumination. It took about an hour to change the damper control. To return the heater damper control back, you don’t need to change anything, just insert the 13-pin connector into the automatic control unit. For example, controlling the ESP damper button stoves VAZ 2110
Conclusion
Of course, it’s best to repair the standard heating system of the VAZ 2110 and control the temperature in the cabin through the SAUO controller, but sometimes you don’t really want to tinker under the hood in the winter without a garage in search of a micromotor gearbox. And you can install manual control of the damper directly from the cabin and within an hour. If you have remade control of the damper via a cable, then there is no way back.
But when installing the ESP button to adjust the damper, you can always return to the standard option of controlling the heater damper through the SAUO controller. xn--2111-43da1a8c.xn--p1ai
Repair of stove (heater) VAZ 2110
With the onset of cold weather, many begin to notice that the stove in the VAZ 2110 does not work. Every day there are more and more questions about why the VAZ 2110 stove does not heat well or the stove does not heat at all, and some people have cold air blowing from the stove. I’ll tell you how you can determine for yourself why the VAZ 2110 stove stopped working, as well as how you can fix it.. In order to determine for yourself why the VAZ 2110 stove doesn’t heat, you need to at least have a little idea of how it works and works.. I’ll try. describe briefly:
Heating and ventilation system VAZ 2110
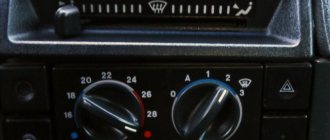
The heating and ventilation system consists of: 1) SAUO controller (automatic heater control system) or called the SAUOL block; the desired temperature in the cabin is set with a handle (temperature setter) from 16 to 28C. In the extreme positions (blue and red dots), the heater damper closes or opens completely, providing cold or hot air, respectively. The right handle sets the fan operating mode.
| 1303.38544 or 5-position Manufactured since 1996, currently out of production For heaters: 2110-8101012, 2110-8101012-01, since 2001 2112-8101012-01 and 2112-8101012-02. This controller and heater interchangeable |
| 1313.38545-position Manufactured since 2001, currently discontinued For heaters: 2110-8101012, 2110-8101012-01, since 2001 2112-8101012-01 and 2112-8101012-02. This controller and heater are interchangeable |
| 1333.38545-position Manufactured since 2003, currently discontinued For heaters: 2110-8101012, 2110-8101012-01, since 2001 2112-8101012-01 and 2112-8101012-02. This controller and heater are interchangeable |
| 1323.38545-position Produced since 2003 Since September 2003, the heater 2111-8101012 has been installed on VAZs of the tenth series. This controller is not interchangeable with previous ones. AVTOVAZ does not recommend changing the heater yourself. |
2) Interior air temperature sensor (called “ceiling air sensor”). A small-sized fan is built into the sensor. 3) Micromotor gearbox (MRZO-01). MMR. Old model until 2003. (photos 1 and 2) Price 1200 rub. New model after 2003. (photos 3 and 4) Price 600 rubles. Inside the MMR there is a shaft position sensor (resistor). See interchangeability of MMR.
Setting up the VAZ 2110 heater control system
To increase the accuracy of maintaining the temperature in the cabin, the SAUO unit has the ability to adjust to the sensor using an adjusting potentiometer located under the slot on the side wall of the controller housing. To do this, remove the controller from the socket and use the adjusting potentiometer to adjust the setting at the rate of: 0.2 ° C per revolution for controller 2110-8128020-01. Rotating the potentiometer clockwise results in a temperature decrease of 0.3°C per revolution for controller 2110-8128020 (1303.3854). Rotating the potentiometer clockwise increases the temperature
The principle of operation of the VAZ 2110 stove:
The SAUO unit receives a signal from the ceiling temperature sensor in the cabin and compares it with the temperature set by the driver. If the difference is more than 2C, then the ACS unit sends a control signal to the micromotor-reducer, which controls the heater dampers (opens or closes hot air from the heater). Damper control: Based on the received information and the set air temperature, the controller controls the position of the heater damper, sending appropriate signals to the micromotor-reducer damper drive. Fan speed control: to obtain a low rotation speed (all but the last), an additional resistor (No. 2) is used, which has two spirals with resistance (0.23 and 0.82 Ohms). When both spirals are connected to the electric motor power supply circuit, the 1st fan rotation speed is ensured; if a spiral with a resistance of 0.23 Ohm is turned on, the 2nd speed is provided. When the electric motor is turned on without a resistor, the fan rotor rotates at a maximum 3rd speed (4100 min-1). Mode “A” on the ACS controller, depending on the difference in air temperature in the cabin and the temperature sensor in the ACS unit, regulates the fan rotation speed (the speed changes when difference is more than 5C between sensors). Mode “A” does not affect the movement of the damper. In the extreme temperature positions “MIN” and “MAX” on the ACS unit, the heater damper should move regardless of the readings of the ceiling sensor.
How to determine the reason why the VAZ 2110 stove does not work
Problems with the stove may be due to the lack of coolant in the Engine Cooling System (ECS): You need to check the level of antifreeze/antifreeze in the expansion tank.
Check that this system is not clogged and is functioning properly. If the heater is not working well, then the reason may be in the heater radiator: You need to make sure that the heater radiator is hot. Perhaps the reason is an air lock; to eliminate it, you need to drive the front wheels onto a hill and let the engine run at medium speed for a couple of minutes. If this doesn’t work, then use the instructions in this article. Check the heater radiator for leaks, if necessary, replace it. If the heater blows weakly on the top ten, then most likely you just need to replace the cabin filter. And in order for the cabin filter to last longer, you can install protection on the air intake. If the heater radiator is in good working order, then the reason is malfunction of the stove can be: In the SAUO controller (repair instructions for the SAUO control unit) In the cabin air sensor on the ceiling In the micromotor gearbox (in the motor or in the shaft position sensor) In the heater damper (or in its attachment to the MMR lever) Possible solutions : xn--2111-43da1a8c.xn--p1ai
Repair of the micromotor of the stove gearbox of the new VAZ 2110-12 model
| In VAZ cars of the tenth family, the air flow (cold or hot) going into the cabin is controlled by a damper, which in turn is controlled by a micromotor-gearbox (MMR). It may be the cause of the stove’s malfunction, but do not rush to change it, try to repair it yourself. |
Depending on the year of production of the VAZ 2110, 2111 or 2112 (the turning point year 2003), the MMR can be old or new. Next we will talk about the new type of MMR.
Checking MMR
Diagram of the automatic heater control system:
We check whether the control unit (ACS) supplies control voltage to the gear motor: With the ignition on, we check the voltage using a multimeter on contacts x1.2 (pink) and x1.8 (brown) of the ACS unit. In the extreme position of the temperature regulator, a control voltage of 10V should appear within 10-15 seconds. When moving the temperature knob to another extreme position, the polarity of the control voltage should change. If there is no voltage, then the ACS controller is faulty. We check the serviceability of the damper position sensor in the MMR: In the extreme positions of the temperature regulator (min and max), we check the resistance between contacts x1.1 (green) and x1.4 (blue with a purple stripe) of the ACS unit. The value limits should be 5 KOhm (at max) and 1.2 KOhm (at min). If there is no resistance, or the gear shaft rotates but the resistance does not change, then the damper position sensor is faulty.
MMR repair
Remove the micromotor gearbox.
We disassemble the case, prying up the fasteners with a thin screwdriver. We take out the motor and check if it spins. To do this, connect it to the connector in the engine compartment. We disassemble the micromotor by carefully bending the edge pressed in two places. We mark the position of the cover relative to the body so that during assembly we do not change the polarity of the motor. If the motor does not work, we try to find a break; if it works, then we simply lubricate it and the gears of the gearbox with silicone grease. The lubricant must retain its properties over a wide temperature range (do not thicken in the cold). If necessary, you can change the damper position sensor and use the same type. We assemble the MMR in the reverse order, crimp the motor, observing the applied marks. We connect the connectors to the gearbox without installing them in place and check the operation.
Let us remind you that most often problems in the operation of the stove are associated with a non-working ACS unit.
In second place is a faulty MMR. The operating principle of the heater, as well as methods for repairing it, are described in this article. xn--2111-43da1a8c.xn--p1ai
www.allanda-auto.ru
VAZ 2110 stove, heater, fan, dampers, video of replacing the VAZ 2110 stove radiator
The VAZ 2110 stove is perhaps the most problematic and capricious mechanism in the entire car design. You cannot do without a stove or a faulty interior heater radiator on a VAZ 2110, given our cold climate. If in the summer a non-working stove may not bother you, then with the onset of the cold season it often turns out that the stove on the VAZ-2110 is blowing cold air. Today we will try to talk in great detail about the design, repair and replacement of the heater on the “ten”. For clarity, we will supplement the text with photographs and videos.
Troubleshooting
Electrical system diagram of the VAZ heater (stove):
Connection diagram for the electric motor of the interior heater fan on a VAZ 2108, VAZ 2109, VAZ 21099:
1 — mounting block (fuse box);
2 - egnition lock;
3 — additional resistor (resistance);
4 — electric motor of the interior heater;
5 – heater motor switch button;
A - to the positive terminal “30” of the generator;
VAZ 2110 heater blows cold, why?
Many owners of “ten” complain that at some point the stove constantly blows cold air and no amount of turning the handles of the automatic heater control system can save the situation. There can be a lot of problems and malfunctions. For example, the ACS controller itself is faulty, the ceiling sensor or micro-geared motor is faulty and simply does not open or close the damper. Another reason is the air (air lock) in the heater radiator, which is simply not capable of heating the air passing through it. Below is a schematic representation of the VAZ 2110 heater device .
Heater dampers VAZ 2110
Often the cause of poor performance of the “tens” heater is the damper of the VAZ 2110 heater . The damper may not close tightly or open poorly. The heater flap itself is made of plastic, which can become warped and perform poorly over time. Many car owners buy a metal damper and change it themselves. How to check the functionality and evaluate the condition of the heater damper? Everything is quite simple, remove the central air duct deflector and there you have it - a damper! Let's look at the photo.
Next, carefully inspect the damper, turn on the stove, turn the controls on the ACS unit and see if the damper works at all. How does it move, does it fit tightly. If she does not respond to commands, then the problem may not be her at all. For one thing, you can see if the lever for redirecting the air flow from the glass to the feet works.
Heater fan VAZ 2110
It is quite simple to determine the performance of a stove fan by looking at the noise. If the fan motor burns out, then it naturally will no longer work. However, before rushing to change the stove fan, you need to make sure that the fuse has not blown. As we already wrote above, the fan of the VAZ 2110 stove is located not in the cabin, but in the engine compartment. To get to it, you will need to remove a special apron that separates the engine compartment from the heater housing, vacuum brake booster and windshield wiper mechanism. The actual photo is below for clarity.
So we got to the stove fan, removing the apron and heater casing. By the way, next to you you will see the cabin filter, in the housing a little to the left. It needs to be pulled out and cleaned. If no one has changed the filter before you, over many years of operation it is seriously clogged with debris and interferes with the normal circulation of air, which is sucked into the cabin of the VAZ 2110.
Heater radiator VAZ 2110
The radiator of the “tens” heater is located in the same place as the fan, that is, under the hood (see photo above). To remove it, you must first remove the fan from the heater casing. If you notice a strange smell in the cabin, lift the floor mats; if there are puddles of antifreeze or antifreeze, then the radiator of the VAZ 2110 heater is leaking. Although the clamps may no longer hold... in any case, you will have to disassemble and find out the cause of the leak. Next, we offer a couple of videos demonstrating the process of disassembling, removing the apron, stove fan, cabin filter and heater radiator.
Instructions for replacing the stove radiator
Due to the fact that the “two-piece” can be equipped with an old or new model radiator unit, the procedure for replacing the device may differ. We will consider each option separately.
So, how to replace the stove radiator in new-style systems:
- First you will need to turn off the ignition and disconnect the battery. Open the expansion tank cap, then place a reservoir with a capacity of about 4-5 liters under the drain hole and drain the coolant. If there is sediment in the antifreeze, then it would be better to change the consumables.
- Next, unscrew the nuts and remove the wiper blades.
- Having done this, you need to remove the plastic trim, which is located under the windshield; it is fixed with two nuts, as well as four self-tapping screws.
- To gain access to the heating device, it is necessary to dismantle the frill, unscrew five self-tapping screws, two nuts and another screw, which are located below, in the area of the steering rack, and also in the middle of the frill.
- To dismantle the heater, you will need to remove the cross brace, if installed. Of course, there may be no spacer. You should also remove the air filter bellows and throttles from the hoses of the radiator assembly.
- Next, the wiring should be disconnected from the heater terminals.
- After this, you should unscrew two nuts from the steering rack, which secure the heater, as well as one nut that secures the device to the body.
- Having done this, you should unscrew three more screws, with the help of which the two halves of the heater are connected. After this, you can remove and, by rocking, disconnect the right part of the heater from the left.
- The radiator assembly itself is located in the dismantled half; it is fixed with three bolts. We remove this device and install a new one in its place; of course, a foam rubber seal should also be installed. Then the operation of the fan is checked; if necessary, the device should also be changed. Before assembly, you need to flush the pipes through which the refrigerant flows. Assembly is carried out in reverse order.
Photo gallery “Replacing the radiator”
Regarding replacement in old-style systems:
- In this case, you also need to drain the consumables, remove the frill, disconnect the chokes from the hoses and turn off the power to the heater.
- After this, the expansion tank is removed and the liquid is poured into it.
- Next, the vacuum booster is dismantled; to do this, unscrew the two nuts using a 17mm wrench and carefully remove the master brake cylinder. In this case, be as careful as possible so as not to damage the brake system hoses. The vacuum booster hose must be removed.
- After this, inside the car you should unscrew the four nuts from the brake pedal studs. The vacuum booster itself is dismantled along with the pedal.
- This way you were able to gain access to the radiator device. All you have to do is unscrew the three bolts that secure it, and then replace the device with a new one. Reassemble in the reverse order; do not forget to add antifreeze.
Price issue
Depending on the manufacturer, as well as the version of the heater (old or new), the cost of the radiator may vary. New radiators will cost the buyer an average of 350 to 1,400 rubles; on the secondary market you can find a working radiator for 300-500 rubles.