A necessary tool for tightening the handbrake.
- Two keys for 13. It is advisable that one of them be a socket.
- Head 8.
- A partner, but you can do without him. The truth is it’s more difficult without him.
The principle of adjusting the handbrake
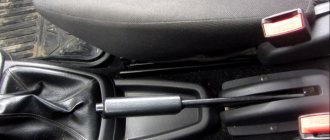
- Fully lower the handbrake lever in the cabin.
Lower the handbrake handle
Remove the muffler from its mounting to the body
Remove and set aside the protective screen
The mechanism looks like this
Handbrake adjustment video
The principle of operation of the handbrake on Grant
Why does it need to be tightened frequently?
This is the peculiarity of the mechanism, which is why you often have to tighten the handbrake. Plus low-quality spare parts from the beginning, and a design that has not changed since the time of Tsar Pea!
In foreign cars (not all of course), the rear brake mechanism (drum or disc) has self-tensioning springs, which are tightened depending on the wear of the pads.
How a properly configured handbrake should work
The handbrake movement in a Lada Granta car should be no more than 6 clicks from the moment it is raised. It is possible to increase the handbrake stroke to 8 clicks, but it is not recommended.
It shouldn’t be like this (the brakes don’t grab the rear wheels)
Ideally, of course, 3-4 clicks. With this setting of the handbrake, you will have a reserve of movement when the cable weakens and the wheels begin to grip later.
If you experience a situation where the handbrake is “pulled out” to its fullest extent, but the wheels do not grab, then the following reasons are possible:
- rear brake pads are worn out;
- the handbrake cable is broken or stretched/
Design and location of the hand brake cable for the LADA Granta
The purpose of the LADA Granta handbrake cable is to transmit force from the lever in the cabin to the rear brake pads. It is enclosed in a multi-layer protective shell and has tips for attaching to the handbrake lever and the rear wheel brake drive. The adjusting nut on the cable allows you to adjust the length of the drive, and the return spring returns the system to its original state after lowering the drive lever. The handbrake cable is located under the bottom of the car and is partially covered by the muffler thermal shield.
Causes and signs of failure
The main reason why you have to change the handbrake cable of the LADA Granta is mechanical wear. The constant forces to which the cable is subjected eventually lead to its deformation (stretching) or rupture. The cause of cable breakage can also be wheel bolts of non-standard length, which catch and fray the steel threads of the cable. Signs that the parking brake cable needs to be replaced:
- the cable stretches or breaks, as a result the handbrake lever rises all the way without effort and “does not hold” the car;
- the cable jams in the braid, the pads do not release the brakes, the brake drum heats up when moving.
When a cable jams in the braid, you can try to lubricate it and, if the cause is not frayed threads, the problem may disappear. In all other cases, it is necessary to replace the Grant hand brake cable.
Advice: do not try to “save” the handbrake, using it as little as possible. If the cable moves infrequently in the sheath, it will eventually jam and break.
What is needed to replace the handbrake cable of the LADA Granta
To change the handbrake cable, you need access to the bottom of the car. Therefore, work must be carried out on a lift or inspection pit. In the latter case, you will additionally need a jack. In addition, you need the following tools and materials:
- wheel wrench;
- keys for 10, 12, 13;
- 2 bolts M8x60 mm;
- pliers;
- flat screwdriver;
- WD-40;
- metal brush;
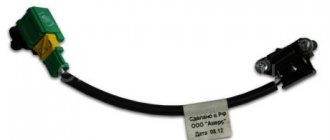
- handbrake cable for LADA Granta.
General questions about the parking brake on Grant
Let's look at a few basic questions about VAZ 2190 brakes.
Operating principle of the Granta handbrake
When raising the handbrake lever in the passenger compartment:
- the drive brake cable is tensioned;
- through the equalizer he pulls the cables going to the rear brake pads;
- The pads are pressed against the brake drums through expansion bars, stopping the wheel from moving;
- When the tension is loosened (removed from the handbrake), the tension of the cables also weakens, and the wheels move freely.
Lever 1 pulls cables 3 through cable 2. Those, through levers 4 and strips 5, push the brake pads apart.
Why is it necessary to tighten the parking brake?
When the cable tension is loosened, there is a danger of the vehicle rolling away .
This means that as the rear pads wear out, the original parking brake setting will lose effectiveness.
Handbrake adjustment video 2190
Crib
Instead of a conclusion, let's summarize :
- Carry out work on a lift, pit or overpass;
- Tools: open-end wrench 13, ratchet with heads 10 and 13 (preferably long);
- It is not necessary to remove the heat shield - just move it forward as the vehicle moves;
- The ideal stroke is 3-4 clicks of the handle until the rear wheels come to a complete stop.
If you've already started adjusting the brakes, maybe change the rear pads too? Detailed instructions with description and photos are here.
Have something to add to the article, share your opinion or recommend? Write in the comments!
Adjusting the Grant's handbrake
Adjusting the parking brake of a VAZ 2190 is no more difficult than on a classic or “chisels”. Let's look at the step-by-step principle , starting with inventory.
Necessary tool for tightening the handbrake
What you will need for work :
- Inspection pit, overpass, lift;
- Keys: open-end and ratchet with long head 13;
- Socket wrench or ratchet with a 10mm head;
- Possibly WD-40.
Parking brake adjustment principle
So, the car is on a pit/lift, the tool is in your hands - the handbrake is loose. What to do?
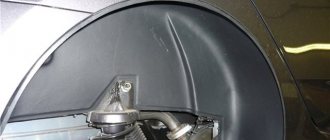
Step 1 : find a resonator under the bottom. We remove its mount, located closer to the front of the car. Then, using a socket wrench or a ratchet with a 10mm socket, unscrew the 4 bolts securing the heat shield.
This way we get the opportunity to move the screen forward without removing it. Underneath there is access to the parking brake adjustment mechanism.
Step 2 : slide the screen forward to access cable adjustment.
Remove the cushion mount 1, unscrew the bolts 2. Move the screen 3.
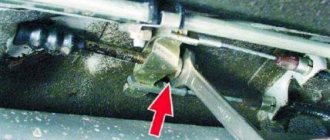
Step 3 : holding the adjusting nut (open-end wrench size 13), loosen the lock nut (head size 13).
Step 4 : Rotating the adjusting nut clockwise, tighten the cables. Periodically check from the inside how the handbrake is holding.
As soon as the parking brake lever reaches 3-4 clicks, tighten the locknut.
1-lock nut. 2-adjusting nut. For convenience, you can loosen the locknut and rotate them both clockwise with a long head of 13.
Step 5 : return the heat shield to its place, fix the fastening screws and the rubber suspension of the resonator.
Checking work:
- the rear axle is suspended, the parking brake is removed - the rear wheels rotate freely;
- the rear axle is suspended, the brake lever is raised (to maximum tension - 3-4 clicks) - the rear wheels do not rotate even with force.
How to properly tighten the handbrake on a Lada Granta
The parking (hand) brake in a car is one of the important parts of the safety system.
In extreme situations or during traffic accidents, the handbrake can save the health and even the life of the driver, passengers or pedestrians. This is why the handbrake system must always be maintained in perfect condition and ensure that the parking brake is always in full working order. To do this, you should regularly tighten it, or, more precisely, adjust it, because there are cases when, for the purpose of adjustment, sometimes it is necessary not only to tighten, but also to loosen the handbrake. It is necessary to test the parking brake of the Lada Grant (VAZ-2190) for proper and uninterrupted operation when there are even the slightest complaints about its functioning.
Checking the operation of the hand brake
There are two ways to find out if the parking brake system on the Lada Granta is in order. They work separately: if at least one type of test shows something wrong, the handbrake needs adjustment. So:
- Stop the car on an uphill or downhill slope of about 23-25 degrees, then put the handbrake in the raised position and turn off all gears. The car must stand still and not roll down. If this happens, the handbrake is working properly and you are in no danger. Otherwise, the handbrake on your car needs adjustment.
- The travel of the hand braking system lever is checked. If the ratchet mechanism clicks 2-4 times before being completely moved to the parking position, there is no need to worry, the handbrake is working properly.
Tips for adjusting the handbrake on the Lada Grant:
If the threaded part of the adjusting unit is not enough to adjust the lever stroke, then it is necessary to check the wear of the brake pads or replace the drive cables.
You can check the functionality of the parking brake system as follows: on an incline of 23 degrees, the handbrake should reliably hold the car stationary.
You need to tighten the handbrake on the Lada Grant if its travel is more than 6 clicks. The optimal stroke is 2-4 clicks, but during operation you can allow up to 8 clicks.
The functionality of the handbrake can be checked very simply: we stop on a section of the road with a slope of about 25 degrees, pull the handbrake, and shift the gearbox to neutral. If the handbrake malfunctions, the car will roll down.
Pull up the handbrake
Adjusting (tightening) the handbrake on a Lada Granta car is a rather troublesome process.
But if you really know how to tighten the handbrake on a Lada Granta standard, this procedure will not take you much time and effort. The only thing that is required for its implementation is a jack or an inspection hole, because access to adjustable components and assemblies occurs from below and you will have to work under the car. To tighten (adjust) the handbrake you will need 3 tools:
- two open-end wrenches for 13, one of them is preferably a socket one;
- one key head for 8;
- a faithful assistant (although in desperate situations you can get by alone).
The process of directly adjusting the manual braking system of a Lada Granta car is carried out in nine main stages:
- We lower the handbrake lever inside the car.
- We climb under the car, unscrew the rubber cushions (brackets) from the resonator, and remove the muffler from its attachment to the body.
- We remove the protective screen of the parking brake adjustment mechanism. To do this, use a socket wrench to unscrew the 4 nuts from the fastening bolts.
- We remove the protective screen or move it to the side behind the muffler - in this case, the necessary space for work is also quite enough. In this case, the muffler can be pulled back with something, for example, by pushing a block of wood under it.
- We take two 13mm wrenches - the first one is to slightly loosen the locknut, holding the adjusting nut. Then vice versa - hold it, and secondly turn (also loosening) the adjusting nut.
- Actually, we adjust the hand brake as follows: tighten the handbrake cable, for which we tighten the adjusting nut (move the key clockwise).
- Next, you should check the travel of the handbrake lever - this is why you need a partner, or you will have to do it yourself. The lock nut can be tightened when the handbrake stroke is 2-4 clicks (see above).
- Then we test the operation of the parking brake mechanism as a whole. To do this, lift the rear wheels and check how freely they rotate when the handbrake is lowered and how completely they lock when fully raised (in this case they should not rotate at all!).
- If the handbrake is working properly, tighten the locknut and replace the protective screen and muffler. The handbrake adjustment is complete!
As the mileage and life of the vehicle increases, the handbrake becomes less and less adjustable. It happens that even after adjustment, the manual braking system does not work properly and does not “hold” the car. This indicates that the wear on the brake pads is too high or the cable stretch is irreversible.
Handbrake adjustment and handbrake repair
As a rule, among the main and most common problems are problems with the brake cable. The specified cable can be replaced or adjusted (if possible).
The first way to solve the problem is to tighten the handbrake cables. This method will only work if the cables are not too stretched and the necessary adjustment can be made to secure the car.
If, after maximum tightening, the car rolls on a slope of 25 degrees, then the hummocks only need to be changed (the handbrake cable is sold in a set of 2 cables). In cases where the handbrake on a Lada Kalina is faulty due to hummocks, the kit starts from 550-600 rubles.
How to adjust the handbrake on Kalina
To properly adjust the parking brake, you need to know how to tighten the handbrake on Kalina. To do this you will need the following:
- open-end and socket wrench “13”;
- penetrating lubricant (type WD-40)
- knob, head at “10” and head at “13”.
Having prepared the tools, the car must be driven into a pit or raised on a lift. Also, wheel chocks should be installed under the wheels when working in a pit or on an overpass.
The process of adjusting the handbrake itself involves the following actions:
- The parking brake lever must be lowered;
- then under the car the muffler is removed from the rubber hangers;
- Having moved the muffler, you need to dismantle the protective panel;
- after removing the panel, access to the parking brake rod and equalizer will open, from which the brake cables go;
- the rod itself is fixed using two nuts (the main lower one and the additional one);
- Having secured the main nut with a spanner, you need to unscrew the additional one;
- The handbrake is tightened and adjusted by rotating the main nut (to tighten the cable, the nut is tightened; to loosen, the nut is released);
- After every 4 or 5 revolutions, the handbrake should be checked. Already with 2 or 3 clicks of the handbrake, the fixation of the wheels should be sufficient so that they cannot be turned manually when hanging;
After completing the setup, there is no need to rush to reassemble. First, the parking brake will be checked using the methods discussed above with the engine running. If the result is unsatisfactory, you need to return to the adjustment procedure and re-learn how to tighten the handbrake on Kalina.
In the case where all operations have been performed correctly, but the parking brake still does not work, there is a high probability that it will be necessary to replace the handbrake cables or rear shoes/drums, as well as check the handbrake mechanism.
How to tighten the handbrake on a Lada Granta, video
It would seem like a trivial matter to tighten the handbrake. But not the Lada Granta. This frantically budget car managed to surprise many owners this time too. Due to the design features and saving on small things, before pulling up the tame ones on the Grant, you need to have a good dance, and without a pit it will be difficult to do anything. Whether you like it or not, you need to tighten it up.
How to tighten the handbrake on a Lada Granta, when to tighten it
Tightening the handbrake cable is necessary in cases where the parking brake lever does not release the brake pads in the upper position. According to science, the pads should block the wheels at 4-6 clicks and hold the car on a slope of 20-25 degrees . Otherwise, we won’t even be able to pass the technical inspection.
Parking brake design
To tighten the handbrake cable, we need to unscrew and move to the side the protective cover of the muffler resonator. It is attached to four studs welded into the body. The difficulty is that when unscrewing these four nuts with a 10mm socket, there is a danger that the studs will break, since the threads often sour and rust.
In this case, adjusting the handbrake may result in drilling the bottom and welding new 6 mm bolts up to 25 mm long. As a last resort, they can simply be inserted into the hole in the bottom by inserting a powerful washer and placing a grommet under the head of the bolt. In a word, we have already prepared ourselves mentally, all that remains is to consider the process itself.
And yet, it is very important to treat these same casing studs in advance with a penetrating lubricant, for example, WD-40. True, this is also connected with traveling under a car.
We adjust the handbrake on Grant with our own hands, video
If we are ready for difficulties, then for adjustment we will need a standard set of tools, grease for processing threads and lubricating the compensator, as well as an inspection hole or overpass. If everything is ready, let's go.
- Release the handbrake completely and go under the car.
- We find the studs with nuts we need and try to unscrew them with a 10mm socket.
- Remove the rubber muffler hanger from the bracket and move the heat shield as far forward as possible.
- We gained access to a 13 mm nut for adjusting the tension of the handbrake cable.
- Use an open-end wrench to hold the locknut, and with another wrench we tighten it several turns, controlling the tension of the cable.
- We tighten the cables until they are lightly tensioned, and then check the tightening force. The suspended rear wheel should rotate freely when the handbrake lever is lowered.
After this, we check the parking brake in accordance with the regulatory data. Below we have attached a video of the process of extreme adjustment of the handbrake on Grant. Good luck to everyone and strong brakes!
Replacing parking brake cables
We replace the parking brake cables when they are pulled out or when they break or become stuck inside the sheaths.
Unscrew the locknut and adjusting nut from the lever rod as described above.
Remove the cable equalizer from the parking brake lever rod
We take out the cable ends from the equalizer and remove it
Remove the end of the cable sheath from the bracket
We disconnect the cable end from the parking brake lever (article - Replacing the brake pads of a Lada Granta car)
We remove the cable tip from the hole in the brake shield
Using a 10mm wrench, unscrew the nut and remove the bracket securing the cable sheath to the rear suspension beam
We remove the cable sheath from the holder on the rear suspension beam mounting bracket
Use a screwdriver to bend the cable mounting bracket on the body and remove the cable from the bracket
Remove the fuel tank heat shield.
Remove the cable from the holder on the body
We remove the parking brake cable from behind the protective screen of the fuel lines
Installation of cables
We install one cable in the reverse order and insert it into the cable equalizer.
We insert the parking brake lever rod into the hole in the equalizer and tighten the adjusting nut several turns.
To facilitate the installation of the second cable, you can make a device from a metal tube 30 cm long and a hole with a diameter of 15 - 16 mm (Fig. 16).
At one end of the tube we drill a hole and cut a thread for a screw (M4 - M6).
We secure the cable in the holders on the body and the rear suspension beam mounting bracket.
We put the tube on the rear end of the cable and fix the cable sheath on the end with a screw
We press the rod on the tip of the cable, compressing its spring
In this case, the front end of the cable will come out of the sheath and can be inserted into the equalizer.
We perform further installation of the cable in the reverse order.
Then we adjust the parking brake as described above.