To ensure the required pressing force on the brake pads or drums during braking, especially emergency braking, a lot of force is required. It roughly corresponds to 80 kg. Applying such force by pressing on the brake pedal with one foot creates great physical stress for the driver.
Therefore, starting from the 70s of the twentieth century, vacuum brake boosters (VBR) began to be installed on almost all cars. They reduce the required force by three to four times.
In principle, it is possible to reduce the force even further. But then the information content of the brake pedal is lost, braking acceleration increases, and vehicle controllability is significantly reduced. Traffic safety and ride comfort directly depend on the performance of the VUT and compliance with its standard parameters.
How does a vacuum brake booster work (working principle)
The VUT is usually a cylindrical block, the internal space of which is divided into two chambers with a diaphragm that can move. There is a vacuum chamber on the side of the main brake cylinder, which is structurally combined with the VUT, and an atmospheric chamber on the side of the brake pedal.
The diaphragm in the vacuum chamber is connected to the drive rod of the brake cylinder. The check valve of the vacuum chamber is connected via a hose to a source of vacuum.
The follower valve, located in the atmospheric chamber, is mechanically connected by a pusher to the brake pedal. Through this valve, the atmospheric chamber communicates with the vacuum chamber through a vacuum channel, or with the atmosphere through an atmospheric channel.
As a “supplier” of vacuum in gasoline engines, they use the vacuum created after the throttle valve in the area of the intake manifold.
In diesel engines, this vacuum is usually insufficient for normal operation of the vacuum brake booster. In this case, an additional vacuum pump is installed, mechanically connected to the rotating crankshaft or camshaft. Some cars with gasoline engines also have a vacuum pump installed.
The principle of operation of a vacuum amplifier is based on the difference in pressure values in the chambers, which are separated by a diaphragm. When the pedal is depressed, the atmospheric and vacuum chambers of the VUT are connected by a vacuum channel. Thus, the same pressure is established in them. The master cylinder rod remains in place.
During braking, the follower valve closes the vacuum channel and simultaneously opens the atmospheric one. The diaphragm, experiencing various atmosphere-vacuum pressures, begins to move towards the main brake cylinder. The force created by the cylinder rod is several times greater than the force created by the driver's foot on the brake pedal. This is the effect of vacuum assisted braking.
If the brake pedal stops moving, the diaphragm also remains in place, fixing the current force. When the pedal is released, the return valve reopens the vacuum channel. The return of the rod in the master cylinder is ensured by the action of a return spring.
The vacuum brake booster, based on its operating principle, has an unpleasant operating feature: the effectiveness of the boost directly depends on atmospheric pressure. The lower the atmospheric pressure, the less the degree of its excess over the pressure in the vacuum chamber, the less the gain.
Theoretically (and practically too) at an altitude of more than 3500 meters above sea level, VUT loses its effectiveness. Under normal vehicle operation conditions with small differences in atmospheric pressure and non-mountainous terrain, the change in its efficiency is imperceptible. In high altitude conditions, other types of brake boosters are used.
Troubleshooting
The problem with a non-working amplifier can only be fixed if the pipeline, check valve or its seal is damaged.
Troubleshooting should be done sequentially:
- we check the tightness of the pipeline clamps and the condition of the tube at the clamping points (cracks often appear in them);
- inspect the condition of the amplifier check valve seal. Over time, this rubber element delaminates due to which the tightness of the vacuum chamber is lost (hence the hissing when braking);
- We change the pipeline along with the clamps. It is inexpensive, so it is easier to change it than to check for leaks, especially since it is quite difficult to fix a crack. After replacement, we check the functionality of the amplifier;
If replacing the pipeline does not produce results, the amplifier itself must be replaced, since this unit is considered non-removable and cannot be repaired.
During the work process, it is not superfluous to check the check valve. There are two ways to do this.
The first involves dismantling this element. Next, you need to blow with your mouth into the fitting that installs the valve into the amplifier. At the same time, it must allow air flow to pass unhindered.
Then we do the opposite action - we draw in air through the same fitting. A working valve should not allow air to pass through.
If you don’t want to remove the valve, which could cause the seal at the connection to be broken, you can do this: start the engine and let it run.
Then press the brake pedal all the way, hold it in this position and turn off the engine.
If the valve is working properly, it will close (due to the lack of vacuum from the manifold), while the vacuum will remain in the vacuum chamber, so the pedal will not provide resistance (there is no need to create additional pressure to hold it).
Finally, a little about vacuum pumps. In a mechanical assembly, to eliminate knocking, some simply remove the rod and that’s it.
In this case, the pump will not work, but since it is auxiliary, turning it off will not greatly affect the performance of the amplifier (although the pedal will still become a little “harder”).
But in some cases, simply changing the position of the rod helps (turn it 180 degrees).
As for the electric pump, it is often simply replaced, since it is difficult to repair.
Failure of the “vacuum seal” is a rather rare failure, but unpleasant - to slow down and stop the car, the driver has to press the brake pedal hard. A sudden failure of the mechanism while driving can provoke an accident - the driver does not have time to change lanes and apply the required force at the right time. To identify signs of critical wear of an element, it is proposed to consider the operating principle of a vacuum brake booster (VBR) and diagnostic methods in a regular garage.
Main symptoms of VUT malfunction
During the operation of vehicles with VUT, special attention is paid to the tightness of its structure and the tubes leading to it. Symptoms of a malfunction are:
- the need to increase pressure on the brake pedal for effective braking;
- reduced brake pedal travel;
- continuation of braking after releasing the pedal;
- uneven engine speed due to suction from the vacuum hose;
- the presence of additional sounds such as “chuck” at the moment of braking;
- complete failure of the amplifier.
If the VUT for some reason fails or the engine stalls, the brake system as a whole remains in good working order, but requires greater effort to press the brake pedal, as if it were not present. This is one of the main conditions for safe movement. However, the effectiveness of emergency braking is significantly reduced.
Therefore, during emergency towing of a car, if the engine is working properly, it is recommended to start it so that the braking system operates normally.
General structure of the brake system of the VAZ 2110
First of all, you need to remove the upholstery and windshield trim in the engine compartment. The pipes connecting to the main brake cylinder should not be removed so that air does not enter the hydraulic system itself. Then you should unscrew the brake cylinder from the booster with a 17mm wrench. Remove it and gently tilt it forward so that the brake pipes do not bend. You must remember to disconnect the hose from the amplifier fitting.
To remove the amplifier along with the brake pedal, unscrew the four 13mm bolts and pull it out, having first disconnected the brake light wire. To disconnect the pedal and VUT together, you first need to pull out the pin that connects them and unscrew the two nuts that you will find in the mount to the bracket.
Principle of operation
By the way, according to the instructions, the standard “vacuum unit” of the VAZ-2110 cannot be repaired, only replaced, but we “do it ourselves.” And judging by the number of different instructions for self-repairing cars posted on the Internet, it can be argued that any domestic car enthusiast with more than five years of experience can safely be awarded the title of design engineer in absentia. Therefore, we will consider the repair procedure, especially since the difference in cost between the repair kit and the vacuum booster itself is disproportionately high.
In any case, first we will have to dismantle the VUT; for this we will need a minimum of available tools.
Main causes of malfunction
The main reasons for the failure of the vacuum brake booster are:
- loss of vacuum hose seal;
- diaphragm malfunction;
- loss of valve properties;
- violation of the tightness of the chambers;
- return spring failure.
The VUT mechanism has been technologically proven for a long time, so most car owners rarely encounter the problem of its malfunction. Given the importance of maintaining a properly functioning braking system, the braking system should be tested periodically, especially before long trips.
How to check the vacuum brake booster without removing it
Method 1
The easiest way to check the operation of the VUT is as follows. It is necessary to start and warm up the engine. Next, you should turn off the engine. After this, press the brake pedal repeatedly. During the first press, it should be pressed all the way. After the second and further presses, the brake pedal travel decreases. If no difference is felt between the first and subsequent presses, it means that no vacuum is created in the amplifier.
Video - how to check the vacuum brake booster on a car:
Method 2
The engine is switched off. The brake pedal is pressed to the limit, preferably several times, and locked in the pressed state. Then the engine starts. The pedal should move down a little if the amplifier is working properly.
The following simple test can determine the presence of possible air leaks. With the engine running, depress the brake pedal as much as possible. The engine stops. If the pedal moves up a little within a minute after the engine stops, there is an air leak in the system.
Video - how to check air leaks through a vacuum brake booster:
Order of Operations
Removing the VAZ 2110 vacuum booster and installing a new device is similar to the work on 2111 and 2112. Special conditions are not required to perform repairs. The machine is installed on a flat surface, and the following operations are performed sequentially:
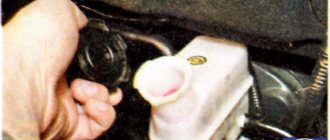
- The soundproofing fasteners are unscrewed. Then you need to unfasten the expansion barrel belt, lift it, move it to the side, put it aside and fix it. The left part of the sound insulation must be removed and also put aside.
After the sound insulation is removed, the block with wires is disconnected from the sensor indicating the fluid level in the brake system.
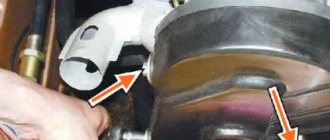
Now you can remove the hose from the vacuum check valve and unscrew the two fasteners of the cylinder to the amplifier.
- The main cylinder turns to the side; here you need to keep an eye on the hoses; if they break, you will have to change them too.
- Now you need to go into the car interior. From here you can unscrew the four fasteners that hold the vacuum seal bracket to the body. They are located under the dashboard.
- Also in the cabin you need to disconnect the wire connectors from the brake light device.
The pin lock plate is now removed. You need to pry it off with a screwdriver. Then the finger is pushed out, it is made of metal, it is easy to pull it out by pressing from below or from above. Then the booster pusher is disconnected from the pedal.
Now you need to remove the amplifier from the bracket, having first unscrewed the two fasteners from the bracket.
This completes the procedure for removing a failed vacuum booster. The new unit is installed in the reverse order. The order must be strictly followed. Mistakes are not acceptable. Installation operations are carried out before the stage of reinstallation of the soundproofing material. Here you need to stop and test the amplifier in operation. If the test results are positive, you can complete the work completely. Do not forget about the smooth pedal stroke; it should vary between 3 and 5 centimeters.